


Filtering through objects and text is perhaps one of the most common features any consumer-facing app is going to have. From blogs to e-commerce apps and SaaS platforms, whenever you need visitors to find something quickly on your site, you will have to build some form of filter.
These filters vary in terms of complexity. The simplest ones only require a search bar and rely on the plain Javascript API to filter through documents. More advanced filters may use a combination of search inputs, checkboxes, and range bars to find whatever the visitor may be looking for.
Even more advanced applications may rely on making requests to a server and simply serving the results. These rely on a combination of technology, perhaps using platforms like elastic search and other complex methodologies such as semantic or full-text search.
But how do you decide whether carrying out these operations entirely on the frontend is a good choice?
Why carry out filtering and pagination on the frontend?
You may have noticed from above that filters/search can be divided roughly into two categories – frontend and backend search.
As the name suggests, search functionality carried out entirely on the frontend usually involves querying data from the server and filtering through it using JavaScript. This approach involves querying your whole dataset and has a few upsides:
- It does not require extra loading, so sorting data and other operations are almost instantaneous.
- Fewer requests are made to the server.
- Any operation carried out, e.g. map, reduce, filter, is done on the whole dataset.
- The downside is that since all the data is queried at once, it doesn’t work very well for extremely large datasets. With millions of records, it would take a significant amount of time to process various operations.
What we’re building
It’s the most suitable method for static sites and blog posts, so our application is going to rely entirely on the frontend approach. It is going to be a simple e-commerce application that allows you to sort alphabetically and by price then apply other filters such as color and brand.
The dependencies
This guide assumes you’re comfortable with both React and Redux but the steps will be broken down where things get a bit heavier. The frontend also relies on Bulma for styling, but that’s purely an aesthetic choice. Any other library will do.
Additionally, you should also be familiar with ES6 functions such as sort, filter, and find. If not, check out this refresher into an array iteration.
With that, let’s get started by installing our dependencies
npm install bulma react-redux -S
A brief introduction to Redux
Redux is a state management library for modern web apps. It can be used with any library and its job is to simplify how developers manage data displayed to users.
Its basic tenets are as follows:
- The application has a single central state – the source of truth.
- The state is read-only. Modifying it will lead to some pretty quirky bugs.
- Changes have to be made with pure functions.
The foundational concepts behind Redux are actions and reducers.
Actions are plain Javascript objects that describe what happened. Think of them like breadcrumbs describing the path you followed before firing an event.
An action in a bread-buttering web app might look like:
{ command: 'BUTTER_BREAD', bothSides: true }
Reducers logically come next after actions. Once the action describes what the application is expected to do (or has done), reducers take in the current state and action, modify the state and return the newly modified state.
A reducer is a simple function that might look like this:
let initialState = {};
function butterBread(state = initialState, action) {
  if (action.type === 'BUTTER_BREAD') {
    let newState;
    if (action.bothSides) {
      newState = butterSides(initialState, true);
    }else {
      newState = butterSides(initialState, false);
    }
    return newState;
  } else {
    return state
  }
}

function butterSides(initialState, bothSides){
  let newBreadState = Object.assign(initialState);
  newBreadState.butterBothSides = bothSides;
  return newBreadState;
}
Notice how we use `Object.assign` to create a new instance of the state rather than mutate the initial state. Redux state should never be modified directly.
Setting up Redux
First, we need to set up Redux so that it can communicate with our main application. This involves creating a store and wrapping our main application with a Redux provider. It can be achieved as follows:
At our entry point (index.js if you used create-react-app):
import React from 'react';
import ReactDOM from 'react-dom';
import './index.css';
import App from './App';
import {Provider} from "react-redux";
import {createStore} from "redux";
import reducers from "./store";
const store = createStore(reducers);
ReactDOM.render(<Provider store={store}>
       <App/>
   </Provider>,
   document.getElementById('root')
);
Next, let’s create our reducers and actions. Create a file – ‘src/store/index.js’.
The actions we are going to create to start with are as follows:
const SORT_BY_ALPHABET = "SORT_BY_ALPHABET";
const SORT_BY_PRICE = "SORT_BY_PRICE";
const LOAD_DATA = "LOAD_DATA";
const FILTER_BY_PRICE = "FILTER_BY_PRICE";
export const sortByPrice = payload => ({
   type: SORT_BY_PRICE,
   payload
});
export const filterByPrice = payload => ({
   type: FILTER_BY_PRICE,
   payload
});
export const sortByAlphabet = payload => ({
   type: SORT_BY_ALPHABET,
   payload
});
export const loadData = (payload) => ({
   type: LOAD_DATA,
   payload
});
Our actions are simply functions that return an object. Everything within the action will be passed to the reducers.
Speaking of reducers, this is what our reducers look like so far:
const initialState = {};
const filterStore = (state = initialState, action) => {
   switch (action.type) {
       case SORT_BY_ALPHABET:
           //sort alphabetically
           return state;
       case SORT_BY_PRICE:
           //sort by price
           return state;
       case FILTER_BY_PRICE:
           //filter by price
           return state;
       case LOAD_DATA:
           //load data
           return state;
       default:
           return state;
   }
};
export default filterStore;
They don’t really do anything, but we’ll add some more details as we go along.
With that said, Redux is now fully set up. Let’s set up the frontend.
Creating the core framework
Bulma is a CSS framework much like bootstrap. It has a very small learning curve, so the details of what every selector will be skimmed over.
First, let’s make a small change to `loadData`. We will use a utility function included in the Github repo to generate random data and change our method to:
//...
case LOAD_DATA:
   let count = action.payload.count;
   let products = generate(count);
   return {
       ...state,
       products
   };

//...
And we’ll change our App.js file to load these generated products.
import React, {Component} from 'react';
import {connect} from 'react-redux';
import {loadData} from "./store";

class App extends Component {

   componentDidMount() {
       //loadData returns an object used by dispatch as the action
       //{count: 20} is our payload
       this.props.dispatch(loadData({count: 20}));
   }

   render() {
       return (
           <div className="App">
               <section className="hero">
                   <div className="hero-body">
                       <div className="container">
                           <h1 className="title">
                               Pagination, Filtering and Sorting with React
                           </h1>
                           <h2 className="subtitle">
                               A detailed guide
                           </h2>
                       </div>
                   </div>
               </section>
               <section className='section'>
                   <div className='container'>
                       <div>
                           <div className="field is-grouped" style={{alignItems: "center"}}>
                               <div className="control">
                                   <div className="select">
                                       <select>
                                           <option value="" disabled selected>Sort by</option>
                                           <option>Price - Lowest to Highest</option>
                                           <option>Price - Highest to Lowest</option>
                                           <option>Alphabet - A-Z</option>
                                           <option>Alphabet - Z-A</option>
                                       </select>
                                   </div>
                               </div>

                               <div className='control' style={{minWidth: "300px"}}>
                                   <input style={{width: "100%"}} placeholder='Filter by' type='text'/>
                               </div>
                           </div>
                       </div>
                       <div className='tile is-ancestor' style={{flexWrap: "wrap"}}>
                           {
                               this.props.state.products && this.props.state.products.map(product => (
                                   <div className='tile is-parent is-3'>
                                       <div className='tile is-child box'>
                                           <p>
                                               <b>Name: </b>
                                               {product.name}
                                           </p>
                                           <p>
                                               <b>Designer: </b>
                                               {product.designer}
                                           </p>
                                           <p>
                                               <b>Type: </b>
                                               {product.type}
                                           </p>
                                           <p>
                                               <b>Price: </b>
                                               {product.price}
                                           </p>
                                       </div>
                                   </div>
                               ))
                           }
                       </div>
                   </div>
               </section>
           </div>

       );
   }
}

function mapStateToProps(state) {
   return {state};
}

export default connect(mapStateToProps)(App);
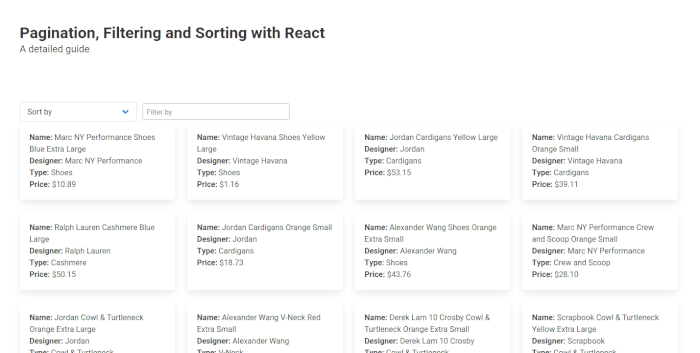
In the browser, that translates to
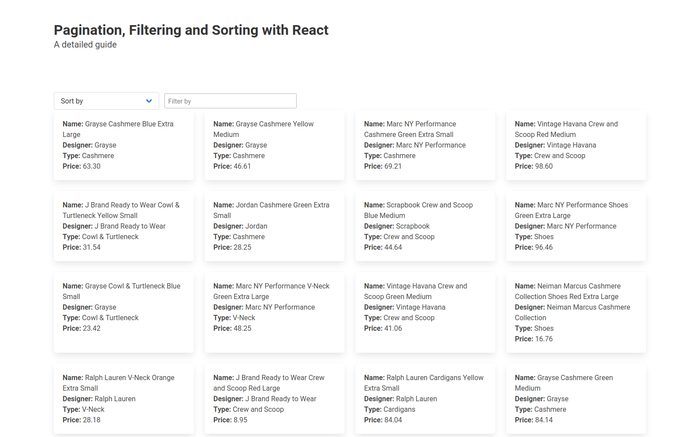
Filtering documents with React and Redux
The first major functionality we are going to add is filtering products according to the name and designer. Whenever there’s any input in our search box, we’ll only return products that have the input value in either their ‘name’ or ‘designer’ fields.
We start off by listening to changes in the search box.
<div className='control' style={{minWidth: "300px"}}>
   <input onChange={e=> {
     //call this method on every change in input
       this.filterByInput(e);
   }} style={{width: "100%"}} placeholder='Filter by' type='text'/>
</div>
And inside the `filterByInput` function, we only dispatch our action:
filterByInput(e){
   let input = e.target.value;
   this.props.dispatch(filterByValue({value: input}))
}
Before we proceed, let’s have a gameplan of what’s supposed to happen once the application receives some form of input to filter.
- User types inside the input box.
- We dispatch the ‘FILTER_BY_VALUE’ action.
- Our application filters through the products and returns a list of any products that match the input.
- The view is re-rendered automatically.
Pay particular attention to step #3 as we proceed.
The first iteration of this functionality might look like this:
//..
case FILTER_BY_VALUE:
   //the value passed from our presentational component
   let value = action.payload.value;
   let filteredValues = state.products.filter(product => {
       //return any product whose name or designer contains the input box string
       return product.name.toLowerCase().includes(value) ||
           product.designer.toLowerCase().includes(value);
   });
   return {
       ...state,
       products: filteredValues,
   };
//..
And sure enough, that should work. There’s just one problem though – do you notice anything when the input is being erased?
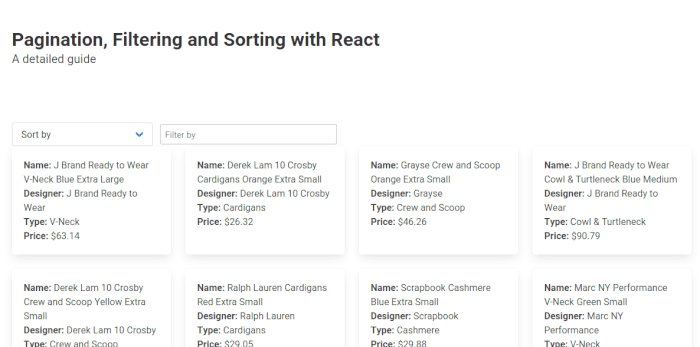
This happens because of step #3 like we’d outlined before. When the ‘FILTER_BY_VALUE’ action is fired, the ‘products’ array is changed to only contain objects that match our search parameters. In order to get it to work even when the input is erased, we need a way to track whether a filter has been applied or not. If an empty string is passed as the action, it probably means everything has been erased and there are no filters applied.
Let’s make a few changes.
case FILTER_BY_VALUE:
   //clone the state
   let newState = Object.assign({}, state);
   //the value received from our presentational component
   let value = action.payload.value;
   let filteredValues = state.products.filter(product => {
       //look for objects with the received value in their ‘name’ or ‘designer’ fields
       return product.name.toLowerCase().includes(value) ||
           product.designer.toLowerCase().includes(value);
   });

   let appliedFilters = state.appliedFilters;
   //if the value from the input box is not empty
   if (value) {
       //check if the filter already exists in the tracking array
       let index = appliedFilters.indexOf(FILTER_BY_VALUE);
       if (index===-1)
           //if it doesn’t, add it.
           appliedFilters.push(FILTER_BY_VALUE);
       //change the filtered products to reflect the change
       newState.filteredProducts = filteredValues;
   } else {
       //if the value is empty, we can assume everything has been erased
       let index = appliedFilters.indexOf(FILTER_BY_VALUE);
       //in that case, remove the current filter
       appliedFilters.splice(index, 1);
       if (appliedFilters.length === 0) {
           //if there are no filters applied, reset the products to normal.
           newState.filteredProducts = newState.products;
       }
   }
   return newState;
And we’ll also need to change our view to match.
//...
render() {
   let products = this.props.state.filteredProducts;
   return (
       <div className="App">
           {/*...*/}
           <section className='section'>
               <div className='container'>
                   {/*...*/}
                   <div className='tile is-ancestor' style={{flexWrap: "wrap"}}>
                       {
                           products && products.length && products.map(product => (
                               <div className='tile is-parent is-3'>
                                   <div className='tile is-child box'>
                                   {/*  ... */}
                                   </div>
                               </div>
                           ))
                       }
                   </div>
               </div>
           </section>
       </div>
   );
}
//...
And, Voila! The filter function should work perfectly now.
Sorting through documents with React
This part doesn’t need much explanation. We want to sort the array alphabetically both in ascending and descending order by name and by price.
Every Javascript array has a `sort` function that accepts a predicate/function. This predicate has two values as the parameters – the current and next value (a & b).
function compare (a, b) {
   // …
}
- If compare (a,b) is less than zero, a is sorted to a lower index than b. i.e. a will come first.
- If compare (a,b) is greater than zero, b is sorted to a lower index than a, i.e., b will come first.
- If compare (a,b) returns zero, a equals b and their positions will be unchanged.
So, to sort alphabetically in ascending order (A-Z)
//...
arr.sort(function (a, b) {
   if (a.name > b.name) {
       return 1;
   }
   if (b.name > a.name) {
       return -1;
   }
   return 0;
})
//...
But we can create a utility function so we don’t have to create dozens of different methods:
function sortAsc(arr, field) {
   return arr.sort(function (a, b) {
       if (a[field] > b[field]) {
           return 1;
       }
       if (b[field]> a[field]) {
           return -1;
       }
       return 0;
   })
}
And to sort in descending order:
function sortDesc(arr, field) {
   return arr.sort(function (a, b) {
       if (a[field] > b[field]) {
           return -1;
       }
       if (b[field]> a[field]) {
           return 1;
       }
       return 0;
   })
}
Then we can change the code under the ‘SORT_BY_ALPHABET’ case to:
case SORT_BY_ALPHABET:
   let sortedArr = action.payload.direction === "asc" ?
       sortAsc(state.filteredProducts, 'name') :
       sortDesc(state.filteredProducts, 'name');

   return {
       ...state,
       filteredProducts: sortedArr
   };
Which should work perfectly well.
Along the same vein, sorting by price should work just as well
Now, onwards to the final part of this guide.
Paginating objects in React
The final phase of this project, and by far the most complex, is adding a bar to the site with a list of all the pages through which our documents can be accessed. If you have, say, 100 documents, it might be a bit unwieldy for the user to view all a hundred of them at once, so we load 20 of them at a time instead.
First, let’s add the component to the view:
<section className='section'>
   <div className='container'>
       <nav className="pagination" role="navigation" aria-label="pagination">
           <button className="button pagination-previous" onClick={()=> {
               this.previousPage()
           }}>Previous</button>
           <button className="button pagination-next" onClick={() => {
               this.nextPage()
           }}>Next page
           </button>
           <ul className="pagination-list">
               {
                   [...Array(this.props.state.filteredPages)].map((value, index) => (
                       <button
                           className={`button pagination-link ${this.props.state.currentPage === index + 1 ? "is-current" : ""}`}
                           aria-label="Page 1"
             onClick={() => this.goToPage(index + 1)}

                           aria-current="page">
                           {index + 1}
                       </button>
                   ))
               }
           </ul>
       </nav>

   </div>
</section>
From the above:
- When the ‘next’ button is clicked, it should take us to the next 20 documents.
- The ‘previous’ button should serve the previous 20 documents.
- ‘[…Array(this.props.state.filteredPages)].map((value, index) =>’ creates a new array with a length defined by ‘filteredPages’ and maps the pagination components to them. We’re getting to ‘filteredPages’ in a little bit.
- When any of these pagination components is clicked, they should load an exact page.
The implementation of ‘nextPage’, ‘previousPage’ and ‘goToPage’ simply dispatch the corresponding actions.
nextPage() {
   this.props.dispatch(loadNewPage({page: 1}))
}

previousPage() {
   this.props.dispatch(loadNewPage({page: -1}));
}

goToPage(page) {
   this.props.dispatch(loadExactPage({page}))
}
Of course, we also have to create these actions
const LOAD_NEW_PAGE = "LOAD_NEW_PAGE";
const LOAD_EXACT_PAGE = "LOAD_EXACT_PAGE";

export const loadNewPage = (payload) => ({
   type: LOAD_NEW_PAGE,
   payload
});

export const loadExactPage = (payload) => ({
   type: LOAD_EXACT_PAGE,
   payload
});
And here’s what it looks like:
In order to get the pagination to work, we have to change quite a bit of code from what we’ve written before, so there will be a lot of jumping back and forth. Whatever file we’re working on will he highlighted for that reason.
We’ll start off on the logic bit by adding a few details when the page is first loaded. Each new detail is explained in the comments.
case LOAD_DATA:
   let count = action.payload.count;
   let countPerPage = action.payload.countPerPage || 20;

   //We need the total number of pages. This is used in rendering the pagination component.
   //round up
   let totalPages = Math.ceil(count / countPerPage);

   let products = generate(count);
   return {
       ...state,
       //All the products, unfiltered.
       products,
       //Notice how we only load 20 documents to start with. This is important.
       filteredProducts: products.slice(0, countPerPage),
       //This is the ‘upper count’. The total number of documents seen so far.
       //It plays different roles throughout the course of the app, however.
       currentCount: countPerPage,
       countPerPage,
       totalCount: count,
       currentPage: 1,
       //The total number of pages without any filters applied.
       totalPages: totalPages,
       //These are the number of pages after a filter has been applied.
       filteredPages: totalPages
   };
The core of all this functionality happens within the ‘LOAD_NEW_PAGE’ case. I prefer to have fewer cases to deal with in my switch, so I use the same one for loading both the previous and the next page. Here is what that implementation looks like
case LOAD_NEW_PAGE:
   //Clone the previous state
   let loadNewPageState = Object.assign({}, state);
   //How many pages should be added. Will always be 1 or -1
   let addPages = action.payload.page;
   //add it to the current
   loadNewPageState.currentPage += addPages;

   let perPage = loadNewPageState.countPerPage; //20 by default

   let nextProducts;
   if (addPages === 1){
       //Moving from page 1 to 2 will cause ‘upperCount’ to be 40
       let upperCount = loadNewPageState.currentCount + perPage;
       let lowerCount = loadNewPageState.currentCount; //This hasn’t been changed. It will remain 20.
       //Now, we change the currentCount to match ‘upperCount.’ It’ll be used as such
       //at any point after this line
       loadNewPageState.currentCount += loadNewPageState.countPerPage;
       //Only retrieve products within the (20,40) range (for page 2)
       //Also, notice that we use ‘products’ rather than ‘filteredProducts.’ This is by design.
       //Using the latter would result in an empty array because we only have 20 documents there when
       //the page first loads.
       nextProducts = loadNewPageState.products.slice(lowerCount, upperCount);
   }

   if (addPages ===-1){
       //’currentCount’ has changed roles. Now it serves as the upperCount.
       let upperCount = loadNewPageState.currentCount; //40
       let lowerCount = loadNewPageState.currentCount - perPage; //20
       //Then it’s reset. This way, the first if statement will always treat it as the ‘upperCount’
       loadNewPageState.currentCount = lowerCount;
       nextProducts = loadNewPageState.products.slice(lowerCount - perPage, upperCount - perPage);
   }

   loadNewPageState.filteredProducts = nextProducts;
   window.history.pushState({page: 1}, "title 1", `?page=${loadNewPageState.currentPage}`);
   return loadNewPageState;
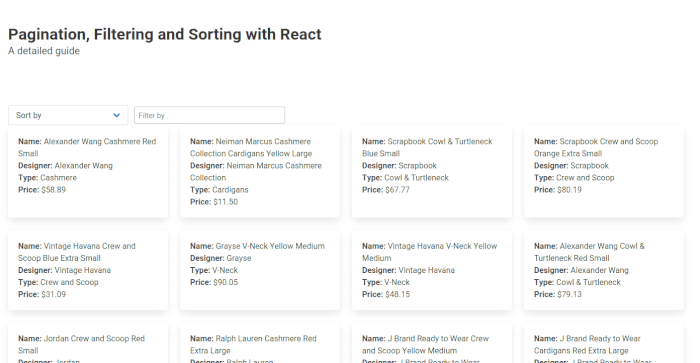
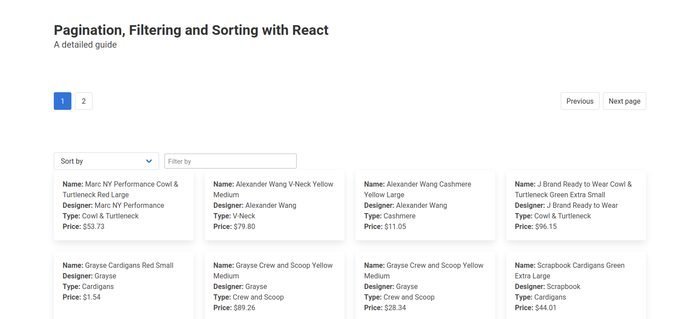
That should result in:
And finally, in order to load the exact page in question, we’ll need some more code. A lot of this works the same way as previous pieces of code already highlighted.
case LOAD_EXACT_PAGE:
   const exactPageState = Object.assign({}, state);
   const exactPage = action.payload.page;
   let upperCountExact = exactPageState.countPerPage * exactPage;
   let lowerCountExact = upperCountExact - exactPageState.countPerPage;

   let exactProducts = exactPageState.products.slice(lowerCountExact, upperCountExact);
   exactPageState.filteredProducts = exactProducts;
   exactPageState.currentCount = upperCountExact;
   exactPageState.currentPage = exactPage;
   window.history.pushState({page: 1}, "title 1", `?page=${exactPageState.currentPage}`);

   return exactPageState;
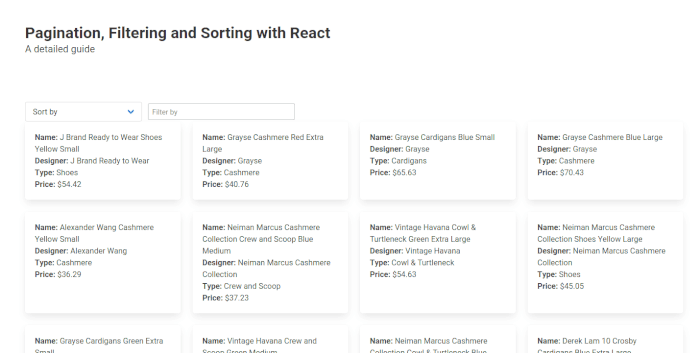
Which brings us to the close of this project:
Notes
- Once you play around with the project a little, you might notice a glaring bug – pagination doesn’t work properly with filters applied. In the interest of keeping this article brief and engaging, that’s been left out.
- Despite using query parameters throughout the project, they aren’t relied on too extensively. In a production app, they should be referenced every time a page is loaded before serving up the documents.
- ‘window.history.pushState’ is called within the main state container. This is an antipattern. Anything that changes the view directly should not be called outside actual components. This would normally be done with ‘redux-thunk’ but, again, this guide would be too long otherwise.
- Nothing restricts users from browsing all the way past the currently available pages – both in the positive and negative directions.
Resources
Github: https://github.com/Bradleykingz/react-filters-pagination
Codesandbox: https://codesandbox.io/s/nice-hugle-q6yyz?fontsize=14&hidenavigation=1&theme=dark