

In the past, a lot of the web only executed simple tasks such as a form validation and so on. However as the web grew, a higher degree of interactivity was needed. Libraries such as JQuery became popular to make it easy for developers to create interactive experiences.
DOM Trees
Concepts such as the DOM tree visualization Data Binding (two-way) were invented, and frameworks such as Angular, Backbone, Knockout, Ember were born. Data Binding (two-way Data Binding) was generally executed using MVC and MVVM models, which has its roots in backend development patterns, where it has been used for many years to build webpages and APIs. We divide our application into modules, which cooperate between each other and do their specific tasks.
The “View” layer cooperates with “Controller” layer, while “Controller” cooperates with defined “Models”. For example, when user pushes a button in the “View” layer, the “Controller” receives your request and notifies the “Models” on any data changed. The “Models” mutates the data, sends them back to “Controller”, which then changes the “View”. Below is a tree visualization:
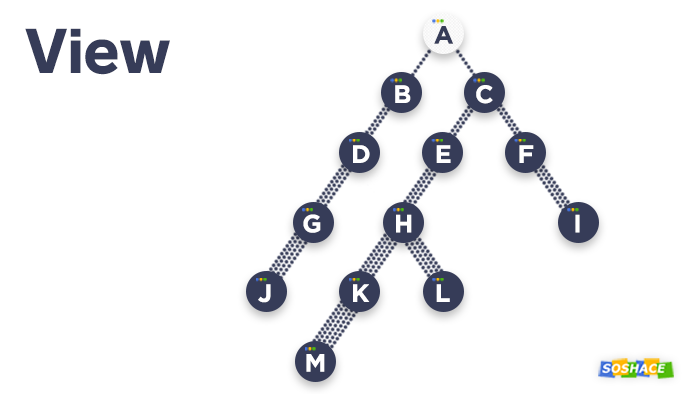


To understand DOM Data Binding’s simply, is that any data that is presented to the User lives in a “Model” storage, and can be manipulated through an action. This can be as simple as opening a Dropdown Menu by flipping the states from `closed` to `open`, or as complex as presenting data pulled from an API and sending state changes to the database to mutate the data.
There were a number of challenges that came with the MVC approach however. Typically, a web app experience has more moving parts than a typical backend server. Every single page could have hundreds of changing states. Moving away from the MVC architecture, React introduces us to the concept of the virtual DOM.
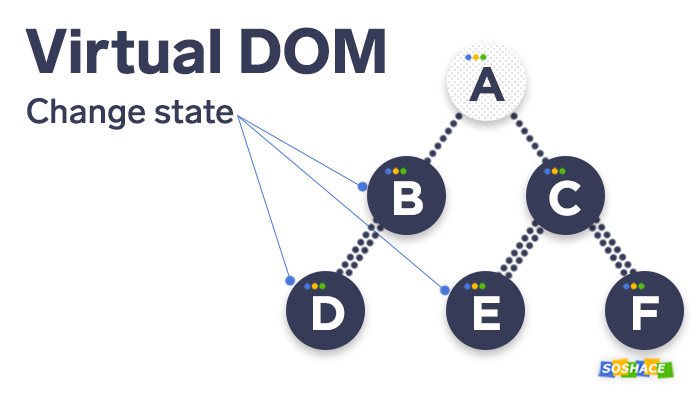
The concept of the virtual DOM is as follows:
- Every time when any change takes place, we rebuild virtual DOM
- React compares old and new virtual DOMs, and analyzes what has been changed. Next it goes further and changes real DOM only in that place where it is necessary. Thus, a user sees only current states.
Here lays the key conception. The main difference from MVC frameworks is that no matter what data have been changed, we are interested only in the fact of these changes to further rebuild our virtual DOM.
Why is real DOM not that fast? It is far more massive than a virtual one. Virtual DOM keeps only the structure. It is much more important that we do not care about DOM itself, but we can build any structures operating with various components. DOM is rather something from the past. It means, we can use such structure creating a native mobile app that does not contain a notion called DOM. There you will find React View, and later React will make Android or iOS Views out of them or render everything in the line, if we’re working on a server.
Getting Started with React
Getting started with React is easy. It’s best to start fresh with a new repository and use React’s Create-React-App boilerplate to get up and running as easy as possible.
Either NPM or Yarn can be used as a package manager to manage dependencies in React and Webpack.
You can install react via your terminal with this command:
npm i react react-dom –S
Your App File Structure
After creating your app, you may notice that your project code is structured like this:
my-app
├── README.md
├── node_modules
├── package.json
├── .gitignore
├── public
│   ├── favicon.ico
│   ├── index.html
│   └── manifest.json
└── src
    ├── App.css
    ├── App.js
    ├── App.test.js
    ├── index.css
    ├── index.js
    ├── logo.svg
    └── serviceWorker.js
Your app is typically divided into style files (`.css`, `.scss`, etc), `index.js`, your router configuration, your page screens, and your components.
my-app
├── README.md
├── node_modules
├── package.json
├── .gitignore
├── public
│   ├── favicon.ico
│   ├── index.html
│   └── manifest.json
└── src
    ├── components /
    ├── screens /
    ├── router /
    ├── styles /
    ├── index.js
    └── serviceWorker.js
Working with React files
Let us create a function that returns a component. Remember: components are always named with a capital letter. Let us name ours as Article.js.
import React from 'react'

 function Article() {
     return (
         <div>
             <h1>{ article.title }</h1>
             <section>{ article body }</section>
         </div>
     )
 }

 export default Article
This component then can be imported onto another file:
import { articles } from './fixtures'
import Article from './Article' // importing the component
A good practice is to have only one file for each component – if you’ve got 100 components, you will import 100 components. The standard rule is to make sure each file is less than 200 lines of code. Files should be readable, succinct, and only do one job.
Let us add some variables to the Article:
render(<Article article = {articles[0]} />, document.getElementById('container'))The code above means that we take an article structure from fixtures.js and use the very first article. This is the JSX syntax, which allows you to embed JavaScript inside standard HTML syntax.
{articles[0]} – the brackets mean this piece will contain some expression, a JS variable. In our case – the articles object.
In JSX everything that will be written in the following form — article = {articles[0]} — will be available in your component through properties (props). We will get this as parameters.
import React from 'react'

 function Article(props) {
 const articles = props.article
     return (
         <div>
             <h1>{ article.title }</h1>
             <section>{ article.text}</section>
         </div>
     )
 }

 export default Article
Let us create an articlelist component to display articles.
Change app.js in the following way:
import { articles } from './fixtures'
import Articlelist from './Articlelist'
import React from 'react'
import { render } from 'react-dom'

render(<Articlelist article = {articles} />, document.getElementById('container'))
Do the following in ArticleList.js:
Nowadays, all component coding written in JSX needs to be covered with the root element (for example, div).
import React from 'react'
import Article from './Article'

function ArticleList(props) {
    const { articles } = props

    const listItems = articles.map((article) => <li key = {article.id}><Article article = {article}/></li>)
    return (
        <div>
            <h1>Article list</h1>
            <ul>
                {listItems}
            </ul>
        </div>
    )
}

export default ArticleList
We want to display our articles and reuse the already written component as our list element, i.e. a component inside another component. To get this done, import it into our code, as it was shown in the 2 line above.
Using map we work with the article structure in line 7 and turn it into the component structure displaying it in line 12. In line 7 make sure to write “key” associating the articles with their id for React to understand what article is here or there, not to mix them, etc. when creating the articles’ structure. ID is generally used, but it is not necessary – any non-recurring keys inside one structure will be OK. Do not use the structure index as a key!
Here we’ve created stateless components, the most simple of all possible, which have received data and then rendered them. It will be better for you to have a majority of such components. But in real life you need to change and save these components’ state. In this case you should use more complicated syntax like ES6 classes.
The next thing we would like to do is not to display the whole body of an article. Let us display only its Title, while the whole article will be displayed when you click.
In line 1 of Articles.js add {Component}. In line 3 create a class that inherits the React component, where we should describe the render method as the easiest. This method does exactly the same that we’ve previously done with the only difference: now we describe all these in our render method. Now we don’t have parameters, props get included into this, when initializing a component props get written into this. We are going to write exactly the same whenever we need more complex components.
Besides props, we also have “states” in line 4.
import React, { Component } from 'react'

class Article extends Component {

    constructor(props) {
        super(props)
        this.state = {
            isOpen: false
        }
    }

    render() {
        const article = this.props.article
//        const { article } = this.props
//        const { article: { title, text } } = props
        const { isOpen } = this.state
        const body = isOpen ? <section>{ article.text }</section> : null

        return (
            <div>
                <h1 onClick = {this.toggleOpen}>{ article.title }</h1>
                {body}
            </div>
        )
    }

    toggleOpen = (ev) => {
        this.setState({
            isOpen: !this.state.isOpen
        })
    }
}


/*
function Article(props) {
    const article = props.article
//    const { article: { title, text } } = props

    return (
        <div>
            <h1>{ article.title }</h1>
            <section>{ article.text }</section>
        </div>
    )
}
*/

export default Article
Introduced in React 16.8 are React Hooks, which allows you to do state management inside functional components:
const Article = props=> {

    const [isOpen, setOpen] = React.useState(false)


    const toggleOpen = (ev) => {
        setOpen(!isOpen)
    }

        const article = this.props.article
//        const { article } = props
//        const { article: { title, text } } = props
        const body = isOpen ? <section>{ article.text }</section> : null

        return (
            <div>
                <h1 onClick = {toggleOpen}>{ article.title }</h1>
                {body}
            </div>
        )

}
Homework
Your home task is execution of Comment List – a list of comments to each article that can be opened/closed by clicking a respective link. The link text should change.
Download our lesson results from here.
React lessons can be viewed here: https://blog.soshace.com/category/javascript/react/react-lessons/