Introduction
In this article, we will be looking at how to go about developing a web application utilizing the flask micro-framework. To that end, we will be doing a little version of an address book development project as a vehicle to get us there.
Prerequisites
A basic understanding of HTML, CSS, JavaScript, and python syntax is expected of this article’s reader. For developers migrating to python programming, I recommend that you get a primer of the language from a book titled “Lean Python” by Paul Gerrard.
Procedures
For us to get started with the project on the right foot it is very important to highlight the major steps/milestones for the project at hand. This will later help us to make an evaluation on whether we are on a good track and keep focused on the project goals. It is, however, crucial to realize that some steps may overlap because of the dependency nature of work. The followings are the major steps in this project.
- Define Key Project Requirements;
- How to Prepare the development environment;
- infrastructure, installation, and configuration;
- Project Folder Structuring, and basic configuration;
- Database Design and Build with Test Data Preparation;
- Completing the Full-stack Development cycle;
Requirements
The followings are the major Requirements to be attained in this project.
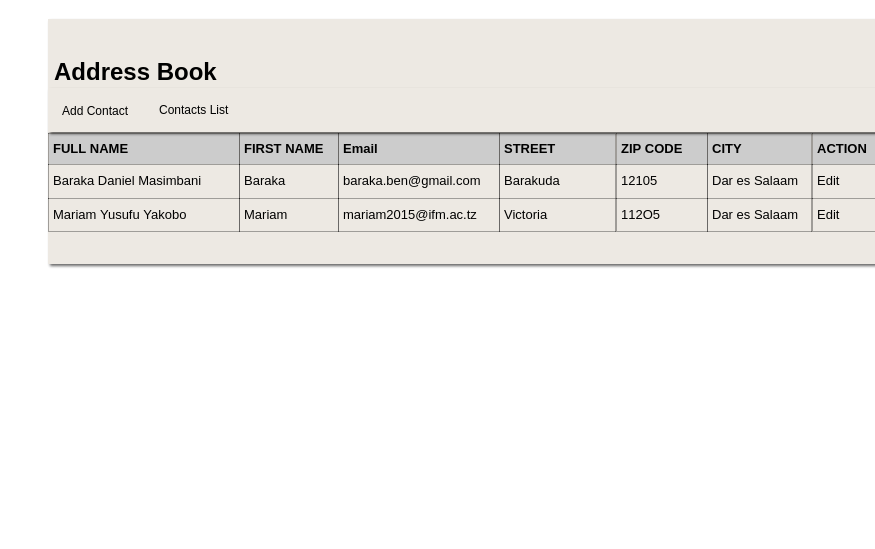
- There should be a paginated list showing all entries of contacts that have been stored in the address book;
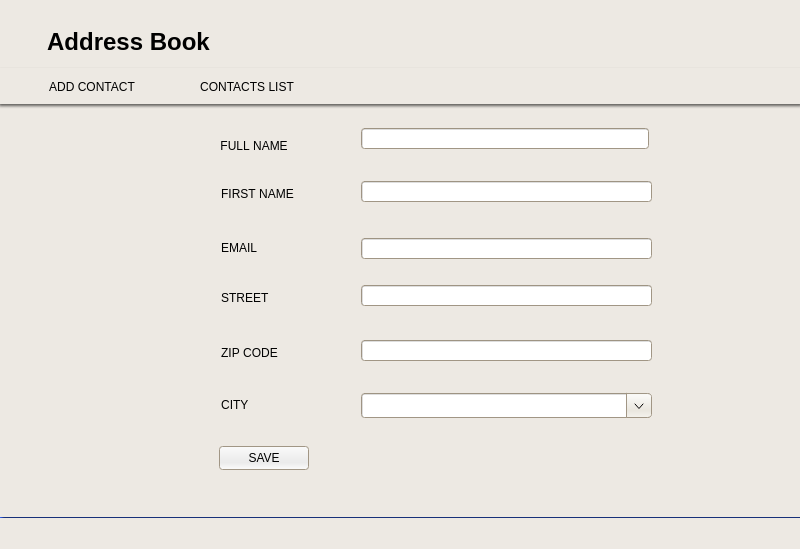
- Every entry(above) should consist of fields(name, first name, email, street, zip code, and a city with cities defined in a table in the database;
- A form to add a new contact entry;
- A form to edit existing contact entries in the database;
- In each of the two forms mentioned above the city, the field should be a drop-down with a list of cities stored in the database;
- And so forth the list continues …
Pictorially[wireframe] put the following two images highlight of what is to be expected upon the project completion
Contact edit form
Contacts List
Development environment preparation
Most of the Linux distro comes up with python installed. You can check if the Python package is there already in your system by opening the terminal and issue the following commands.
python -v
If the package is already there you would see its version number information as a confirmation else you would be informed that the package is missing. If the version number is at least 2.7 or and above you may proceed with the examples set out in this tutorial without any problem. If it turns out that the version number of the python package in your system is below 2.7 I would you to make an upgrade if by issuing the following command in the terminal
sudo apt-get upgrade python
In order not to pollute our global Operating System(OS) environment, we are going to use a virtual environment within a chosen folder named flask_address_book in our development machine. Having our web development environment structured like this is very useful as it helps us not to clutter up the main OS global environment. Such arrangement of our development utilizes the important concept in computing known as virtualization. This virtualization helps us to isolate several such development project environments within our machine with each environment appearing self-contained with its specific settings/configurations not interfering with one another.
With that information let us now create the project folder in /home/user/ directory. Open the command terminal and issue the following commands;
cd /home/user
mkdir flask_address_book
cd flask_address_book
virtualenv flaskye
source flaskye/bin/activate
pip install flask
Remember to replace the user with the username of the computer with which you use to login into your system for instance the username on my development machine is benedict.
Exception!!
Please note that all of the above is run well on a system with python2.7 installation. For those whose systems are installed with python 3.0 and above you might be required to rephrase command number 4 to venv flaskye and 6 to pip3 install … to any occurrence of such command as you go along with this tutorial. That is to say, replace virtualenv to venv and pip to pip3.
Just a word of advice if the version of python installed into your system is lower than 3 consider upgrading to python3 as versions lower to than it won’t be supported post-January 2021 according to the official documentation.
Please observe the ordering of the commands shown above, if you go and run them sequentially as shown above, Upon issuing the command number (5)five the virtual environment will be activated, and (flaskye)$ text will appear in the command terminal. Completing command number 6 we will have installed the flask micro-framework with all the preliminary packages that come with it. The word pip in the previous commands is the naming of the python package manager similar to composer package/dependency manager in PHP world or npm in the Nodejs development ecosystem. With the flaskye virtual environment activated we can check all the preliminary packages that come with Flask installation by issuing the following command in the terminal
pip freeze > requirements.txt
This will generate the requirements.txt in the main flask_address_book folder path. It is this requirements.text that hold the definitions or all required packages/dependencies in our project. You can open the requirements.txt via the text editors in your machine or quickly open it with the command line command cat to see what is inside it. At this moment what the preceding command generated requirements.txt looks like the text in italic shown hereunder.
click==7.1.2
Flask==1.1.2
itsdangerous==1.1.0
Jinja2==2.11.2
MarkupSafe==1.1.1
pkg-resources==0.0.0
Werkzeug==1.0.1
As we add dependencies/packages reissuing of the above “pip freeze >requrements.txt” will have the effect of updating the file contents to reflect the added packages at any instant.
It is important to remember that as from now on once dealing with our flask_address_book project we should be within that flask_address_book project folder path and activate the virtual environment by issuing command number 5 above to interact with the program under development. Once done with the program interactions we should remember to deactivate the virtual environment by issuing the following command from the terminal that we initially activated.
deactivate
Once we are done now with the Development environment stuff we should pull our sleeves and get ready for the next lesson where we will be dealing with Project Folder Structuring, and basic configurations. Project Folder Structuring, configuration, and app kick-start files. There is a number of options when it comes to the structure of the project folder/directory. Though there are no strict guidelines there are some good rules to observe in organizing the project code&resource files for the sake of easy maintainability and clarity.
Diagram of the flask_address_book project folder
flask_address_book
|
|-app/
| |
| |-templates/
| |-static/
| |-main/
|     |--__init__.py
|     |--errors.py
|     |--forms.py
|     |--views.py
| |-__init__.py
| |-models.py
|-flaskye/
|-requirements.txt
|-config.py
|-manage.py
Seeing the project folder is very helpful as it helps us to understand the software architecture and overall design of the system. After having seen our project folder structure it now time to do the essentials configurations and coding of a few preliminary files to kick-start the application under development. To put it clearly we are going to make the following files:
- config.py
- manage.py
- app/__init__.py
- app/main/__init__.py
- app/main/errors.py
- app/main/views.py
- app/templates/base.html
- app/templates/header.html
- app/templates/menu.html
- app/templates/footer.html
Now let’s begin coding for the files starting with the config.py and save them in the root path of our project folder as seen in the folder structure diagram.
import os
basedir = os.path.abspath(os.path.dirname(__file__))

class Config:
SECRETE_KEY="=xf1x87xe5x95Lxe5xe5hx00Exebixa3x07xeex0bxb3knx86'#x11"
#os.environ.get('SECRETE_KEY') or
FLASK_ADMIN=os.environ.get('FLASKY_ADMIN')

@staticmethoddef init_app(app):
pass

class DevelopmentConfig(Config):
SECRETE_KEY="=xf1x87xe5x95Lxe5xe5hx00Exebixa3x07xeex0bxb3knx86'#x11"
DEBUG=True

class TestingConfig(Config):
SECRETE_KEY="=xf1x87xe5x95Lxe5xe5hx00Exebixa3x07xeex0bxb3knx86'#x11"
TESTING=True

class ProductionConfig(Config):
SECRETE_KEY="=xf1x87xe5x95Lxe5xe5hx00Exebixa3x07xeex0bxb3knx86'#x11"

config={
'development':DevelopmentConfig,
'testing':TestingConfig,
'production':ProductionConfig,
'default':DevelopmentConfig
}
Now it is time to code for the manage.py file and save it in the project root path as shown in the project folder structure diagram.
#!/usr/bin/env python
import os
from app import create_app
app=create_app(os.getenv('FLASK_CONFIG') or 'default')
app.secret_key = b'_5#y2L"F4Q8znxec]/'
if __name__=='__main__':
manager.run()
Let’s now code for the __init__.py file and save it in the app folder found in the project folder just as shown in the project folder structure diagram.
from flask import Flask,render_template
from config import config
def create_app(config_name):
 app=Flask(__name__)
 app.config.from_object(config[config_name])
 config[config_name].init_app(app)
 from main import main as main_blueprint
 app.register_blueprint(main_blueprint)
 return app
Now let’s move on and code for the __init__.py file in the app/main/ folder path of the project folder just as shown in the project folder structure.
from flask import Blueprint
main=Blueprint('main',__name__)
from . import views,errors
After this let us now code for the errors.py file and save it in its respective folder in accordance with the project folder structure layout.
from flask import render_template
from . import main
@main.app_errorhandler(404)
def page_not_found(e):
 return render_template('404.html'),404
@main.app_errorhandler(500)
def internal_server_error(e):
 return render_template('500.html'),500
It is now time to code for the views.py file and save it in its proper place as shown in the project folder structure diagram.
from flask import render_template, flash, request, session, redirect, url_for
from . import main
from datetime import datetime
@main.context_processordef inject_now():
 return {'now':datetime.utcnow()}
@main.route('/',methods=['GET'])
def index():
 return render_template(‘base.html’)
@main.route('/contacts/')
def contacts(page=1):
 pass
@main.route('/contacts/edit/<int:id>',methods=['GET','POST'])
def editContact(id):
 pass
@main.route('/contacts/create',methods=['GET','POST'])
def createContact():
 pass#end of views.py
To wind up this section lets us now code for the four essential template files using the jinja2 templating language before kick-start testing of our app as described next. We begin coding for the templates file starting with the “header.html” and save it under the app/templates/ path within our project folder. The header.html is simply just a single line as shown below.
<h1>Address Book</h1>
Now let’s code for the menu.html template file and save it in the app/templates path of our project folder.
<nav>
    <ul>
        <li style="display:inline-block;"><a style="text-decoration:none;" href="{{url_for('main.createContact')}}"><button class="button success"> Add Contact</button></a></li>
        <li style="display:inline-block;"><a style="text-decoration:none;" href="{{url_for('main.contacts',page=1)}}"><button class="button success">List Contacts</button></a></li>
    </ul>
</nav>
Let’s now code for another template file by the name of footer.html and save it accordingly.
<h5 id="footer" style="position: fixed;bottom: 0;width:100%;margin-bottom:0;height: 2.5rem;background-color: blue;color: white;">
©{{now.year}} Benedict Masimbani Productions</h5>Now it is time to code for the base.html file and save it as required in its respective folder.
{% block title %}{% endblock %}
{%block body%}
{%block header%}
{% include 'header.html' %}
{%endblock%}
{%block nav%}
{% include 'menu.html' %}
{%endblock%}
{%block container%}
‘Welcome to web Development with Flask’
{%endblock%}
{%block footer%}
{% include 'footer.html' %}
{%endblock%}
{%endblock%}
Let’s now turn to the 500.html template file. Code is as shown hereunder and save it in its respective folder as shown in the project folder structure.
{%extends 'base.html'%}
{%block container%}
    <div class="">
        <p>The service encountered problem due to Server Error i.e Service unaivailable at the moment</p>
    </div>
{%endblock%}
We finalize template files coding [at least for now] by coding for the 404.html file as shown below and save it with the rest of the templates in the app/templates folder/directory.
{%extends 'base.html'%}
{%block container%}
    <div class="">
        <p>The page that you are looking for can not be found at the moment</p>
    </div>
{%endblock%}
Now the moment to test our simple minimum/viable application has come. Checking our application status so far by activating our app virtual environment and turn it on by issuing the following commands on the terminal.
cd /home/user/flask_address_book
virtualenv flaskye
source flaskye/bin/activate
export APP=”manage.py”
export DEBUG=1
export ENVIRONMENT="Development"
flask run
Now with our development machine browser turned on visit http://localhost:5000/.
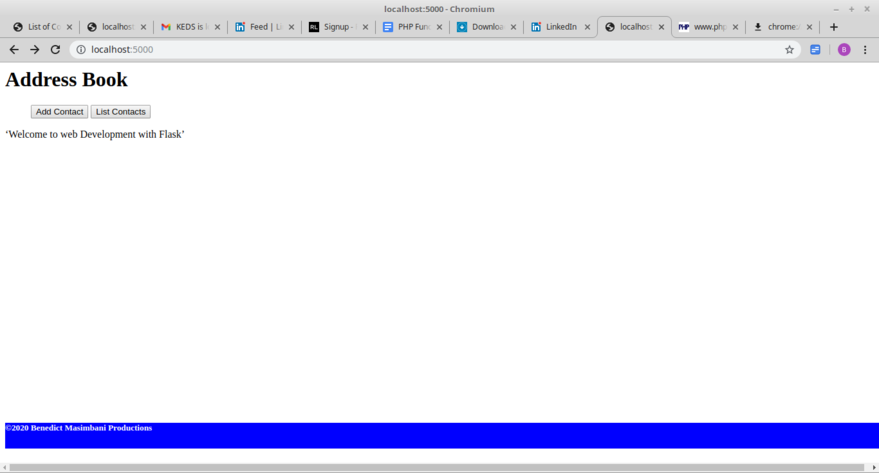
All the code of this tutorial is available at https://www.gitlab.com/barakaben/flask_address_book.gitrepository. So if you wish to have all the code quickly, you clone the repository with your command terminal up and running. Before performing this operation make sure that git is installed on your machine. Then run git clone https://www.gitlab.com/barakaben/flask_address_book.git
To get the code written up to this stage in the tutorial first make sure you have run the clone command above and then just do so by running git checkout kick-start-app command on your development machine terminal remember to have internet access switched on to download the code from the GitLab repository. For instructions to install git in your given platform visit: https://www.bitdegree.org
Once you clone the code repository for this tutorial, before running the test of the code in your system from the command terminal run the virtualenv flaskye if you are on a system with python2.7 or venve flaskye if you are on a system with python3.0 or above. Then run pip install -r requirements.txt to install the dependencies.
Due to the fact that the repository has been slimmed to include the minimal essential number of files and leave out the dependencies so that anyone who would like to work on the repository code can install the dependencies on his/her own provided that he/she has access to the internet. For this kick-start-app use, the requirements.txt shown on page 5 of this tutorial
Database design, build, and sample/test data seeding
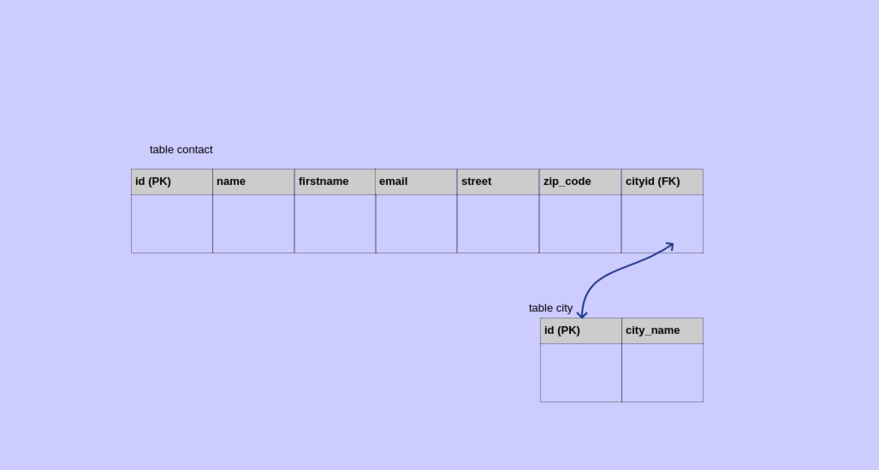
For the sake of this project, we will be using the in-memory SQLite database which is available in most Linux distro. From requirements number 2 and 3 it can be postulated that our little project requires at least two tables in its database to get going. We shall call our database contactdb.Sqlite and the tables contact and city. From the user story/narration we may deduce that schema for table city to be city:( id, city_name) and for the table contact to be contact 🙁id, name, firstname, email, street, zip_code, cityid) where id serve as the surrogate primary key and cityid as foreign key in table contact referencing id in table city
Database Schema visually
Database scripting via model building
With our database description well outlined, it is time to make our project database. However, in creating the database and populating its tables with records we are going to apply the object-relational mapper tool (ORM) which in this case serves as a data abstraction layer facilitating data querying and execution operations in an object-based manner using the normal python syntax in this way relieve us from writing directly to specific relational database syntax utilizing the flask_sqlalchemy dependency package which is the SQLAlchemy ORM descendant.
Furthermore, we can optionally apply another package called flask-migrate together with these to provide for database migration feature which enables version management of the database schema changes throughout the database development cycle just as source code management tools keep track of the program source code throughout the system development life-cycle.
Now before starting creating our application data models for database artifacts generation we need to install the flask_sqlalchemy package via the command line in our activated ($flaskye) virtual environment that is by issuing the command
pip install flask-sqlalchemy
Issuing the pip freeze >requirements.txt command will regenerate the requirements.txt file with new added package appearing in there. After having done that we can now move on open the text editor and code for the models.py file as shown below and save it in the app folder our project
from app import db
class Contact(db.Model):
 __tablename__='contacts'
 id=db.Column(db.Integer(),primary_key=True,autoincrement=True)
 name=db.Column(db.String(55),index=True)
 firstname=db.Column(db.String(20))
 email=db.Column(db.String())
 street=db.Column(db.String(25))
 zip_code=db.Column(db.Integer())
 cityid=db.Column(db.Integer,db.ForeignKey('cities.id'))
 city=db.relationship('City', backref='contacts')
 def __repr__(self):
  return '<contact % r>' %self.name

class City(db.Model):
 __tablename__='cities'
 id=db.Column(db.Integer(),primary_key=True,autoincrement=True)
 cityname=db.Column(db.String(40),unique=True)
 def __repr__(self):
  return '<city % r>' %self.cityname #.name
With our models.py file ready, it is now time to code for the sampledata.py file within the main project’s folder(flask_address_book)which holds the test data that will be seeded to help test our app for the envisioned functionalities.
#flask_address_book/sampledata.py
cities=[
"LONDON",
"LIVERPOOL",
"LYON",
"DORTMOND",
"MADRID",
"LEICESTER",
"BERLIN"
]
contacts=[
["Bernd Lenno","Bernd","lenno@afc.com","Ashburton Groove",55105,1],
["Jurgen Klop","Jurgen","klop@lfc.com","Anfield",54104,2],
["Nicolous Pepe","Nicolous","pepe@afc.com","AshBurton Groove",55105,3],
["Pierre Aubemeyang","Pierre","pam@afc.com","AshBurton Groove",55105,4],
["Per Mertsacker","Per","bfg@afc.com","AshBurton Groove",55105,4]
]
#end of sampledata.py
Now let us update the __init__.py file that is available in the app/__init__.py path to include the added package flask_sqlalchemy in app initialization function as shown below and save changes in the same file path.
from flask import Flask,render_template
from flask_sqlalchemy import SQLAlchemy
from config import config
db=SQLAlchemy()
def create_app(config_name):
 app=Flask(__name__)
 app.config.from_object(config[config_name])
 config[config_name].init_app(app)
 db.init_app(app)
 from main import main as main_blueprint
 app.register_blueprint(main_blueprint)
 return app
Right now we are to code for the final piece of code file “seed_data.py” which will have all the necessary data seeding functionalities logic in it and save it in the main project’s folder. This will have us all it takes to begin interactions with our app’s data store via the flask shell command.
from app import db
from sampledata import cities, contacts
from app.models import City, Contact
class seeder():

 def __init__(self,cities=cities,contacts=contacts):
  self.cities=citiesself.contacts=contacts

 def _getCities(self):
  return self.cities

 def _getContacts(self):
  return self.contacts
 def city_seed(self,db=db,City=City):
  cities=self._getCities()
  for cit in cities:
   print("adding cit into cities table")
   city_name=citcity=City(cityname=city_name)
   db.session.add(city)

 def contact_seed(self,db=db,Contact=Contact):
  contacts=self._getContacts()
  for contacti in contacts:
   print("adding contacti into contacts table")
   name=contacti[0]
   firstname=contacti[1]
   email=contacti[2]
   street=contacti[3]
   zip_code=contacti[4]
   cityid=contacti[5]
   contact=Contact(name=name,firstname=firstname,email=email,street=street,zip_code=zip_code,cityid=cityid)
   db.session.add(contact)
Before getting to Flask shell for data operations let’s now update our config.py to add the inclusion of the flask_sqlalchemy settings suitable for our app as shown below.
import os
basedir = os.path.abspath(os.path.dirname(__file__))

class Config():
 SECRETE_KEY=os.environ.get('SECRETE_KEY') or "=xf1x87xe5x95Lxe5xe5hx00Exebixa3x07xeex0bxb3knx86'#x11"
 SQLALCHEMY_COMMIT_ON_TEARDOWN=True
 FLASK_ADMIN=os.environ.get('FLASKY_ADMIN')
 @staticmethod
 def init_app(app):
  pass

class DevelopmentConfig(Config):
 SECRETE_KEY="=xf1x87xe5x95Lxe5xe5hx00Exebixa3x07xeex0bxb3knx86'#x11"
 DEBUG=True
 SQLALCHEMY_DATABASE_URI=os.environ.get('DEV_DATABASE_URI') or 'sqlite:///'+os.path.join(basedir,'contactsdb.sqlite')

class TestingConfig(Config):
 SECRETE_KEY="=xf1x87xe5x95Lxe5xe5hx00Exebixa3x07xeex0bxb3knx86'#x11"
 TESTING=True
 SQLALCHEMY_DATABASE_URI = os.environ.get('TEST_DATABASE_URL') or 'sqlite://'

class ProductionConfig(Config):
 SECRETE_KEY="=xf1x87xe5x95Lxe5xe5hx00Exebixa3x07xeex0bxb3knx86'#x11"
 SQLALCHEMY_DATABASE_URI=os.environ.get('DATABASE_URI') or 'sqlite:///'+os.path.join(basedir,'contactsdb .sqlite')

config={
'development':DevelopmentConfig,
'testing':TestingConfig,
'production':ProductionConfig,
'default':DevelopmentConfig
}
Assuming that you have cloned this tutorial repository, you may have all the code written so far in this tutorial by running git checkout data-driven-app on your development machine command terminal.
Interacting with the flask shell to perform a database operation
With our database domain model now properly written up it is time to do the following:
- run the database creation/generation operation;
- seed the database with sample data;
- try some two or more queries through the flask shell interface.
Remember the name of the generated database will be the one set in the config.py file.
Now to create our contactdb.sqlite database in our in-memory SQLite database Launch the terminal on your development machine/computer and issue the following commands;
cd /home/user/flask_address_book
Note, remember to replace the user with the username with which you use to log in to the computer as previously described.
flask shell
export DEBUG=1
source flaskye/bin/activate
export APP=”manage.py”
flask shell
if the preceding statement run supposedly you should see the following.
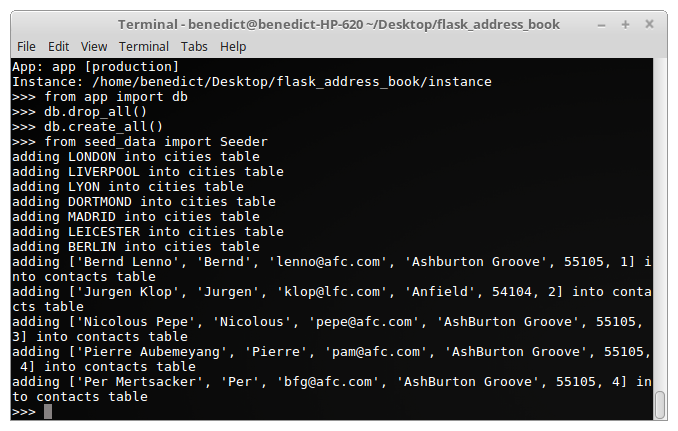
you may also run a few queries to check the data in the database after the previous commands succeeded by using the same shell environment. Below are a few examples
db.session.query(City).all()
db.session.query(Contact).all()
db.session.query(Contact).get(1)
If you have cloned the tutorial’s code repository as described in the previous section you can get the code for up this moment in the tutorial by issuing the following command through the command terminal
git checkout data-driven-app
Make sure that you are on the right path in your cloned repository directory before issuing the command above.
Completing the Full-stack Development cycle
We complete the full-stack cycle by coding the following files starting with the __init__.py file and save it in the app directory then editing file at app/main/views.py and associated files step by step until all functionalities are complete as now described.
from flask import Flask,render_template
from flask_foundation import Foundation
from flask_sqlalchemy import SQLAlchemy
from config import config
foundation=Foundation()
db=SQLAlchemy()
def create_app(config_name):
 app=Flask(__name__)
 app.config.from_object(config[config_name])
 config[config_name].init_app(app)
 foundation.init_app(app)
 db.init_app(app)
 from main import main as main_blueprint
 app.register_blueprint(main_blueprint)
 return app
 #end of __init__.py file
Coding for the Contacts list
Edit the views.py file found at the app/main/views.py path by adding the text in bolds on the topmost part of the file as shown below.
from flask import render_template, flash, request, session, redirect, url_for
from . import main
from datetime import datetime
from .. import db
from flask_paginate import Pagination,get_page_parameter,get_page_args
from ..models import Contact, City
Edit the contacts () function decorated as @main.route(‘/contacts/’) in app/main/views.py file by replacing pass with the following:
joincondition=(Contact.cityid==City.id)
contacts=db.session.query(Contact).join(City,(joincondition)).order_by(Contact.id.desc())
total=contacts.count()
per_page=2
page=int(request.args.get("page",1))
factor=page-1
ofset=factor*per_page
shown_contacts=contacts.limit(per_page).offset(ofset)
paging=Pagination(page=page,per_page=per_page,offset=ofset,total=total,record_name=contacts,css_framework='foundation')
return render_template('contacts.html',contacts=shown_contacts,page=page,offset=ofset,pagination=paging)
Now edit the views.py file’s index function to add a redirect to the contact route as shown below.
def index():
 return redirect(url_for(‘main.contact’, page=1))
 ##end of index method
After that update, the base.html template file found at the app/templates path to include the foundation CSS framework in our application as shown in bolds below.
{% extends "foundation_base.html" %}
    {%block head%}
    {% block title %}{% endblock %}
    {{super()}}
    {%endblock%}
    {%block body%}
        {%block header%}
            {% include 'header.html' %}
        {%endblock%}
        {%block nav%}
            {% include 'menu.html' %}
        {%endblock%}
        {%block container%}
            ‘Welcome to web Development with Flask’
        {%endblock%}
        {%block footer%}
            {% include 'footer.html' %}
        {%endblock%}
    {%endblock%}
Now code for the contacts.html template file as shown below and save it in the app/templates folder.
{% extends "base.html" %}
{% block container%}
    <table style=”width:100%;”>
        <thead>
            <th>Full Name</th>
            <th>First Name</th>
            <th>Email</th>
            <th>Street</th>
            <th>Zip Code</th>
            <th>City</th>
            <th>Action</th>
        </thead>
        {%for contact in contacts%}
        <tr>
            <td>{{contact.name}}</td>
            <td>{{contact.firstname}}</td>
            <td>{{contact.email}}</td>
            <td>{{contact.street}}</td>
            <td>{{contact.zip_code}}</td>
            <td>{{contact.city.cityname}}</td>
            <td><a href="{{url_for('main.editContact',id=contact.id)}}">EDIT</a></td>
        </tr>
        {% endfor %}
    </table>
    {{pagination.links|safe}}
{% endblock %}
You may get the tutorial code files worked on up to this point if you have cloned the tutorial repository as explained early by running the git checkout contacts-list-paginated command on your development machine command terminal. Now if you turn on the application by opening the command terminal on your development machine then issue the following commands in succession.
cd /home/user/flask_address_book
virtualenv flaskye
source flaskye/bin/activate
export APP=”manage.py”
export DEBUG=1
export ENVIRONMENT="Development"
flask run
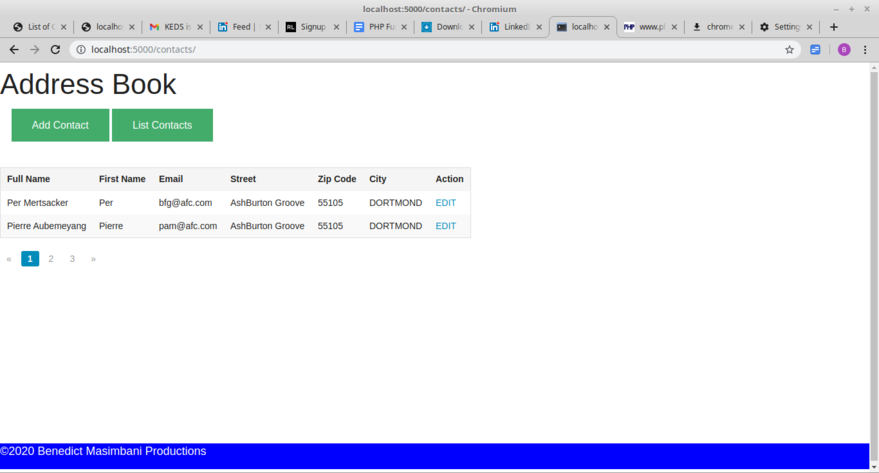
If everything is okay opening the http://localhost:5000/ or http://localhost:5000/contacts/
with your development machine browser you will see the next page view :
The Contact Edit functionalityPrior to adding both the add_contact and edit_contact forms:
- install the flask-wtf dependency from our activated virtualenv make sure you have internet connection prior the installation operation for it to be of any success;
- add the ContactForm in the app/main/forms.py;
- edit the editContact function of the app/main/views.py file as shown below;
- add the editContact templates respectively in the app/templates folder;
- update the base.html template as shown below Add flash messaging functionality by editing the app/templates/base.html and;
Now activate our development virtualenv and issue the following command:
pip install -U Flask_WTF
After that, we run the pip freeze > requirements.txt command via the development machine command terminal to update the dependencies. Now code forms.py file as shown below and save it in the app/main folder path.
from flask_wtf import FlaskForm
from wtforms import StringField,SelectField,validators
from wtforms.validators import DataRequired,Length,Email,NumberRange,re

class ContactForm(FlaskForm):
 name=StringField('Name',validators=[DataRequired(),Length(min=7,max=40)])
 firstname=StringField('First Name',validators=[DataRequired(),Length(min=2,max=20)])
 email=StringField('Email' ,validators=[DataRequired(),Email()])
 street=StringField('Street',validators=[DataRequired(),Length(min=2,max=20)])
 zip_code=StringField('Zip Code', validators=[DataRequired(),validators.Regexp(regex='d{5}$')])
 city=SelectField('City',coerce=int)
Now code the contact_edit.html file and save it in the app/templates/ path.
{%extends 'base.html'%}
{%import "foundation_wtf.html" as wtf%}
{%block container%}
    <form method="POST" action="" role="form">
        <div class="grid-container">
            <div class="grid-x grid-padding-x">
                <div class="medium-6 cell">
                    <div class="form-group">{{form.name.label}}{{form.name()}}</div>
                </div>
            </div>
        </div>
        <div class="grid-container">
            <div class="grid-x grid-padding-x">
                <div class="medium-6 cell">
                    <div class="form-group">{{form.firstname.label}}{{form.firstname()}}</div>
                </div>
            </div>
        </div>
        <div class="grid-container">
            <div class="grid-x grid-padding-x">
                <div class="medium-6 cell">
                    <div class="form-group">{{form.email.label}}{{form.email()}}</div>
                </div>
            </div>
        </div>
        <div class="grid-container">
            <div class="grid-x grid-padding-x">
                <div class="medium-6 cell">
                    <div class="form-group">{{form.street.label}}{{form.street()}}</div>
                </div>
            </div>
        </div>
        <div class="grid-container">
            <div class="grid-x grid-padding-x">
                <div class="medium-6 cell">
                    <div class="form-group">{{form.zip_code.label}}{{form.zip_code()}}</div>
                </div>
            </div>
        </div>
        <div class="grid-container">
            <div class="grid-x grid-padding-x">
                <div class="medium-6 cell">
                    <div class="form-group">{{form.city.label}}{{form.city()}}</div>
                </div>
            </div>
        </div>
        <button type="submit" class="button default">Submit</button>
    </form>
{%endblock%}
Now edit the file under app/main/views.py to include the finished editContact function
def editContact(id):
 form=ContactForm(csrf_enabled=False)
 my_contact = db.session.query(Contact).get(id)
 city_id=my_contact.cityid
 cities=[(c.id,c.cityname) for c in db.session.query(City).all()]
 mycity_name = db.session.query(City).get(city_id)
 my_city=(city_id,mycity_name)
 if request.method == 'GET' and my_contact is not None:
  cities=[(c.id,c.cityname) for c in db.session.query(City).all()]
  form.name.data = my_contact.name
  form.firstname.data = my_contact.firstname
  form.email.data = my_contact.email
  form.street.data = my_contact.street
  form.zip_code.data = my_contact.zip_code
  form.city.choices=cities
  form.city.default=my_city
  form.city.data = my_city[0]
 elif request.method=='GET' and my_contact is None:
  print("no saved contact")
  form.city.choices=cities
  form.city.choices=cities
 if form.validate_on_submit():
  name=form.name.data
  firstname=form.firstname.data
  email=form.email.data
  street=form.street.data
  zip_code=form.zip_code.data
  city=form.city.data
  db.session.query(Contact).filter_by(id=id).update({'name':name,'firstname':firstname,‘email’:email,'street':street,'zip_code':zip_code,'cityid':city})
  db.session.commit()
  flash(''SuccessThe contact details %s have been updated” %name)
return render_template('contact_edit.html',form=form)
Now update the file found in app/templates/base.html path as shown below to add flash messaging functionality and re-save it with the same name in the same path.
{% extends "foundation_base.html" %}
{%block head%}
{% block title %}{% endblock %}
{{super()}}
{%endblock%}
{%block body%}
{%block header%}
{% include 'header.html' %}
{%endblock%}
{%block nav%}
{% include 'menu.html' %}
{%endblock%}
{%block flashes%}
{% for message in get_flashed_messages()%}
<div class="alert alert-warning">
<button type="button" class="close" data-dismiss="alert">×</button>
{{message}}
</div>
{% endfor %}
{%endblock%}
{%block container%}
‘Welcome to web Development with Flask!Oh Yes!’
{%endblock%}
{%block footer%}
{% include 'footer.html' %}
{%endblock%}
{%endblock%}
If you cloned the tutorial’s code repository previously and you would like to get the code for this part of the tutorial covered so far just issue the command git checkout contact-detail-editable from the right path in your cloned copy/local repository.
Visiting the contact edit form via browser once our application is turned on by clicking one of the edit links on the contacts list page we get the nice-looking view as shown hereunder
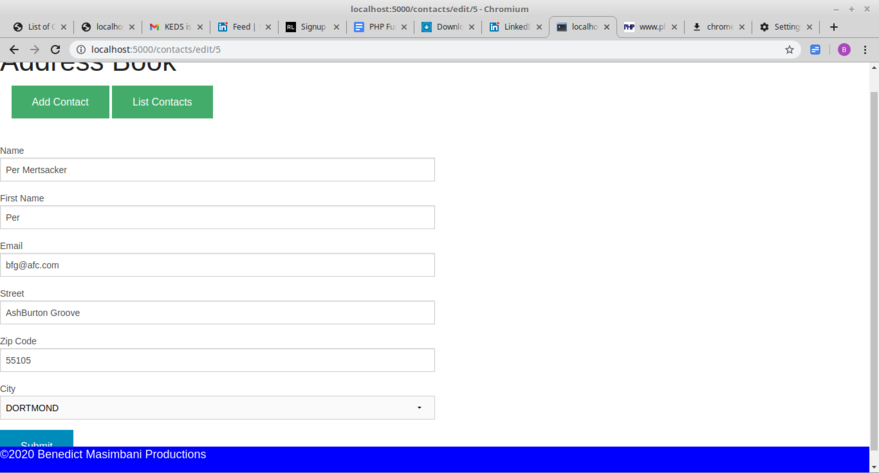
Editing contact details pageContact creating functionality
To make contact create functionality successful start by editing the createContact function of the file found at app/main/views.py path as shown below.
def createContact():
 form=ContactForm(csrf_enabled=False)
 cities=[(c.id,c.city_name) for c in db.session.query(City).all()]

 form.city.choices=cities
 if form.validate_on_submit():
  name=form.name.data
  firstname=form.firstname.data
  email=form.email.data
  street=form.street.data
  zip_code=form.zip_code.data
  city=form.city.data
  contact=Contact(name=name,firstname=firstname,email=email,street=street,zip_code=zip_code,cityid=city)
  db.session.add(contact)
  db.session.commit()
  flash('The new contact %s has been saved' %name,'success')
 return render_template('contact_edit.html',form=form)
Code for the contact_create.html templates file as shown in bolds below and save it in the app/templates folder. The flask-wtforms come in handy by offering us an alternative method to create the form. If you have followed along this tutorial from the previous section take this as a plus.
{%extends “base.html”%}
{% import “foundation/wtf.html” as wtf %}
{% block container %}
    {{wtf.quickform(form)}}
{% endblock %}
With our app bootstrapped that is the virtualenv activated and the app turned on, Test the route leading http://localhost:5000/contacts/create via the browser, add new contact details as shown below and clicking submit we get the following view that confirms that the create contact functionality is okay.
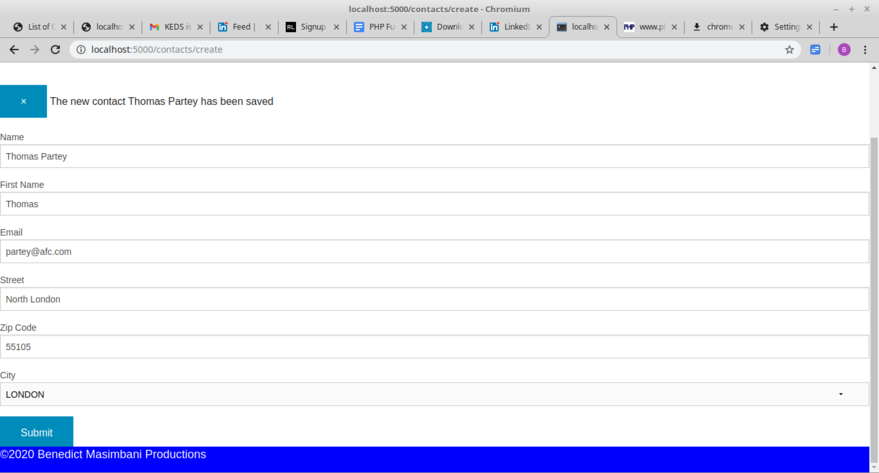
The task to refine the form for creating the new contact has been left as an exercise to the reader of this tutorial. Hint try to adjust the ContactForm defined in the forms.py file that is found in the app/main/ directory. Please note that you may also use an alternative CSS framework different from the foundation for instance you could use the popular bootstrap framework direct from within the flask by installing the package Flask-Bootstrap and play around with its multitude of classes of CSS style files.
Other tasks that have been left for the reader include:
- Finding a suitable icon that will act as favicon.png or favicon.ico for the site; put that in the tutorial project folder in the path app/static/image and apply it to make it visible through inclusion in the base.html template’s blockhead.
- Populating the contacts list to avail at least 20 number of records rows through either the completed add contact form’s functionality or via the sampledata.py file
- Altering the per_page variable on the contact function to either 5 or 10, save and rerun the program and observe the impact of changing the per_page variable.
If you have cloned the tutorial’s code repository at https://www.gitlab.com/barakaben/flask_address_book.git and you would like to get the code for this part of the tutorial do issue the command git checkout contact-details-writable from the right path in your local repository that is the local repository working directory.
About the Author
Benedict Daniel Masimbani is a full stack developer currently working as an IT consultant with mnadan group. He is a Computer Science graduate from the Institute of Finance Management(IFM) in Dar es Salaam Tanzania. He has hands on experience in information systems analysis, design, implementation, and maintenance across a variety of environments and platforms. Besides professional life, Benedict is a football fan and likes very much to watch competitive football league matches both at home(Tanzania) and abroad plus international tournaments. You may contact Benedict through his Linkedin account: Benedict’s Linkedin Account’s profile: https://www.linkedin.com/in/benedict-daniel-masimbani-607b1b182/

