Close Menu
Soshace Digital Blog

    Subscribe to Updates

    Get The Latest News, Updates, And Amazing Offers

    What's Hot
    Beginners

    Bootstrap: TOP 5 Free Bootstrap Editors & Tools

    LinkedIn

    Nurturing LinkedIn Prospects Through Consistent Engagement

    Interview

    Behavioral Interview 101: How to Tackle the Toughest Questions | Sample Answers Included

    Important Pages:
    • Home
    • About
    • Services
    • Contact Us
    • Privacy Policy
    • Terms & Conditions
    Facebook X (Twitter) Instagram LinkedIn YouTube
    Today's Picks:
    • Scaling Success: Monitoring Indexation of Programmatic SEO Content
    • Leveraging Influencers: Key Drivers in New Product Launches
    • How Privacy-First Marketing Will Transform the Industry Landscape
    • The Impact of Social Proof on Thought Leadership Marketing
    • Balancing Value-Driven Content and Promotional Messaging Strategies
    • Top Influencer Marketing Platforms to Explore in 2025
    • Emerging Trends in Marketing Automation and AI Tools for 2023
    • Strategies to Mitigate Duplicate Content in Programmatic SEO
    Wednesday, September 10
    Facebook X (Twitter) Instagram LinkedIn YouTube
    Soshace Digital Blog
    • Home
    • About
    • Services
    • Contact Us
    • Privacy Policy
    • Terms & Conditions
    Services
    • SaaS & Tech

      Maximizing Efficiency: How SaaS Lowers IT Infrastructure Costs

      August 27, 2025

      Navigating Tomorrow: Innovations Shaping the Future of SaaS

      August 27, 2025

      Maximizing Impact: Strategies for SaaS & Technology Marketing

      August 27, 2025
    • AI & Automation

      Enhancing Customer Feedback Analysis Through AI Innovations

      August 27, 2025

      Navigating the Impact of AI on SEO and Search Rankings

      August 27, 2025

      5 Automation Hacks Every Home Service Business Needs to Know

      May 3, 2025
    • Finance & Fintech

      Critical Missteps in Finance Marketing: What to Avoid

      August 27, 2025

      Analyzing Future Fintech Marketing Trends: Insights Ahead

      August 27, 2025

      Navigating the Complex Landscape of Finance and Fintech Marketing

      August 27, 2025
    • Legal & Compliance

      Exploring Thought Leadership’s Impact on Legal Marketing

      August 27, 2025

      Maximizing LinkedIn: Strategies for Legal and Compliance Marketing

      August 27, 2025

      Why Transparency Matters in Legal Advertising Practices

      August 27, 2025
    • Medical Marketing

      Enhancing Online Reputation Management in Hospitals: A Guide

      August 27, 2025

      Analyzing Emerging Trends in Health and Medical Marketing

      August 27, 2025

      Exploring Innovative Content Ideas for Wellness Blogs and Clinics

      August 27, 2025
    • E-commerce & Retail

      Strategic Seasonal Campaign Concepts for Online and Retail Markets

      August 27, 2025

      Emerging Trends in E-commerce and Retail Marketing Strategies

      August 27, 2025

      Maximizing Revenue: The Advantages of Affiliate Marketing for E-Commerce

      August 27, 2025
    • Influencer & Community

      Leveraging Influencers: Key Drivers in New Product Launches

      August 27, 2025

      Top Influencer Marketing Platforms to Explore in 2025

      August 27, 2025

      Key Strategies for Successful Influencer Partnership Negotiations

      August 27, 2025
    • Content & Leadership

      The Impact of Social Proof on Thought Leadership Marketing

      August 27, 2025

      Balancing Value-Driven Content and Promotional Messaging Strategies

      August 27, 2025

      Analyzing Storytelling’s Impact on Content Marketing Effectiveness

      August 27, 2025
    • SEO & Analytics

      Scaling Success: Monitoring Indexation of Programmatic SEO Content

      August 27, 2025

      Strategies to Mitigate Duplicate Content in Programmatic SEO

      August 27, 2025

      Effective Data Visualization Techniques for SEO Reporting

      August 27, 2025
    • Marketing Trends

      How Privacy-First Marketing Will Transform the Industry Landscape

      August 27, 2025

      Emerging Trends in Marketing Automation and AI Tools for 2023

      August 27, 2025

      Maximizing ROI: Key Trends in Paid Social Advertising

      August 27, 2025
    Soshace Digital Blog
    Blog / Beginners / Upload Multiple Images to a Django Model without plugins
    Beginners

    Upload Multiple Images to a Django Model without plugins

    coderashaplBy coderashaplAugust 18, 2020No Comments6 Mins Read
    Facebook Twitter Pinterest Telegram LinkedIn Tumblr Email Reddit
    Upload Multiple Images to a Django Model without plugins
    Upload Multiple Images to a Django Model without plugins
    Share
    Facebook Twitter LinkedIn Pinterest Email Copy Link
    Upload Multiple Images to a Django Model without plugins
    Upload Multiple Images to a Django Model without plugins

    In this article, I am going to show you how to add multiple images to a Django model without any plugins. It’s better to keep the project simple and avoid any extra plugins which can cause unexpected errors during production or disable some of the functionalities. By using a small trick in Django admin you will able to upload multiple images to a particular model.

    Now, I assume that you already activated your virtual environment so, let’s create a new Django project named “mysite” and a new app named “posts”.

    django-admin startproject mysite
    django-admin startapp posts

    Since we use images in our project, we have to configure settings.py in order to serve static and media files and display templates. Update the TEMPLATES configuration:

    settings.py

    TEMPLATES = [
        {
            'BACKEND': 'django.template.backends.django.DjangoTemplates',
            'DIRS': [os.path.join(BASE_DIR, 'templates')],
            'APP_DIRS': True,
            'OPTIONS': {
                'context_processors': [
                    'django.template.context_processors.debug',
                    'django.template.context_processors.request',
                    'django.contrib.auth.context_processors.auth',
                    'django.contrib.messages.context_processors.messages',
                ],
            },
        },
    ]

    Now, we should add static and media files configurations at the end of this file:

    settings.py

    STATIC_URL = '/static/'
    STATICFILES_DIRS = [
        os.path.join(BASE_DIR, 'static'),
    ]
    STATIC_ROOT = os.path.join(BASE_DIR, 'static_root')
    
    
    MEDIA_URL = '/media/'
    MEDIA_ROOT = os.path.join(BASE_DIR, 'media')
    

    Great! It’s time to add our models into models.py and there will be two models in our case. The first model is “Post” which includes three fields just to show basic information about the post on the home page.

    models.py

    from django.db import models
    
    class Post(models.Model):
        title = models.CharField(max_length=250)
        description = models.TextField()
        image = models.FileField(blank=True)
    
        def __str__(self):
            return self.title

    As you see from the code snippet above we have a title, description, and image fields in the Post model. You can change FileField to ImageField it’s up to you since this tutorial covers multiple files and images, FileField is probably the right choice for now.

    In Django, you can’t store multiple images in one field, so we are going to add a new model named “PostImage” to store all images and at this time we will use the ForeignKey field to create a relationship between these two models. Update your models.py by adding “PostImage” model:

    models.py

    from django.db import models
    
    class Post(models.Model):
        title = models.CharField(max_length=250)
        description = models.TextField()
        image = models.FileField(blank=True)
    
        def __str__(self):
            return self.title
    
    class PostImage(models.Model):
        post = models.ForeignKey(Post, default=None, on_delete=models.CASCADE)
        images = models.FileField(upload_to = 'images/')
    
        def __str__(self):
            return self.post.title

    Once you updated models, it’s time to migrate our models and create a new superuser in order to access Django admin.

    python manage.py makemigrations posts
    python manage.py migrate
    python manage.py createsuperuser

    Great! Now, the main part is starting, open your admin.py to make configurations. We will create a single Django admin from two different models. The default Django administration comes with a concept of inlines, so if you have a one-to-many relationship you can edit the parent and its children on the same page or we can say admin interface has the ability to edit models on the same page as a parent model. However, you are limited in a way that you can’t have inlines inside inlines and nested one-to-many relations, so to avoid that we are using StackedInline class to edit “PostImage” model inside “Post” model.

    Read More:  Top 10 Bug Tracking Tools for Web Developers and Designers

    admin.py

    from django.contrib import admin
    
    from .models import Post, PostImage
    
    class PostImageAdmin(admin.StackedInline):
        model = PostImage
    
    @admin.register(Post)
    class PostAdmin(admin.ModelAdmin):
        inlines = [PostImageAdmin]
    
        class Meta:
           model = Post
    
    @admin.register(PostImage)
    class PostImageAdmin(admin.ModelAdmin):
        pass

    Configure your admin.py as shown the above and you can go and check your admin now by clicking add new post. It should look like the image below:

    Stacked Inline Django
    Stacked Inline Django

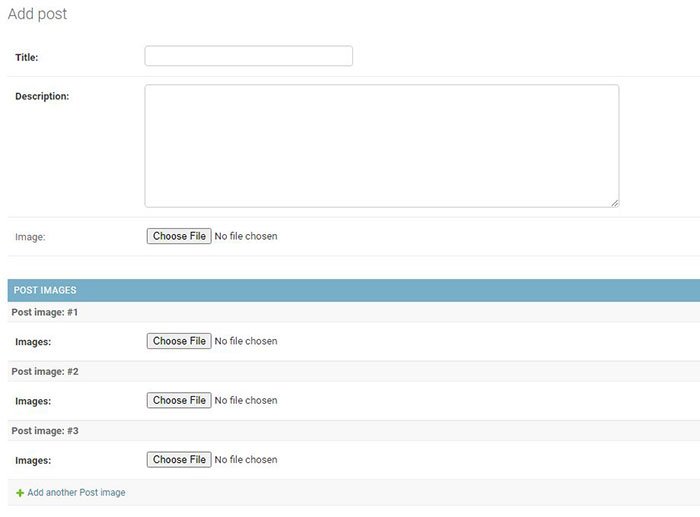
    As you see you can add how many images you want into a Post model and all these images will belong to a specific Post model with the help of ForeignKey.

    Now,  navigate to your views.py to create views in order to render templates so we can see the created posts.  In detail_view we are filtering “PostImage” objects by post foreign key, so related images will be populated inside detail of post. Simply add the following views, it’s not complicated just basic level views to populate images and posts :

    views.py

    from django.shortcuts import render, get_object_or_404
    
    from .models import Post, PostImage
    
    def blog_view(request):
        posts = Post.objects.all()
        return render(request, 'blog.html', {'posts':posts})
    
    def detail_view(request, id):
        post = get_object_or_404(Post, id=id)
        photos = PostImage.objects.filter(post=post)
        return render(request, 'detail.html', {
            'post':post,
            'photos':photos
        })

    Next, open urls.py to configure URLs and also add media URL configuration to serve images:

    urls.py

    from django.contrib import admin
    from django.urls import path
    from django.conf import settings 
    from django.conf.urls.static import static 
    
    from posts import views
    
    urlpatterns = [
        path('admin/', admin.site.urls),
        path('', views.blog_view, name='blog'),
        path('<int:id>/', views.detail_view, name='detail')
    ] + static(settings.MEDIA_URL, document_root=settings.MEDIA_ROOT)

    Finally, create a new folder named “templates” in your project, and then we will add three HTML files just to show posts and details in the browser.

    base.html

    <!DOCTYPE html>
    <html lang="en">
    <head>
        <meta charset="UTF-8">
        <meta name="viewport" content="width=device-width, initial-scale=1.0">
        <meta http-equiv="X-UA-Compatible" content="ie=edge">
        <link rel="stylesheet" href="https://stackpath.bootstrapcdn.com/bootstrap/4.4.1/css/bootstrap.min.css" integrity="sha384-Vkoo8x4CGsO3+Hhxv8T/Q5PaXtkKtu6ug5TOeNV6gBiFeWPGFN9MuhOf23Q9Ifjh" crossorigin="anonymous">
        <title>Multi-Image Tutorial</title>
    </head>
    <body>
        <div class="container py-4">
            {% block content %}
            {% endblock %}
        </div>
            <script src="https://code.jquery.com/jquery-3.4.1.slim.min.js" integrity="sha384-J6qa4849blE2+poT4WnyKhv5vZF5SrPo0iEjwBvKU7imGFAV0wwj1yYfoRSJoZ+n" crossorigin="anonymous"></script>
            <script src="https://cdn.jsdelivr.net/npm/popper.js@1.16.0/dist/umd/popper.min.js" integrity="sha384-Q6E9RHvbIyZFJoft+2mJbHaEWldlvI9IOYy5n3zV9zzTtmI3UksdQRVvoxMfooAo" crossorigin="anonymous"></script>
            <script src="https://stackpath.bootstrapcdn.com/bootstrap/4.4.1/js/bootstrap.min.js" integrity="sha384-wfSDF2E50Y2D1uUdj0O3uMBJnjuUD4Ih7YwaYd1iqfktj0Uod8GCExl3Og8ifwB6" crossorigin="anonymous"></script>        
    </body>
    </html>

    We are using Bootstrap just to give a simple design to our project.

    Read More:  Getting Started with React Native in 2020

    blog.html

    {% extends 'base.html' %}
    
    {% block content %}
    <div class="row row-cols-1 row-cols-md-2">
        {% for post in posts %}
        <div class="col mb-4">
          <div class="card">
            <div class="view overlay">
              <img class="card-img-top" src="{{post.image.url}}" alt="">
              <a href="#!">
                <div class="mask rgba-white-slight"></div>
              </a>
            </div>
            <div class="card-body">
              <h4 class="card-title">{{post.title}}</h4>
              <p class="card-text">{{post.description}}</p>
              <a href="{% url 'detail' post.id %}" class="btn btn-primary btn-md">Read more</a>
            </div>
          </div>
        </div>
        {% endfor %}
      </div>
    {% endblock %}

    detail.html

    {% extends 'base.html' %}
    
    {% block content %}
    <!--Carousel Wrapper-->
    <div id="carousel-example-1z" class="carousel slide carousel-fade" data-ride="carousel">
        <!--Indicators-->
        <ol class="carousel-indicators">
        {% for p in photos %}
          <li data-target="#carousel-example-1z" data-slide-to="{{ forloop.counter0 }}" class="{% if forloop.counter0 == 0 %} active {% endif %}"></li>
        {% endfor %}
        </ol>
        <!--/.Indicators-->
        <!--Slides-->
        <div class="carousel-inner" role="listbox">
          {% for p in photos %}
          <div class="carousel-item {% if forloop.counter0 == 0 %} active {% endif %}">
            <img class="d-block w-100" src="{{p.images.url}}"
              alt="First slide">
          </div>
          {% endfor %}
          <!--/First slide-->
        <!--/.Slides-->
        <!--Controls-->
        <a class="carousel-control-prev" href="#carousel-example-1z" role="button" data-slide="prev">
          <span class="carousel-control-prev-icon" aria-hidden="true"></span>
          <span class="sr-only">Previous</span>
        </a>
        <a class="carousel-control-next" href="#carousel-example-1z" role="button" data-slide="next">
          <span class="carousel-control-next-icon" aria-hidden="true"></span>
          <span class="sr-only">Next</span>
        </a>
        <!--/.Controls-->
      </div>
    
      {% endblock %}

    In detail.html I added a carousel to show related images for a specific post. You can see the indicators of the carousel (<ol>) surrounded with for loops and I used for loop counter to detect active carousel item. The same logic applied to carousel items to detect active images.

    Great! Now, you can create a new post and check it on the home page. Once you click the details you will able to see related images in a carousel.

    I hope it helps you to organize your multiple images and also it keeps the project simple. Maybe there are a lot of plugins on the internet that can handle multiple images but as I said before these plugins can cause errors or disable some of the functionalities of the project. Simple is more!

    You can find source code in the following link:

    https://github.com/raszidzie/Multiple-Images-Django-Tutorial/

    Share. Facebook Twitter Pinterest LinkedIn Tumblr Email
    coderashapl

      Related Posts

      Flask Development Made Easy: A Comprehensive Guide to Test-Driven Development

      January 4, 2024

      Creating Our Own Chat GPT

      July 27, 2023

      The Ultimate Guide to Pip

      June 12, 2023
      Leave A Reply Cancel Reply

      You must be logged in to post a comment.

      Stay In Touch
      • Facebook
      • Twitter
      • Pinterest
      • Instagram
      • YouTube
      • Vimeo
      Don't Miss
      JavaScript May 5, 2020

      How to build a full stack serverless application with React and Amplify

      With emerging cloud technologies (i.e. Amplify) it is now easier than ever to build production ready, robust, scalable modern web applications. Let’s build our own fullstack serverless app with React.

      13 Best Data Science Podcasts

      October 1, 2019

      Daily Schedule Post

      June 25, 2016

      Building a Telegram Bot with Node.js

      December 6, 2019

      Categories

      • AI & Automation
      • Angular
      • ASP.NET
      • AWS
      • B2B Leads
      • Beginners
      • Blogs
      • Business Growth
      • Case Studies
      • Comics
      • Consultation
      • Content & Leadership
      • CSS
      • Development
      • Django
      • E-commerce & Retail
      • Entrepreneurs
      • Entrepreneurship
      • Events
      • Express.js
      • Facebook Ads
      • Finance & Fintech
      • Flask
      • Flutter
      • Franchising
      • Funnel Strategy
      • Git
      • GraphQL
      • Home Services Marketing
      • Influencer & Community
      • Interview
      • Java
      • Java Spring
      • JavaScript
      • Job
      • Laravel
      • Lead Generation
      • Legal & Compliance
      • LinkedIn
      • Machine Learning
      • Marketing Trends
      • Medical Marketing
      • MSP Lead Generation
      • MSP Marketing
      • NestJS
      • Next.js
      • Node.js
      • Node.js Lessons
      • Paid Advertising
      • PHP
      • Podcasts
      • POS Tutorial
      • Programming
      • Programming
      • Python
      • React
      • React Lessons
      • React Native
      • React Native Lessons
      • Recruitment
      • Remote Job
      • SaaS & Tech
      • SEO & Analytics
      • Soshace
      • Startups
      • Swarm Intelligence
      • Tips
      • Trends
      • Vue
      • Wiki
      • WordPress
      Top Posts

      How I Got Started with Angular and TypeScript

      Angular February 4, 2020

      Top IT Conferences and Events in 2020

      Events January 3, 2020

      React Advanced: The Tiniest Recap — See What You’ve Missed

      Events October 31, 2019

      Interview with Max

      Interview August 4, 2017

      Subscribe to Updates

      Get The Latest News, Updates, And Amazing Offers

      About Us
      About Us

      Soshace Digital delivers comprehensive web design and development solutions tailored to your business objectives. Your website will be meticulously designed and developed by our team of seasoned professionals, who combine creative expertise with technical excellence to transform your vision into a high-impact, user-centric digital experience that elevates your brand and drives measurable results.

      7901 4th St N, Suite 28690
      Saint Petersburg, FL 33702-4305
      Phone: 1(877)SOSHACE

      Facebook X (Twitter) Instagram Pinterest YouTube LinkedIn
      Our Picks
      Remote Job

      How We are Looking for Proposals on UpWork

      Programming

      Programming Patterns. Introduction

      Django

      Creating Our Own Chat GPT

      Most Popular

      Create simple POS with React.js, Node.js, and MongoDB #17: Stat screen

      JavaScript

      Elastic Search – Basics

      Programming

      Interview with Iskander

      Interview
      © 2025 Soshace Digital.
      • Home
      • About
      • Services
      • Contact Us
      • Privacy Policy
      • Terms & Conditions

      Type above and press Enter to search. Press Esc to cancel.