")

Understanding Linked Lists can be a difficult task when you are a beginner JavaScript developer since JavaScript does not provide built-in Linked List support. In an advanced language like JavaScript, we need to implement this data structure by scratch and, if you are unfamiliar with how this data structure works, the implementation part becomes that much more difficult.
In this article, we will discuss how a linked list gets stored in the database and, we will implement a linked-list from scratch with operations like the addition and deletion of an element, lookups, and reversing a linked-list. Before moving onto implementing a linked-list, one needs to understand what are the advantages of using a linked-list when we already have data structures like arrays and objects present.
We know that elements inside an array get stored in the database with numbered indexes and, in sequential order:

While using arrays, operations like adding/deleting elements at the start or at a specific index can be a slow task since we have to shift indexes of all the other elements. This slowness is caused due to the numbered indexes feature of arrays.
The above problem can get solved with the use of objects. Since in objects, the elements get stored at random positions and therefore, there is no need to shift indexes of elements while performing the operations like adding/deleting elements at the start or specific index:

Although operations like addition and deletion are fast in objects, we observe from the above image that, when it comes to iterating operations, objects are not the best choice since elements of an object get stored in random positions. Therefore, iterating operations can take a long time. This is where linked-lists come in.
So what is a linked list?
From the name itself, we can figure out that it’s a list that is linked in some way. So how is it linked and what does the list contain? A linked list consists of nodes that have two properties, data and the pointer. The pointer inside a node points to the next node in the list. The first node inside a linked list is called the head. For understanding better, let’s take a look at the following image that describes a linked list:

We observe from the above image that each node has two properties, data and a pointer. The pointer points to the next node in the list and, the pointer of the last node points to null. The above image represents a singly linked list.
We can see there is a big difference when comparing linked lists with objects. In linked-lists, each node gets connected to the next node via a pointer. Therefore, we have a connection between each node of the linked list, whereas, in objects, the key-value pairs get stored randomly and have no connection between each other.
Let’s implement a linked-list that stores integers as data. Since JavaScript does not provide built-in linked list support, we will be using objects and classes to implement a linked list. Let’s get started:
class Node{
  constructor(value){
    this.value = value;
    this.next = null;
  }
}

class LinkedList{
  constructor(){
    this.head = null;
    this.tail = this.head;
    this.length = 0;
  }

  append(value){

  }

  prepend(value){

  }

  insert(value,index){

  }

  lookup(index){

  }

  remove(index){

  }

  reverse(){

  }
}
In the above code, we have created two classes, one for the linked-list itself and the other for creating nodes. Like we discussed, each node will have two properties, a value and a pointer (“next” in the above case). The LinkedList class contains three properties, the head (which is null initially), the tail (which points to null as well) that is used to store the last node of the linked list and the length property that holds the length of the linked list. It also consists of functions that are empty for now. We will fill these functions one by one.
append (Adding values sequentially)
This function adds a node to the end of the linked list. For implementing this function, we need to understand the operation that it’s going to perform:

From the above image, we can implement the append function in the following way:
  append(value){
    const newNode = new Node(value);
    if(!this.head){
      this.head = newNode;
      this.tail = newNode;
    }
    else{
      this.tail.next = newNode;
      this.tail = newNode;
   }
    this.length++;
  }
Let’s decode the function,
If you are new to JavaScript, understanding the above function can be daunting therefore, let’s breakdown what happens when we perform the append function:
const linkedList1 = new LinkedList();
linkedList1.append(2);
Check whether the head points to null, it does, so we create a new object and assign the new object to both head and tail:
let node = new Node(2);
this.head = newNode;
this.tail = newNode;
Now, both head and tail are pointing to the same object and this is a very important point to remember.
Next, let’s append two more values to the linked list:
linkedList1.append(3);
linkedList1.append(4);
Now, the head does not point to null, so we go into the else condition of append function:
this.tail.next = node;
Since both head and tail point to the same object, any change in tail results in change of the head object as well. That is how objects work in JavaScript. In JavaScript, objects are passed by reference and therefore, both head and tail point to the same address space where the object is stored. The above line of code is equivalent to:
this.head.next = node;
Next,
this.tail = node;
Now, after the executing the above line of code, the this.head.next and this.tail are pointing to the same object and therefore, whenever we append new nodes, the head object will automatically get updated.
After performing three appends, try console.logging the linkedList1 object, this is how it should look:
head: {value: 2 , next: {value: 3, next: {value: 4,next: null}}}
tail : {value: 4, next: null}
length:3
We observe from all the above code that the append function of a linked list is of complexity O(1) since we neither have to shift indexes nor iterate through the linked list.
Let’s move on to the next function,
prepend (Adding values to the start of the linked list)
For implementing this function, we create a new node using the Node class and point the next object of this new node to the head of the linked list. Next, we assign the new node to the head of the linked list:
prepend(value){
   const node = new Node(value);

   node.next = this.head;
   this.head = node;
   this.length++;
}
Just like the append function, this function as well has the complexity of O(1).
insert(Adding values at a specific index)
Before implementing this function in code, it’s important to visualise what this function does, therefore, for understanding purposes, let’s create a linked list with few values and then visualise the insert function. The insert function takes in two parameters, value and index.
let linkedList2 = new LinkedList();
linkedList2.append(23);
linkedList2.append(89);
linkedList2.append(12);
linkedList2.append(3);
linkedList2.insert(45,2);
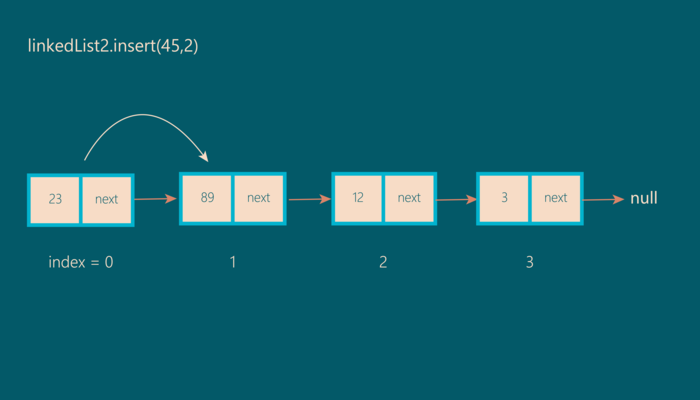
Step 1:
Iterate through the linked list till we reach the index-1 position (1st index in this case):
Step 2:
Assign the pointer of node at index-1 position(89 in this case) to the new node(45 in this case):
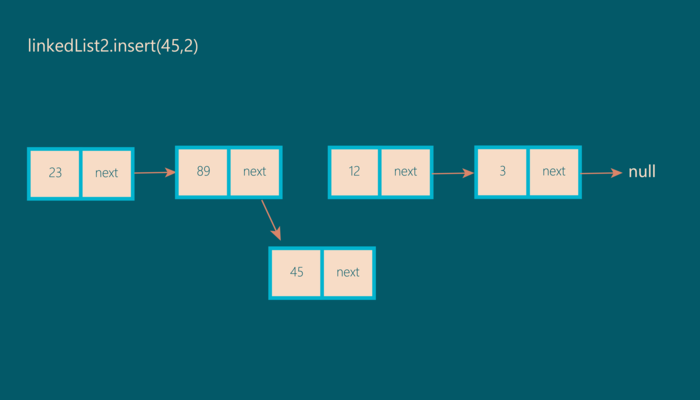
Step 3:
Assign the next pointer of the new node (45) to the next node (12):

This is how the insert operation is performed. Using the above visualisation, we observe that we need to find nodes at index-1 position and index position so that we can insert the new node between them. Let’s implement this in code:
 insert(value,index){
    if(index >= this.length){
      this.append(value);
    }

    const node = new Node(value);

    const {prevNode,nextNode} = this.getPrevNextNodes(index);
    prevNode.next = node;
    node.next = nextNode;

    this.length++;
  }
Let’s decode the function, if the value of index is greater than or equal to the length property, we handover the operation to the append function. For the else condition, we create a new node using Node class, next we observe a new function getPrevNextNodes( ) through which we receive values of prevNode and nextNode. The getPrevNextNodes function gets implemented like this:
 getPrevNextNodes(index){
    let count = 0;
    let prevNode = this.head;
    let nextNode = prevNode.next;

    while(count < index - 1){
      prevNode = prevNode.next;
      nextNode = prevNode.next;
      count++;
    }

    return {
      prevNode,
      nextNode
    }
  }
The above function basically returns the nodes at index-1 position and index position by iterating through the linked list. After receiving these nodes, we point the next property of the prevNode to the new node and the new node’s next property to the nextNode.
The insert operation for a linked list is of complexity O(n) since we have to iterate through the linked list and search for nodes at index-1 and index positions. Although the complexity is O(n), we observe that this insert operation is much faster than the insert operation on arrays, in arrays we would have to shift the indexes of all the elements after a particular index but, in the case of a linked list, we only manipulate the next properties of nodes at index-1 and index positions.
remove (Removing element at a specific index)
Now that we have covered the insertion operation, the remove operation might feel easier since it’s almost the same as the insertion operation with a small difference, when we get prevNode and nextNode values from the getPrevNextNodes function, we have to perform the following operation in remove function:
prevNode.next = nextNode.next;
By executing the above line of code, the next property of node at index-1 position will now point to node at index+1 position. This way, the node at index position will be removed.
The complete function:
remove(index){
    let {previousNode,currentNode} = this.getNodes(index);
    previousNode.next = currentNode.next;
    this.length--;
}
The remove operation is also of complexity O(n) but, again, like the insertion operation, the remove operation in linked lists is faster than the remove operation in arrays.
reverse(Reversing the linked list)
Although it might seem simple, reversing a linked list can often be the most confusing operation to implement and hence, this operation gets asked a lot in coding interviews. Before implementing the function, let’s visualise the strategy that we are going to use to reverse a linked list.
For reversing a linked list, we need to keep track of three nodes, previousNode, currentNode and nextNode.
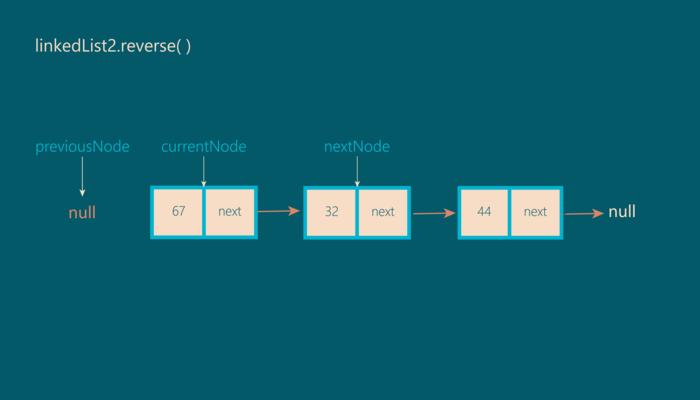
Consider the following linked list:
let linkedList2 = new LinkedList();
linkedList2.append(67);
linkedList2.append(32);
linkedList2.append(44);
Step 1:
Initially, the previousNode has the value null and, the currentNode has the value of head:

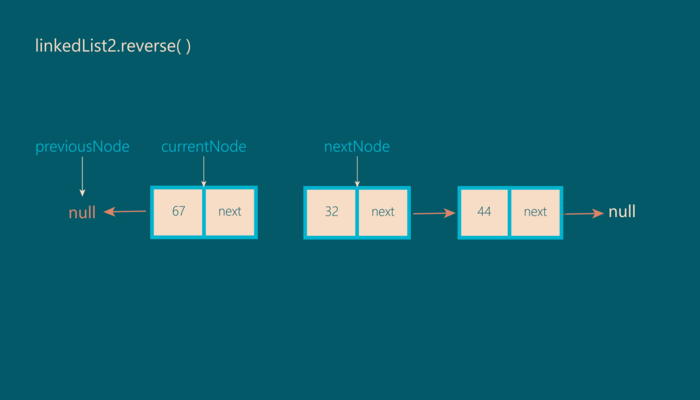
Step 2:
Next, we assign the nextNode to the currentNode.next:
Step 3:
Next, we point the currentNode.next property to the previousNode:
Step 4:
Now, we shift the previousNode to currentNode and currentNode to nextNode:

This process restarts from step 2 and continues till currentNode equals null.
To implement this on code:
reverse(){
    let previousNode = null;
    let currentNode = this.head;

    while(currentNode !== null){
      let nextNode = currentNode.next;
      currentNode.next = previousNode;
      previousNode = currentNode;
      currentNode = nextNode;
    }

    this.head = previousNode;
}
Like we visualised, till we hit the currentNode === null mark, we keep iterating and shifting the values. In the end, we assign the previousNode value to the head.
The reverse operation has a complexity of O(n).
lookup (Looking up a value at specific index)
This operation is simple, we just iterate through the linked list and return the node at specific index. This operation as well has the complexity of O(n).
lookup(index){
    let counter = 0;
    let currentNode = this.head;
    while(counter < index){
      currentNode = currentNode.next;
      counter++;
    }
    return currentNode;
  }
There you go, we have finished implementing basic operations of a singly linked list in javascript. The difference between a singly and doubly linked list is that, doubly linked list has nodes which have pointers to both the previous node and the next node.
From the above operations, let’s conclude linked lists.
Linked lists provide us with fast append(Adding element at the end) and prepend(Adding element at the start) operations. Although the insertion operation in linked lists is of complexity O(n), it is much faster than insertion operation of arrays. The other problem that we face while using arrays is size complexity, when we use dynamic arrays, while adding an element, we have to copy the complete array to a different address space and then add the element whereas, in linked lists, we don’t face such problems.
The problem we face while using objects is the random placement of elements in memory whereas in linked lists, the nodes are connected to each other with pointers that provide us some order.
So finally, we have finished understanding and evaluating a commonly used data structure called, a Linked List.