


Serverless architecture has emerged as a leading paradigm for developing applications that demand scalability, cost efficiency, and ease of management. This article provides a complete guide into serverless microservices, along with the integration of Nest.js, a robust and extensible Node.js framework, with AWS Lambda — a key player in the serverless ecosystem. By combining Nest.js and AWS Lambda, developers can harness the benefits of serverless computing to build flexible, resilient, and highly scalable microservices.
Introduction to Nest.js
Nest.js stands out as a versatile and opinionated framework for building server-side applications with Node.js. It embraces the architectural patterns of Angular, making it particularly suitable for developers familiar with the Angular framework. Nest.js combines elements of both object-oriented programming and functional programming, offering a well-organized structure and an integrated development experience.
Key Features of Nest.js
Modularity: Nest.js encourages a modular structure, facilitating the organization of code into reusable and maintainable modules.
Dependency Injection: Using TypeScript, Nest.js utilizes dependency injection to enhance code maintainability and testability.
Decorators and Metadata: The framework employs decorators and metadata reflection to simplify the creation of controllers, services, and modules.
Middleware Support: Nest.js also supports the use of middleware for handling requests and responses, enabling the creation of custom processing logic.
WebSockets and Microservices: Provides built-in support for WebSockets and facilitates the creation of microservices, aligning with the demands of modern, real-time applications.
Key Features of AWS Lambda
AWS Lambda is a serverless computing service within Amazon Web Services (AWS), designed to enable code execution without the hassle of server provisioning. Embracing an event-driven model, it responds to events and dynamically scales based on demand. Its support for various programming languages, including Node.js, positions it as an excellent choice for deploying Nest.js applications.
Usage-Based Billing: AWS Lambda operates on a pay-as-you-go billing model, ensuring charges are directly tied to the compute time your code utilizes.
Event-Driven Architecture: Lambda functions respond to diverse triggers, including AWS services, HTTP requests, or custom events. This adaptability facilitates smooth integration into the wider AWS ecosystem.
Automatic Scaling: Lambda effortlessly scales to manage incoming requests, maintaining optimal performance without manual intervention.
API Gateway Integration: Lambda functions can be easily exposed as HTTP endpoints through AWS API Gateway, establishing a scalable and managed API layer.
Installing Nest.js CLI Globally
Before proceeding with developing serverless microservices using Nest.js, we need to have the Nest.js Command Line Interface (CLI) installed globally on our machine. This will allow us to simplify the process of creating, managing, and deploying Nest.js applications.
On your terminal, run the following command to install the Nest.js CLI globally:
npm install -g @nestjs/cli
Once the installation is complete, verify the installation by running:
nest --version
This should display the installed version of the Nest.js CLI. We are now ready to create a project for building serverless microservices.
Creating a New Nest.js Project
We will use Nest.js CLI to set up a Nest.js project that we will use to build a Lambda for serverless microservices. On your terminal run the following command to generate a new Nest.js project:
nest new nest-serverless-microservice
This command will walk you through the process of selecting a package manager (e.g., npm or yarn) and allow you to configure the project based on your choices.
Understanding the Nest.js Project Structure
A Nest.js project structure relies on several key files and directories that play integral roles in the application’s functionality.

src Directory: Within this directory, the main.ts file stands as the entry point of your Nest.js application. This file takes on the responsibility of initializing the Nest application, configuring global middleware, and initiating the server.
app.module.ts: Considered the primary module of your application, this file orchestrates the various modules, controllers, and services that compose your Nest.js project.
app.controller.ts and app.service.ts (or equivalent): Within these files, you’ll find a fundamental illustration of a Nest.js controller and service. Controllers manage incoming requests, while services encapsulate the application’s business logic.
nestjs-cli.json and nest-cli.json (or nestconfig.json): These configuration files belong to the Nest.js CLI, defining settings like the root directory and the source code directory. They play a crucial role in influencing how the CLI interacts with your project.
package.json and package-lock.json: Standard Node.js project files that define dependencies and scripts crucial for managing the project.
tsconfig.json: This TypeScript configuration file outlines compiler options and project settings, ensuring the proper compilation and execution of the TypeScript code.
test Directory: Within this directory, you can find files and configurations specifically tailored for testing your Nest.js application. This section is essential for ensuring the robustness and reliability of your codebase.
Running the Project
In the terminal, move to the project directory:
cd nest-serverless-microservice
Initiate the development server:
npm run start:dev
This script compiles the TypeScript code and initiates the Nest.js application in development mode. Access http://localhost:3000 through your web browser to view the default welcome message.
Understanding the Flow
Let’s take a closer look at the main.ts file, which plays a crucial role in setting up your Nest.js application:
import { NestFactory } from '@nestjs/core';
import { AppModule } from './app.module';

async function bootstrap() {
  const app = await NestFactory.create(AppModule);
  await app.listen(3000);
}
bootstrap();
The NestFactory.create(AppModule) method creates a new instance of the Nest application, initializing the AppModule.
Open the src/app.controller.ts file in your code editor.
import { Controller, Get } from '@nestjs/common';
import { AppService } from './app.service';

@Controller() export class AppController {

constructor(private readonly appService: AppService) {}

@Get()   getHello(): string {
return this.appService.getHello();
}

}
The @Get() decorator defines an HTTP GET endpoint at the root path (‘/’). The getHello() method invokes the getHello() method from the AppService class.
Next, check out the src/app.service.ts file:
import { Injectable } from '@nestjs/common';

@Injectable() export class AppService {
getHello(): string {
return 'Hello World!';
}
}
The AppService class contains a simple getHello() method that returns the “Hello World!” message.
 method in AppController is executed. This method, in turn, calls the getHello() method in AppService class, returning the \"Hello World!\" message")
Feel free to explore and modify these files to suit your project requirements. As you build serverless microservices, keep in mind that AWS Lambda deployment involves adapting your application to work within the constraints of serverless architecture.
Now that our Nest.js project is up and running locally, we are now ready to proceed with building serverless microservices and deploying them on AWS Lambda.
Creating User Module
In this section, we will create a User module to handle user-related operations using Nest CLI. The User Module in Nest.js centralizes functionalities related to user management, encompassing a controller for handling HTTP requests, a service for business logic.
nest generate resource user

Next, install the required dependencies for database access:
npm install --save @nestjs/typeorm typeorm mysql2
We will use TypeORM, a powerful tools for performing database operations, defining entities, and managing relationships between them.
Next, implement the User entity using TypeORM to define the user’s data structure. This modular organization enhances code maintainability and scalability.
Update the entity file (user.entity.ts):
// src/user/entities/user.entity.ts
import { Column, Entity, PrimaryGeneratedColumn } from 'typeorm';

@Entity()
export class User {
  @PrimaryGeneratedColumn()
  id: number;
  @Column()
  username: string;
  @Column()
  email: string;
  @Column()
  password: string;
}
To enable the module to work with the entity, add an import to the module definition (user.module.ts):
//src/user/user.module.ts
import { Module } from '@nestjs/common';
import { UserService } from './user.service';
import { UserController } from './user.controller';
import { TypeOrmModule } from '@nestjs/typeorm';
import { User } from './entities/user.entity';

@Module({
  imports: [TypeOrmModule.forFeature([User])],
  controllers: [UserController],
  providers: [UserService],
})
export class UserModule {}
Now, implement the service layer in the user.service.ts file:
// src/user/user.service.ts
import { Injectable } from '@nestjs/common';
import { InjectRepository } from '@nestjs/typeorm';
import { Repository } from 'typeorm';
import { User } from './entities/user.entity';
@Injectable()
export class UserService {
  constructor(
    @InjectRepository(User)
    private userRepository: Repository<User>,
  ) {}
  async create(user: User): Promise<User> {
    return await this.userRepository.save(user);
  }
  async findAll(): Promise<User[]> {
    return await this.userRepository.find();
  }
  async findOne(id: number): Promise<User> {
    return await this.userRepository.findOne({ id });
  }
  async remove(id: number): Promise<void> {
    await this.userRepository.delete(id);
  }
}
To keep things simple, we’ll use the User entity as a DTO. Update the controller and service in user.controller.ts:
// src/user/user.controller.ts
import { Body, Controller, Delete, Get, Param, ParseIntPipe, Post } from '@nestjs/common';
import { UserService } from './user.service';
import { User } from './entities/user.entity';

@Controller('users')
export class UserController {
  constructor(private readonly userService: UserService) {}
  @Post()
  async create(@Body() user: User): Promise<User> {
    return await this.userService.create(user);
  }
  @Get()
  async findAll(): Promise<User[]> {
    return await this.userService.findAll();
  }
  @Get(':id')
  async findOne(@Param('id', ParseIntPipe) id: number): Promise<User> {
    return await this.userService.findOne(id);
  }
  @Delete(':id')
  async remove(@Param('id', ParseIntPipe) id: number): Promise<void> {
    await this.userService.remove(id);
  }
}
Now we will create a Database named usersapi and define a user table within it by executing the following script in your local MySQL environment.
CREATE DATABASE `usersapi`;

USE `usersapi`;
CREATE TABLE `user`
(
    `id`       int(11)      NOT NULL AUTO_INCREMENT,
    `username` varchar(200) NOT NULL,
    `email`    varchar(200) NOT NULL,
    `password` varchar(200) NOT NULL,
    PRIMARY KEY (`id`)
) ENGINE = InnoDB
  DEFAULT CHARSET = utf8;
Ensure the API can connect to it by updating the configuration in app.module.ts:
// src/app.module.ts
import { Module } from '@nestjs/common';
import { TypeOrmModule } from '@nestjs/typeorm';
import { UserModule } from './user/user.module';

@Module({
  imports: [
    TypeOrmModule.forRoot({
      type: 'mysql',
      host: 'localhost',
      port: 3306,
      username: 'root',
      password: '',
      database: 'usersapi',
      autoLoadEntities: true,
    }),
    UserModule,
  ],
  controllers: [AppController],
  providers: [AppService],
})
export class AppModule {}
Run the application using npm run start and test it by sending requests to create, list, and remove users.
Run and Test the Users API
Let’s test the API by sending some requests. Use curl commands to interact with the API endpoints. Here’s an example of creating a new user:
curl -X POST 'localhost:3000/users'
--header 'Content-Type: application/json'
--data-raw '{
    "username": "john_doe",
    "email": "john@example.com",
    "password": "securepassword"
}'
The response will provide details about the created user, including the user ID.
Now trying retrieving a list of all the created users:
curl 'localhost:3000/users'
In return, you will receive an array of user objects with their respective data.
In order to fetch details of a specific user by ID, use the following command (replace {user_id} with an actual user ID):
curl 'localhost:3000/users/{user_id}'If you want to delete a user, you can use the following command (replace {user_id} with the ID of the user to be deleted):
curl -X DELETE 'localhost:3000/users/{user_id}'By testing these requests locally, we have ensured that the Users API is functioning correctly before deploying it to the cloud.
Setting Up AWS CLI
Before taking your Nest.js application to AWS Lambda, make sure you’ve got your AWS account in place, and your credentials are correctly set up.
On Windows, setting environment variables is accomplished using the set command and the export command is used in Unix-based systems. Follow these steps to set the AWS_PROFILE environment variable:
//for Windows
set AWS_PROFILE=profile-name

//for Unix-based systems
set AWS_PROFILE=profile-name
Replace profile-name with your AWS profile name. This sets the AWS_PROFILE variable for the current command prompt session.
AWS CLI Installation and Configuration
Install the AWS CLI from here. Open the command line and run the following:
aws configure
Enter your AWS Access Key ID, Secret Access Key, default region, and output file format when prompted. Your credentials file will be stored in the following directory:
C:UsersYourUsername.aws
With content similar to:
//credentials file
[default]
aws_access_key_id = xxx
aws_secret_access_key = xxx
The configuration step is important for secure and efficient communication between your system and AWS services, enabling the development and deployment tasks.
Setting up an SQL-based RDS Database
Amazon RDS (Relational Database Service) is a managed relational database service by AWS that simplifies database setup, operation, and scaling. It supports multiple database engines, including MySQL, which we will use in this example.
Use the following CloudFormation template (rds.yaml) to define an RDS instance. Adjust the parameters, including MasterUsername and MasterUserPassword for security:
AWSTemplateFormatVersion: '2010-09-09'

Resources:
  UsersDatabase:
    Type: AWS::RDS::DBInstance
    Properties:
      AllocatedStorage: 20
      DBInstanceClass: db.t3.micro
      DBInstanceIdentifier: usersapi
      PubliclyAccessible: true
      StorageType: gp2
      MasterUsername: xxx # change
      MasterUserPassword: yyy # change
      Engine: mysql
      EngineVersion: 8.0.28
Deploying the CloudFormation Stack
Save the rds.yaml file and run the following command to deploy the CloudFormation stack, creating the RDS instance:
aws cloudformation deploy --stack-name users-api-db --template-file rds.yaml --region your-preferred-region
Replace your-preferred-region with the code for your desired AWS region (e.g., us-east-1 or eu-west-1).

Obtaining Database URL and Configurations
Once the RDS database is ready, follow either of the below mentioned steps:
- AWS Console: Navigate to the AWS RDS Console, locate your database instance, and find its details, including the endpoint URL.
- AWS CLI and CloudFormation: Use the AWS CLI to list the exports of the CloudFormation stack. Look for values related to your RDS instance, including the endpoint URL.
With the obtained database URL, update your local project’s app.module.ts file to configure the connection settings. Ensure your local application can connect to the remote AWS RDS instance for seamless development and testing.
Cloud Deployment with Serverless
Next, install Serverless Framework CLI globally.
npm install -g serverless
For deployment configuration, create a serverless.yaml file in the project root with all the necessary settings. This file defines deployment details for the Serverless Framework, specifying AWS as the provider and setting up functions.
service: users-api

frameworkVersion: '3'

plugins:
  - serverless-jetpack

provider:
  name: aws
  runtime: nodejs18.x # or your current node version
  region: us-east-1 # or your region

functions:
  api:
    handler: dist/lambda_api.handler
    events:
      - http:
          method: any
          path: /{proxy+}
Additionally, install serverless-jetpack as it efficiently packages your app for Serverless deployment. Also, include serverless-express as it adapts Express-based apps for Lambda environments, ensuring compatibility and efficient execution during deployments.
npm i @vendia/serverless-express
npm i -D serverless-jetpack
Finally, create a lambda_api.ts file in the source folder. This file serves as the Lambda handler function, facilitating the integration of your Nest.js application with the AWS Lambda service. The handler function, defined in this file, enables seamless communication between the AWS Lambda environment and your Nest.js app.
import { configure as serverlessExpress } from '@vendia/serverless-express';
import { NestFactory } from '@nestjs/core';
import { AppModule } from './app.module';

let cachedServer;

export const handler = async (event, context) => {
  if (!cachedServer) {
    const nestApp = await NestFactory.create(AppModule);
    await nestApp.init();
    cachedServer = serverlessExpress({ app: nestApp.getHttpAdapter().getInstance() });
  }

  return cachedServer(event, context);
}
Build your Nest.js application.
npm run build
Now you are all set to deploy your API to the cloud using Serverless.
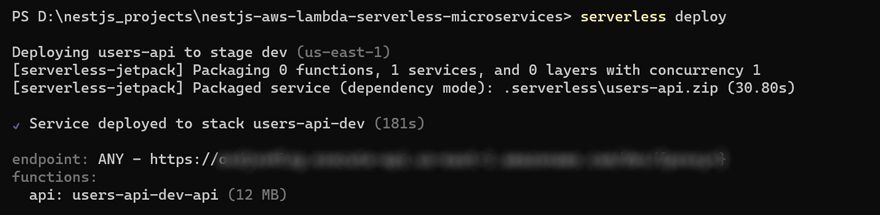
serverless deploy
Once the deployment is complete, you will receive a unique URL, such as https://your-unique-id.execute-api.your-region.amazonaws.com.
Interact with your serverless API using this URL. Test with different requests to test its functionality.
Diagrammatic flow of Nest.js and AWS Lambda Integration
Explore the visual representation of the end-to-end process, providing a comprehensive overview of Nest.js and AWS Lambda integration for serverless microservices.
Nest.js + AWS Lambda + Serverless
         │
         ▼
┌─────────────────┐            ┌───────────────────┐
│   Nest.js CLI   │            │ Project Structure │
│ nest new ...    │            │   src, app.module,│
└─────────────────┘            │   etc.            │
         │                     └───────────────────┘
         ▼
┌─────────────────┐            ┌───────────────────┐
│ Development    │            │ Running Project   │
│ Server (npm    │            │ Locally (npm      │
│ run start:dev) │            │ run start:dev)     │
└─────────────────┘            └───────────────────┘
         │                              │
         ▼                              ▼
┌─────────────────┐            ┌───────────────────┐
│ Application    │            │ Application Flow │
│ Flow in main.ts│            │   NestFactory...  │
└─────────────────┘            └───────────────────┘
         │                              │
         ▼                              ▼
┌─────────────────┐            ┌───────────────────┐
│ Handling HTTP  │            │ Creating a User   │
│ Requests       │            │ Module            │
│ app.controller,│            │ Nest CLI, Database│
│ app.service    │            └───────────────────┘
└─────────────────┘                              │
         │                              ▼
         ▼                    ┌───────────────────┐
┌─────────────────┐            │ Connecting to a   │
│ Creating a User │            │ Database          │
│ Module          │            │ MySQL Setup,      │
│ Nest CLI,       │            │ Database Config   │
│ Dependencies    │            └───────────────────┘
└─────────────────┘                              │
         │                              ▼
         ▼                    ┌───────────────────┐
┌─────────────────┐            │ Cloud Deployment  │
│ Connecting to a │            │ AWS Credentials,  │
│ Database        │            │ RDS Configuration │
│ Database Config │            │ Serverless Deploy │
└─────────────────┘            └───────────────────┘
                                      │
                                      ▼
                             ┌───────────────────┐
                             │ Unique API URL    │
                             │ Provided          │
                             └───────────────────┘
Conclusion
Nest.js coupled with AWS Lambda is a robust combination for building serverless microservices. Nest.js simplifies development, AWS Lambda provides cost-effective serverless computing, and the Serverless Framework streamlines deployment. This approach also paves way for rapid development, maintainability, and automatic scaling, making it an ideal choice for crafting efficient and scalable microservices.