Creating Real-Time API with Beautiful Soup and Django REST Framework
Creating Real-Time API with Beautiful Soup and Django REST Framework
A few weeks ago, I was interested in trading and found that the majority of companies are offering their paid services to analyze the forex data. My objective was to implement some ML algorithms to predict the market. Therefore, I decided to create a real-time API to use it in React and test my own automated strategies.
At the end of this tutorial, you’ll be able to turn any website into an API without using any online service. We will mainly use the Beautiful Soup and Django REST Framework to build real-time API by crawling the forex data.
You’ll need a basic understanding of Django and Ubuntu to run some important commands. If you’re using other operating systems, you can download Anaconda to make your work easier.
Installation and Configuration
To get started, create and activate a virtual environment by following commands:
1 2 | virtualenv env . env/bin/activate |
Once the environment activated, install Django and Django REST Framework:
1 | pip install django djangorestframework |
Now, create a new project named trading and inside your project create an app named forexAPI.
1 2 3 | django-admin startproject trading cd trading django-admin startapp forexAPI |
then open your settings.py and update INSTALLED_APPS configuration:
settings.py
1 2 3 4 5 6 | INSTALLED_APPS = [ ... 'rest_framework', 'forexAPI', ] |
In order to create a real-time API, we’ll need to crawl and update data continuously. Once our application is overloaded with traffic, the web server can only handle a certain number of requests and leave the user waiting for way too long. At this point, Celery is the best choice for doing background task processing. Passing the crawlers to queue to be executed in the background will keep the server ready to respond to new requests.
1 | pip install Celery |
Additionally, Celery requires a message broker to send and receive messages, so we have to utilize RabbitMQ as a solution. You can install RabbitMQ through Ubuntu’s repositories by the following command:
1 | sudo apt-get install rabbitmq-server |
then enable and start the RabbitMQ service:
1 2 | sudo systemctl enable rabbitmq-server sudo systemctl start rabbitmq-server |
If you are using other operating systems, you can follow the download instructions from the official documentation of RabbitMQ.
After installation completed, add CELERY_BROKER_URL configuration at the end of settings.py file:
settings.py
1 | CELERY_BROKER_URL = 'amqp://localhost' |
Now, we have to set the default Django settings module for the ‘celery’ program. Create a new file named celery.py inside the root directory, as shown in the schema below:
1 2 3 4 5 6 7 | . ├── asgi.py ├── celery.py ├── __init__.py ├── settings.py ├── urls.py └── wsgi.py |
celery.py
1 2 3 4 5 6 7 8 | import os from celery import Celery os.environ.setdefault('DJANGO_SETTINGS_MODULE', 'trading.settings') app = Celery('trading') app.config_from_object('django.conf:settings', namespace='CELERY') app.autodiscover_tasks() |
We are setting the default Django settings module for the ‘celery’ program and loading task modules from all registered Django app configs.
Open __init__.py in the same directory (root) and import the celery to ensure our Celery app is loaded once Django starts.
1 2 3 | from .celery import app as celery_app __all__ = ['celery_app'] |
Crawling Data with Beautiful Soup
We are going to crawl one of the popular real-time market screeners named investing.com using Beautiful Soup which is easy to use parser tool and doesn’t require any knowledge of actual parsing theory and techniques. Thanks to the excellent documentation that makes it easy to learn with many code examples. Install the Beautiful Soup with the following command:
1 | pip install beautifulsoup4 |
The next step is to create a model to save crawled data in the database. If you open the website, you can see a forex table with column names which will be our model fields.
models.py
1 2 3 4 5 6 7 8 9 10 11 12 13 14 15 16 17 18 | from django.db import models class Currency(models.Model): pair = models.CharField(max_length=20) bid = models.FloatField() ask = models.FloatField() high = models.FloatField() low = models.FloatField() change = models.CharField(max_length=20) change_p = models.CharField(max_length=20) time = models.TimeField() class Meta: verbose_name = 'Currency' verbose_name_plural = 'Currencies' def __str__(self): return self.pair |
then migrate your database by following commands:
1 2 | python manage.py makemigrations forexAPI python manage.py migrate |
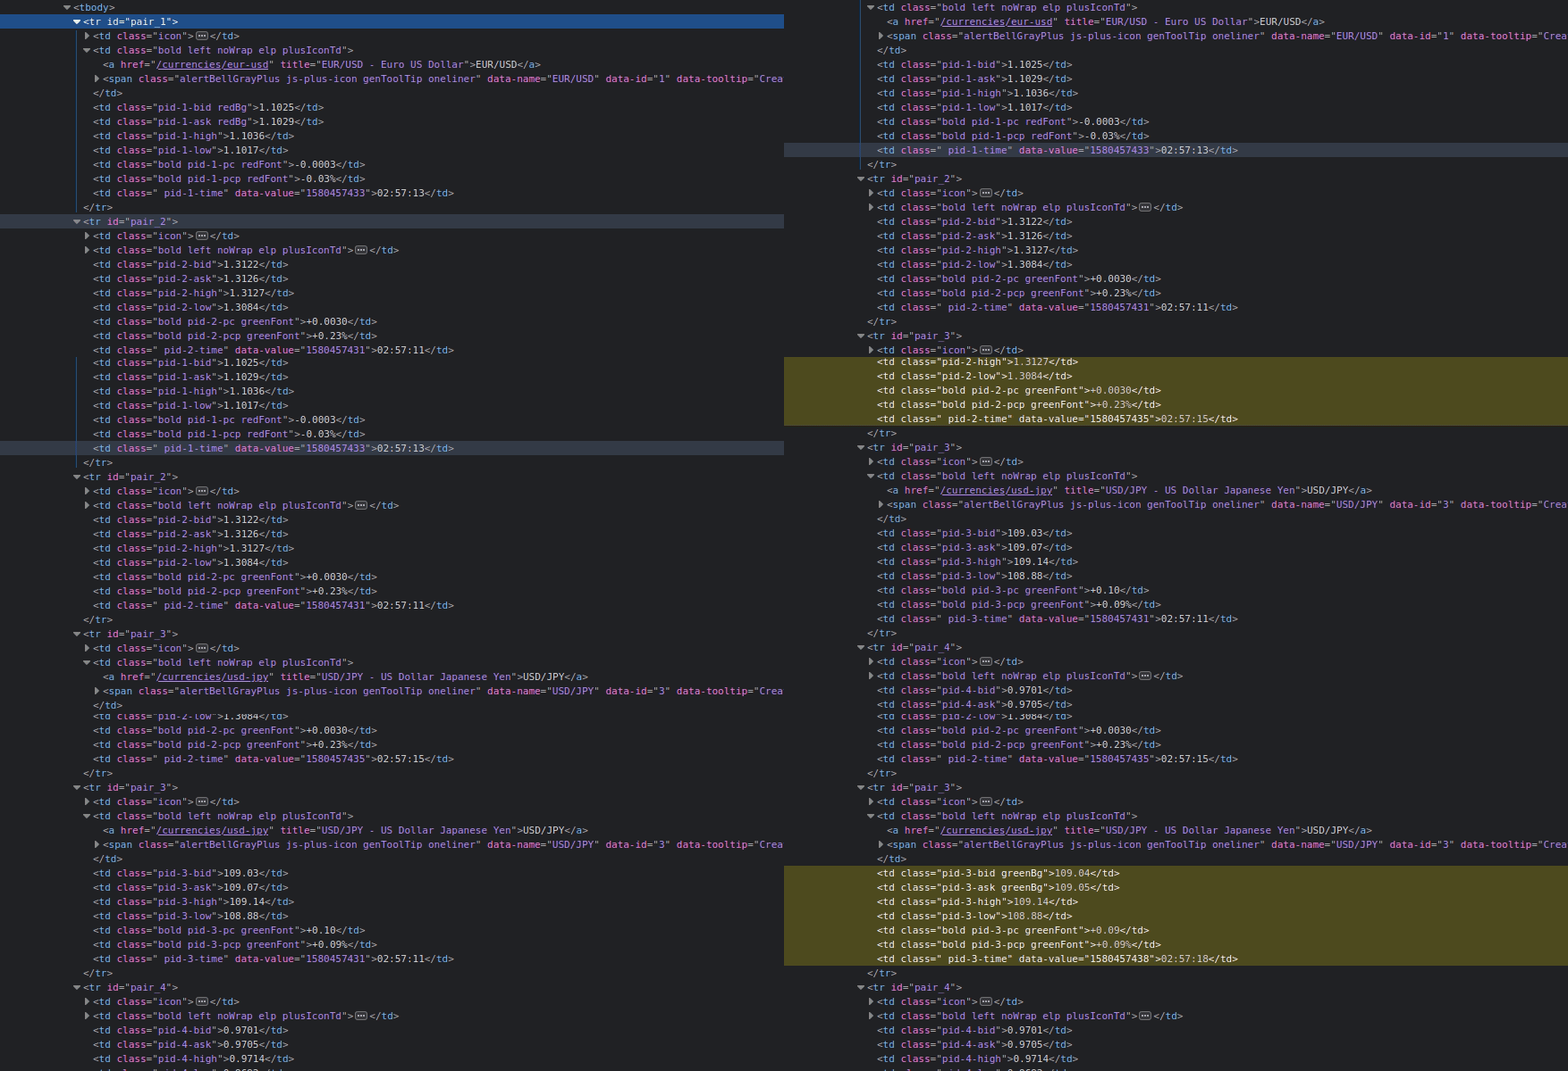
After migrations, create a new file named tasks.py inside the app directory (forexAPI) which will include all our Celery tasks. The Celery app that we built in the root of the project will collect all of the tasks in all Django apps mentioned in the INSTALLED_APPS. Before implementation, open developer tools of browser to inspect table elements that are going to be crawled.
Inspect-Element-Forex
Initially, we are using abstraction class Request of urllib to open the website because Beautiful Soup can’t make a request to a particular web server. Then, we have to get all table rows (<tr>) and iterate through them to get into details of cells (<td>). Consider the table cells inside rows, and you’ll notice that class names include increment value that defines the number of the specific row, so we also need to keep a count of iterations to get the right information about the row. Python provides a built-in function enumerate() for dealing with this kind of iterators, enumerate rows to pass index inside the class name.
tasks.py
1 2 3 4 5 6 7 8 9 10 11 12 13 14 15 16 17 18 19 20 21 22 23 24 25 26 27 28 29 30 31 32 33 34 35 36 37 38 39 40 41 42 43 44 45 | from time import sleep from celery import shared_task from bs4 import BeautifulSoup from urllib.request import urlopen, Request from .models import Currency @shared_task # some heavy stuff here def create_currency(): print('Creating forex data ..') req = Request('https://www.investing.com/currencies/single-currency-crosses', headers={'User-Agent': 'Mozilla/5.0'}) html = urlopen(req).read() bs = BeautifulSoup(html, 'html.parser') # get first 5 rows currencies = bs.find("tbody").find_all("tr")[0:5] # enumerate rows to pass index inside class name # starting index from 1 for idx, currency in enumerate(currencies, 1): pair = currency.find("td", class_="plusIconTd").a.text bid = currency.find("td", class_=f"pid-{idx}-bid").text ask = currency.find("td", class_=f"pid-{idx}-ask").text high = currency.find("td", class_=f"pid-{idx}-high").text low = currency.find("td", class_=f"pid-{idx}-low").text change = currency.find("td", class_=f"pid-{idx}-pc").text change_p = currency.find("td", class_=f"pid-{idx}-pc").text time = currency.find("td", class_=f"pid-{idx}-time").text print({'pair':pair, 'bid':bid, 'ask':ask, 'high':high, 'low':low, 'change':change, 'change_p':change_p, 'time':time}) # create objects in database Currency.objects.create( pair=pair, bid=bid, ask=ask, high=high, low=low, change=change, change_p=change_p, time=time ) # sleep few seconds to avoid database block sleep(5) create_currency() |
@shared_task will create an independent instance of the task for each app, making task reusable, so it’s important to specify this decorator for time-consuming tasks. The function will create a new object for each crawled row and sleep a few seconds to avoid blocking the database.
Save the file and run Celery worker in your console to see the result.
1 | celery -A trading worker -l info |
Once you run the worker, results will appear in the console and if you want to see the created objects, navigate to Django admin and check inside your app. Create a superuser to access the admin page.
1 | python manage.py createsuperuser |
Then, register your model in admin.py:
1 2 3 | from django.contrib import admin from .models import Currency admin.site.register(Currency) |
To create real-time data, we’ll need to continuously update these objects. We can achieve that by making small changes in the previous function.
tasks.py
1 2 3 4 5 6 7 8 9 10 11 12 13 14 15 16 17 18 19 20 21 22 23 24 | @shared_task # some heavy stuff here def update_currency(): print('Updating forex data ..') req = Request('https://www.investing.com/currencies/single-currency-crosses', headers={'User-Agent': 'Mozilla/5.0'}) html = urlopen(req).read() bs = BeautifulSoup(html, 'html.parser') currencies = bs.find("tbody").find_all("tr")[0:5] for idx, currency in enumerate(currencies, 1): pair = currency.find("td", class_="plusIconTd").a.text bid = currency.find("td", class_=f"pid-{idx}-bid").text ask = currency.find("td", class_=f"pid-{idx}-ask").text high = currency.find("td", class_=f"pid-{idx}-high").text low = currency.find("td", class_=f"pid-{idx}-low").text change = currency.find("td", class_=f"pid-{idx}-pc").text change_p = currency.find("td", class_=f"pid-{idx}-pc").text time = currency.find("td", class_=f"pid-{idx}-time").text # create dictionary data = {'pair':pair, 'bid':bid, 'ask':ask, 'high':high, 'low':low, 'change':change, 'change_p':change_p, 'time':time} # find the object by filtering and update all fields Currency.objects.filter(pair=pair).update(**data) sleep(5) |
To update an existing object, we should use the filter method to find a particular object and pass the dictionary to update() method. This is one of the best ways to handle multiple fields at once. Here is the full code for real-time updates:
1 2 3 4 5 6 7 8 9 10 11 12 13 14 15 16 17 18 19 20 21 22 23 24 25 26 27 28 29 30 31 32 33 34 35 36 37 38 39 40 41 42 43 44 45 46 47 48 49 50 51 52 53 54 55 56 57 58 59 60 61 62 63 64 65 66 67 68 69 70 71 72 73 74 | from time import sleep from celery import shared_task from bs4 import BeautifulSoup from urllib.request import urlopen, Request from .models import Currency @shared_task # some heavy stuff here def create_currency(): print('Creating forex data ..') req = Request('https://www.investing.com/currencies/single-currency-crosses', headers={'User-Agent': 'Mozilla/5.0'}) html = urlopen(req).read() bs = BeautifulSoup(html, 'html.parser') # get first 5 rows currencies = bs.find("tbody").find_all("tr")[0:5] # enumerate rows to include index inside class name # starting index from 1 for idx, currency in enumerate(currencies, 1): pair = currency.find("td", class_="plusIconTd").a.text bid = currency.find("td", class_=f"pid-{idx}-bid").text ask = currency.find("td", class_=f"pid-{idx}-ask").text high = currency.find("td", class_=f"pid-{idx}-high").text low = currency.find("td", class_=f"pid-{idx}-low").text change = currency.find("td", class_=f"pid-{idx}-pc").text change_p = currency.find("td", class_=f"pid-{idx}-pc").text time = currency.find("td", class_=f"pid-{idx}-time").text print({'pair':pair, 'bid':bid, 'ask':ask, 'high':high, 'low':low, 'change':change, 'change_p':change_p, 'time':time}) # create objects in database Currency.objects.create( pair=pair, bid=bid, ask=ask, high=high, low=low, change=change, change_p=change_p, time=time ) # sleep few seconds to avoid database block sleep(5) @shared_task # some heavy stuff here def update_currency(): print('Updating forex data ..') req = Request('https://www.investing.com/currencies/single-currency-crosses', headers={'User-Agent': 'Mozilla/5.0'}) html = urlopen(req).read() bs = BeautifulSoup(html, 'html.parser') currencies = bs.find("tbody").find_all("tr")[0:5] for idx, currency in enumerate(currencies, 1): pair = currency.find("td", class_="plusIconTd").a.text bid = currency.find("td", class_=f"pid-{idx}-bid").text ask = currency.find("td", class_=f"pid-{idx}-ask").text high = currency.find("td", class_=f"pid-{idx}-high").text low = currency.find("td", class_=f"pid-{idx}-low").text change = currency.find("td", class_=f"pid-{idx}-pc").text change_p = currency.find("td", class_=f"pid-{idx}-pc").text time = currency.find("td", class_=f"pid-{idx}-time").text # create dictionary data = {'pair':pair, 'bid':bid, 'ask':ask, 'high':high, 'low':low, 'change':change, 'change_p':change_p, 'time':time} # find the object by filtering and update all fields Currency.objects.filter(pair=pair).update(**data) sleep(5) create_currency() while True: # updating data every 15 seconds sleep(15) update_currency() |
Real-time crawlers can interrupt servers that can end with preventing you to access a certain webpage, so it is important being undetected while scraping continuously and bypass any restriction. You can prevent detection by setting a proxy on an instance of class Request.
1 2 3 4 5 6 7 8 | proxy_host = 'localhost:1234' # host and port of your proxy url = 'http://www.httpbin.org/ip' req = urlrequest.Request(url) req.set_proxy(proxy_host, 'http') response = urlrequest.urlopen(req) print(response.read().decode('utf8')) |
Creating API with Dango REST Framework
The final step is to create serializers to build a REST API from crawled data. By using serializers we can convert our model instance to native Python datatype that can be easily rendered into JSON. The ModelSerializer class provides a shortcut that lets you automatically create a Serializer class with fields that correspond to the Model fields. For more information, check official documentation of the Django REST Framework.
Create serializers.py inside your app:
serializers.py
1 2 3 4 5 6 7 8 | from rest_framework import serializers from .models import Currency class CurrencySerializer(serializers.ModelSerializer): class Meta: model = Currency fields = '__all__' # importing all fields |
Now, open views.py to create ListAPIView that represents a collection of model instances. It’s used for read-only endpoints and provides a get method handler.
1 2 3 4 5 6 7 8 | from django.shortcuts import render from rest_framework import generics from .models import Currency from .serializers import CurrencySerializer class ListCurrencyView(generics.ListAPIView): queryset = Currency.objects.all() # used for returning objects from this view serializer_class = CurrencySerializer |
For more information about generic views visit Generic Views. Finally, configure the urls.py to render views:
1 2 3 4 5 6 7 8 | from django.contrib import admin from django.urls import path from forexAPI.views import ListCurrencyView urlpatterns = [ path('admin/', admin.site.urls), path('', ListCurrencyView.as_view()) ] |
In class-based views, the function as_view() must be called to return a callable view that takes a request and returns a response. It’s the main entry-point for generic views in the request-response cycle.
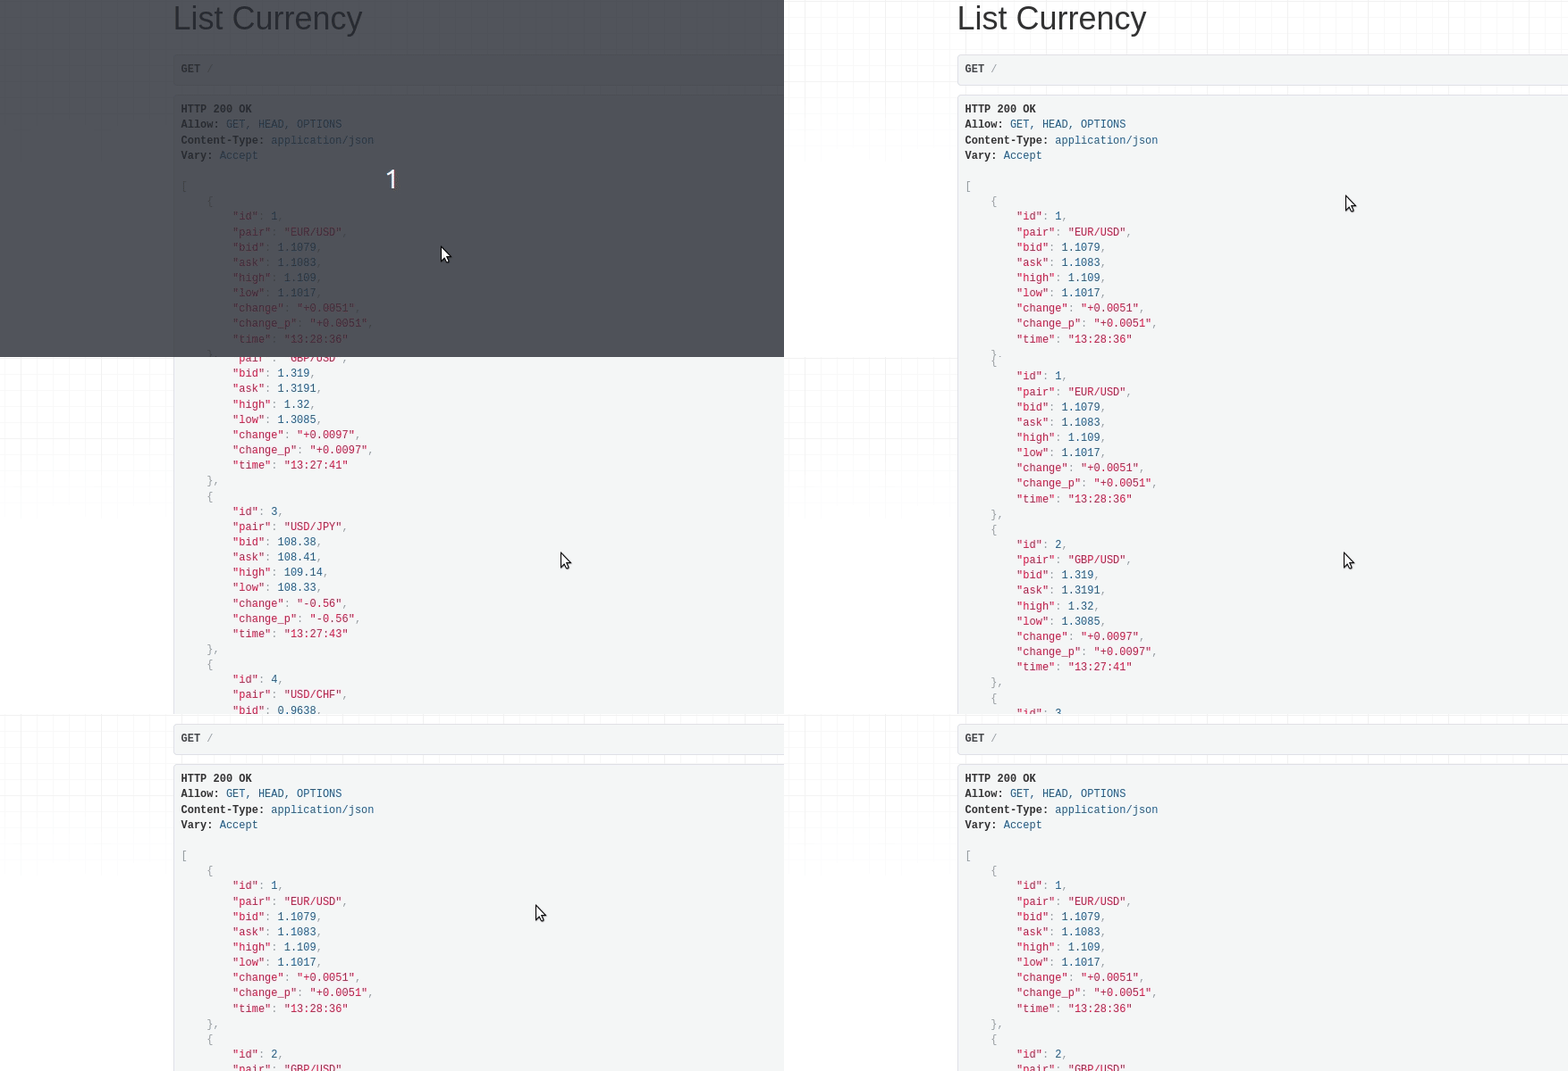
You’re almost done! In order to run the project properly, you have to run celery and Django server separately. The final result should look like this:
Final result
Try to refresh the page after 15 seconds and you’ll see the values are changing.
Source Code
GitHub repository to download the project.
Conclusion
Web scraping plays main role in the data industry and used by corporations to stay competitive. The real-time mode becomes useful when you want to get information on demand. Keep in mind, though, that you’re going to put a lot of server load on the site you’re scraping, so maybe check to see if they have an API or some other way to get the data. Companies put a lot of effort to provide services, so it’s best to respect their business and request permission before using it in production.



4 comments
1. Why would you put a sleep inside a for-loop inside a task? You should setup properly a rate-limit.
2. This could be improved by creating smaller tasks that take care of individual parts.
3. print? use logging module.
4. What if your request doesn’t return 2xx?
5. since you already wrote that dict to print it, you can use it as Currency.objects.create(**dct)
Thanks for corrections this small changes will make code clean and professional.
Please look at comments here https://www.reddit.com/r/django/comments/f9puec/creating_realtime_api_with_beautiful_soup_and/
Websockets using django channels can be used to display the changing values without refreshing.