Close Menu
Soshace Digital Blog

    Subscribe to Updates

    Get The Latest News, Updates, And Amazing Offers

    What's Hot
    CSS

    CSS Grid

    Beginners

    Working the Agile Way: Lean and Kanban

    Content & Leadership

    Analyzing Storytelling’s Impact on Content Marketing Effectiveness

    Important Pages:
    • Home
    • About
    • Services
    • Contact Us
    • Privacy Policy
    • Terms & Conditions
    Facebook X (Twitter) Instagram LinkedIn YouTube
    Today's Picks:
    • Scaling Success: Monitoring Indexation of Programmatic SEO Content
    • Leveraging Influencers: Key Drivers in New Product Launches
    • How Privacy-First Marketing Will Transform the Industry Landscape
    • The Impact of Social Proof on Thought Leadership Marketing
    • Balancing Value-Driven Content and Promotional Messaging Strategies
    • Top Influencer Marketing Platforms to Explore in 2025
    • Emerging Trends in Marketing Automation and AI Tools for 2023
    • Strategies to Mitigate Duplicate Content in Programmatic SEO
    Tuesday, September 9
    Facebook X (Twitter) Instagram LinkedIn YouTube
    Soshace Digital Blog
    • Home
    • About
    • Services
    • Contact Us
    • Privacy Policy
    • Terms & Conditions
    Services
    • SaaS & Tech

      Maximizing Efficiency: How SaaS Lowers IT Infrastructure Costs

      August 27, 2025

      Navigating Tomorrow: Innovations Shaping the Future of SaaS

      August 27, 2025

      Maximizing Impact: Strategies for SaaS & Technology Marketing

      August 27, 2025
    • AI & Automation

      Enhancing Customer Feedback Analysis Through AI Innovations

      August 27, 2025

      Navigating the Impact of AI on SEO and Search Rankings

      August 27, 2025

      5 Automation Hacks Every Home Service Business Needs to Know

      May 3, 2025
    • Finance & Fintech

      Critical Missteps in Finance Marketing: What to Avoid

      August 27, 2025

      Analyzing Future Fintech Marketing Trends: Insights Ahead

      August 27, 2025

      Navigating the Complex Landscape of Finance and Fintech Marketing

      August 27, 2025
    • Legal & Compliance

      Exploring Thought Leadership’s Impact on Legal Marketing

      August 27, 2025

      Maximizing LinkedIn: Strategies for Legal and Compliance Marketing

      August 27, 2025

      Why Transparency Matters in Legal Advertising Practices

      August 27, 2025
    • Medical Marketing

      Enhancing Online Reputation Management in Hospitals: A Guide

      August 27, 2025

      Analyzing Emerging Trends in Health and Medical Marketing

      August 27, 2025

      Exploring Innovative Content Ideas for Wellness Blogs and Clinics

      August 27, 2025
    • E-commerce & Retail

      Strategic Seasonal Campaign Concepts for Online and Retail Markets

      August 27, 2025

      Emerging Trends in E-commerce and Retail Marketing Strategies

      August 27, 2025

      Maximizing Revenue: The Advantages of Affiliate Marketing for E-Commerce

      August 27, 2025
    • Influencer & Community

      Leveraging Influencers: Key Drivers in New Product Launches

      August 27, 2025

      Top Influencer Marketing Platforms to Explore in 2025

      August 27, 2025

      Key Strategies for Successful Influencer Partnership Negotiations

      August 27, 2025
    • Content & Leadership

      The Impact of Social Proof on Thought Leadership Marketing

      August 27, 2025

      Balancing Value-Driven Content and Promotional Messaging Strategies

      August 27, 2025

      Analyzing Storytelling’s Impact on Content Marketing Effectiveness

      August 27, 2025
    • SEO & Analytics

      Scaling Success: Monitoring Indexation of Programmatic SEO Content

      August 27, 2025

      Strategies to Mitigate Duplicate Content in Programmatic SEO

      August 27, 2025

      Effective Data Visualization Techniques for SEO Reporting

      August 27, 2025
    • Marketing Trends

      How Privacy-First Marketing Will Transform the Industry Landscape

      August 27, 2025

      Emerging Trends in Marketing Automation and AI Tools for 2023

      August 27, 2025

      Maximizing ROI: Key Trends in Paid Social Advertising

      August 27, 2025
    Soshace Digital Blog
    Blog / JavaScript / Node.js / NestJS / Monitoring your NestJS application with Sentry
    JavaScript

    Monitoring your NestJS application with Sentry

    Samfield HawbBy Samfield HawbJanuary 31, 2023Updated:April 4, 2023No Comments9 Mins Read
    Facebook Twitter Pinterest Telegram LinkedIn Tumblr Email Reddit
    Monitoring your NestJS application with Sentry
    Share
    Facebook Twitter LinkedIn Pinterest Email Copy Link
    Monitoring your NestJS application with Sentry
    Monitoring your NestJS application with Sentry

    Introduction

    Over the years in software development, monitoring the status and performance of your application has been a thing of concern among developers to enable them to build better applications and fix bugs quickly.

    When errors occur on our applications, the questions will always be: “why did it happen?”, “how did it happen?” “where did it happen?” and “when did it happen?”. With this question in mind, we consider monitoring errors that occur in our applications, whether a web application, a mobile application, or any software program.

    When developing applications, logically we do throw errors or raise exceptions from time to time when things do work as expected. For instance, trying to make a network request to an external API from your application resulted in an error, let’s say an INVALID API KEY error or database connection error, this error can be caught and reported by our application with detail using Sentry for your attention to be drawn to it in other for it to be fixed immediately.

    Prerequisite for this tutorial:

    • You should have a working internet connection.
    • You should have a sentry.io account.
    • You should have a basic understanding of Javascript and Node.js.
    • You should have a basic understanding of the Nestjs Framework.
    • You should have Nodejs installed on your computer device.
    • You should have Nestjs CLI installed on your computer device.

    What is Sentry?

    Sentry is an exceptional service that is integrated to ensure that any issues that arise in our application are quickly identified, reported and resolved. Sentry is an error-tracking and monitoring service that allows you to track and fix issues in your application in real-time. It contains an API for sending events from multiple programming languages and frameworks. With Sentry our application can triage, reproduce, and resolve errors with efficiency and visibility.

    Sentry started as and remains a 100% open-source project, now delivered as a hosted service, which means you may not need to host your sentry dashboard since you can utilize their hosted dashboard service.

    Monitoring your Nestjs Application

    NestJs is a progressive Node.js framework for building efficient, reliable, and scalable server-side applications.

    In this article, I will be showing you how to set up Sentry in your NestJs application and how to use it to monitor your application for errors.

    Setting up your Nestjs application

    We will start by installing the Nestjs CLI in case the CLI is missing on your computer device by running the below command in our terminal or shell.

     npm i -g @nestjs/cli

    The above command will install the Nestjs CLI globally on your computer device.

    Next, we are going to create a new Nestjs application by running the below Nestjs command in our terminal:

    nest new sentry-app

    This will require you to choose your preferred package manager. For this tutorial, I will be using the most popular package manager npm as my choice package manager.
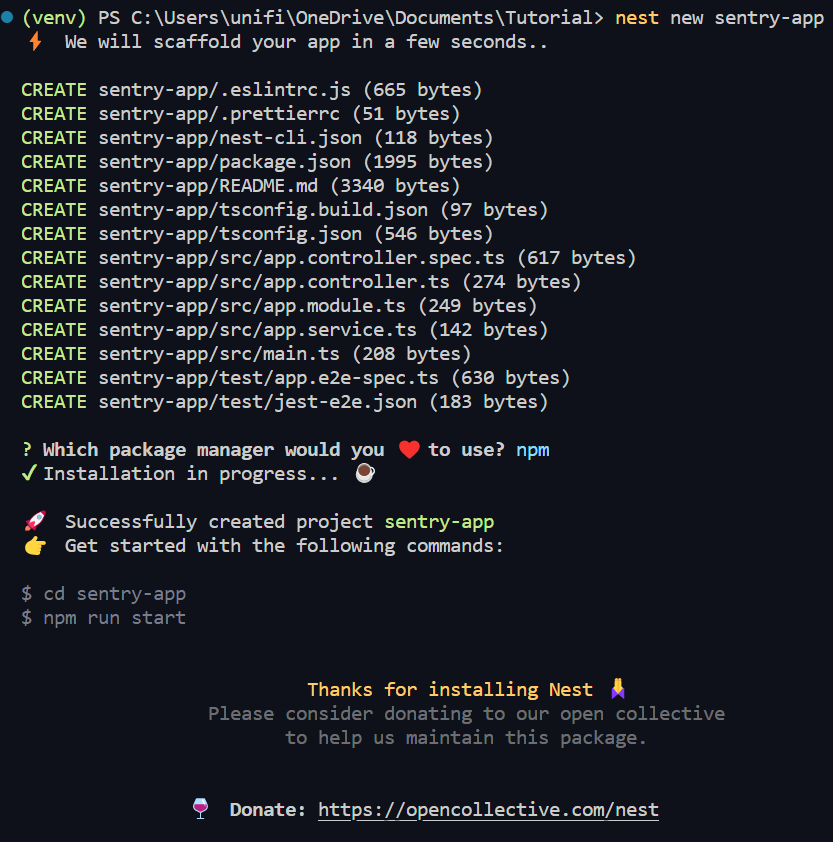
    Node.js. NPM - the most popular package manager.
    Node.js. NPM – the most popular package manager.

    This will bootstrap a Nest.js application with a boilerplate that contains an src folder having a structure as seen below:

    ├── src
    │   ├── app.controller.spec.ts
    │   ├── app.controller.ts
    │   ├── app.module.ts
    │   ├── app.service.ts


    Next, we will start our application to ensure that the application is running with the following command:

    npm run start:dev

    The command runs our application in the development and watch mode on port 3000 by default. this can be altered by modifying the port number on our main.js entry file for our nestjs application. You can now visit the app on your browser at http://127.0.0.1:3000 where we will be greeted with the Hello World message.

    Read More:  Effective Strategies for Managing Scope Creep in Projects

    Setting up a project on Sentry

    Let’s move on to set up Sentry to get our DSN. Login to your sentry.io dashboard to create a new project. In step one, you are to select the platform you want to use, here we will select Nodejs.
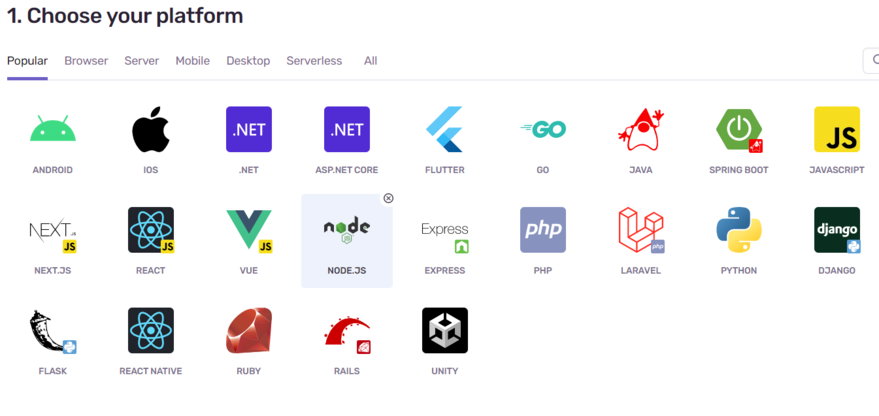
    Nest.js, Sentry. Select the platform you want to use
    Nest.js, Sentry. Select the platform you want to use

    For step two you are required to set your alert frequency, here we will use the default to alert on every issue reported by our application.

    Nest.js, Sentry. Set your alert frequency
    Nest.js, Sentry. Set your alert frequency

    The next step is for you to give your project a name and team name, it will be good to name it as the name of the application you will be monitoring so has to guide you to the right application if you have many projects you are monitoring.

    Nest.js, Sentry. Name your project and assign the team
    Nest.js, Sentry. Name your project and assign the team

    Click on the create project button to create your project. The next screen will show you the necessary steps and code you can add to your Node.js project to integrate sentry into your application.
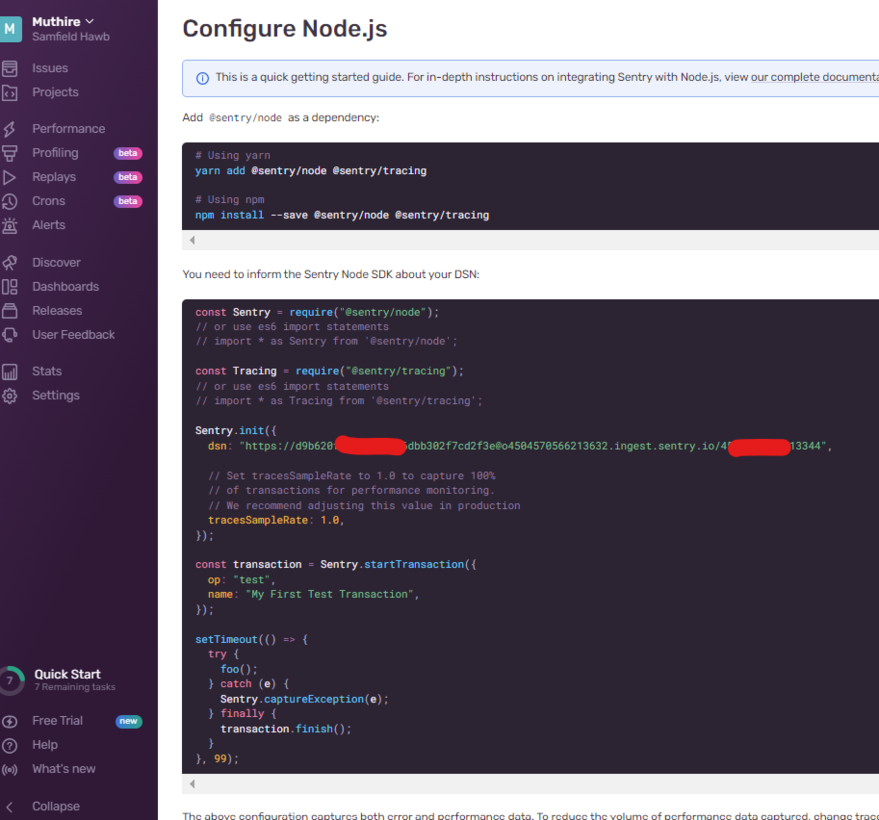
    Nest.js, Sentry. Add to your Node.js project to integrate sentry into your application
    Nest.js, Sentry. Add to your Node.js project to integrate sentry into your application

    what will be important here on this page will be the  DNS URL in the Sentry.init() method.

    Installing and Configuring Sentry Nodejs package

    Now that we have our application running perfectly and have created our project on the sentry dashboard, let’s move on to install the necessary @sentry/node package in your  NestJs application using the npm package manager by running the below command:

    npm install @sentry/node


    Once the package has been installed, the next system is to import it into your main.ts file, then initialize Sentry inside the bootstrap function, passing in the dsn URL we got from the project created in the sentry dashboard.

    import { NestFactory } from '@nestjs/core';
    import { AppModule } from './app.module';
    import * as Sentry from '@sentry/node';
    async function bootstrap() {
      const app = await NestFactory.create(AppModule);
      // INITIALIZE SENTRY IN APPLICATION
      Sentry.init({
        dsn: 'https://dns_url'
      });
      
      await app.listen(3000);
    }
    bootstrap();


    The sentry package provides us with a method Sentry.captureException which receives the application error and logs it according to our sentry dashboard. The Sentry.captureException can be used at any place in our code where we wish to monitor errors, For instance :

    try {
      // Some code that might throw an error
    } catch (error) {
      // CAPTURE ERROR WITH SENTRY
      Sentry.captureException(error);
    }


    Always ensure to import sentry into the file to be able to use the Sentry.captureException method.

    import * as Sentry from '@sentry/node';

    You can read more about Nestjs Interceptors in the official Nestjs Documentation which could be found here

    Using the Sentry.captureException(error) method all over our nest application could be a very handy approach until you see yourself using the Sentry.captureException(error) method all over your nestjs application, especially in big applications with lots of files, which can make it cumbersome and difficult to manage, as well being able to report all the errors that may be thrown by your application.

    Read More:  Verifying an Email Address Without Sending an Email in NodeJS

    A better solution is the use of Nestjs Interceptors. Nestjs Interceptors come in handy to solve the problem of manually having to report the errors via our Sentry.captureException(error)  all over our application code.

    An interceptor is a class annotated with the @Injectable() decorator and implements the NestInterceptor interface. With the interceptors, we can intercept all errors thrown in our controller and Log them to the Sentry at one location in our application.

    Let’s implement our interceptor by creating a new file sentry-interceptor.ts with the following content:

    import {
        ExecutionContext,
        Injectable,
        NestInterceptor,
        CallHandler,
      } from '@nestjs/common';
      import { Observable } from 'rxjs';
      import { tap } from 'rxjs/operators';
      import * as Sentry from '@sentry/core';
      
      @Injectable()
      export class SentryInterceptor implements NestInterceptor {
      
        intercept( context: ExecutionContext, next: CallHandler): Observable<any> {
          return next
            .handle()
            .pipe(
              tap(null, (exception) => {
                // CAPTURE ERROR IN SENTRY
                Sentry.captureException(exception);
              }),
            );
        }
      
      }


    With our SentryInterceptor class ready now, you will need to inject it into our desired controllers. For example, let’s inject it into our app controller in the app.controller.ts file.

    Let’s import our UseIntereptor from our @nestjs/common and our new SentryInterceptor into the app.controller.ts, the UseInterceptor annotation is used to inject Interceptors into our Nestjs Controllers.

    import { SentryInterceptor } from './sentry-interceptor';
    import { Controller, Get, UseInterceptors } from '@nestjs/common';
    import { AppService } from './app.service';
    
    
    @UseInterceptors(SentryInterceptor) // APPLY THE INTERCEPTOR
    @Controller()
    export class AppController {
      constructor(private readonly appService: AppService) {}
      @Get()
      getHello(): string {
        return this.appService.getHello();
      }
    }


    For test purposes let’s log an error by throwing a new error in the getHello() method of the app controller:

    import { SentryInterceptor } from './sentry-interceptor';
    import { Controller, Get, InternalServerErrorException, UseInterceptors } from '@nestjs/common';
    import { AppService } from './app.service';
    @UseInterceptors(SentryInterceptor)
    @Controller()
    export class AppController {
      constructor(private readonly appService: AppService) {}
      @Get()
      getHello(): string {
        throw new InternalServerErrorException(); // throw error code
        return this.appService.getHello();
      }
    }


    You can now refresh your browser to throw an error and visit the sentry dashboard for the project to see the error reported.
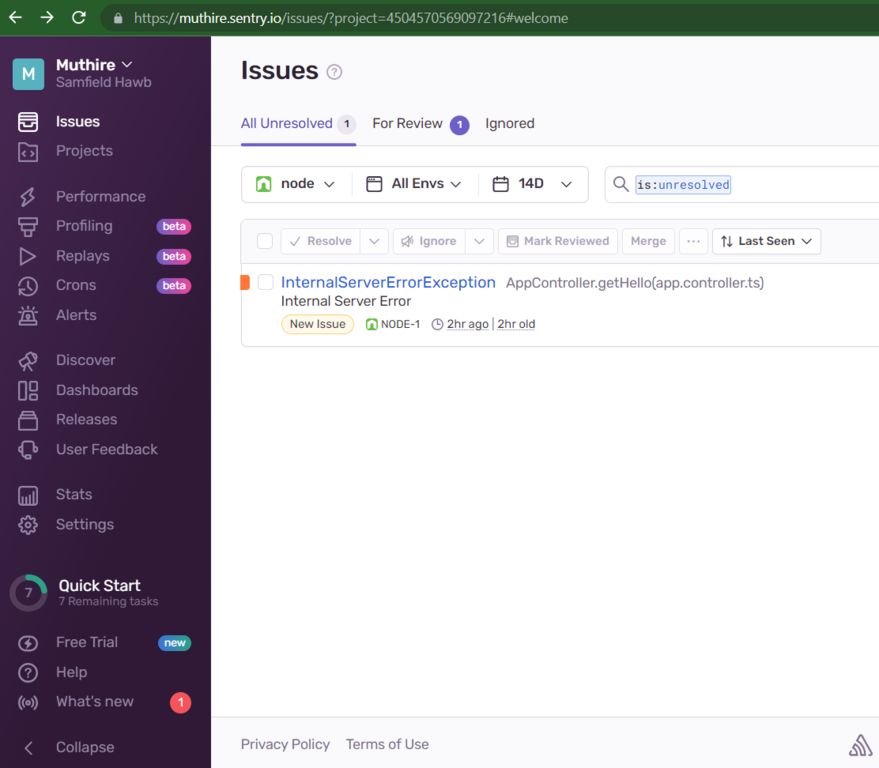
    Node.js. Sentry dashboard
    Node.js. Sentry dashboard

    You can read more about the Sentry Node.js package here 

    The complete code for this tutorial can be downloaded from github.

    Conclusion

    Now that you are done with your Sentry set up in your NestJs application, Your application can now monitor and report all errors in real-time to your Sentry dashboard, and Sentry in turn will notify you via email on every error that is reported, this will be based on your alert frequency setting on the Sentry project making it easy for you to quickly identify and resolve any issues arising in your application. In Addition, Sentry provides a powerful dashboard that allows you to see detailed information about each error, including the stack trace and any relevant context data.

    In conclusion, Sentry is a powerful tool for monitoring and tracking errors in your NestJs application. It’s easy to set up and use, and it provides detailed information about each error, making it easy to identify and resolve any issues that arise in your application.

    You can follow me on Twitter here 

    Share. Facebook Twitter Pinterest LinkedIn Tumblr Email
    Samfield Hawb

      Related Posts

      Streamlining Resource Allocation for Enhanced Project Success

      December 18, 2024

      Conducting Effective Post-Project Evaluations: A Guide

      December 16, 2024

      Strategies for Keeping Projects on Track and Meeting Deadlines

      December 10, 2024
      Leave A Reply Cancel Reply

      You must be logged in to post a comment.

      Stay In Touch
      • Facebook
      • Twitter
      • Pinterest
      • Instagram
      • YouTube
      • Vimeo
      Don't Miss
      React December 29, 2020

      Build Real-World React Native App #8 : implement Dark mode

      In this chapter, we are going to implement a new feature in our app. The feature is called dark mode which is very prevalent in the app nowadays. The dark mode is configured into any app to make it night friendly or low light friendly.

      The Full Guide to the New Excel XLOOKUP Function

      February 1, 2020

      Amazon S3 Cloud Storage Proxying Through NodeJS from Angular Frontend Securely

      October 28, 2019

      Node.js Lesson 2: Modules and Exports

      September 7, 2020

      Categories

      • AI & Automation
      • Angular
      • ASP.NET
      • AWS
      • B2B Leads
      • Beginners
      • Blogs
      • Business Growth
      • Case Studies
      • Comics
      • Consultation
      • Content & Leadership
      • CSS
      • Development
      • Django
      • E-commerce & Retail
      • Entrepreneurs
      • Entrepreneurship
      • Events
      • Express.js
      • Facebook Ads
      • Finance & Fintech
      • Flask
      • Flutter
      • Franchising
      • Funnel Strategy
      • Git
      • GraphQL
      • Home Services Marketing
      • Influencer & Community
      • Interview
      • Java
      • Java Spring
      • JavaScript
      • Job
      • Laravel
      • Lead Generation
      • Legal & Compliance
      • LinkedIn
      • Machine Learning
      • Marketing Trends
      • Medical Marketing
      • MSP Lead Generation
      • MSP Marketing
      • NestJS
      • Next.js
      • Node.js
      • Node.js Lessons
      • Paid Advertising
      • PHP
      • Podcasts
      • POS Tutorial
      • Programming
      • Programming
      • Python
      • React
      • React Lessons
      • React Native
      • React Native Lessons
      • Recruitment
      • Remote Job
      • SaaS & Tech
      • SEO & Analytics
      • Soshace
      • Startups
      • Swarm Intelligence
      • Tips
      • Trends
      • Vue
      • Wiki
      • WordPress
      Top Posts

      Exploring Innovative Content Ideas for Wellness Blogs and Clinics

      Medical Marketing August 27, 2025

      Why You Should Use APIs To Build Your Own Price Tracking Engine

      Beginners January 15, 2020

      Maximizing B2B Lead Generation with Interactive Content

      B2B Leads December 9, 2024

      Exploring Thought Leadership’s Impact on Legal Marketing

      Legal & Compliance August 27, 2025

      Subscribe to Updates

      Get The Latest News, Updates, And Amazing Offers

      About Us
      About Us

      Soshace Digital delivers comprehensive web design and development solutions tailored to your business objectives. Your website will be meticulously designed and developed by our team of seasoned professionals, who combine creative expertise with technical excellence to transform your vision into a high-impact, user-centric digital experience that elevates your brand and drives measurable results.

      7901 4th St N, Suite 28690
      Saint Petersburg, FL 33702-4305
      Phone: 1(877)SOSHACE

      Facebook X (Twitter) Instagram Pinterest YouTube LinkedIn
      Our Picks
      Angular

      How to Upload Images to a Cloud Storage(Imgur) in an Angular Application

      LinkedIn

      Strategies for Identifying High-Quality LinkedIn Prospects by Niche

      Node.js

      Node.js Lesson 17: Timers, Differences from Browser, ref and ref

      Most Popular

      22. Чат через long-polling, чтение POST. Pt.1.

      Programming

      Create simple POS with React.js, Node.js, and MongoDB #17: Stat screen

      JavaScript

      Building a serverless web application with Python and AWS Lambda

      AWS
      © 2025 Soshace Digital.
      • Home
      • About
      • Services
      • Contact Us
      • Privacy Policy
      • Terms & Conditions

      Type above and press Enter to search. Press Esc to cancel.