 #2")
First part: How to Create a Personal Blogging Website: Back-End (Flask/Python) #1
In this article, we are going to create the client-side part of the personal blogging website using Angular.
Before starting to code the front-end part, I want you to clone or download the starter code for the front-end. This starter code will contain HTML and CSS of all the components we are going to create in this article. Along with HTML and CSS, I have also provided routing for the application. This way, it’ll be easier for me to guide you through the article instead of asking you to add HTML and CSS at different stages of the application.
So go ahead, clone/download the starter code:
https://github.com/Bviveksingh/angular-starter
Requirements for the front-end:
- Angular (I’m using angular 8 for this application)
- A text editor (I’m using Visual Studio Code for this application)
Next, run the following command to install all the dependencies related to the application:
npm install
Now that we have installed all the dependencies for the application, let’s start writing some code.
Let’s add the functionality to the admin dashboard. For doing this, inside admin/admin.component.ts add the following code so that the component looks like this:
import { AuthService } from './../auth.service';
import { DialogBodyComponent } from './../dialog-body/dialog-body.component';
import { MatDialog } from '@angular/material/dialog';
import { Component, OnInit } from '@angular/core';

@Component({
  selector: 'app-admin',
  templateUrl: './admin.component.html',
  styleUrls: ['./admin.component.css']
})
export class AdminComponent implements OnInit {

  constructor(private dialog:MatDialog,private auth_service:AuthService) { }

  ngOnInit() {
  }

  open_dialog(message:string){
    const dialogRef = this.dialog.open(DialogBodyComponent,{
      data:{
        message
      },
      width:'550px',
      height:'200px'
    });
    dialogRef.afterClosed().subscribe((confirm:boolean)=>{
      if(confirm){
        this.sign_out();
      }
    })
  }

  sign_out(){
    this.auth_service.logout();
  }

}
In the above code, we have created two functions named open_dialog and sign_out. The open_dialog function is called when the sign-out link is clicked.
Notice we imported AuthService in this component, and the AuthService implements the logout function. Since there is no code inside AuthService, the logout function will not be executed yet.
Next, we are going to create the add-blog page. Presently, when clicked on the Add Blog navigation link in the dashboard, this is how the add-blog page looks:
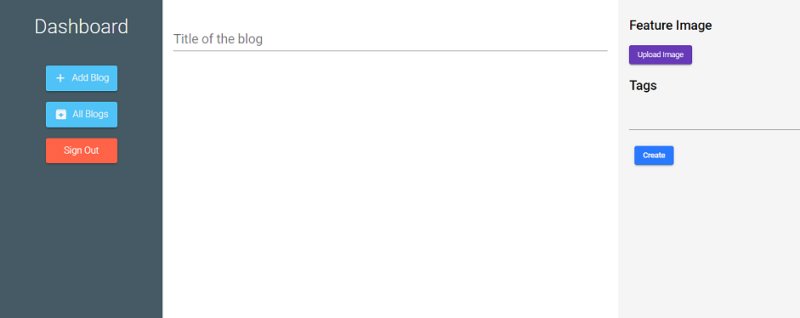
As one can see from the above image, there are input fields for title, feature image, and tags but, there is no input field for the content of the blog. We require an inline text-editor for the application so that the admin user can write the content of the blog inside the text-editor. There are a number of inline text-editors available online but the one I’ve used for the application is Syncfusion RichTextEditor.
For installing the text-editor run the following command:
npm install @syncfusion/ej2-angular-richtexteditor --save
Then, inside the imports array of the app.module.ts file, add RichTextEditorAllModule. Also, add the following import statement in app.module.ts:
import { RichTextEditorAllModule } from '@syncfusion/ej2-angular-richtexteditor';Next, inside the <head> tag of the index.html file, add the following line:
<link href="https://cdn.syncfusion.com/ej2/material.css" rel="stylesheet" />
Now that we’ve installed the inline text-editor, let’s add the editor inside the code, for doing this, inside admin/add-blog/add-blog.component.html, look for the div container named add-blog-input-content and inside the container, add the text-editor like this:
<div class="add-blog-input-content">
  <ejs-richtexteditor [(value)]="content" height="auto" placeholder="Add Paragraph..."></ejs-richtexteditor>
</div>
In the above code, we bound the value of the text-editor to the variable called content which we are going to define in the component.
Next, as one can see in the image above, we have provided an input to upload a feature image but, as seen in the first part of the blog, our back-end saves the feature image as a string in the database since we are going to use cloud storage to store the feature image.
In this application, I’m going to use Imgur to store feature images for the blog. For storing images in Imgur, follow the steps given below:
- Create an account at https://imgur.com/
- Register an application at https://api.imgur.com/oauth2/addclient? (While registering, select the Authorization Type as OAuth 2 authorization without callback URL)
- After registering an application, one will receive a Client ID. We will use this client id to send requests to the API.
Note- Remember that if one is using Imgur for a commercial purpose, then one needs to check the Imgur API since the method I have used here works for a non-commercial application.
Next, we are going to add all the HTTP requests to the Imgur API inside our feature-image service. For doing this, inside api-calls/feature-image.service.ts,
add the following code:
import { HttpClient,HttpHeaders } from '@angular/common/http';
import { Injectable } from '@angular/core';

@Injectable({
  providedIn: 'root'
})
export class FeatureImageService {
  private imgur_url:string = 'https://api.imgur.com/3/image';
  private client_id:string = 'YOUR_CLIENT_ID';
  constructor(private http:HttpClient) { }

  upload_image(image_file:File){
    let formData = new FormData();
    formData.append('image',image_file, image_file.name);


    let headers = new HttpHeaders({
      "authorization": 'Client-ID '+this.client_id
    });

    return this.http.post(this.imgur_url , formData, {headers:headers});
  }
}
As one can notice in the above code, we have created a function called upload_image which takes a file as an argument and sends the HTTP request to the Imgur API with the client-id in the header of the request.
Note- Change the variable client_id in the above code, with the client_id you received after registering an application.
Now that we have completed setting up the input fields of the content blog and the feature image, let’s add the functionality inside the add-blog page.
Inside AddBlogComponent class of the admin/add-blog/add-blog.component.ts, add the following code:
import { AlertDialogBodyComponent } from './../../alert-dialog-body/alert-dialog-body.component';
import { BlogService } from './../../api-calls/blog.service';
import { FeatureImageService } from './../../api-calls/feature-image.service';
import { TagComponent } from './../../material-components/tag/tag.component';
import { Component, OnInit,ViewChild } from '@angular/core';
import {MatDialog} from '@angular/material/dialog';
import { DialogBodyComponent } from 'src/app/dialog-body/dialog-body.component';

@Component({
  selector: 'app-add-blog',
  templateUrl: './add-blog.component.html',
  styleUrls: ['./add-blog.component.css']
})
export class AddBlogComponent implements OnInit {
  private selectedFile:File;
  private preview_image:any;
  private tags: [];
  private title:string;
  private content:string;
  private blog_id:string;
  private show_spinner: boolean = false;
  @ViewChild(TagComponent, {static:false}) childReference:any;
  constructor(private image_service: FeatureImageService, private blog_service:BlogService, private dialog:MatDialog) { }

  ngOnInit() {
  }

  ngAfterViewInit(){
    this.tags = this.childReference.tags;
  }


  processFile(imageInput:any){
    this.selectedFile = imageInput.files[0];
    this.previewImageLoad();
  }

  previewImageLoad(){
    let reader = new FileReader();
    reader.onloadend = e =>{
      this.preview_image = reader.result;
    }
    reader.readAsDataURL(this.selectedFile);
  }

  open_dialog(message:string){
    const dialogRef = this.dialog.open(DialogBodyComponent, {
      width: '550px',
      height: '200px',
      data: {
        message
      }

    });
    dialogRef.afterClosed().subscribe((confirm:boolean)=>{
      if(confirm){
        this.submit_blog();
      }
    })

  }

  open_alert_dialog(message:string){
    let dialogRef = this.dialog.open(AlertDialogBodyComponent,{
      width:'550px',
      height: '200px',
      data:{
        message
      }
    });
  }

  async submit_blog(){
      this.show_spinner = true;
      const image_data = await this.image_service.upload_image(this.selectedFile).toPromise();
      let blog = {
        title: this.title,
        content: this.content,
        feature_image:image_data["data"].link,
        tags:[]
      }

      this.tags.map((element)=>{
        blog.tags.push(element["name"])
      });

      this.blog_service.add_blog(blog).subscribe((response:any)=>{
        this.blog_id = response.id;
        this.show_spinner = false;
        this.open_alert_dialog(`Blog has been created with the id: ${this.blog_id}`);
        this.title = "";
        this.content = "";
        this.preview_image = "";
        this.tags = [];
      });

    }
}
Let’s breakdown the code,
The functions open_dialog and open_alert_dialog open a dialog box and an alert-dialog box respectively so that we provide a way for confirming the decisions and providing an acknowledgment for the admin user.
Next, the processFile function takes in the feature image selected by the user and stores it in the variable called selectedFile. Then, this function calls the previewImageLoad function which sets the preview_image which is useful in showing the user which feature image was selected.
Then comes the submit_blog function, which in turn calls the function inside the BlogService called add_blog with the arguments set as the blog properties.
Since we have not added the add_blog function inside BlogService, the editor will show an error. Therefore, let’s add the add_blog function inside BlogService.
Inside the BlogService class of api-calls/blog.service.ts, add the following code:
export class BlogService {
  private add_blog_url:string = 'http://localhost:5000/add_blog';
  constructor(private http:HttpClient) { }

  add_blog(blog_props:Object){
    return this.http.post(this.add_blog_url,blog_props);
  }
}
Note- In the above code, I’ve used localhost:5000 since that was the port number my flask server was running on. Change the port number to the port number your server is running on.
Next, let’s create the all-blogs page, the all-blogs page will look like this after completion:
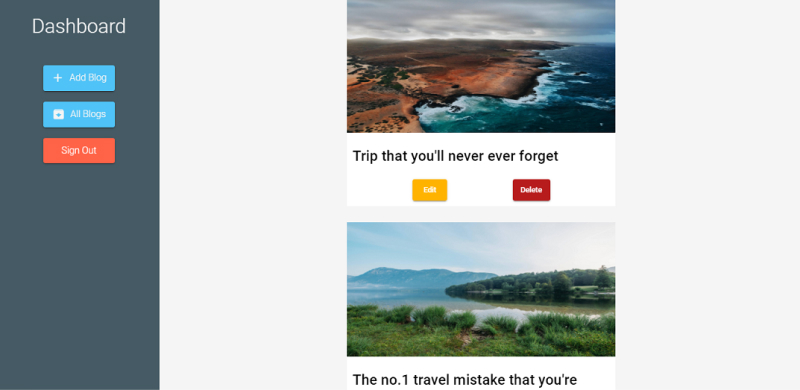
As one can see, this page displays all the blogs that the admin created and provides options for editing and deleting the blog. We will only add the deleting functionality in this component since the editing/updating part will be handled by the update-blog page.
Inside admin/all-blogs/all-blogs.component.ts, add the following code:
import { AlertDialogBodyComponent } from './../../alert-dialog-body/alert-dialog-body.component';
import { DialogBodyComponent } from 'src/app/dialog-body/dialog-body.component';
import { BlogService } from './../../api-calls/blog.service';
import { Component, OnInit, OnChanges, ChangeDetectorRef } from '@angular/core';
import { MatDialog } from '@angular/material/dialog';

interface Blog{
  title:string,
  content:string,
  feature_image:string,
  tags: []
}

@Component({
  selector: 'app-all-blogs',
  templateUrl: './all-blogs.component.html',
  styleUrls: ['./all-blogs.component.css']
})


export class AllBlogsComponent implements OnInit {
  private blogs: Array<Blog> = [];
  private deleted_blog_id:string;
  private show_spinner:boolean = false;
  constructor(private blog_service:BlogService, private dialog:MatDialog) {}

  ngOnInit() {
    this.load_all_blogs();
  }

  load_all_blogs(){
    this.blog_service.get_all_blogs().subscribe((response:any)=>{
      response.all_blogs.forEach((element:any) => {
        this.blogs.push(element);
      });
    })
  }

  open_dialog(message:string, blog_id:string): void {
    let dialogRef = this.dialog.open(DialogBodyComponent,{
      data: {
        message
      },
      width: '550px',
      height:'200px'
    })

    dialogRef.afterClosed().subscribe((confirm:boolean)=>{
      if(confirm){
        this.delete_single_blog(blog_id);
      }
    });
  }

  open_alert_dialog(message:string){
    let dialogRef = this.dialog.open(AlertDialogBodyComponent,{
      width:'550px',
      height: '200px',
      data:{
        message
      }
    });
  }


  delete_single_blog(blog_id:string){
    this.show_spinner = true;
    this.blog_service.delete_blog(blog_id).subscribe((response)=>{
      if(response){
        this.show_spinner = false;
        this.open_alert_dialog("The blog was successfully deleted");
      }
    })
  }

}
The code above is pretty straight forward. The load_all_blogs functions load all the blogs using the get_all_blogs function of BlogService and the delete_single_blog function deletes the specific blog using the delete_blog function of BlogService.
Let’s add the delete_blog and get_all_blogs functions inside BlogService:
private get_all_blogs_url:string = 'http://localhost:5000/blogs';
private delete_blog_url:string = 'http://localhost:5000/delete_blog/';

get_all_blogs(){
    return this.http.get(this.get_all_blogs_url);
}

delete_blog(id:string){
    return this.http.delete(this.delete_blog_url + id);
}
Next, for updating the blog, add the following code inside admin/update-blog/update-blog.component.ts:
import { FeatureImageService } from './../../api-calls/feature-image.service';
import { AlertDialogBodyComponent } from './../../alert-dialog-body/alert-dialog-body.component';
import { DialogBodyComponent } from 'src/app/dialog-body/dialog-body.component';
import { MatDialog } from '@angular/material/dialog';
import { BlogService } from './../../api-calls/blog.service';
import { Component, OnInit, ViewChild } from '@angular/core';
import { ActivatedRoute, Router } from '@angular/router';


interface Blog{
  title:string,
  content:string,
  tags:string[],
  feature_image:any
}

@Component({
  selector: 'app-update-blog',
  templateUrl: './update-blog.component.html',
  styleUrls: ['./update-blog.component.css']
})


export class UpdateBlogComponent implements OnInit {
  private blog_id: string;
  private selectedFile:any;
  private show_spinner:boolean = false;
  private blog_props: Blog = {
    title: "",
    content: "",
    tags: [],
    feature_image: ""
  }

  constructor(private active_route:ActivatedRoute,
              private dialog:MatDialog,
              private blog_service:BlogService,
              private image_service:FeatureImageService
              ) { }

  ngOnInit() {
      this.active_route.params.subscribe((response)=>{
      this.blog_id = response.id;
      this.get_blog_info();
      });

  }

  processFile(imageInput:any){
    this.selectedFile = imageInput.files[0];
    this.previewImageLoad();
  }

  previewImageLoad(){
    let reader = new FileReader();
    reader.onloadend = e =>{
      this.blog_props.feature_image = reader.result;
    }
    reader.readAsDataURL(this.selectedFile);
  }

  open_dialog(message:string){
    const dialogRef = this.dialog.open(DialogBodyComponent, {
      width: '550px',
      height: '200px',
      data: {
        message
      }

    });
    dialogRef.afterClosed().subscribe((confirm:boolean)=>{
      if(confirm){
        this.submit_blog();
      }
    })

  }

  open_alert_dialog(message:string){
    let dialogRef = this.dialog.open(AlertDialogBodyComponent,{
      width:'550px',
      height: '200px',
      data:{
        message
      }
    });
  }

  get_blog_info(){
    this.blog_service.get_single_blog(this.blog_id).subscribe((response:any)=>{
      this.blog_props.title = response.single_blog.title;
      this.blog_props.content = response.single_blog.content;
      this.blog_props.feature_image = response.single_blog.feature_image;
      response.single_blog.tags.forEach((element:any) => {
        this.blog_props.tags.push(element);
      });
    });
  }

  async submit_blog(){
    this.show_spinner = true;
    let image_link:any;
    if(this.selectedFile){
      const image_data = await this.image_service.upload_image(this.selectedFile).toPromise();
      image_link = image_data["data"].link;
    }
    else{
      image_link = this.blog_props.feature_image;
    }

    let blog = {
      title: this.blog_props.title,
      content: this.blog_props.content,
      feature_image:image_link,
    }

    this.blog_service.update_blog(blog,this.blog_id).subscribe((response:any)=>{
      this.blog_id = response.blog_id;
      this.show_spinner = false;
      this.open_alert_dialog(`Blog with the id: ${this.blog_id} has been updated`);
    });

  }

}
Let’s breakdown the code, when the UpdateBlog component loads, the id present in the params is captured and stored in the blog_id variable. Then the get_blog_info function is called which loads all the information related to the blog with the specific blog_id. Other functions are similar to the ones used in add-blog.component.ts.
Note- Don’t forget to add the following code inside the update-blog-input-content container of the update-blog.component.html file:
<ejs-richtexteditor [(value)]="blog_props.content" height="auto"></ejs-richtexteditor>
The get_single_blog and update_blog functions in the above code need to be added inside BlogService:
private get_single_blog_url:string = 'http://localhost:5000/blog/';
private update_blog_url:string = 'http://localhost:5000/update_blog/';

get_single_blog(blog_id:string){
  return this.http.get(this.get_single_blog_url + blog_id);
}

update_blog(blog_props: Object, blog_id:string){
  return this.http.put(this.update_blog_url + blog_id, blog_props);
}
Now that we have completed most of the CRUD operations the admin user can execute, let’s move onto building the homepage and the blog-details page.
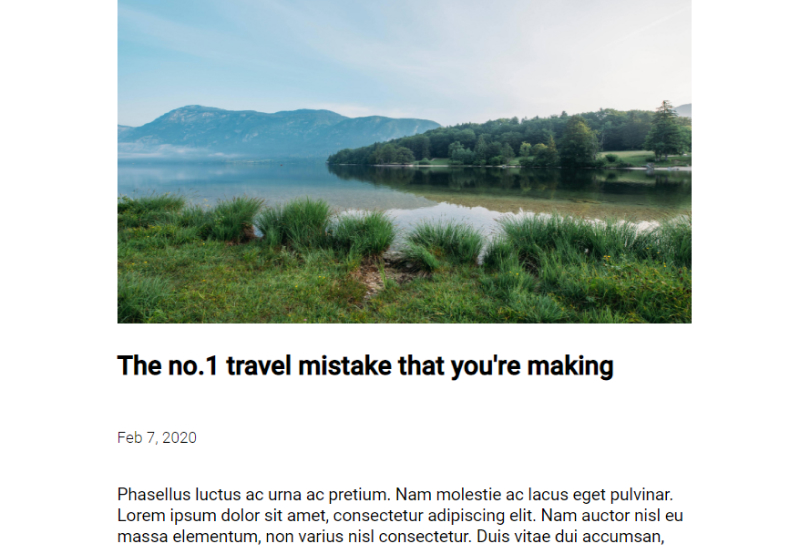
After completion, the homepage will look like this:
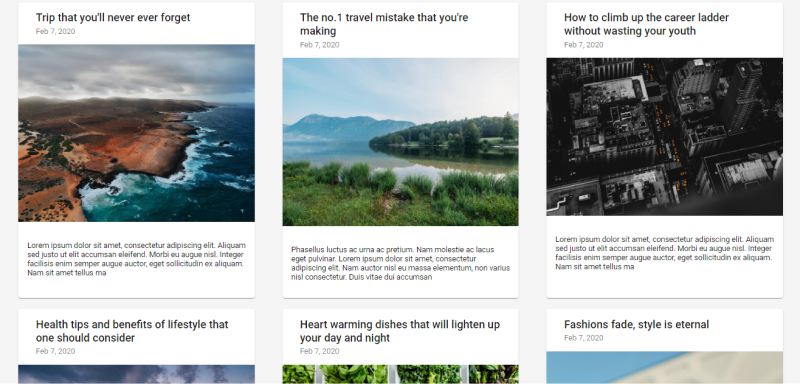
On clicking any of the blogs, we’ll be redirected to the blog-details page which will show the complete blog. Let’s add functionality to the homepage first.
Inside homepage/homepage.component.ts, add the following code:
import { BlogService } from './../api-calls/blog.service';
import { Component, OnInit } from '@angular/core';

interface Blog{
  title:string,
  feature_image:string,
  created_at:string,
  content:string
}

@Component({
  selector: 'app-homepage',
  templateUrl: './homepage.component.html',
  styleUrls: ['./homepage.component.css']
})
export class HomepageComponent implements OnInit {
  private all_blogs: Blog[] = [];
  constructor(private blog_service:BlogService) { }

  ngOnInit() {
    this.load_all_blogs();
  }

  load_all_blogs(){
    this.blog_service.get_all_blogs().subscribe((response:any)=>{
      response.all_blogs.forEach((element:any) => {
        this.all_blogs.push(element);
      });
    })
  }

}
As seen in the code above, after the homepage component is initialized, the load_all_blogs function loads all the blogs written by the admin.
After completion, the blog-details page will look like this:
For adding functionality to the blog-details page, add the following code inside blog-details.component.ts:
import { ActivatedRoute } from '@angular/router';
import { BlogService } from './../api-calls/blog.service';
import { Component, OnInit } from '@angular/core';

interface Blog{
  title:string,
  content:string,
  feature_image:string,
  tags: string[],
  created_at: string
}

@Component({
  selector: 'app-blog-details',
  templateUrl: './blog-details.component.html',
  styleUrls: ['./blog-details.component.css']
})
export class BlogDetailsComponent implements OnInit {
  private blog_id:string;
  private blog_props : Blog = {
    title: "",
    content:"",
    feature_image: "",
    tags: [],
    created_at:""
  };
  constructor(private blog_service:BlogService, private active_route:ActivatedRoute) { }

  ngOnInit() {
    this.active_route.params.subscribe((response)=>{
      this.blog_id = response.id;
      this.get_blog_details();
    })

  }

  get_blog_details(){
    this.blog_service.get_single_blog(this.blog_id).subscribe((response:any)=>{
      this.blog_props.title = response.single_blog.title;
      this.blog_props.content = response.single_blog.content;
      this.blog_props.feature_image = response.single_blog.feature_image;
      this.blog_props.created_at = response.single_blog.created_at;
      response.single_blog.tags.foreach((element:any)=>{
        this.blog_props.tags.push(element);
      });
    });
  }

}
We have completed most of the pages of the application but, there is one important feature that needs to be added. Since we created an admin user in the back-end, I want to protect the admin routes in the front-end(add-blog, update-blog and, delete-blog). For protecting the routes, we are going to create a login page and the admin user needs to login with the email and password created in the back-end. Only if the user is logged in as admin, he/she can create/update/delete a blog.
For adding login functionality, the following code needs to be added inside login/login.component.ts:
import { Router } from '@angular/router';
import { AuthService } from './../auth.service';
import { Component, OnInit } from '@angular/core';

@Component({
  selector: 'app-login',
  templateUrl: './login.component.html',
  styleUrls: ['./login.component.css']
})
export class LoginComponent implements OnInit {
  private email:string;
  private password:string;
  private hide:true;
  constructor(private auth_service:AuthService,private router:Router) { }

  ngOnInit() {
  }

  submit_form(){
    let credentials = {
      email:this.email,
      password:this.password
    }
    this.auth_service.login(credentials).subscribe((response:any)=>{
      if(response.token){
        localStorage.setItem('auth_token', response.token);
        this.router.navigate(['/admin']);
      }

    })
  }

}
In the above code, the submit_form function executes the login function from AuthService which returns a token after logging in. The token received, is then stored as auth_token in the localStorage of the client-side.
We are storing the auth_token in the localStorage so that the CRUD requests to the back-end can be sent with auth_token in the header of the request.
We have not added the login function in AuthService, so let’s add the login function. Along with the login function, I’m adding the logout function and is_logged_in function as well.
Add the following code inside auth.service.ts:
import { Router } from '@angular/router';
import { HttpClient } from '@angular/common/http';
import { Injectable } from '@angular/core';
import {JwtHelperService} from '@auth0/angular-jwt';

@Injectable({
  providedIn: 'root'
})
export class AuthService {
  private login_url:string = 'http://localhost:5000/login';
  constructor(private http:HttpClient, private jwtHelper:JwtHelperService,private router:Router) { }

  login(credentials:Object){
    return this.http.post(this.login_url, credentials);
  }

  is_logged_in(){
    const token = localStorage.getItem('auth_token');
    if(!token) return false

    const is_expired = this.jwtHelper.isTokenExpired(token);

    return !is_expired;
  }

  logout(){
    localStorage.removeItem('auth_token');
    this.router.navigate(['/login']);
  }
}
logout function removes the auth_token from the localStorage and whereas, the is_logged_in function checks whether the auth_token is available and if the auth_token is available, checks whether the token is expired or not and returns a boolean.
For the above code to run, you have to install auth0/angular-jwt:
npm install @auth0/angular-jwt
Also, inside the imports array of app.module.ts, add the following code:
JwtModule.forRoot({
   config: {
      tokenGetter: function  tokenGetter() {
          return localStorage.getItem('auth_token');},
      whitelistedDomains: ['localhost:5000'],
      blacklistedRoutes: ['http://localhost:5000/login']
   }
})
By adding the above code, all the HTTP requests will now be sent with the auth_token in the header. This way, the admin user can perform CRUD operations.
Note- Don’t forget to import JwtModule from auth0/angular-jwt inside app.module.ts.
Finally, we need to create a Guard service that will redirect the user to the login page if the user is trying to access the admin routes without being logged in.
For doing this, add the following code inside auth-guard.service.ts:
import { AuthService } from './auth.service';
import { Router, CanActivate, RouterStateSnapshot, ActivatedRouteSnapshot } from '@angular/router';
import { Injectable } from '@angular/core';


@Injectable({
  providedIn: 'root'
})
export class AuthGuardService implements CanActivate{

  constructor(private auth_service:AuthService, private router:Router) { }

  canActivate(next:ActivatedRouteSnapshot,state:RouterStateSnapshot):boolean{
    if(this.auth_service.is_logged_in()) return true

    this.router.navigate(['/login']);
    return false;
  }
}
Also, inside the routes array of the app-routing.module.ts, add the canActivate property to the admin path so that the admin path looks like this:
{path:'admin', component:AdminComponent,
    canActivate:[AuthGuardService],
    children:[
      {path:'all-blogs', component:AllBlogsComponent},
      {path:'add-blog', component:AddBlogComponent},
      {path:'update-blog/:id',component:UpdateBlogComponent}
    ]
}
There you go, we have created the front-end part of the blogging website. Run the flask and angular servers to see the magic.
You can clone the GitHub repo of the complete code from: