Close Menu
Soshace Digital Blog

    Subscribe to Updates

    Get The Latest News, Updates, And Amazing Offers

    What's Hot
    Trends

    7 Job Recruitment Trends 2019 | From Self-Service Modules to Peculiarities of Gen Z

    JavaScript

    Filtering, Sorting and Pagination – Advanced Filtering with React and Redux

    Startups

    Women in Tech Series: Pioneers of ‘Coding for Everyone’ Movement

    Important Pages:
    • Home
    • About
    • Services
    • Contact Us
    • Privacy Policy
    • Terms & Conditions
    Facebook X (Twitter) Instagram LinkedIn YouTube
    Today's Picks:
    • Scaling Success: Monitoring Indexation of Programmatic SEO Content
    • Leveraging Influencers: Key Drivers in New Product Launches
    • How Privacy-First Marketing Will Transform the Industry Landscape
    • The Impact of Social Proof on Thought Leadership Marketing
    • Balancing Value-Driven Content and Promotional Messaging Strategies
    • Top Influencer Marketing Platforms to Explore in 2025
    • Emerging Trends in Marketing Automation and AI Tools for 2023
    • Strategies to Mitigate Duplicate Content in Programmatic SEO
    Wednesday, September 10
    Facebook X (Twitter) Instagram LinkedIn YouTube
    Soshace Digital Blog
    • Home
    • About
    • Services
    • Contact Us
    • Privacy Policy
    • Terms & Conditions
    Services
    • SaaS & Tech

      Maximizing Efficiency: How SaaS Lowers IT Infrastructure Costs

      August 27, 2025

      Navigating Tomorrow: Innovations Shaping the Future of SaaS

      August 27, 2025

      Maximizing Impact: Strategies for SaaS & Technology Marketing

      August 27, 2025
    • AI & Automation

      Enhancing Customer Feedback Analysis Through AI Innovations

      August 27, 2025

      Navigating the Impact of AI on SEO and Search Rankings

      August 27, 2025

      5 Automation Hacks Every Home Service Business Needs to Know

      May 3, 2025
    • Finance & Fintech

      Critical Missteps in Finance Marketing: What to Avoid

      August 27, 2025

      Analyzing Future Fintech Marketing Trends: Insights Ahead

      August 27, 2025

      Navigating the Complex Landscape of Finance and Fintech Marketing

      August 27, 2025
    • Legal & Compliance

      Exploring Thought Leadership’s Impact on Legal Marketing

      August 27, 2025

      Maximizing LinkedIn: Strategies for Legal and Compliance Marketing

      August 27, 2025

      Why Transparency Matters in Legal Advertising Practices

      August 27, 2025
    • Medical Marketing

      Enhancing Online Reputation Management in Hospitals: A Guide

      August 27, 2025

      Analyzing Emerging Trends in Health and Medical Marketing

      August 27, 2025

      Exploring Innovative Content Ideas for Wellness Blogs and Clinics

      August 27, 2025
    • E-commerce & Retail

      Strategic Seasonal Campaign Concepts for Online and Retail Markets

      August 27, 2025

      Emerging Trends in E-commerce and Retail Marketing Strategies

      August 27, 2025

      Maximizing Revenue: The Advantages of Affiliate Marketing for E-Commerce

      August 27, 2025
    • Influencer & Community

      Leveraging Influencers: Key Drivers in New Product Launches

      August 27, 2025

      Top Influencer Marketing Platforms to Explore in 2025

      August 27, 2025

      Key Strategies for Successful Influencer Partnership Negotiations

      August 27, 2025
    • Content & Leadership

      The Impact of Social Proof on Thought Leadership Marketing

      August 27, 2025

      Balancing Value-Driven Content and Promotional Messaging Strategies

      August 27, 2025

      Analyzing Storytelling’s Impact on Content Marketing Effectiveness

      August 27, 2025
    • SEO & Analytics

      Scaling Success: Monitoring Indexation of Programmatic SEO Content

      August 27, 2025

      Strategies to Mitigate Duplicate Content in Programmatic SEO

      August 27, 2025

      Effective Data Visualization Techniques for SEO Reporting

      August 27, 2025
    • Marketing Trends

      How Privacy-First Marketing Will Transform the Industry Landscape

      August 27, 2025

      Emerging Trends in Marketing Automation and AI Tools for 2023

      August 27, 2025

      Maximizing ROI: Key Trends in Paid Social Advertising

      August 27, 2025
    Soshace Digital Blog
    Blog / JavaScript / React / React Native / React Native Lessons / Build Real-World React Native App #9 : Implementing Remove Ads Feature
    JavaScript

    Build Real-World React Native App #9 : Implementing Remove Ads Feature

    Krissanawat KaewsanmuangBy Krissanawat KaewsanmuangJanuary 19, 2021No Comments9 Mins Read
    Facebook Twitter Pinterest Telegram LinkedIn Tumblr Email Reddit
    Build Real-World React Native App #9 : Implementing Remove Ads Feature
    Build Real-World React Native App #9 : Implementing Remove Ads Feature
    Share
    Facebook Twitter LinkedIn Pinterest Email Copy Link
    Build Real-World React Native App #9 : Implementing Remove Ads Feature
    Build Real-World React Native App #9 : Implementing Remove Ads Feature

    One of the simplest ways to make money from apps is through Advertisements. Hence, we have a popular ads network for mobile that is Admob. There are many ways to implement ads in our app. We can simply pick some ideas from the play store and implement them. In this chapter, the idea is to display ads on our app screen and force a user to watch the ad video in order for them to read the post content freely.

    So, let’s get started!

    Setup Admob package

    First, we need to set up the Admob package. Since Admob became the part of Firebase family, we can install Admob package from Firebase by running the following command in our project terminal:

    yarn add @react-native-firebase/admob

    Find Publisher ID

    Next, we need to configure the AdMob publisher in order to acquire publisher ID. We can find the publisher ID on the AdMob dashboard. Hence, we need to create two apps for both Android and iOS as shown in the Google Admob dashboard screenshot below:
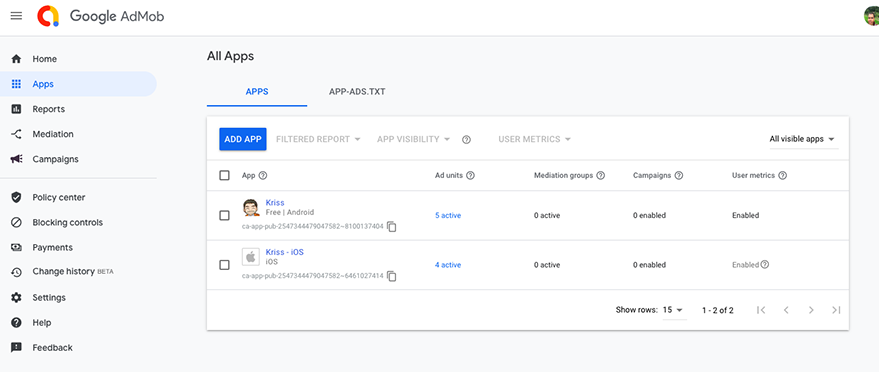
    Admob dashboard
    Admob dashboard

    Admob dashboardIn order to store the publisher ID in our app, we need to create firebase.json in the root directory as shown in the screenshot below:
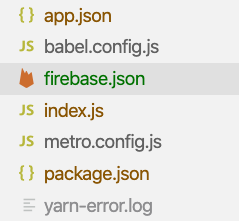
    Firebase JSON location
    Firebase JSON location

    And, inside the firebase.js file, we need to add a JSON structure with android id and ios id as shown in the code snippet below:

    {
       "react-native": {
           "admob_android_app_id": "ca-app-pub-2547344479047582~8100137404",
           "admob_ios_app_id": "ca-app-pub-2547344479047582~6461027414"
       }
    }

    Setup on iOS

    For iOS, we need to navigate to the ios directory and run the following command:

    cd ios/ && pod install ; cd ..

    Installation on Android

    For android, we may need to link the Admob package to native configurations. For that, we need to run the following link command:

    react-native link @react-native-firebase/admob --platforms android

    Display Banner

    First, we are going to create a banner unit from the Admob dashboard as shown in the screenshot below:
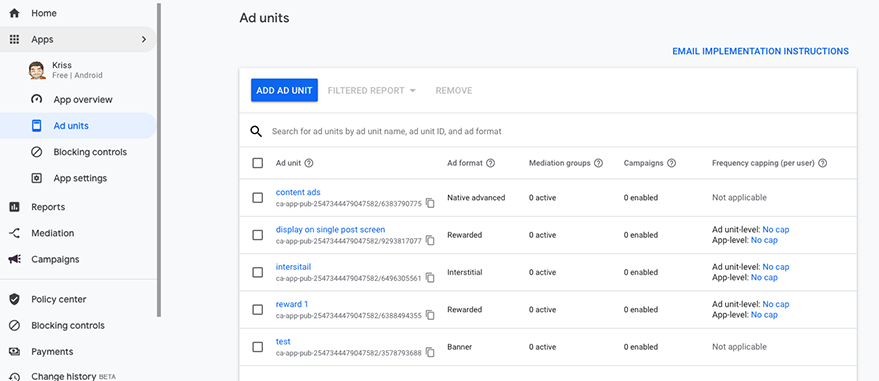
    Create a new Admob app
    Create a new Admob app

    Now, we are going to use a context hook again because the banner needs to be included on every screen. Hence, we need to import the Admob component in order to create a banner and TestIds for testing publisher id. Here, we are going to use the Platform component to detect the operating system and use the right publisher id as shown in the code snippet below:

    import React, { createContext } from 'react';
    import { BannerAd, BannerAdSize,TestIds } from '@react-native-firebase/admob';
    const banner_id =
       Platform.OS === 'ios'
           ? 'ca-app-pub-25473444792'
           : 'ca-app-pub-2547344479';
    export const AdmobContext = createContext();
    export const AdmobController = ({ children }) => {

    Next, we need to create a function to contain Banner Ads as shown in the code snippet below:

    const renderBanner = () => {
           return (
               <BannerAd style={{ alignItems: 'center', justifyContent: 'center', alignSelf: 'center' }}
                  unitId={TestIds.BANNER}
                   size={BannerAdSize.SMART_BANNER}
                   onAdLoaded={() => {
                       console.log('Advert loaded');
                   }}
                   onAdFailedToLoad={(error) => {
                       console.log('Advert failed to load: ', error);
                   }}
               />
           )
       }

    Here, we have used the BannerAd component with unitID, size, onAdLoaded and onAdFailedtoLoad props configured.

    Now, we need to use the Provider of AdmobContext with renderBanner function in the value prop as shown in the code snippet below:

    return (
           <AdmobContext.Provider value={{ renderBanner}}>
               {children}
           </AdmobContext.Provider>
       );
    };

    In order to inject context to the root component, we need to import AdmobController in App.js as shown in the code snippet below:

    import { AdmobController } from './src/components/AdmobController';

    In order to inject context to the root component, we need to import AdmobController in App.js as shown in the code snippet below:

    return (
       <AdmobController>
         <NetworkController>
           <ThemeController>
             <Navigators />
           </ThemeController>
         </NetworkController>
       </AdmobController>
     )
    }

    Now, in order to check if the AdBanner works, we need to go to the Home screen and import AdmobContext first as shown in the code snippet below:

    import { AdmobContext } from '../components/AdmobController'

    Then, we need to get the renderBanner function from the AdmobContext using useContext hook as shown in the code snippet below:

    let { renderBanner } = useContext(AdmobContext)

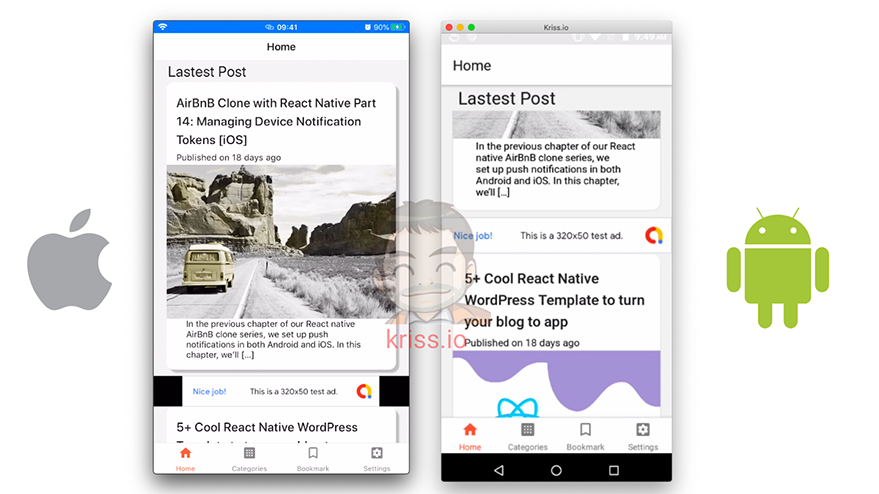
    Now, we can try and display a banner after every three posts using the following piece of code:

                      renderItem={({ item ,index}) => (
                           <React.Fragment>
                               <FlatlistItem item={item} navigation={navigation} />
                               { index % 3 == 0 ? renderBanner() : <React.Fragment />}
                           </React.Fragment>
                       )}

    Hence, we will get the following result on our Home screen:
    Read More:  Advanced Mapmaking: Using d3, d3-scale and d3-zoom With Changing Data to Create Sophisticated Maps

    Admob in react native

    Admob in react nativeHere, we can see the AdBanner below the post.

    Ad Banner in Single Post Screen

    The process of adding an Ad banner to the SinglePost.js screen is the same as that of the Home Screen. First, we need to import AdmobContext as shown in the code snippet below:

    import { AdmobContext } from '../components/AdmobController'

    Then, we need to get the renderBanner function from the AdmobContext using useContext hook as shown in the code snippet below:

    let { renderBanner } = useContext(AdmobContext)

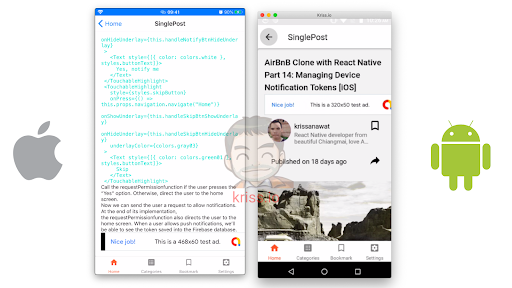
    Then, we need to call the function somewhere between the screen UI elements. Here, we have called the function just above the ImageLoad component as shown in the code snippet below:

                 </Card.Content>
                  {renderBanner()}
                       <ImageLoad
                           style={{ width: '100%', height: 250 }}
                           loadingStyle={{ size: 'large', color: 'grey' }}
                           source={{ uri: post[0].jetpack_featured_media_url }}
                />

    Hence, we will get the following result in our SinglePost screen:
    Show Admob in single post screen
    Show Admob in single post screen

    Watch video ads in exchange to read more post

    This can be a fun part for the app developer but annoying for the users. Here, we are going to force the user to watch an ad after they reach and access 10 posts. In this chapter, we are going to utilize AsyncStorage in order to store the accessed post score.

    First, we import Asyncstorage as shown in the code snippet below:

    import AsyncStorage from '@react-native-community/async-storage';

    Then, we are going to start an initial free posts counter in App.js. Here, we need to check for the counter if it exists or not to create a new one as shown in the code snippet below:

    async function initPoint() {
       let initPoint = await AsyncStorage.getItem('yourcanreadfreepost');
       if (initPoint == null) {
         await AsyncStorage.setItem('yourcanreadfreepost', '10')
       }
     }

    Back in the AdmobController, we import another ad type RewardedAd from the Admob package that provides users with rewards when they watch an ad video for a certain period.

    We must not forget to create an Ad unit in the Admob dashboard. The code with RewardedAd and RewardedAdEventType is shown in the code snippet below:

    import { BannerAd, BannerAdSize, TestIds, RewardedAd, RewardedAdEventType } from '@react-native-firebase/admob';
    const unitId =
       Platform.OS === 'ios'
           ? 'ca-app-pub-2547344479047582/1964568575'
           : 'ca-app-pub-2547344479047582/3578793688';

    Now, we need to create a new state to handle reward points as shown in the code snippet below:

    const [point, setPoint] = useState()

    Next, we need to create a function to handle RewardAd behavior when they meet reward criteria and reset the counter back to 10 as shown in the code snippet below:

    const initRewardAds = () => {
           const rewarded = RewardedAd.createForAdRequest(TestIds.REWARDED, {
               requestNonPersonalizedAdsOnly: true,
           });
           rewarded.onAdEvent(async (type, error, reward) => {
               if (type === RewardedAdEventType.LOADED) {
                   rewarded.show();
               }
               if (type === RewardedAdEventType.EARNED_REWARD) {
                   await AsyncStorage.setItem('yourcanreadfreepost', '10').then(res => {
                       setPoint(10)
                       alert('Thank for support us')
                   });
     
               }
           });
     
           rewarded.load();
       }

    Launching Reward Ad

    In order to launch the Ad video, we need to go to SinglePost.js and import AdmobContext as shown in the code snippet below:

    import { AdmobContext } from '../components/AdmobController'

    Then, we get the required context values from AdmobContext using useContext hook as shown in the code snippet below:

    let { renderBanner, initRewardAds, point, setPoint } = useContext(AdmobContext)

    Next, we create a button to trigger ads and add some text that lets the user know about the ad and reward. We are going to define a function called renderRewardAdsButton function that returns the ad button as shown in the code snippet below:

    const renderRewardAdsButton = () => {
           return (
               <View>
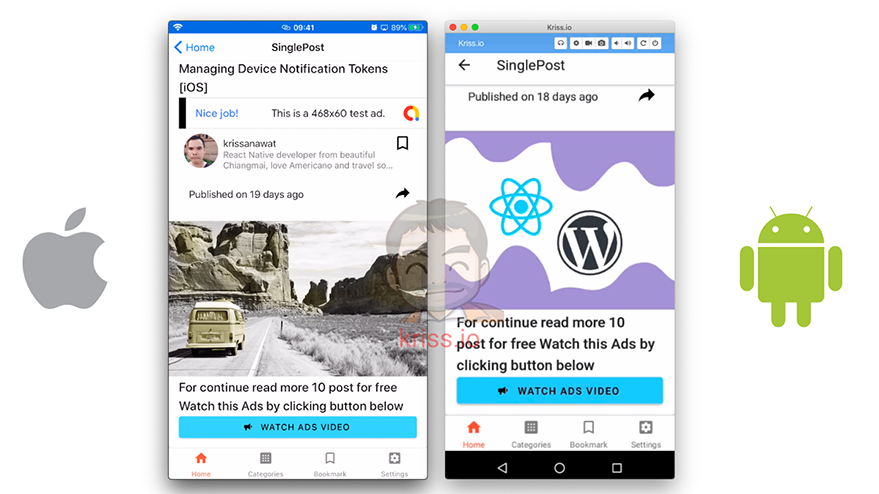
                   <Title style={{ textAlign: 'center' }} >For continue read more 10 post for free Watch this Ads by clicking button below</Title>
                   <Button icon="bullhorn" color={'#53ccf9'} mode="contained" onPress={() => initRewardAds()} >
                       Watch Ads Video
                    </Button>
               </View>
           )
       }

    Also, we need to create a function to check user points and call the reward function as shown in the code snippet below:

    const renderContent = () => {
     
           if (point <= 0) {
               return renderRewardAdsButton();
           }
     
           return <Card.Content>
               <HTML 
    		  key={theme.dark}
                   html={post[0].content.rendered}
                   imagesMaxWidth={Dimensions.get('window').width}
                   tagsStyles={{
                       p: { color: theme.colors.text },
                       pre: { color: theme.colors.accent },
                       h1: { color: theme.colors.text },
                       h2: { color: theme.colors.text },
                       li: { color: theme.colors.text },
                   }}
               />
           </Card.Content>
     }

    Lastly, we need to create a function that uses the counter value. And when user reaches that screen, we deduce their score and save it Asyncstorage as shown in the code snippet below:

    async function fetchPoint() {
           await AsyncStorage.getItem('yourcanreadfreepost').then(async (res) => {
               let remain_point = JSON.parse(res)
               let currpoint = remain_point <= 0 ? 0 : remain_point - 1
               await AsyncStorage.setItem('yourcanreadfreepost', JSON.stringify(currpoint));
               setPoint(currpoint)
           });
       }

    Then, we start to check the user’s point every time the screens are loaded using useEffect hook as shown in the code snippet below:

    useEffect(() => {
           fetchPost()
           fetchPoint()
       }, []);

    Hence, we get the following result in the emulator screens when a user reaches the zero points:
    Read More:  Creating Our Own Chat GPT

    Watch ads for remove ads

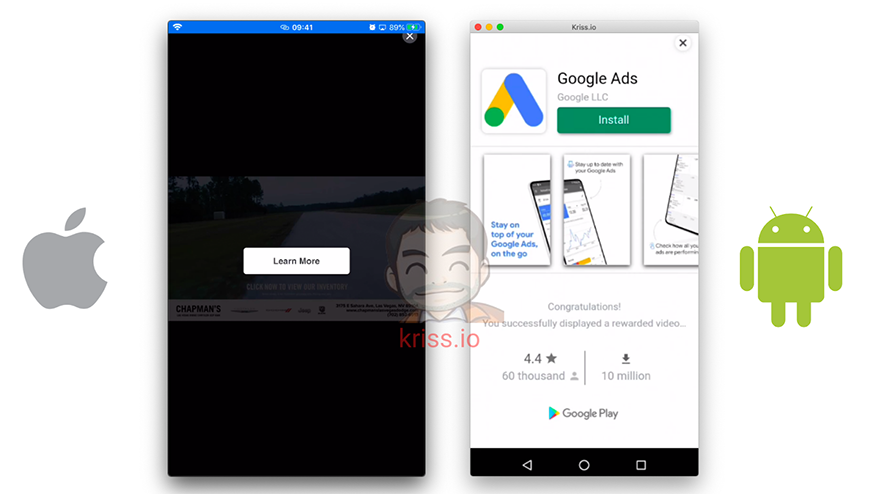
    Watch ads for remove adsThe result in the emulator screen when a user triggers an ad:
    Admob video ads

    Admob video adsFinally, we have successfully integrated Admob to our React Native project.

    Conclusion

    In this chapter, we learned how to use the Admob package to React native that can help us monetize apps easily. We integrated the Banner ad and Video ad in our app screens as well as added reward points for users to access extra posts. Actually, this is not a suitable way to make users trigger the ad in order for them to access extra content. This will surely irritate the users. Instead, we offer them a payment option in order to remove the ads completely. We are going to implement this in our next chapter.

    All codes are available on Github.

    Share. Facebook Twitter Pinterest LinkedIn Tumblr Email
    Krissanawat Kaewsanmuang
    • Website
    • X (Twitter)

    Developer Relation @instamobile.io

    Related Posts

    Streamlining Resource Allocation for Enhanced Project Success

    December 18, 2024

    Conducting Effective Post-Project Evaluations: A Guide

    December 16, 2024

    Strategies for Keeping Projects on Track and Meeting Deadlines

    December 10, 2024
    Leave A Reply Cancel Reply

    You must be logged in to post a comment.

    Stay In Touch
    • Facebook
    • Twitter
    • Pinterest
    • Instagram
    • YouTube
    • Vimeo
    Don't Miss
    Entrepreneurship November 29, 2024

    Leveraging Content Marketing Strategies to Propel Startup Growth

    In today’s competitive landscape, startups must leverage content marketing strategies to drive growth. By creating valuable, targeted content, startups can engage customers, build brand authority, and foster loyalty, ultimately enhancing their market position and scalability.

    Уроки React. Урок 4. Домашнее Задание.

    September 14, 2016

    Mastering Common Interview Questions: A Guide to Effective Responses

    December 19, 2024

    Everything You Wanted to Know about the UX Research Methods

    September 4, 2019

    Categories

    • AI & Automation
    • Angular
    • ASP.NET
    • AWS
    • B2B Leads
    • Beginners
    • Blogs
    • Business Growth
    • Case Studies
    • Comics
    • Consultation
    • Content & Leadership
    • CSS
    • Development
    • Django
    • E-commerce & Retail
    • Entrepreneurs
    • Entrepreneurship
    • Events
    • Express.js
    • Facebook Ads
    • Finance & Fintech
    • Flask
    • Flutter
    • Franchising
    • Funnel Strategy
    • Git
    • GraphQL
    • Home Services Marketing
    • Influencer & Community
    • Interview
    • Java
    • Java Spring
    • JavaScript
    • Job
    • Laravel
    • Lead Generation
    • Legal & Compliance
    • LinkedIn
    • Machine Learning
    • Marketing Trends
    • Medical Marketing
    • MSP Lead Generation
    • MSP Marketing
    • NestJS
    • Next.js
    • Node.js
    • Node.js Lessons
    • Paid Advertising
    • PHP
    • Podcasts
    • POS Tutorial
    • Programming
    • Programming
    • Python
    • React
    • React Lessons
    • React Native
    • React Native Lessons
    • Recruitment
    • Remote Job
    • SaaS & Tech
    • SEO & Analytics
    • Soshace
    • Startups
    • Swarm Intelligence
    • Tips
    • Trends
    • Vue
    • Wiki
    • WordPress
    Top Posts

    Enhancing Customer Feedback Analysis Through AI Innovations

    AI & Automation August 27, 2025

    Maximizing Lead Generation with LinkedIn InMail Strategies

    LinkedIn December 6, 2024

    Mastering Project Performance Reviews: A Step-by-Step Guide

    JavaScript December 9, 2024

    Our strength Proper Business in your Path

    Entrepreneurs June 29, 2019

    Subscribe to Updates

    Get The Latest News, Updates, And Amazing Offers

    About Us
    About Us

    Soshace Digital delivers comprehensive web design and development solutions tailored to your business objectives. Your website will be meticulously designed and developed by our team of seasoned professionals, who combine creative expertise with technical excellence to transform your vision into a high-impact, user-centric digital experience that elevates your brand and drives measurable results.

    7901 4th St N, Suite 28690
    Saint Petersburg, FL 33702-4305
    Phone: 1(877)SOSHACE

    Facebook X (Twitter) Instagram Pinterest YouTube LinkedIn
    Our Picks
    AWS

    Uploading Files To Amazon S3 With Flask Form – Part1 – Uploading Small Files

    Beginners

    Node.js Lesson 6: Util and Inheritance

    Beginners

    Web Development Contract: Talent Agreement Essentials | Things to Include and Avoid

    Most Popular

    TOP Most In-Demand IT Certifications 2020

    Beginners

    DigitalOcean vs. AWS: Comparing Offers and Choosing the Better Option

    Programming

    15 Common JavaScript Questions

    Interview
    © 2025 Soshace Digital.
    • Home
    • About
    • Services
    • Contact Us
    • Privacy Policy
    • Terms & Conditions

    Type above and press Enter to search. Press Esc to cancel.