
 #1")
The first thing which comes in our mind when we think of creating a personal blogging website is to use any CMS to do most of the work for you. Although content management systems provide a quick and easy way to set up a blogging website, adding custom features and look to one’s website becomes tricky.
For web developers like me, it’s always exciting to code a blog since it gives me complete authority over my website.
Yes, the process of creating a personal blogging website from scratch can be tedious, but also, especially as a newbie developer, it can be a great learning experience.
In this article, we’re going to create the back-end for our application using Flask, and in the next part, we’ll be creating the front-end using Angular.
Requirements for the back-end:
- Python (I’m using version 3.8.0)
- Text-editor (I’m using visual studio code)
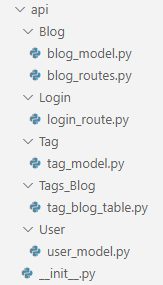
Create your application directory, and add folders and files in your application directories so that the application directory looks like this:
Next, we’re going to create our back-end in the following steps:
- Flask set up
- Creating tables
- Adding routes
- Protecting routes
Flask set up
For setting up Flask,
Inside your command prompt/terminal, run the following commands:
pipenv install flask flask-sqlalchemy flask-cors
The above command will create a virtual environment for our project and also install flask and flask-sqlalchemy.
Note- For those of you who aren’t aware of flask-sqlalchemy, in simple terms, flask-sqlalchemy provides us support to perform CRUD operations on the database without having to write raw SQL statements.
To activate the virtual environment, all you have to do is to run the following command:
pipenv shell
Inside api/__init__.py add the following code:
from flask import Flask
from flask_sqlalchemy import SQLAlchemy
from flask_cors import CORS

db = SQLAlchemy()

def create_app():
    app = Flask(__name__)
    app.config['SQLALCHEMY_DATABASE_URI'] = 'sqlite:///flaskdatabase.db'
    app.config['SQLALCHEMY_TRACK_MODIFICATIONS'] = False
    CORS(app)

    db.init_app(app)

    return app
The code above is quite straight forward, we’ve created a function called create_app() which is our application factory and it initializes our app and as well as our database.
Creating tables
We’re going to create a blog table where we store all the properties of a blog. The properties/columns I’m considering for this particular blog are as follows:
- id ( This will be our blog-id)
- title (Title of the blog)
- content (Content of the blog)
- created_at (Date at which the blog was created)
- feature_image (Cover image for our blog)
- tags (Tags related to the blog)
One can add more properties/columns to the blog according to their convenience.
Let’s start building the model for our table.
Inside Blog/blog_model.py add the following code:
from api import db
from datetime import datetime
from api.Tags_Blog.tag_blog_table import tag_blog

class Blog(db.Model):
    id = db.Column(db.Integer,primary_key=True)
    title=db.Column(db.String(50),nullable=False)
    content=db.Column(db.Text,nullable=False)
    feature_image= db.Column(db.String,nullable=False)
    created_at = db.Column(db.DateTime, default=datetime.utcnow)

    @property
    def serialize(self):
        return {
            'id': self.id,
            'title': self.title,
            'content': self.content,
            'feature_image': self.feature_image,
            'created_at': self.created_at,
        }
We’ve created a new Blog Model and we’ve added the properties that our blog will contain. Also, we’ve added a function named serialize so that we can return data in JSON format.
Notice that we’ve haven’t added the tags property to our blog model. The reason behind not adding the tags property yet is, first 5 properties of the blog are pretty straight forward, however, tags property of the blog should be handled differently since the tag property maintains a many-to-many relationship with the blog i.e each blog can have multiple numbers of tags and each tag can be added to multiple numbers of blogs.
For handling many-to-many relationships, we need to create two tables, one for storing the Tag itself and the other will be helper table for storing the reference for the blog and tag i.e this particular table will contain just two columns, tag_id and blog_id and these two columns will act as Foreign Keys to the tables Tag and Blog respectively.
Let’s create the first table called Tag, which will contain all the tags that we create.
Inside api/Tag/tag_model.py, add the following code
from api import db

class Tag(db.Model):
    id=db.Column(db.Integer,primary_key=True)
    name=db.Column(db.String(20))
    @property
    def serialize(self):
        return {
        'id': self.id,
        'name': self.name
        }
Next, let’s create a table for storing the reference of the blog and the tag.
As mentioned in the official flask-sqlalchemy docs, we needn’t create a Model for this table.
Inside api/Tags_Blog/tag_blog_table.py, add the following code:
from api import db

tag_blog = db.Table('tag_blog',
    db.Column('tag_id',db.Integer,db.ForeignKey('tag.id'), primary_key=True),
    db.Column('blog_id', db.Integer,db.ForeignKey('blog.id'),primary_key=True)
)
As one can see from the above code, we’ve created a table to store tag_id and blog_id respectively. Notice that I’ve defined the columns as Primary Keys, this way, a tag can be mentioned only once per blog.
Now that we’ve defined both the tables, we can add the tags property inside our Blog model:
tags=db.relationship('Tag',secondary=tag_blog,backref=db.backref('blogs_associated',lazy="dynamic"))Note- Don’t forget to import the tag_blog table inside blog_model.py.
Unlike the other properties in the blog model, tags property is not a column in our database. It’s there to create a connection between Blog, Tag, and the tag_blog table. In the above line of code, we’ve specified the relationship between Blog, Tag and tag_blog table. Also, in the above line of code, we created a new property inside the Tag table called blogs_associated which can be used to describe which blogs are associated with a single tag.
Note- Remember that tags and blogs_associated properties aren’t columns in our database since they are attributes to describe the many-to-many relationship. Although they aren’t columns, we can still query both the attributes.
Adding routes
Before adding the routing methods to our application, we need to create a blueprint inside blog_routes.py and import it in the __init__.py file.
Note- For those of you who aren’t aware of blueprints, they provide us a way for organizing our application into smaller reusable components. In this case, we are creating a blueprint for our blog so that we define all the routes related to the blog inside the blueprint.
Inside Blog/blog_routes.py add the following code:
from flask import Blueprint

from api import db

blogs= Blueprint('blogs',__name__)
Next, we need to register this blueprint in our application, so inside the create_app function of the __init__.py file, add the following code:
from api.Blog.blog_routes import blogs
app.register_blueprint(blogs)
Let’s add routing to our application for performing CRUD operations on the database,
Creating:
Add the following code inside blog_routes.py:
@blogs.route('/add_blog',methods=["POST"])
def create_blog():
    data = request.get_json()

    new_blog=Blog(title=data["title"],content=data["content"],feature_image=data["feature_image"])

    for tag in data["tags"]:
        present_tag=Tag.query.filter_by(name=tag).first()
        if(present_tag):
            present_tag.blogs_associated.append(new_blog)
        else:
            new_tag=Tag(name=tag)
            new_tag.blogs_associated.append(new_blog)
            db.session.add(new_tag)


    db.session.add(new_blog)
    db.session.commit()

    blog_id = getattr(new_blog, "id")
    return jsonify({"id": blog_id})
Note- Don’t forget to import “jsonify” and “request” from flask on top of the page
Let’s breakdown the code we’ve added,
We’ve created a new route called add_blog and this route will be handled by a function called create_blog.
The create_blog function will first parse the incoming JSON data from the request. Then, it creates a new instance of our blog model from the data received from the request.
Next, we’re going to send tags as an “Array” inside the body of the request, so we need to find a way to check if each tag specified in the array is already present in the Tag table and if it isn’t present, we need to create a new Tag. For this purpose, I’ve created a “for” loop which iterates through each tag present in the tags array of the request and performs actions accordingly.
Retrieving:
We’re going to create two routes for retrieving operation, one for retrieving all the blogs from the database and the other for retrieving a single blog by id.
For retrieving all the blogs from the database, add the following code inside blog_routes.py:
@blogs.route('/blogs',methods=["GET"])
def get_all_blogs():
    blogs= Blog.query.all()
    serialized_data = []
    for blog in blogs:
        serialized_data.append(blog.serialize)

    return jsonify({"all_blogs": serialized_data})
In the above code, we query the database to retrieve all the blogs. Since we cannot directly send the blog object in the return function, we use the serialize function to convert the blog object into JSON format and then return all the blogs.
For retrieving a single blog by id, add the following code inside blog_routes.py:
@blogs.route('/blog/<int:id>',methods=["GET"])
def get_single_blog(id):
    blog = Blog.query.filter_by(id=id).first()
    serialized_blog = blog.serialize
    serialized_blog["tags"] = []

    for tag in blog.tags:
        serialized_blog["tags"].append(tag.serialize)

    return jsonify({"single_blog": serialized_blog})
In the above code, we query the database based on the id provided in the URL. Also, since I want to return the blog object with tags property as well, I’ve appended all the tags present inside blog.tags to the serialized_blog[“tags”] and then returned the serialized_blog.
Updating:
For updating the database, I’m using the PUT method.
Inside blog_routes.py, add the following code:
@blogs.route('/update_blog/<int:id>', methods=["PUT"])
def update_blog(id):
    data = request.get_json()
    blog=Blog.query.filter_by(id=id).first_or_404()

    blog.title = data["title"]
    blog.content=data["content"]
    blog.feature_image=data["feature_image"]

    updated_blog = blog.serialize

    db.session.commit()
    return jsonify({"blog_id": blog.id})
In the code above, inside the update_blog function, we query the database based on the id provided in the url and find the record. Then we replace the information present in the record with data provided inside the body of the request.
Deleting:
The record deletion route is quite straight forward:
@blogs.route('/delete_blog/<int:id>', methods=["DELETE"])
def delete_blog(id):
    blog = Blog.query.filter_by(id=id).first()
    db.session.delete(blog)
    db.session.commit()

    return jsonify("Blog was deleted"),200
Protecting routes
We’re going to create an admin user for our application and only the admin user will have access to all the routes, therefore, we need to protect some of our routes from a non-admin user.
Before adding functionality to protect our routes, let’s create an admin user.
We need to create a new User model in our application, so inside api/User/user_model.py, add the following code:
from api import db

class User(db.Model):
    id=db.Column(db.Integer,primary_key=True)
    email=db.Column(db.String(120),nullable=False)
    password=db.Column(db.String(120),nullable=False)
Since we are going to create a single admin user for the application, we needn’t create routes for the User model. We’re going to create a custom admin user just before our server starts. For doing so, we are going to create a custom command which will be executed right before we run the flask run command and this custom command will create an admin user for us.
Inside the create_app function of __init__.py file, add the following code:
@click.command(name='create_admin')
    @with_appcontext
    def create_admin():
        admin=User(email="admin_email_address",password="admin_password")
        admin.password = generate_password_hash(admin.password,'sha256',salt_length=12)
        db.session.add(admin)
        db.session.commit()

    app.cli.add_command(create_admin)
Note: Don’t forget to add the following import statements on top of the page:
import click
from flask.cli import with_appcontext
from werkzeug.security import generate_password_hash
Let’s breakdown the code.
We created a custom command called create_admin. Next, we added our app instance to this command by using @with_appcontext. The custom command will execute a function create_admin. The function creates a new instance of the user model with the specified email and password. Since for security purposes, we cannot store the password as a string, therefore, we generate a hash and then store the hashed password in the database. Next, we add the create_admin command to the app cli.
Note- Don’t run the command create_admin yet since we haven’t created the database yet.
Now that we’ve created our custom admin user, we need to create a login route where we match the input credentials with our admin credentials and if they match, we’re going to send back a JWT token in the response.
Inside Login/login_route.py, add the following code:
from flask import Blueprint,request,jsonify
from api.User.user_model import User
from flask_jwt_extended import create_access_token
from werkzeug.security import check_password_hash

login=Blueprint('login', __name__)

@login.route('/login', methods=["POST"])
def log_in():
    request_data = request.get_json()

    user=User.query.filter_by(email=request_data["email"]).first()
    if user:
        if check_password_hash(user.password,request_data["password"]):
            jwt_token=create_access_token(identity=user.email)
            return jsonify({"token":jwt_token})
    else:
        return "Invalid email or password",400
In the above route, we validate the credentials and if they match, we’re sending back a JWT token in the response.
Also, we need to set up the flask-jwt-extended library for our application. For doing so, add the following lines of code inside create_app function of the __init__.py file:
app.config['JWT_SECRET_KEY']='YOUR_SECRET_KEY'
jwt=JWTManager(app)
Remember to change the YOUR_SECRET_KEY value with a value of your choice. Also, add the import statement to import JWTManager from flask-jwt-extended.
Note- Don’t forget to install flask-jwt-extended library and with the command:
pipenv install flask-jwt-extended
Now that we’ve created our login route, with the help of flask-jwt-extended, by just adding one line of code we can protect specific routes in our application.
For doing so, add code inside the routes so that the protected route looks like this:
@blogs.route('/delete_blog/<int:id>', methods=["DELETE"])
@jwt_required
def delete_blog(id):
    blog = Blog.query.filter_by(id=id).first()
    db.session.delete(blog)
    db.session.commit()

    return jsonify("Blog was deleted"),200
Notice that I’ve added the line @jwt_required inside the route. By doing this, this route cannot be accessed without providing a valid JWT token inside the header. Add the same line of code for the following routes:
- add_blog
- update_blog
Note- Don’t forget to import jwt_required from flask-jwt-extended library.
To access the protected route, one needs to provide an authorization header in the following format:
Bearer ‘YOUR_JWT_TOKEN‘
With this, we’ve completed protecting some of our routes.
Before creating our database and running our application, we need to remember a few points:
- Import all the models created inside the create_app function of the __init__.py file
- Since the application is in the development phase, I’ve stored the admin user and the JWT_SECRET_KEY in our code. Changes should be made when the application is in the deployment phase.
- Error handling of the routes hasn’t been done in this article since each developer has a different approach to error handling.
We haven’t created the database for this application. So for doing so, run the following commands inside the virtual environment:
python
from api import db,create_app
db.create_all(app=create_app())
This should create a database called flaskdatabase.db in your application directory.
Next, type the following commands to run the application:
set FLASK_APP=api
set FLASK_DEBUG=1
set FLASK_ENV=development
flask create_admin
flask run
By running the above commands, we’ve set up some environment variables for our application, we’ve run the custom command to create the admin user for our application and then, we ran the application using the flask run command.
Note- The above commands are for Windows users, for Linux and Mac users, replace set with export.
There you go, we’ve created the back-end part for our personal blogging website. In the next part, we’ll add the client-side code to complete the application.
Below is the link to the repository of the back-end:
https://github.com/Bviveksingh/Personal-blog-flask
Second part: How to Create a Personal Blogging Website: Front-End (Angular) #2