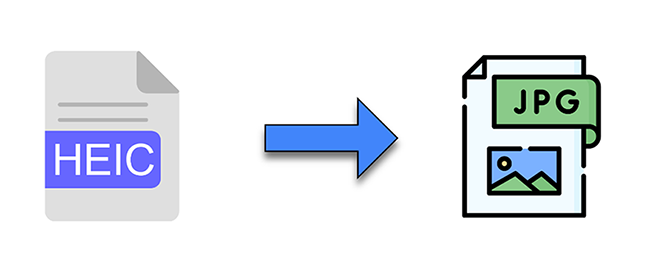
In this article, we will learn how to handle the HEIC image formats in an angular application, To begin with, you should have basic knowledge of angular.
Table of Contents:
- Overview of HEIC Image Format
- Setting up the Angular Application
- Installing Necessary Dependencies
- Creating a Custom Directive for Image Conversion
- Handling File Upload and Image Preview
- Implementing Image Conversion and Download
- Displaying HEIC Images in Angular Components
- Adding Support for Multiple Images
- Integrating with a Backend Service
- Using Alternative Libraries for Image Conversion
- Browser Support and Compatibility Considerations
- Testing and Debugging
- Performance Optimization
- Conclusion
Overview of HEIC Image Format:
The High-Efficiency Image Container (HEIC) is an image format based on the High-Efficiency Video Codec (HEVC). It was introduced by Apple in iOS 11 and macOS High Sierra as a more efficient alternative to the widely used JPEG format. HEIC images offer better compression and higher image quality than JPEG images, resulting in smaller file sizes without sacrificing image quality. However, not all web browsers and operating systems support the HEIC format, making it necessary to convert HEIC images to more widely supported formats like JPEG or PNG in web applications.
Here is the git repository link to the application developed in this tutorial https://github.com/psmohan/handling-heic-angular/tree/master
This tutorial will guide you through handling HEIC images in an Angular application, including uploading, previewing, converting, and displaying HEIC images. We will also cover various aspects like error handling, progress indication, and performance optimization.
Setting up the Angular Application:
First, create a new Angular application using the Angular CLI:
ng new heic-handling
cd heic-handling
This command will create a new Angular project in the “heic-handling” directory.
Installing Necessary Dependencies:
For this tutorial, we’ll use the heic2any library to convert HEIC images to JPEG or PNG format. Install the library and its required dependencies using npm:
npm install heic2any
Creating a Custom Directive for Image Conversion:
To simplify handling HEIC images in Angular components, we’ll create a custom directive called appHeicToJpeg. This directive will convert an input HEIC file to a JPEG or PNG image and update the src attribute of an <img> element.
Create a new file called heic-to-jpeg.directive.ts in the src/app directory and add the following code:
import { Directive, ElementRef, Input, Renderer2 } from '@angular/core';
import heic2any from 'heic2any';

@Directive({
  selector: '[appHeicToJpeg]',
})
export class HeicToJpegDirective {
  @Input('appHeicToJpeg') set heicFile(file: File | null) {
    if (file) {
      this.convertHeicToJpeg(file);
    }
  }

  constructor(private el: ElementRef, private renderer: Renderer2) {}

  private async convertHeicToJpeg(heicFile: File) {
    try {
		const result = await heic2any({ blob: heicFile, toType: 'image/jpeg', quality: 0.8 });
		const jpegBlob = Array.isArray(result) ? result[0] : result;
		this.convertedImageUrl = URL.createObjectURL(jpegBlob);
		this.renderer.setAttribute(this.el.nativeElement, 'src', this.convertedImageUrl);
	}
	catch (error) {
		console.error('Error converting HEIC to JPEG:', error);
	}
}
}
This code defines a new directive with an input property heicFile. When the heicFile property is set, the convertHeicToJpeg method is called, which converts the HEIC file to a JPEG image using the heic2any library. The resulting JPEG image is then set as the src attribute of the <img> element.
Next, add the HeicToJpegDirective to the declarations array in the src/app/app.module.ts file:
import { BrowserModule } from '@angular/platform-browser';
import { NgModule } from '@angular/core';
import { AppComponent } from './app.component';
import { HeicToJpegDirective } from './heic-to-jpeg.directive';

@NgModule({
  declarations: [AppComponent, HeicToJpegDirective],
  imports: [BrowserModule],
  providers: [],
  bootstrap: [AppComponent],
})
export class AppModule {}
Handling File Upload and Image Preview:
Now, let’s create a simple file input element in the `src/app/app.component.html` file to allow users to upload HEIC images:
<input type="file" (change)="onFileSelected($event)" accept=".heic" />
Next, update the `src/app/app.component.ts` file to handle the selected file:
import { Component } from '@angular/core';

@Component({
  selector: 'app-root',
  templateUrl: './app.component.html',
  styleUrls: ['./app.component.css'],
})
export class AppComponent {
  selectedFile: File | null = null;

  onFileSelected(event: Event) {
    const fileInput = event.target as HTMLInputElement;
    if (fileInput.files && fileInput.files.length > 0) {
      this.selectedFile = fileInput.files[0];
    }
  }
}
To display a preview of the uploaded HEIC image, add an <img> element to the `src/app/app.component.html` file and use the appHeicToJpeg directive:
<img *ngIf="selectedFile" [appHeicToJpeg]="selectedFile" alt="Preview" />
Implementing Image Conversion and Download:
To allow users to download the converted JPEG image, add a download button to the `src/app/app.component.html` file:
<button *ngIf="selectedFile" (click)="downloadConvertedImage()">Download</button>
Update the `src/app/app.component.ts` file to implement the downloadConvertedImage method:
import { ViewChild } from '@angular/core';
import { HeicToJpegDirective } from './heic-to-jpeg.directive';

// ...

export class AppComponent {
  // ...
  @ViewChild(HeicToJpegDirective, { static: false }) heicToJpegDirective: HeicToJpegDirective;

  downloadConvertedImage() {
    if (this.selectedFile && this.heicToJpegDirective) {
      const a = document.createElement('a');
      a.href = this.heicToJpegDirective.convertedImageUrl;
      a.download = this.selectedFile.name.replace(/.[^.]+$/, '.jpg');
      a.click();
    }
  }
}
Output:

Displaying HEIC Images in Angular Components:
Now that we’ve implemented the core functionality, you can easily display HEIC images in your Angular components by using the appHeicToJpeg directive. For example, if you have an array of HEIC images
heicImages: File[] = [...];
You can display these images in your component’s template by iterating over the array using the *ngFor directive and applying the appHeicToJpeg directive to each <img> element:
<div *ngFor="let image of heicImages">
  <h3>{{ image.name }}</h3>
  <img [appHeicToJpeg]="image" alt="HEIC Image" />
</div>
Here’s what the code does:
- The *ngFor directive iterates over the heicImages array and creates a new <div> element for each image in the array.
- The {{ image.name }} expression displays the name of the image file.
- The <img> element uses the [appHeicToJpeg]=”image” binding to apply the appHeicToJpeg directive to each image.
- This directive takes care of converting the HEIC image to a JPEG image and updating the src attribute of the <img> element.
Adding Support for Multiple Images:
To extend our application to support multiple HEIC images, modify the file input element in the src/app/app.component.html file to accept multiple files:
<input type="file" (change)="onFilesSelected($event)" multiple accept=".heic" />
Update the src/app/app.component.ts file to handle multiple selected files:
When clicked on the download button below the image, that file will be passed to the downloadConvertedImage().
import { Component, ViewChild } from '@angular/core';
import { HeicToJpegDirective } from './heic-to-jpeg.directive';

@Component({
  selector: 'app-root',
  templateUrl: './app.component.html',
  styleUrls: ['./app.component.css'],
})
export class AppComponent {

  selectedFiles: File[] = [];

  onFilesSelected(event: Event) {
    const fileInput = event.target as HTMLInputElement;
    if (fileInput.files) {
      this.selectedFiles = Array.from(fileInput.files);
    }
  }

  @ViewChild(HeicToJpegDirective, { static: false }) heicToJpegDirective: HeicToJpegDirective | undefined;
  async downloadConvertedImage(file: any) {
    if (file && this.heicToJpegDirective && this.heicToJpegDirective.convertedImageUrl) {
      const a = document.createElement('a');
      a.href = this.heicToJpegDirective.convertedImageUrl;
      a.download = file.name.replace(/.[^.]+$/, '.jpg');
      a.click();
    }
  }
}
Now, update the src/app/app.component.html file to display and convert multiple images:
<input type="file" (change)="onFilesSelected($event)" multiple accept=".heic" />
<div *ngFor="let file of selectedFiles">
    <h3>{{ file.name }}</h3>
    <img [appHeicToJpeg]="file" alt="Preview" />
    <button *ngIf="file" (click)="downloadConvertedImage(file)">Download</button>
</div>

Integrating with a Backend Service:
In a real-world scenario, you may need to send the converted images to a backend service for further processing or storage. To achieve this, you can create a service to handle HTTP requests and upload images.
First, generate a new service using the Angular CLI:
ng generate service image-upload
Next, update the src/app/image-upload.service.ts file to implement the uploadImage method:
import { HttpClient } from '@angular/common/http';
import { Injectable } from '@angular/core';

@Injectable({
  providedIn: 'root',
})
export class ImageUploadService {
  private apiUrl = 'https://your-api-url.com/upload';

  constructor(private http: HttpClient) {}

  uploadImage(image: Blob, imageName: string) {
    const formData = new FormData();
    formData.append('image', image, imageName);

    return this.http.post(this.apiUrl, formData);
  }
}
Make sure to replace https://your-api-url.com/upload with the actual API URL.
Now, update the src/app/app.module.ts file to import the HttpClientModule:
import { BrowserModule } from '@angular/platform-browser';
import { NgModule } from '@angular/core';
import { HttpClientModule } from '@angular/common/http';
import { AppComponent } from './app.component';
import { HeicToJpegDirective } from './heic-to-jpeg.directive';

@NgModule({
  declarations: [AppComponent, HeicToJpegDirective],
  imports: [BrowserModule, HttpClientModule],
  providers: [],
  bootstrap: [AppComponent],
})
export class AppModule {}
modify the src/app/app.component.ts file to use the ImageUploadService and upload the converted images:
import { Component } from '@angular/core';
import { ImageUploadService } from './image-upload.service';

@Component({
  selector: 'app-root',
  templateUrl: './app.component.html',
  styleUrls: ['./app.component.scss'],
})
export class AppComponent {
  // ...

  constructor(private imageUploadService: ImageUploadService) {}

  // ...

  async uploadConvertedImage() {
    if (this.selectedFile && this.heicToJpegDirective) {
      try {
        await this.imageUploadService.uploadImage(this.heicToJpegDirective.convertedImageBlob, this.selectedFile.name.replace(/.[^.]+$/, '.jpg')).toPromise();
        console.log('Image uploaded successfully');
      } catch (error) {
        console.error('Error uploading image:', error);
      }
    }
  }
}
Finally, modify the src/app/app.component.html file to show the upload to server button:
<input type="file" (change)="onFilesSelected($event)" multiple accept=".heic" />
<div *ngFor="let file of selectedFiles">
    <h3>{{ file.name }}</h3>
    <img [appHeicToJpeg]="file" alt="Preview" />
    <button *ngIf="file" (click)="downloadConvertedImage(file)">Download</button>
    <button *ngIf="file" style="margin:20px" (click)="uploadConvertedImage(file)">Upload to Server</button>
</div>
Backend server
If you don’t have a backend server to test this, you can always use Beeceptor to mock a backend server to upload a file. Here are the detailed steps:
First, go to https://beeceptor.com/ and sign up for a free account. Once you have signed up, log in to your account.
After logging in, click on the “Create Endpoint” button after entering a sample endpoint name.


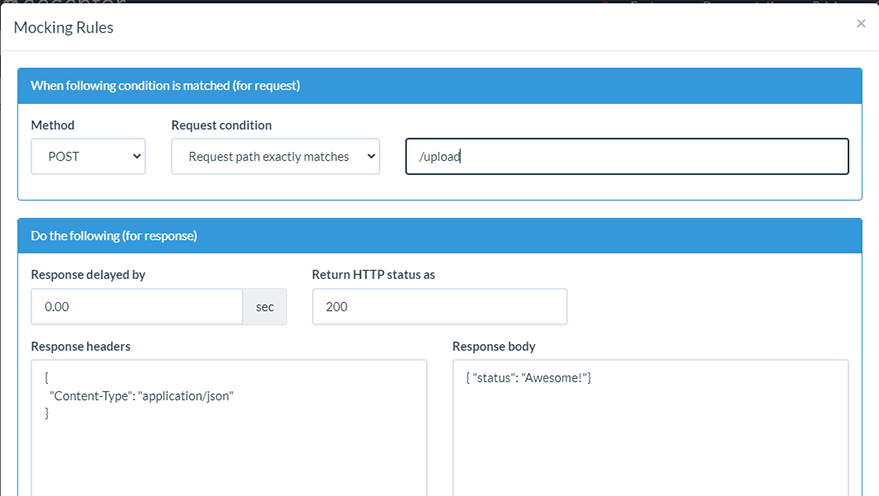
Now, enter the URL endpoint for the file upload API that you want to mock. For example, if your actual API endpoint for file upload is https://api.example.com/upload, then you can enter “/upload” in the “Endpoint” field, and save the rule.

Configuring the endpointWhen you click on the upload to server button you should be able to see the following results in the Beeceptor dashboard.


Above are the images showing the request received in backend webserver.
Using Alternative Libraries for Image Conversion:
While heic2any is a convenient library for converting HEIC images, there are other libraries available, such as libheif-js. You can experiment with different libraries to see which one best suits your needs.
Browser Support and Compatibility Considerations:
HEIC image support is not universal across all browsers and operating systems. As a result, always test your application in various browsers to ensure compatibility.
Testing and Debugging:
Use the Angular CLI to run unit and end-to-end tests to ensure your application works as expected:
ng test
ng e2e
You can go through the official angular documentation to learn more about testing and debugging in angular https://angular.io/guide/test-debugging
Performance Optimization:
Large HEIC files may take some time to process, and conversion performance can be a concern. To optimize performance, consider using web workers to offload the conversion process to a separate thread.
Conclusion
In this tutorial, we’ve covered how to handle HEIC images in Angular applications, from setting up the environment to uploading, previewing, and converting images. We also touched on error handling, progress indication, and integration with backend services. With this knowledge, you should now be able to build robust Angular applications that can handle HEIC images.

