

A hybrid approach to create mobile apps have has evolved a lot in the past decade. With frameworks and libraries competing with each other, big organizations triggering faster development and scope by making them open-source, this post is not going to be about which Hybrid framework is the best approach for you. Because there isn’t.
This post is going to be about giving you a quick start if you are interested in learning and developing mobile apps using React Native. Few fair advantages a framework like React Native is that it follows best practices from already tested and popular web development library Reactjs and if you are coming from a web development background, it is easier to pick.
What is React Native
In a nutshell, React Native a framework based on JavaScript APIs over native binaries that allows you to build mobile apps. It uses the same building blocks as regular iOS and Android apps for UI (user interface). As compared to some of the other hybrid frameworks, React Native does not use web views.
Rather, it runs an instance of JavaScript Core to execute JavaScript code when an app starts. It then uses RCTBridgeModule to make a connection between native code and JavaScript code.
Setting up a development environment
To get started with React Native’s ecosystem and build apps, you have to install the following SDKs and utilities.
- Node.js with at least
10.x.x.LTS. React Native uses Node.js as a JavaScript runtime to build the JS code. (install here) - Watchman is a tool developed by Facebook that watches for any file change in a React Native project. For Windows users, you are required to install
python2since there is no watchman available. - Java SE development kit for Android development.
- Xcode and/or Android Studio.
For different OS, there are different ways to install the above SDKs and utilities. However, React Native’s official documentation here precisely explains how to install them. Just choose your OS of choice.
React Native CLI or npx
To generate a new React Native project, there are two ways you can follow. The first one is to install a command-line interface (CLI) tool called react-native-cli. Open up a terminal window and execute the following command. Make sure you have root permissions to install a new CLI tool and a JavaScript package manager like npm or yarn already installed.
npm install -g react-native-cliThe other way is to use npx (a command-line utility that ships with Nodejs). This does not require you to install react-native-cli, and there is no difference in both of these approaches. To generate a new React Native project, open the terminal window and run:
npx react-native init [ProjectName]After the project directory, open it in your favorite code editor or IDE. You are going to get a similar project structure.

From the above image, let us take a brief look at the files or directories that are essential to understand.
- App.js is the entry file to any React Native project for the development process. Whatever code is written inside this file is going to render first on the mobile device.
- index.js is the second most important file that triggers the app on a device or a simulator.
- node_modules/ is the directory that contains all the dependencies and developer dependencies required in order to build the app.
- package.json is a file that keeps a record of every dependency and dev dependency installed.
- ios/ directory contains Xcode project and files to bootstrap React Native app on an iOS device.
- android/ directory contains files to bootstrap React Native app on an Android device.
- app.json lets you define the name of the application.
How to run a React Native app?
The default project generated with React Native CLI or using npx comes with a default set of components to display on a device (inside App.js file). In this section, let us learn how to run this default app. I am going to use an iOS simulator and an Android emulator. You can either of the two or both if you have access to it. The following two commands are going to create the native binaries for the React Native app to work on each of the platforms.
From a terminal window, make sure you are inside the project directory. For iOS, execute the below command.
npx react-native run-iosFor Android, just replace the keyword to run-android. Keep in mind that, an Android emulator or an Android device (with USB debugging on) must be connected to your development environment.
npx react-native run-androidHere is the demo of the default app running on both platforms:
Modify the App.js file
The default App.js has to many components being imported. Let us minify it to understand what is going on. Open the App.js file and start by importing the following statements.
import React from 'react';
import {View, Text} from 'react-native';
Then create a functional component called App that is going to return JSX code like below:
const App = () => {
  return (
    <View style={{flex: 1, justifyContent: 'center', alignItems: 'center'}}>
      <Text style={{fontSize: 24}}>Hello, world!</Text>
    </View>
  );
};
The JSX code in the above code snippet is a syntax for embedding XML within JavaScript. React uses a specialized templating language that allows embedding markup inside code.
Lastly, do not forget to export the App component, otherwise, an error is going to be displayed on the simulator device.
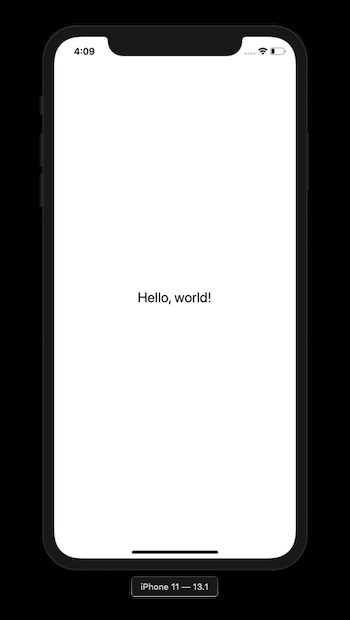
export default App;This statement is significant and we will cover the why in the next section. If you have completed the above steps, the result is going to be shown as below:
What is AppRegistery?
Remember that index.js file we discussed earlier in the directory structure? Go ahead and open it. You are going to find the following code snippet inside it:
/**
 * @format
 */

import {AppRegistry} from 'react-native';
import App from './App';
import {name as appName} from './app.json';

AppRegistry.registerComponent(appName, () => App);
This file is responsible to trigger any React Native app to run. It states that the App component should register by using AppRegistry.registerComponent. This helps the native system to load the React Native app as a bundle.
Understanding the components
In any React Native app, Components are the visual elements that let the user see what is being rendered on the screen. There are several core components to be used made available in React Native core. For example, the two of the most basic ones being used in the App.js file are: View and Text.
<View style={{flex: 1, justifyContent: 'center', alignItems: 'center'}}>
  <Text style={{fontSize: 24}}>Hello, world!</Text>
</View>
A View component is the basic building block. It puts a container element to support styling. The styling of any React Native component is done by using Flexbox. It maps native iOS (UIView) and Android (View) components. If you have any web development or HTML experience, think of it as a div element from HTML.
The Text component is similar to a View component. It is only used to display text and supports styling using Flexbox.
Note: Flexbox is the algorithm to specify the layout for a component and for its children to follow the same pattern.
In general, components bundled within React Native core can be classified in six different categories:
- Basic components such as
Text,View,Image,ScrollView,TextInputandStyleSheet. - List components such as
FlatListandSectionList. - iOS specific components such as
ActionSheetIOS,AlertIOSandImagePickerIOS. - Android specific components such as
PermissionsAndroidandToastAndroid. - Other components such as
Animated,Alert,Dimensions,Clipboard,StatusBar,WebViewand many more.
Styling React Native components
JavaScript objects are used style React Native components. All of the core components discussed in the previous section accept a prop called style. This prop is currently being used inside App.js and do notice that some amount of styling is being passed. This is one way to style components and is known as inline styling.
This is not the recommended way for various reasons such as a component grows in complexity, it becomes harder to maintain the inline styles.
The more efficient and organized way is to use StyleSheet API. This can be imported from react-native as below:
import {View, Text, StyleSheet} from 'react-native';To define styles using this API, you have to pass a JavaScript object (as shown below) and it returns a new StyleSheet object. To create a set of new styles, all you have to do is pass the JavaScript object inside StyleSheet.create() method.
const styles = StyleSheet.create({
  container: {
    flex: 1,
    justifyContent: 'center',
    alignItems: 'center',
  },
  title: {
    fontSize: 24,
  },
});
Styles returned from the above snippet can now be used instead of inline styling. This is done by directly referencing the object property name. For example, in App.js, replace the inline styles.
const App = () => {
  return (
    <View style={styles.container}>
      <Text style={styles.title}>Hello, world!</Text>
    </View>
  );
};
You can also pass an array of styles. For example, let us create another property in StyleSheet that just defines a color of red to anything it is applied as styles.
const styles = StyleSheet.create({
// ... rest remains same
red: {
color: 'red',
},
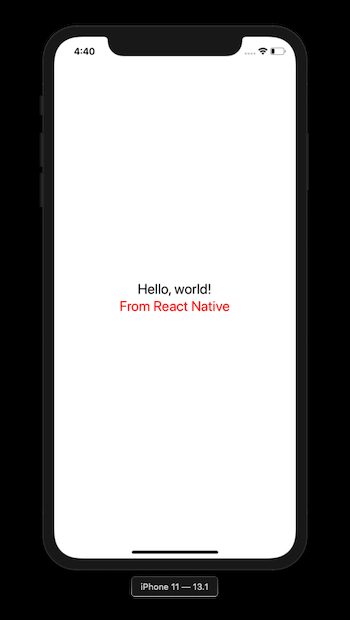
});Now, modify the JSX rendered by adding another Text component.
const App = () => {
  return (
    <View style={styles.container}>
      <Text style={styles.title}>Hello, world!</Text>
      <Text style={[styles.title, styles.red]}>From React Native</Text>
    </View>
  );
};
Here is the output:
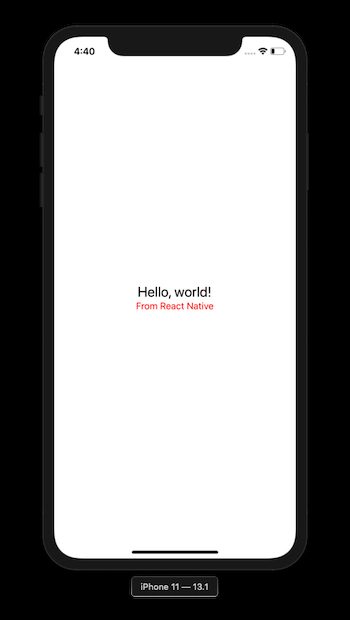
The last style in the array in the above snippet has precedence, so you can use this to inherit styles. If you add the fontSize in red, the second Text component is going to use the new fontSize property.
red: {
    fontSize: 16,
    color: 'red',
  },
Now go back to the simulator and you will notice the difference.
Conclusion
Once you understand the basic concepts of how to start and develop a React Native app, you should consider getting yourself familiarize with concepts like:
- ES6 and beyond JavaScript features
- Flexbox
- Basic Reactjs concepts such as state, props, hooks, and the difference between class and function components
This post was to get you familiar with what React Native is and how you can quickly start your development using it by setting up an environment and understanding the core components.