This article is aimed at developers who are interested in implementing email support with Flask. In the following example, I will start with an overview of the Flask-Mail package followed by the code that explains to integrate email support with the Flask Web Application.
1) Application Overview
One of the basic functions of any web application is to send emails. As a Python developer, you would have heard about the standard mail library smptlib which is quite easy to implement email functionality. The Flask-Mail extension on the other hand wraps smptlib and integrates it nicely with Flask making it much easier and effective to use.
To demonstrate the usage of email integration with Flask in this article let’s create a small application. We will create a small web interface for our Admin staff to add new users to the team and notify the Operations team with an email when a new user is onboarded.
Our flask application will have a home page for admins with add user button to add any new users to the database (SQLite as the backend) and notify the operations team email as soon as a new user is added.
2) Configuring our Back end – SQLite
We will first focus on getting our back end configured. Python has packages for most database engines, both open source, and commercial. Flask on other hand puts no restrictions on what database packages can be used, so you can work any of your favorite databases.
NOTE: You need not choose a framework that has integration with Flask, However, it will save you from having to write the integration code yourself.
Flask-SQLAlchemy is a Flask extension that simplifies the use of SQLAlchemy inside Flask applications.
Let’s install the Flask-SQLAlchemy extension using pip.
pip install flask-sqlalchemy
In Flask-SQLAlchemy, a database is specified as a URL. So remember for SQLite on Linux, Unix, or macOS specify the database as
sqlite:////absolute/path/to/database while on windows use the URL as sqlite:///z:/absolute/path/to/database.
SQLALCHEMY_DATABASE_URI in the flask can be used for configuring the URL of the SQLite database. The below code shows thee configuration used for the SQLite database.
# imports

import os
from flask import Flask, render_template, session, redirect, url_for, request
from flask_sqlalchemy import SQLAlchemy

"""
    Configuring the SQLite database...
"""
# set the directory
db_directory = os.path.abspath(os.path.dirname(__file__))

# configure the database URL
app.config['SQLALCHEMY_DATABASE_URI'] = 'sqlite:///' + os.path.join(db_directory, 'dbusers.sqlite')

# configure to use less memory
app.config['SQLALCHEMY_TRACK_MODIFICATIONS'] = False

# initiate the database
db = SQLAlchemy(app)
In the above code, db object represents our SQLite database.
2a) USERS table/model definition
We need to have a table called USERS in the database to store the details of the users. When referring to the persistent entities in the application the term model is used. A model is typically a Python class with attributes that match the columns of a corresponding database table (in our case USERS table).
# -------------------------------------------------------------------------
#                        Data Model Definition
# -------------------------------------------------------------------------
class User(db.Model):
    """
         Class: User
      Function: Data-model Definition for users table
    """
    __tablename__ = 'users'
    unq_id = db.Column(db.Integer, primary_key=True)
    user_full_name = db.Column(db.String(120), unique=True, index=True)

    def __repr__(self):
        return '<User  %r>' % self.user_full_name


# Import the objects with flask shell
@app.shell_context_processor
def make_shell_context():
    return dict(db=db, user_full_name=User)
Few important points from the above code.
- __tablename__ variable defines the table name in the database, If you omit it, SQLAlchemy assigns a default name.
- db.Column – defines the column name (note the upper case in Column)
- __repr__() – We will use this method for debugging and testing. Not a mandatory method
2b) Table Creation
Now that our configuration of the database is completed, time to create the USERS table using the Python shell as our table creation is a once-off activity.
I’m going to instruct Flask-SQLAlchemy to create a database based on the model classes. The db.create_all() function locates all the subclasses of db.Model and creates corresponding tables in the database for them.
Open the shell or anaconda prompt( on Windows) navigate to the root directory of the app and fire the below commands sequentially.
flask shell
from app import db
db.create_all()
Refer to the screenshot below on how to invoke the flask shell commands.

Upon validating the application directory, you will now see a new file there called dbusers.sqlite, the name that was given to the SQLite database in the configuration. Refer to the below screenshot as a reference.

2c) Inserting Sample Rows

The following example creates a few users in the USERS database. The constructors for models accept initial values for the model attributes as keyword arguments. The unq_id attribute of these new objects is not set explicitly as the primary keys in many databases are managed by the database itself.
>>> from app import User
>>> user1 = User(user_full_name='Roger Federer')
>>> user2 = User(user_full_name='Rafael Nadal')
For now, the objects exist only on the Python side and they have not been written to the database yet.
Flask-SQLAlchemy provides db.session to manage the changes to the database. First, we need to add the objects to the session as below.
>>> db.session.add(user1)
>>> db.session.add(user2)
Now to write the objects to the database, the session needs to be committed by calling its commit() method.
>>> db.session.commit()
2d) Validating the data
Flask-SQLAlchemy makes a query object available in each model class. To return the entire contents of our USERS table is with the all() method.
>>> User.query.all()
[<User  'Roger Federer'>, <User  'Rafael Nadal'>]
I will just consolidate all the flask shell commands used above in one piece of code below.
>>> flask shell
>>> from app import db
>>> db.create_all()
>>> from app import User
>>> user1 = User(user_full_name='Roger Federer')
>>> user2 = User(user_full_name='Rafael Nadal')
>>> db.session.add(user1)
>>> db.session.add(user2)
>>> db.session.commit()
>>> User.query.all()
3) Configuring Flask – Mail
First thing first let us install Flask mail library before we go on to more details.
pip install flask-mail
As per the official documentation, we can set up below configuration keys in our application to configure the SMTP server. Just remember, If no configuration is given, Flask-Mail connects to localhost at port 25 and sends email without authentication.
- MAIL_SERVER – Hostname or IP address of the email server.
- MAIL_PORT – Port Number of the email server.
- MAIL_USE_SSL – Enable Secure Sockets Layer (SSL) security.
- MAIL_USE_TLS – Enable Transport Layer Security (TLS) security.
- MAIL_USERNAME – EMail user name.
- MAIL_PASSWORD – EMail user Password.
- MAIL_DEFAULT_SENDER – EMail Default Sender name and email.
I will now show you how to configure our application to send email through GMAIL account.
import os
from flask_mail import Mail

app.config['MAIL_SERVER'] = 'smtp.gmail.com'
app.config['MAIL_PORT'] = 587
app.config['MAIL_USE_TLS'] = True
app.config['MAIL_USE_SSL'] = False
app.config['MAIL_DEFAULT_SENDER'] = ('Sender name', 'sender email')


mail = Mail(app)
Couple of important settings you should be aware of when using a GMAIL account with FLask.
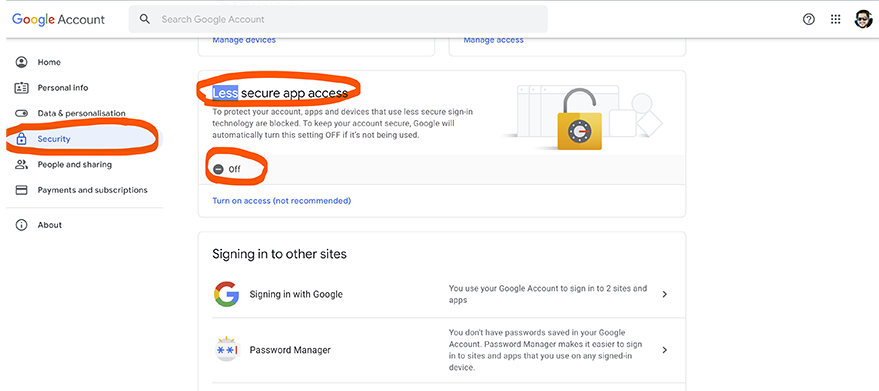
- Enabling Access for the less secure app: Python’s smtplib library does not support the OAuth2 method of authentication which is required by any external applications to connect to the GMAIL server. To make your Gmail account accept standard SMTP authentication, go to your Google account settings page and select “Security” from the left menu bar. On that page, locate the “Allow less secure apps” setting and make sure it is enabled. Refer to the below screenshot for reference.
- SMTP Authentication error: This is a common error that you might face while configuring an email. You can avoid this error by making sure you initialize the flask-mail only after setting up the configuration parameters first.

SMTP Authentication error
NOTE: Always use environment variables to set your account username and password rather than hardcoding it in your script.
3a) Testing the email configuration
To test the configuration, you can start a shell session and send a test email as shown in the below code.
>>> from app import mail
>>> from flask_mail import Message
>>> message = Message("This is a test email send with love..", recipients=['<email>@gmail.com'])
>>> message.body = "This is a test email send with love.."
>>> mail.send(message)
3b) Integrating email with web application
We will create a function for sending the email and avoid having to create email messages manually every time.
# -----------------------------------------------------------------------------------------
# send email function
def send_email(recipient, email_subject, email_body):
    """
      function: send email
       :param : recipient - deliver the email to this recipient
                email_subject - subject of the email
                email_body - Body of the mail..

    """
    message = Message(email_subject, recipients=[recipient])
    message.body = email_body
    mail.send(message)
The send_email() function takes the recipient’s email address, a subject line, and an email body.
4. Integration With Flask Web Application
Flask is very simple to use, but it supports many extensions that are useful in professional web development. It’s my personal favorite among Python web frameworks because it balances ease of use with a rich feature set.
The flask package also includes the jinja2 template library that is quite powerful with a very rich set of features.
First thing first let us set up the app like below and then we will go into details.
~/Flask-Mail
        |-- app.py
        |__ /views
            |-- UserForm.py
        |__ /templates
            |__ /includes
                |-- _flashmsg.html
                |-- _formhelpers.html
            |__ index.html
Time to discuss the components in detail before we go and run it to see LDAP validation. We will first discuss the design steps that are being implemented. The design is pretty simple and I will do my best to explain it in that way.
4a). Design Steps
- The Admin user will initiate the flask web application through the URL which displays the index page with a box to submit the user name to be added.
- Upon adding the user name (full name), the user is validated against our database.
- If the User is in the database no action will happen.
- If the User is not in the database, the user is added to the database, and an email is sent to the pre-configured email.
4b) Components: Templates
I will be using a single index template simple enough for this demonstration purpose.
index.html
This is the home page for the admin user to add a new user to the database. The HTML template is quite simple with just the userbox and submits button.
In this template, we have used Jinja to render fields from the Flask form stored in the /views directory. In this template, we have used the CSRF (Cross Site Request Forgery) for security purposes.
We have protected our web app from the CSRF attack, so we need to use it in all our forms just to make sure we are not be attacked by anonymous requests.
Lets now look at our index.html
<html lang="en">
<head>
    <!-- Required meta tags -->
    <meta charset="utf-8">
    <meta name="viewport" content="width=device-width, initial-scale=1, shrink-to-fit=no">

    <!-- Bootstrap CSS -->
    <link rel="stylesheet" href="https://maxcdn.bootstrapcdn.com/bootstrap/4.0.0/css/bootstrap.min.css"
          integrity="sha384-Gn5384xqQ1aoWXA+058RXPxPg6fy4IWvTNh0E263XmFcJlSAwiGgFAW/dAiS6JXm" crossorigin="anonymous">
    <title>Flask Example</title>
</head>


<br>
<body class="bg-gradient-white">
<div id="page-wrapper">
    <div class="container">
        {% include 'includes/_flashmsg.html' %}
        {% from "includes/_formhelpers.html" import render_field %}
        <div class="row justify-content-center">
            <div class="col-xl-10 col-xl-12 col-xl-9">
                <div class="card o-hidden border-0 shadow-lg my-5">
                    <div class="card-body p-0">
                        <div class="row">
                            <div class="col-lg-6">
                                <div class="p-4">
                                    <div class="text-center">
                                        <h1 class="h4 text-gray-900 mb-4">
                                            <button type="button" class="btn btn-danger btn-circle-sm"><i
                                                    class="fa fa-mask"></i></button>
                                            Flask-Main Integration
                                        </h1>
                                    </div>

                                    <div class="page-header">
                                        {% if not known %}
                                            <p>Lets add a new user to the database!</p>
                                        {% else %}
                                            <p>User {{ user_full_name }} added to the database and Ops team notified</p>
                                        {% endif %}
                                    </div>

                                    <form method="POST" class="form-horizontal needs-validation"
                                          action="{{ url_for('index') }}">
                                        {{ form.csrf_token }}
                                        <div class="form-group row">
                                            <div class="col-sm-10">
                                                {{ render_field(form.user_name_pid, class_="form-control", value="") }}
                                            </div>
                                        </div>

                                        <div class="form-group row">
                                            <div class="col-sm-4 col-form-label">
                                                <input type="submit" class="btn btn-primary" onclick="loading();">
                                            </div>
                                        </div>

                                    </form>
                                    <hr>
                                </div>
                            </div>
                        </div>
                    </div>
                </div>
            </div>
        </div>
    </div>
</div>

<script src="https://code.jquery.com/jquery-3.2.1.slim.min.js"
        integrity="sha384-KJ3o2DKtIkvYIK3UENzmM7KCkRr/rE9/Qpg6aAZGJwFDMVNA/GpGFF93hXpG5KkN"
        crossorigin="anonymous"></script>
<script src="https://cdnjs.cloudflare.com/ajax/libs/popper.js/1.12.9/umd/popper.min.js"
        integrity="sha384-ApNbgh9B+Y1QKtv3Rn7W3mgPxhU9K/ScQsAP7hUibX39j7fakFPskvXusvfa0b4Q"
        crossorigin="anonymous"></script>
<script src="https://maxcdn.bootstrapcdn.com/bootstrap/4.0.0/js/bootstrap.min.js"
        integrity="sha384-JZR6Spejh4U02d8jOt6vLEHfe/JQGiRRSQQxSfFWpi1MquVdAyjUar5+76PVCmYl"
        crossorigin="anonymous"></script>
</body>
</html>
4c) Components: Views
UserForm.py
This is the form that will be rendered in the above index.html. The form is imported from flask_wtf with just one string field.
from app import *
from flask_wtf import Form
from wtforms import StringField, validators


class LoginValidation(Form):
    user_name_pid = StringField('', [validators.Required()],
                                render_kw={'autofocus': True, 'placeholder': 'Enter User Full Name'})
4d) Components: app.py
This is the heart of our program. The app.py contains the details that are discussed in the above sections.
import os
from flask import Flask, render_template, session, redirect, url_for, request
from flask_sqlalchemy import SQLAlchemy
from flask_mail import Message
from flask_bootstrap import Bootstrap
from flask_wtf.csrf import CSRFProtect

from flask_mail import Mail
from views.UserForm import *

app = Flask(__name__)
bootstrap = Bootstrap(app)

app.config.from_object('settings')
app.secret_key = os.urandom(24)
app.config['MAX_CONTENT_LENGTH'] = 16 * 1024 * 1024

app.config['MAIL_SERVER'] = 'smtp.gmail.com'
app.config['MAIL_PORT'] = 587
app.config['MAIL_USE_TLS'] = True
app.config['MAIL_USE_SSL'] = False
app.config['MAIL_USERNAME'] = ''
app.config['MAIL_PASSWORD'] = ''
app.config['MAIL_DEFAULT_SENDER'] = ('Sender name', 'sender email')
app.config['OPS_TEAM_MAIL'] = ''
csrf = CSRFProtect(app)
mail = Mail(app)

# -----------------------------------------------------------------------------------------
"""
    Configuring the SQLite database...
"""
# set the directory
db_directory = os.path.abspath(os.path.dirname(__file__))

# configure the database
app.config['SQLALCHEMY_DATABASE_URI'] = 'sqlite:///' + os.path.join(db_directory, 'dbusers.sqlite')

# configure to use less memory
app.config['SQLALCHEMY_TRACK_MODIFICATIONS'] = False

# initiate the database
db = SQLAlchemy(app)


# -------------------------------------------------------------------------
#                        Data Model Definition
# -------------------------------------------------------------------------
class User(db.Model):
    """
         Class: User
      Function: Data-model Definition for users table
    """
    __tablename__ = 'users'
    unq_id = db.Column(db.Integer, primary_key=True)
    user_full_name = db.Column(db.String(120), unique=True, index=True)

    def __repr__(self):
        return '<User  %r>' % self.user_full_name


# -----------------------------------------------------------------------------------------
# Import the objects with flask shell
@app.shell_context_processor
def make_shell_context():
    return dict(db=db, user_full_name=User)


# -----------------------------------------------------------------------------------------
# send email function
def send_email(recipient, email_subject, email_body):
    """
      function: send email
       :param : recipient - deliver the email to this recipient
                email_subject - subject of the email
                email_body - Body of the mail..

    """
    message = Message(email_subject, recipients=[recipient])
    message.body = email_body
    mail.send(message)


# -----------------------------------------------------------------------------------------
@app.route('/', methods=['GET', 'POST'])
def index():
    # initiate the form..
    form = LoginValidation()

    if form.validate_on_submit():
        user = User.query.filter_by(user_full_name=form.user_name_pid.data).first()
        if user is None:
            print(f" *** {user} Not found")
            user = User(user_full_name=form.user_name_pid.data)
            db.session.add(user)
            db.session.commit()
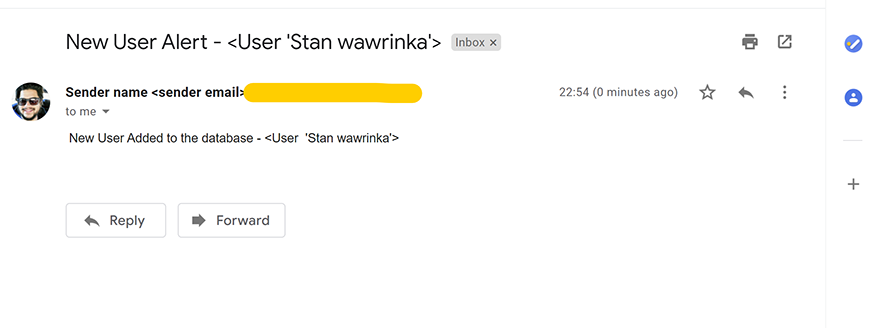
            email_subject = f" New User Alert - {str(user)}  "
            email_body = f" New User Added to the database - {str(user)}  "
            send_email(app.config['OPS_TEAM_MAIL'], email_subject, email_body)
            session['known'] = False
        else:
            print(f" *** {user} found")
            session['known'] = True
        session['user_full_name'] = form.user_name_pid.data
        form.user_name_pid.data = ''
        return redirect(url_for('index'))

    return render_template('index.html',
                           form=form,
                           name=session.get('user_full_name'),
                           known=session.get('known', False))


if __name__ == '__main__':
    app.run(debug=True)
5. Final Step – Executing The Code
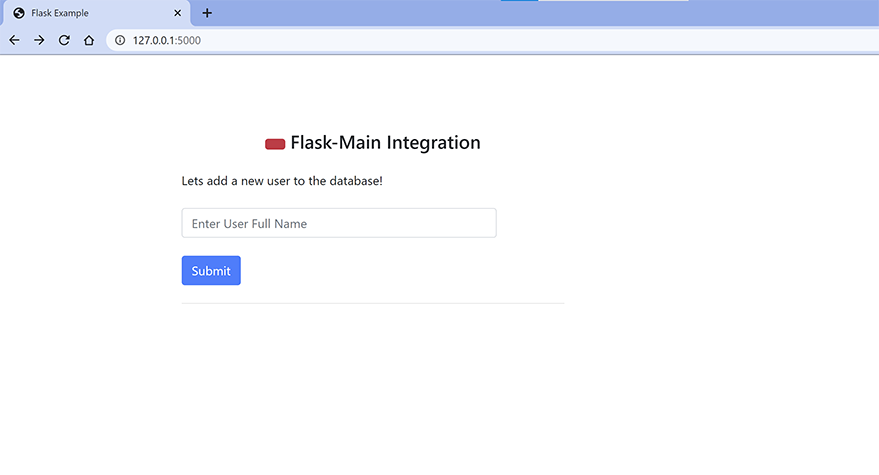
It is time now to initiate the Flask App. Once the APP is initiated, it’s time to open the browser and hit the URL – “http://127.0.0.1:5000/login”.
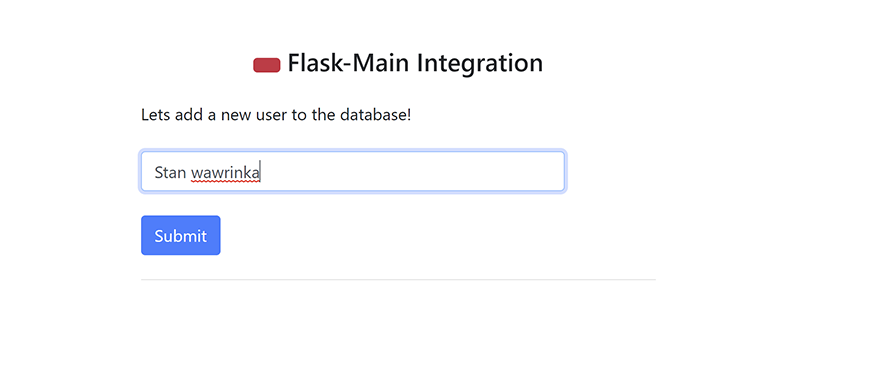
Now, let’s enter the user name and hit the submit button. The new user will be updated in the back-end database and the email will be triggered back to the recipient.
The article cover image had been downloaded from Unsplash.
If you liked this article and if it helped you in any way, feel free to like it and subscribe to this website for more tutorials.
If you believe this article will be of big help to someone, feel free to share.


