

In June, OpenAI announced that third-party applications’ APIs can be passed into the GPT model, opening up a wide range of possibilities for creating specialized agents. Our team decided to write our own chat for working with GPT4 from OpenAI and other ML/LLM models with the ability to customize for the company’s internal needs. The project is open source, and can be downloaded via the link. It is currently in active development, so we would be glad to see your comments / wishes in the comments. Also, send us your pull requests with corrections.
For the backend, we chose Python, Django Rest Framework. On the frontend, React, Redux, Saga, Sass. Let’s start with the backend, which was managed by Yegor. He writes about the server part of the project himself.

Backend
The backend part of my project runs on Django. Also, Django Rest Framework is used for the API. These tools are very popular today, and there are many ready-made libraries for them, which has accelerated the programming process.
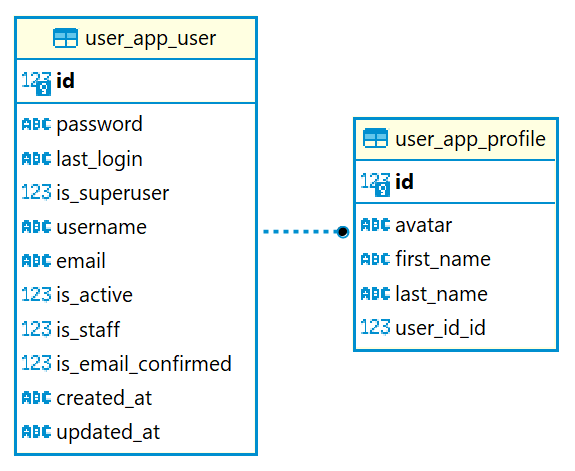
Let’s start with the fact that users more easily remember their email address than a username, which may be taken unlike a unique email. Therefore, I decided to create my own User model, with some changes compared to the basic model in Django. It’s important not to forget that it’s crucial to think through the user model at the initial stages of the project!
Custom User Model
Let’s start with the changes:
1. Create a User model. I added an ‘is_email_confirmed’ flag, so we could track the email confirmation. Authorization will now be made through email. Decided to leave the option of choosing the own username.
class User(AbstractBaseUser, PermissionsMixin):
   username = models.CharField(db_index=True, max_length=25, unique=True)
   email = models.EmailField(db_index=True, unique=True)


   is_active = models.BooleanField(default=False)
   is_staff = models.BooleanField(default=False)
   is_email_confirmed = models.BooleanField(default=False)


   created_at = models.DateTimeField(auto_now_add=True)
   updated_at = models.DateTimeField(auto_now=True)


   USERNAME_FIELD = 'email'
   REQUIRED_FIELDS = ['username']
   objects = UserManager()
2. Add a Manager, so users can be added to the database.
class UserManager(BaseUserManager):
   def create_user(self, username, email, password=None):
       if username is None:
           raise TypeError('Users must have a username.')
       if email is None:
           raise TypeError('Users must have an email address.')
       user = self.model(username=username, email=self.normalize_email(email))
       user.set_password(password)
       user.save()
       return user


   def create_superuser(self, username, email, password):
       if password is None:
           raise TypeError('Superusers must have a password.')
       user = self.create_user(username, email, password)
       user.is_superuser = True
       user.is_email_confirmed = True
       user.is_staff = True
       user.save()
       return user
3. Assign User model in settings.py configuration:
AUTH_USER_MODEL = "user_app.User"
I wanted users to edit their personal information, creating the image of live communication. Thus, I decided to add a profile, where personal information is stored, including avatar.
Profile model:
class Profile(models.Model):
   user_id = models.OneToOneField(settings.AUTH_USER_MODEL, on_delete=models.CASCADE)
   avatar = models.ImageField(upload_to=get_image_filename, blank=True)
   first_name = models.TextField(max_length=32)
   last_name = models.TextField(max_length=32)
But if you do registration verification, you’ll notice that only the User model is created, without Profile. To fix this, and to add a profile model when creating a user model, you should apply a signal. Django uses the receiver decorator to define signal receivers. The following code will automatically create our profile for the user:
@receiver(post_save, sender=User)
def create_profile(sender, instance, created, **kwargs):
   if created:
       Profile.objects.create(user_id=instance)
JWT Authorization
Now to interact with the system, you need to authenticate. For this, I decided to choose JWT authorization, as it’s considered one of the safe ways to transfer information between two parties. The main usage scenario looks like this: using an access token, we can access private resources, but when this token expires, we send a refresh token and we get a new pair of access token + refresh token. Refresh token can also expire, but it has a much longer lifespan and if the lifespan of the refresh token expires, you can simply re-pass the authorization procedure to get the JWT.

This implementation already has a ready library, Simple JWT. It does an excellent job of generating access and refresh tokens, but to secure against CSRF and XSS attacks, I decided to pass the refresh token in an HttpOnly Cookie. For this, I had to change the basic JWT settings, and add a cookie to the response. The sample code to add a refresh token to the cookie is:
response.set_cookie(
   key=settings.SIMPLE_JWT['AUTH_COOKIE_REFRESH'],
   value=token,
   expires=settings.SIMPLE_JWT['REFRESH_TOKEN_LIFETIME'],
   secure=settings.SIMPLE_JWT['AUTH_COOKIE_SECURE'],
   httponly=settings.SIMPLE_JWT['AUTH_COOKIE_HTTP_ONLY'],
   samesite=settings.SIMPLE_JWT['AUTH_COOKIE_SAMESITE']
)
I had certain difficulties. The question why the token is not being saved properly and just hangs in the response took most of the time. In this case, you should consider the settings.py file and add the parameter to it:
CORS_ALLOW_CREDENTIALS = True
And don’t forget to change SIMPLE_JWT settings, as follows:
'AUTH_COOKIE_SECURE': False – needed when connecting https;
'AUTH_COOKIE_HTTP_ONLY' : True – HttpOnly Flag;
'AUTH_COOKIE_SAMESITE': ‘Lax’ – cookies are fully blocked for cross-site requests.
Also, remember that on the Frontend, the request should be with the withCredentials: true parameter.
Access to NLP (GPT)
Now that we’re authorized, we can reach out to the model and get a response. The inquiry is a regular message, and what does a message have? Exactly, its own dialog within which it goes. Based on this logic, you can communicate with NLP taking into account the context of previous messages. Perhaps it’s time to write a request. The text of our request will be “Write bubble sort in Python”, because who didn’t start programming with writing bubble sort :). As soon as you press Enter, a request is sent to our API, from which we will get a response. The response is recorded using the function take_answer(), to which we pass the request:
answer_text = take_answer(validated_data['message_text'], validated_data['dialog_id'])
message = Message.objects.create(answer_text=answer_text, **validated_data)
OpenAI provides access to its API. In the project, interaction with the API is organized according to the following principle:

The request to OpenAI is made using the ChatCompletion.create() function, let’s study it in more detail:
previous_messages = Message.objects.filter(dialog_id=dialog_id).order_by('-id')[:5]
    messages = [
        {"role": "system", "content": "You are a helpful assistant."}
    ]

    for message in previous_messages:
        user_message = {"role": "user", "content": message.message_text}
        ai_message = {"role": "assistant", "content": message.answer_text}
        messages.extend([user_message, ai_message])

    user_prompt = {"role": "user", "content": prompt}
    messages.append(user_prompt)

    response = openai.ChatCompletion.create(
        model="gpt-4",
        messages=messages
    )
We take the previous requests and responses, 5 pieces each, and send them to OpenAI in ChatCompletion, decided not to change the model without any specific needs for now. Now it’s time to look at the response, which should have already come:
{
  "id": 1,
  "message_text": "Write bubble sort in Python",
  "answer_text": "Certainly! Here's an example of the bubble sort algorithm implemented in Python:nn```pythonndef bubble_sort(arr):n    n = len(arr)n    n    for i in range(n):n        # Last i elements are already in placen        for j in range(0, n-i-1):n            # Swap if the element found is greater than the next elementn            if arr[j] > arr[j+1]:n                arr[j], arr[j+1] = arr[j+1], arr[j]nn# Example usagenarr = [64, 34, 25, 12, 22, 11, 90]nbubble_sort(arr)nprint("Sorted array: ", arr)n```nnThis implementation sorts the input list in ascending order using the bubble sort algorithm.",
  "dialog_id": 1
}
And I was so pleased when I realized that this response can be converted into Markdown for the user. Otherwise, it would be completely unreadable and I would have to come up with or look for a solution to display the answer on the screen.
Frontend
Now, I will tell about my part of the work (Nikita). I have broken down the application into the following Redux modules:
- Auth (authorization, registration, password recovery);
- Chat (working with messages, dialogs);
- User (user data such as username, email, loading, error);
- Profile (user data such as First Name, Last Name, Photo).
Then, I will go into detail about how the routing, registration, authorization, and chat are organized.
Routing
I’ve added routing for the pages of authorization, registration, chat, settings, profile. The use of routing is very relevant for chat since it allows using a link to open a certain state. I divided the routing into two files: routes and index. In routes.js I created several lists of routes, which assume different levels of access. For example, for an authorized and unauthorized user, as well as public routes, the behavior of which should not change depending on whether the user is authorized or not. This approach reduces the number of redirects and checks that are used in the application. And if a user ends up on a page where they don’t have access, the router automatically redirects them to the authorization page. Here is a portion of the routes file as an example:
const authProtectedRoutes = [
  { path: "/chats/", component: <Chats /> },
  { path: "/chats/:id", component: <Chats /> },
  { path: "/profile", component: <Profile /> },
  { path: "/settings", component: <Settings /> },
  { path: "/logout", component: <Logout /> },


  // this route should be at the end of all other routes
  // eslint-disable-next-line react/display-name
  {
    path: "/",
    exact: true,
    component: <Navigate to="/chats" />,
  },
];


const publicRoutes = [
  { path: "/email-verify/:token", component: <EmailVerification/> },
  { path: "/password-reset/:token", component: <PasswordReset/> },
  { path: "/forget-password", component: <ForgetPassword /> },
];


const authRoutes = [
  { path: "/login", component: <Login /> },
  { path: "/register", component: <Register /> },
];
Index.js is the main routing component that returns a list of routers and sets different rules for each route depending on the type of list. Here is an example of a route from index.js for an internal dashboard of the project, which is not available for authorized users:
{/* private/auth protected routes */}
{authProtectedRoutes.map((route, idx) =>
  <Route
    path={route.path}
    layout={AuthLayout}
    element={
      <AuthProtected>
        <AuthLayout>
          {route.component}
        </AuthLayout>
      </AuthProtected>
    }
    key={idx}
  />
)}
Registration / Authorization
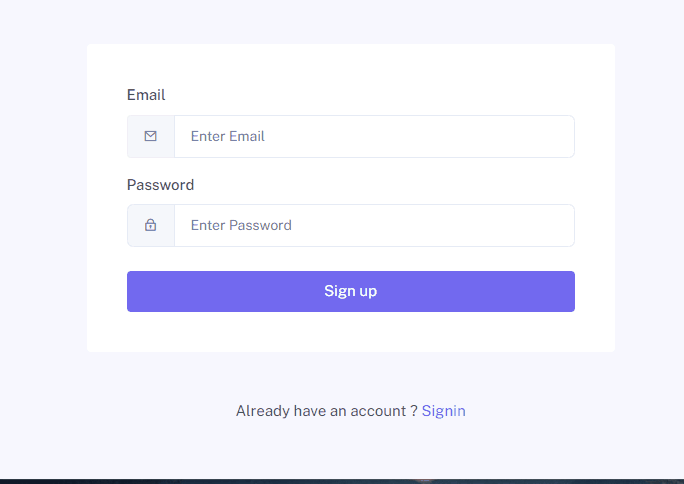
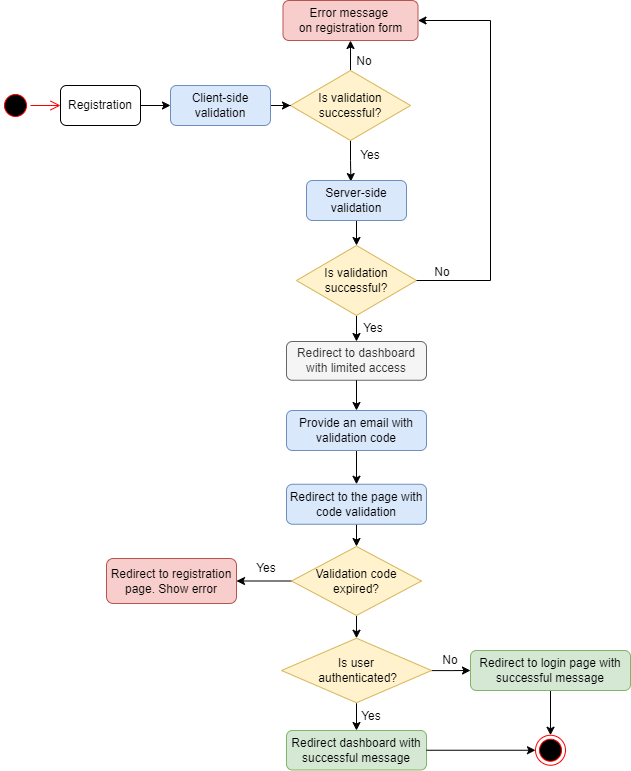
Registration consists of several stages:
- Registration window, validation of user data.
- Sending an email with a link to confirm user data.
- Immediately after registration, the user is redirected to the /chats page with limited access.
- At this point, the user has a flag
"is_email_confirmed" = false. - After email confirmation, a notification should be displayed in the dashboard that the email has been confirmed, if the user is already authorized. If the user is not authorized, redirect to the login page and display a message that the email has been confirmed.
Validation during Registration
Validation is organized through the ReactHook useFormik.
const formik = useFormik({
        initialValues: {
            email: '',
            password: ''
        },
        validationSchema: Yup.object({
            email: Yup.string().email('Enter proper email').required('Required'),
            password: Yup.string()
                .required('Required')
        }),
        onSubmit: values => {
            console.log('Register page', 'onSubmit', values.email, values.password );
            props.registerUser(values.email, values.password );
        },
    });
At the same time, through the Hook useEffect, we track the errors that come from the server and also display them in the View:
useEffect(() => {
        if (props.error && props.error.errors) {
            const propsErrors = props.error.errors;
            setErrors(propsErrors);
            let formErrors = {};
            for (let key in propsErrors) {
                formErrors[key] = propsErrors[key][0];
            }
            formik.setErrors(formErrors);
        }
    }, [props.error]);
Email Confirmation
Email confirmation is implemented through the EmailVerification.js component. If a correct token is received, the component redirects to the login page, otherwise, it displays an error.
<CardBody className="p-4">
  {/* In case if user is already logged in it manages at router */}
    {props.emailConfirmed ? (
    // We have to show successfull message at login page
      <Navigate to={{ pathname: "/login", state: { from: props.location } }} />
        ) : (
          <Alert color="danger">
            Confirmation failed.
          </Alert>
        )}
        <Link to="/login" className="font-weight-medium text-primary"> {t('Signin now')} </Link>
  </CardBody>
Authorization
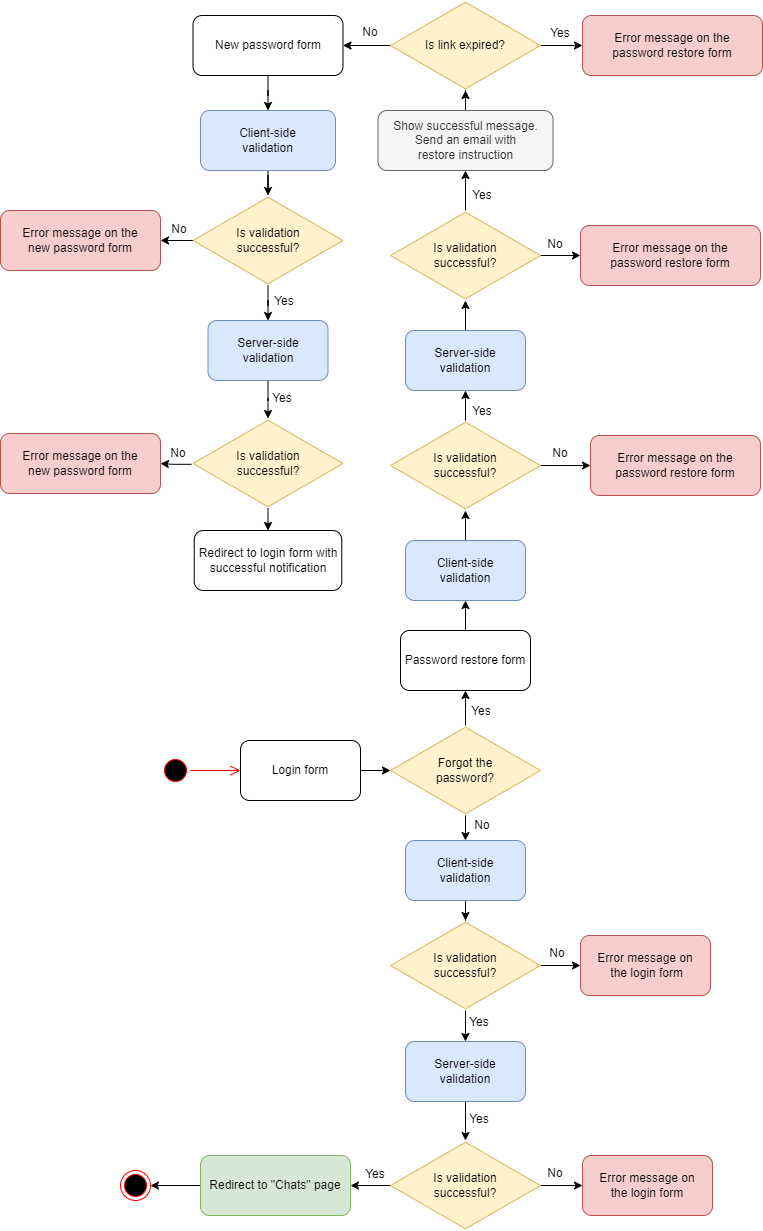
The main logic for working with authorization, I transferred to the autUtils.js helper. We use the OAuth2 mechanism to work with authorization. Two tokens, access and refresh, are used to track user authorization. Accordingly, while the access token is active, the user has access to the internal structure of the project. When the token expires, I request a token refresh through the API using a refresh token. The jwtDecode module is used to check the token expiry date.
/**
 * Refresh the access token
 * We use API here, because we use it in middleware in ApiAuthorizedClient
 */
const refreshAccessToken = async () => {
    let tokens = getTokens();
    if (tokens && tokens.access) {
        const decoded = jwtDecode(tokens.access);
        const currentTime = Date.now() / 1000;
        if (decoded.exp > currentTime) {
            // Token is still valid, return it
            return tokens.access;
        }
    }


    // Token is not in localStorage or is expired, refresh it
    try {
        const response = await axios.post(`${API_URL}/token/refresh/`, { refresh: tokens.refresh });
        if (response.data && response.data.access) {
            setTokens(response.data); // Save the new token to localStorage
            return response.data.access;
        }
    } catch (error) {
        console.error('Error refreshing access token:', error);
        localStorage.removeItem("tokens");
        throw error;
    }
}


/**
 * Checks if access token is expired and refreshes it if necessary
 */
const checkAndRefreshToken = async () => {
    const tokens = getTokens();
    if (!tokens) {
        throw new Error('User not authenticated');
    }


    try {
        const decoded = jwtDecode(tokens.access);
        const currentTime = Date.now() / 1000;
        if (decoded.exp < currentTime) {
            console.warn('Access token expired. Refreshing...');
            const newAccessToken = await refreshAccessToken();
            return newAccessToken;
        } else {
            return tokens.access;
        }
    } catch(error) {
        console.warn('Error decoding token:', error);
        throw error;
    }
}
Chat
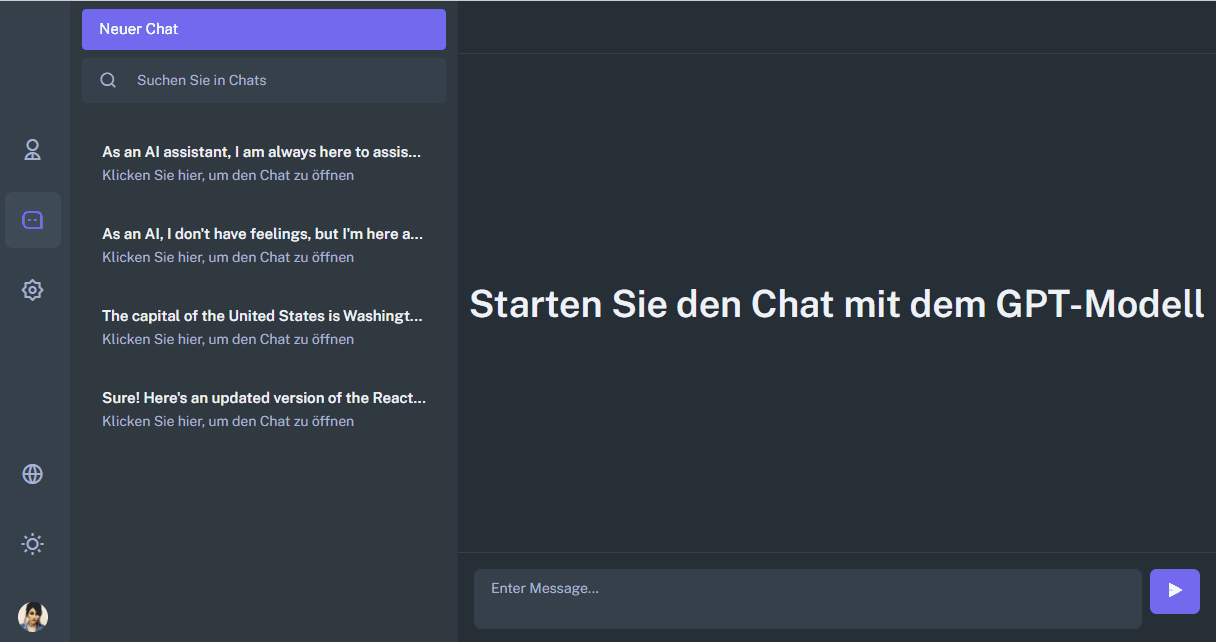
The chat is divided into the following components:
- Chats.js contains a list of chats from the left column. The component contains logic on working with paths such as chats/:id
- ChatInput.js the component is responsible for the operation of the input field.
- Index.js contains logic for displaying a list of messages.
- UserHead contains the logic of chat operation: delete, return to the list of dialogs for the mobile version.
The OpenAI API returns responses in Markdown format. To display responses from the chat, which contain formatting, I used the ReactMarkdown component. For code inserts, I used React Syntax Highlighter.
We import the necessary components:
import React, { useRef } from 'react';
import ReactMarkdown from 'react-markdown';
import { Prism as SyntaxHighlighter } from 'react-syntax-highlighter';
import { solarizedlight } from 'react-syntax-highlighter/dist/esm/styles/prism';
We output responses from GPT using formatting:
<div className="conversation-list">
  <div className="user-chat-content">
    <div className="ctext-wrap">
      <div className="ctext-wrap-content">
        <ReactMarkdown components={{code: CodeBlock}} className="mb-0">
          {chat.answer_text}
        </ReactMarkdown>
      </div>
  </div>
</div>
It was not entirely obvious how to correctly switch from the screen of a new chat, which is located on the path /chats to a certain chat /chats:id.
The logic is now as follows:
- When creating the first message, a POST request is sent to create a dialogue.
- Upon receiving a response that the dialogue is created, a new list of dialogs is drawn.
- A POST request is sent to send a message to the LLM model.
- After the list of dialogues is finished rendering, a redirect to a new tab is implemented.
- We wait for an answer from the model and display the message in the chat.
The main part of the business logic, which is responsible for switching to a new dialogue, is implemented in the Chats.js component.
useEffect(() => {
        props.getAuthorizedUser();
        props.fetchDialogues();
    }, []);


    useEffect(() => {
        const dialogues = props.dialogues;
        if (dialogues && dialogues.length === 0) {
            return;
        }


        setRecentChatList(dialogues);

        const activeDialogueId = props.activeDialogueId;
        if (id === 0 && activeDialogueId > 0) {
            //added new dialogue
            navigate(`/chats/${activeDialogueId}`);
        }
    }, [props.dialogues]);


    useEffect(() => {
        if (props.activeDialogueId === id){
            return;
        }
        props.setActiveDialogue(id);
        openUserChat(id);
    }, [id]);


    const openUserChat = (dialogueId) => {
        //check /chats page or initalStage
        if (dialogueId === 0) {
            return;
        }
        //TODO: we have to check if we already have actual messages into state
        props.fetchMessages(dialogueId);
    };
Function in Chat/saga.js, which implements POST requests to the server to create a new dialogue and chat:
function* addDialogue(action) {
  const data = action.payload;
  try {
      const dialogue = yield api.post('/dialogues/', {
          "user_id": data.user_id,
          "name": data.name
      });
      yield put({ type: ADD_DIALOGUE_SUCCESS, payload: dialogue });
      if (data.message) {
        yield put({ type: ADD_MESSAGE_REQUEST, payload: {
          "message_text": data.message,
          "dialog_id": dialogue.id
        }});
      }
  } catch (error) {
    console.log(error);
  }
}
Near Future Plans
- Displaying of errors and server messages – currently, this is partially implemented for registration and authorization.
- Message loading display. Streaming server messages as implemented in ChatGpt. Instantly display user messages.
- Add logic to work with the user profile.
- Add the ability to work with different types of agents (ML models).
Github link: https://github.com/FosterFlow/fosterflow
Project link: fosterflow.com