Defenition: POS – “Point of Sale”. At the point of sale, the merchant calculates the amount owed by the customer, indicates that amount, may prepare an invoice for the customer (which may be a cash register printout), and indicates the options for the customer to make payment.
In the previous chapters, we completed the setup of the Recaptcha protected frontend and backend. In this chapter, we are going to continue to create our POS system by integrating Redux state management. Redux is a manageable and structured state container for JavaScript applications. It can be easily used with React. The Redux store enables you to manage the state variables globally. It helps the applications to behave consistently, run in different environments, and test easily. In this chapter, we are going to make use of redux-devtools as well. Redux devtools enables hot reloading, action replay, and customizable UI of our React-based application. It powers up the Redux development workflow or any other architecture which handles the state change.
Why Redux ..??
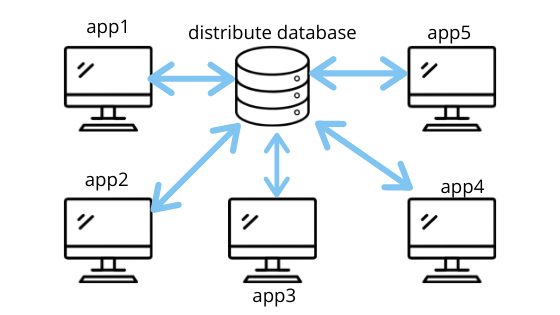
Sharing data between the components of the project can be difficult. The data connected to different parts of the component may change. The change may occur from any component. The change must be synchronized so that the change from one component is visible to every other component. You can imagine redux like a distributed database in which all application doesn’t have their own local database. The data is synchronized to a central database so that each and every machine receives the updated data. This solves the problem of multiple components.

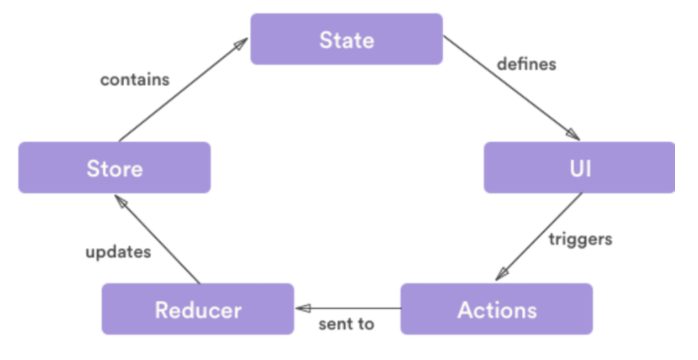
In the absence of Redux state management, the variables and function of each component will be stored in the component themselves difficult to synchronize between different components. Using redux, this problem can be easily solved as the state variables and functions are kept in a centralized redux store rather than in components. The components can access these state variables in store using actions and reducers as shown in the redux state management flow diagram below:

Reducer
Reducers defines the way in which the application’s state changes in response to actions sent to the store.
Actions
Actions are functions that are accessed or triggered by components to send data from your application to your store.
Store
Store is an object that integrates the cooperation of both reducers and actions. It is the location that holds the application state.

Here, we have got an overview of what redux state management is. You can go into the depth of the redux state management mechanism in any other articles out there. Now, we are going to install the redux into our react project.
In order to install the redux with all its required dependencies into our project, we need to run the command from the following code snippet into our projects command prompt:
yarn add redux react-redux redux-thunk redux-logger
redux – main redux package for state management
react-redux – Official React bindings for Redux. for more info check out react-redux site
redux-thunk – Redux Thunk middleware allows you to write action creators that return a function instead of an action.
redux-logger – Simply description is the log for redux
Redux for the first component
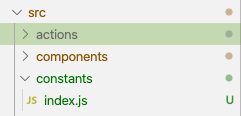
First, we are going to integrate redux functionality into our login component. For that, we are going to create constant to store environment variables and create a folder named constant and index.js inside it as shown in the screenshot below:

In index.js, we define states for login fetching, success, failed as shown in the code snippet below:
export const LOGIN_FETCHING = "LOGIN_FETCHING";
export const LOGIN_FAILED = "LOGIN_FAILED";
export const LOGIN_SUCCESS = "LOGIN_SUCCESS";
In order to make things easier later, we define additional environment variables to contain route information and required URLs:
export const apiUrl = "http://localhost:8080/api/v1";
export const imageUrl = "http://localhost:8080";
export const server = {
  LOGIN_URL: `login`,
  REFRESH_TOKEN_URL: `refresh/token`,
  REGISTER_URL: `register`,
  PRODUCT_URL: `product`,
  TRANSACTION_URL: `transaction`,
  REPORT_URL: `report`,
};
Actions
Now, we are going to move into implementing actions. First, we need to create a file named HttpClient. This file should contain the functions that hold any request by attaching a token to the request. It the token is not available then the server returns 401 error. Now, we need to refresh the token. If the server returns 403 error then, we need to force the user to re-login. The overall code to implement this is shown in the code snippet below:
import axios from "axios";
import join from "url-join";
import { server, apiUrl } from "../constants";

const isAbsoluteURLRegex = /^(?:w+:)///;

axios.interceptors.request.use(async (config) => {
  if (!isAbsoluteURLRegex.test(config.url)) {
    config.url = join(apiUrl, config.url);
  }

  const userToken = localStorage.getItem(server.TOKEN_KEY);
  if (userToken) {
    config.headers = { "x-access-token": userToken };
  }
  config.timeout = 10000; // 10 Second
  return config;
});

axios.interceptors.response.use(
  (response) => {
    return response;
  },
  async (error) => {
    // debugger;
    if (error.response.status == "401") {
      const refreshToken = localStorage.getItem(server.REFRESH_TOKEN_KEY);
      const refreshUrl = `${apiUrl}/${server.REFRESH_TOKEN_URL}`;
      let result = await axios.post(refreshUrl, { refreshToken });

      const token = result.data.jwt;
      localStorage.setItem(server.TOKEN_KEY, token);
      // debugger;
      return axios.request(error.config);
    } else if (error.response.status == "403") {
      // force logout
      localStorage.removeItem(server.TOKEN_KEY);
      localStorage.removeItem(server.REFRESH_TOKEN_KEY);
    }

    return Promise.reject(error);
  }
);

export const httpClient = axios;
Now, we are going to add the function to check the login state. For this, we use the token store in localStorage. If the token is available in local storage then, the user is logged in else the user is not. The code for this function is provided in the code snippet below:
export const isLoggedIn = () => {
  let token = localStorage.getItem(server.TOKEN_KEY);
  if (token) {
    var decodedToken = jwt.decode(token, { complete: true });
    var dateNow = new Date();
    if (decodedToken.exp < dateNow.getTime()) {
      return false;
    } else {
      return true;
    }
  } else {
    return false;
  }
};
The function to check the login state is to be stored in the login.action.js file under the actions folder as shown in the screenshot below:

Next, we need to import or constants and functions as shown in the code snippet below:
import {
  LOGIN_FETCHING,
  LOGIN_FAILED,
  LOGIN_SUCCESS,
  server,
} from "../constants";
import { httpClient } from "./../utils/HttpClient";
import jwt from "jsonwebtoken";
import swal from "sweetalert";
After the imports, we need to define the functions which will change the login states as shown in the code snippet below:
export const setLoginStateToFetching = () => ({
  type: LOGIN_FETCHING,
});

export const setLoginStateToFailed = () => ({
  type: LOGIN_FAILED,
});

export const setLoginStateToSuccess = (payload) => ({
  type: LOGIN_SUCCESS,
  payload,
});
Next, we need to implement the login function. For this, we create a function called login taking value and history as parameters and then navigate out from the login component. We use the dispatch function in order to change the login state and add the changed state data to the store. The overall code to implement this login function is provided in the code snippet below:
export const login = (value, history) => {
  return async (dispatch) => {
    try {
      dispatch(setLoginStateToFetching()); // fetching
      let result = await httpClient.post(server.LOGIN_URL, value);
      console.log(result);
      if (result.data.result === "success") {
        const { token, refreshToken } = result.data;
        localStorage.setItem(server.TOKEN_KEY, token);
        localStorage.setItem(server.REFRESH_TOKEN_KEY, refreshToken);
        dispatch(setLoginStateToSuccess(result));
        swal("Success!", result.data.message, "success").then((value) => {});
        console.log("success");
        history.push("/dashboard");
      } else {
        swal("Error!", result.data.message, "error").then((value) => {});
        dispatch(setLoginStateToFailed(result));
      }
    } catch (error) {
      swal("Error!", error.message, "error").then((value) => {});
      dispatch(setLoginStateToFailed({ data: { message: error } }));
    }
  };
};
Reducer
We use reducers to change the state of variables in the application. In reducer, we import the constant states and initialize them to the default value. Then, we change the state based on the login type as shown in the code snippet below:
import { LOGIN_FETCHING, LOGIN_FAILED, LOGIN_SUCCESS } from "../constants";

const initialState = {
  isFetching: false,
  isError: false,
  result: null,
};

export default (state = initialState, { type, payload }) => {
  switch (type) {
    case LOGIN_FETCHING:
      return { ...state, isFetching: true, isError: false, result: null };
    case LOGIN_FAILED:
      return { ...state, isFetching: false, isError: true, result: null };
    case LOGIN_SUCCESS:
      return { ...state, isFetching: false, isError: false, result: payload };

    default:
      return state;
  }
};
Plug redux to login component
In this step, we are going to integrate the redux functionality to our login component. But first, we need to change the class component to functional component in our login component so that we are able to use useSelector and useDispatch to set and manage the state variables.
Now, we need to import the react-redux library which provides the useSelector and useDispatch modules as shown in the code snippet below:
import { useSelector, useDispatch } from "react-redux";
import * as loginActions from "../../actions/login.action";
Next, we define the login function component and start using loginReducers as shown in the code snippet below:
const Login = (props) => {
  const dispatch = useDispatch();
  const loginReducer = useSelector(({ loginReducer }) => loginReducer);
In order to trigger actions, we use the dispatch method to call the login function from loginActions as shown in the code snippet below:
            <Formik
             initialValues={{
               username: "",
               password: "",
               recaptcha: "",
             }}
             onSubmit={(values, { setSubmitting }) => {
               dispatch(loginActions.login(values, props.history));
               setSubmitting(false);
             }}
             validationSchema={LoginSchema}
           >
We are done with integrating the redux state management mechanism to the Login component. But, we still need to integrate it into the root component.
Integrating redux in the root component
For that, in the root index.js file, we import the redux library and required dependencies as shown in the code snippet below:
import { createStore, applyMiddleware } from "redux";
import thunk from "redux-thunk";
import { Provider } from "react-redux";
import reducers from "./reducers";
import logger from "redux-logger";
Now, we need to add the redux-thunk and redux-logger to the middleware based on production condition as shown in the code snippet below:
var middlewares = null;

if (process.env.REACT_APP_IS_PRODUCTION === "1") {
  middlewares = applyMiddleware(thunk);
} else {
  middlewares = applyMiddleware(thunk, logger);
}
Next, we need to plug reducer and middleware to the app as sown in the code snippet below:
const store = createStore(reducers, middlewares);

ReactDOM.render(
  <Provider store={store}>
    <App />
  </Provider>,
  document.getElementById("root")
Lastly, in our App.js file, we have to check the login state. For that, we need to import the login action module as well as react-redux:
import * as loginActions from "./actions/login.action";
import { useDispatch, useSelector } from "react-redux";
Then, we need to change the component type from class to functional and we use isLoggedIn state which we import from actions module as shown in the code snippet below:
const App = (props) => {
  // const {pathname} = this.props.location;
  useSelector(({ loginReducer }) => loginReducer);
  const SecuredRoute = ({ component: Component, ...rest }) => (
    <Route
      {...rest}
      render={(props) =>
        // ternary condition

        loginActions.isLoggedIn() === true ? (
          <Component {...props} />
        ) : (
          <Redirect to="/login" />
        )
      }
    />
  );
  return (
    <Router>
      <Switch>
        <div>
          {loginActions.isLoggedIn() && <Header />}
          {loginActions.isLoggedIn() && <Sidebar />}
          <Route path="/register" component={Register} />
          <Route path="/login/:notify?" component={Login} />
          <Route path="/password/reset/:token" component={Passwordreset} />
          <Route path="/password/forgot" component={Passwordforgot} />
          <SecuredRoute path="/dashboard" component={Dashboard} />
          <SecuredRoute path="/profile" component={Profile} />
          <Route path="/" exact component={Login} />
          {loginActions.isLoggedIn() && <Footer />}
        </div>
      </Switch>
    </Router>
  );
};
export default App;
Based on the isLoggedIn state, the UI components like header and sidebar are displayed.
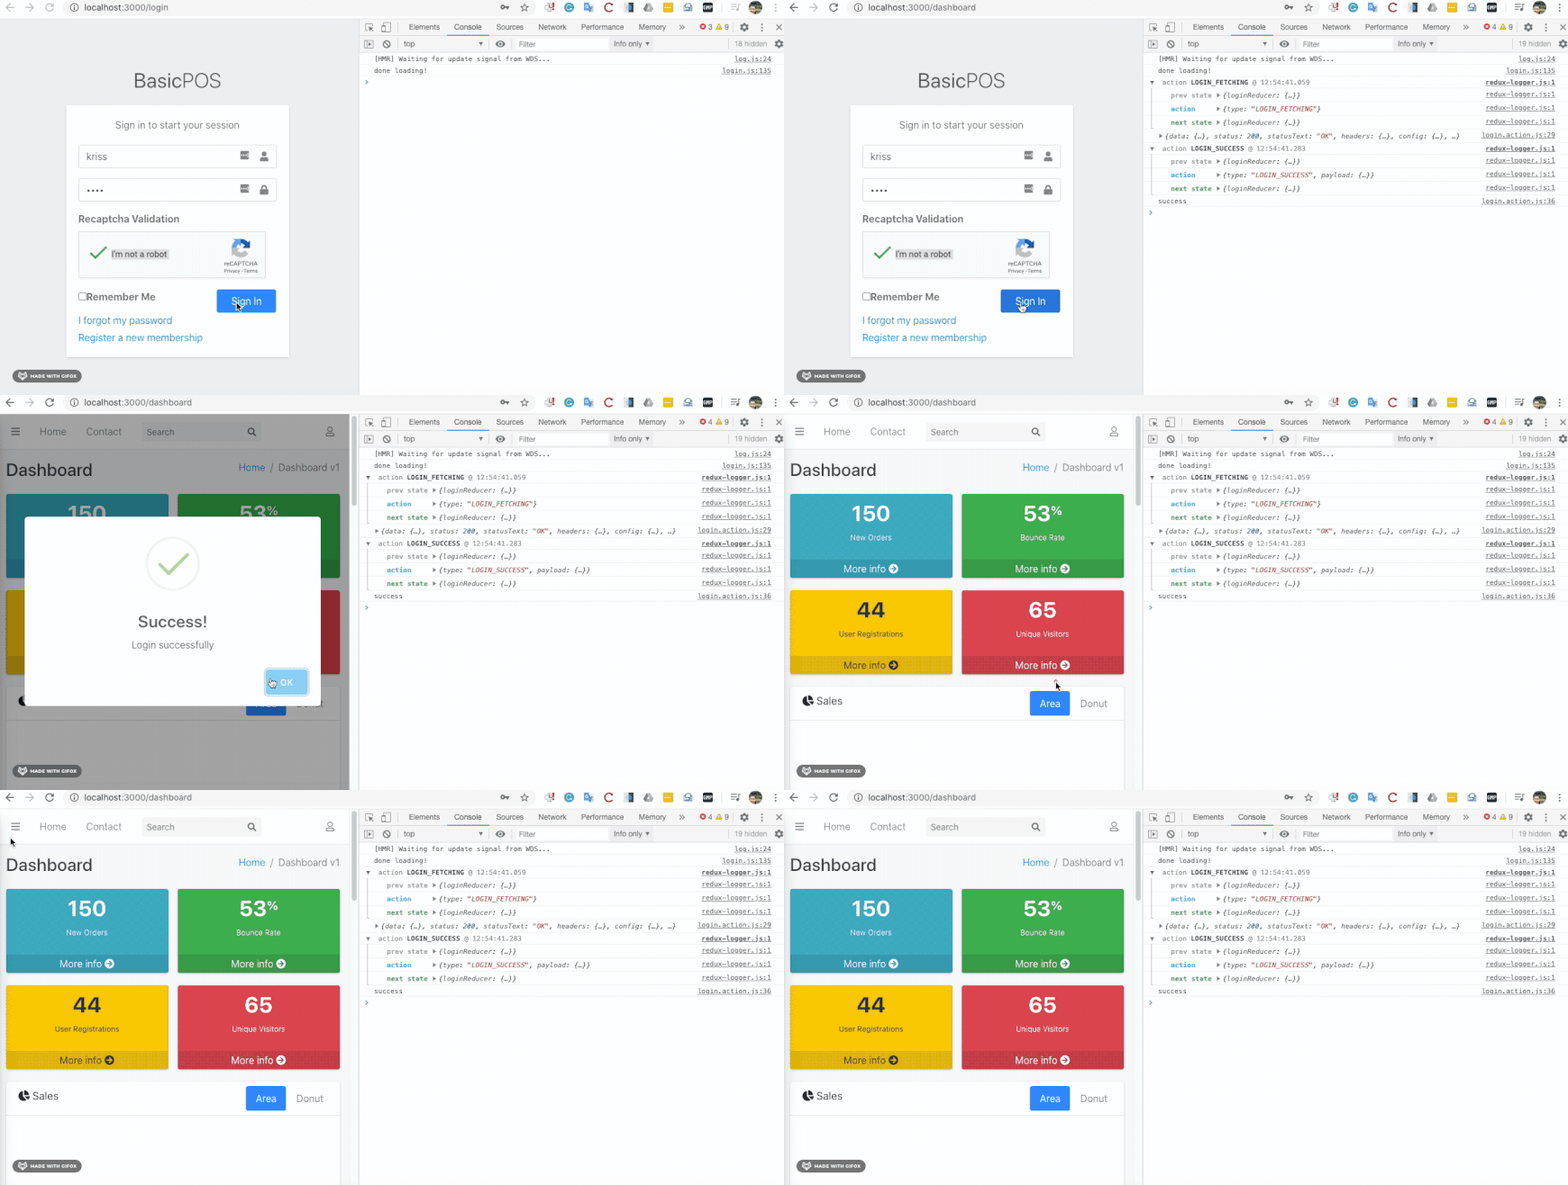
Finally, we have successfully integrated the redux state management mechanism to our react POS project. In order to test the integration, we need to open the developer tools in the browser and check for state change logs as shown in the simulation below:

Conclusion
In this chapter, we got a brief inside of the redux state mechanism. The problem that comes into play without the redux state management system and how the redux mechanism solves that problem by providing the centralized store. Then, we moved to integrate the redux state management into our project thus implementing constants, actions, reducers, and a store. Then, we made use of the reducers, actions, and constants in the login component. We also learned the integration of redux in our root component. Hence based on the app state, we displayed the required UI to the user.
your can find live demo here and all code in this chapter available on Github
In the next chapter, we will add redux to register and logout components.
Credit
cashier image in cover image from logomakr
redux diagram image from dev.to article

