
")
According to W3tech, nearly 35% of the websites over the internet are powered by WordPress. The development of WordPress has always been centre around PHP, but as the use of headless CMS grows, you can now seamlessly build fast websites with React and WordPress using a framework like Frontity.
Frontity is a free and open-source framework with a focus on WordPress that helps you build a React-based frontend for a headless (or decoupled) WordPress site. Although React frameworks like Gatsby.js and Next.js work with WordPress, none of them is exclusively focusing on WordPress. You would normally have to do some complex configuration and additional tooling, Fortunately, Frontity eliminates all these pain-staking and additional tooling developers have to do and gets you to the development stage faster.
In this tutorial, we will work you through the process of building a WordPress website with Frontity but before that let’s consider how the Frontity works and why it is a better option for your WordPress project.
What is Frontity
As described by Frontity, it’s a free and open-source framework that enables you to build a React-based frontend for a headless (or decoupled) WordPress site. After setting up frontity, your WordPress site serves its data via the REST API, Frontity will then consumes this data and render it in the browser as a SPA (Single Page Application) which you can configure and style to your choice.
Yet, Frontity was created with a focal point on WordPress in mind to make everything simpler, even for developers who are not familiar with React. All aspects of the framework have been simplified and optimized for WordPress. Frontity includes everything you need to build a WordPress without having to figure out what tools to use for things like state management, CSS or any extra tooling. Since you don’t have to set up any additional tooling, it makes building your websites ready-to-go out of the box.
How Frontity Works
In Frontity WordPress dashboard is utilized as a headless CMS for creating and managing content the same way you’re used to. As you make changes, your content is automatically updated in your Frontity site as it is when working with a traditional WordPress theme
Since React is a JavaScript library, the Frontity app needs a Node.js server to run. It requests content from the WordPress REST-API and uses it to generate the final HTML that is displayed in the browser. Moreover, it’s capable of generating AMP pages utilizing the same React code and CSS.
The diagram below is a visual representation of how Frontity works.
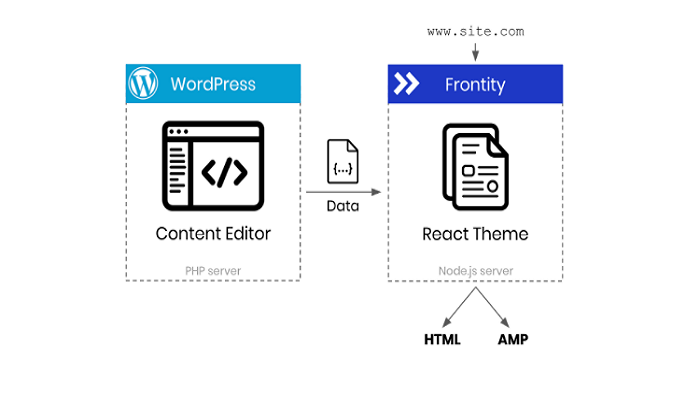
How Frontity worksHere are some of the advantages of using Frontity:
SSR and SEO Friendly: Frontity does server-side rendering out of the box. This approach works great with dynamic content and is useful for SEO.
Extensible: Frontity powers a flexible extensibility pattern like WordPress. Themes and extensions will activate without code changes.
Lightning Fast Loading: What I love more about Frontity is the speed in load type. Frontity sends a navigation ready HTML page, that is immediately usable. So the initial load feels almost instant.
Required Zero Setup: Everything you need to make the connection is already included(React, Webpack, Babel, Routing), So you can jump straight in and start creating your site.
Easy to Use: Frontity gives you a big head start by taking care of the complexity associated with connecting WordPress to React.
How to Build a website with Frontity
These are the list of prerequisite you will need for this tutorial:
Node JS installed on your computer – If you don’t already have it you can get Node.js from the official site. This will also install npm and npx along with Node.js. You will use these to run Frontity commands during the set-up and development of your project
A remote WordPress site – (In my case I’m using a friend blog website africanhairinfo.com ). However, you can use the default test site that comes with the Frontity for your demo. so you won’t be without content.
Setting up Frontity
Frontity has a built-in CLI that enables you to create a new frontity application with a single command.
To install the frontity CLI:
npx frontity create my-project
You should replace the name my-project with your project name. If you’re starting with Frontity then the Mars theme is a good choice to help you get an idea of how it works.
You may also decide to subscribe to Frontity newsletter by entering your email after a successful installation then move into your new project directory with the command below.
cd my-project
The project directory will contain the following structure:
my-app/
|__ node_modules/
|__ package.json
|__ frontity.settings.js
|__ favicon.ico
|__ packages/
    |__ mars-them
If you’re new to React, this directory contains the following important Frontity files and folders.
- Node_modules: This is where all your development dependencies are stored. You shouldn’t need to modify or open any of the files inside these folders.
- Frontity.setting.js: This is where you will define your project settings and any packages it requires.
- Package.json: This is a JSON file that will be used to configure all your Node.js projects, it is also where you will store dependencies required by your application.
- Packages: This folder contains all local packages including your theme.
To start the development server, run the following command below:
npx frontity dev
Once you run the command, the server will be listening to https://locahost:300 and the page will open automatically in your browser. Initially, Frontity will connect to a test blog that displays demo content.
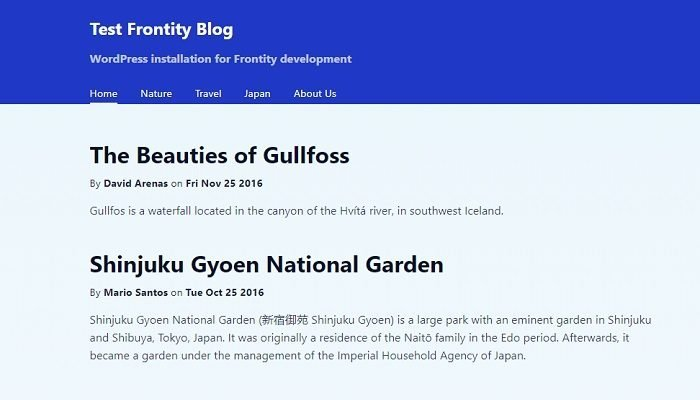
You can connect to your WordPress website by editing the frontity.setting.js file, which you will find in the root directory of your project I showed to you earlier.
To do that, open the file with any programming text editor. Locate this file @frontity/wp-source setting object is at the bottom of the file and change the API property to the address of your website.
frontity.settings.js
const settings = {
  ...,
  packages: [
    ...,
    {
      name: "@frontity/wp-source",
      state: {
        source: {
          // Change this url to point to your WordPress API.
          api: "https://test.frontity.io/wp-json/"
        }
      }
    }
  ]
}
By default, the API property is set to “https://test.frontity.io/wp-json/” which is the URL that points to the default Frontity WordPress test API. You will need to change the address to point to your WordPress website with the wp-json extension, In our case, I’m changing the API to point to this https://africanhairinfo.com/.
name: "@frontity/wp-source",
      state: {
        source: {
          // Change this url to point to your WordPress API.
          api: "https://africanhairinfo.com/wp-json/"
        }
      }
    }
In the code above, don’t forget to add wp-json extension after your website URL, then save your changes and manually refresh the page in your browser. The page should be updated and display content fetched from your website.
Configure your Menu
Before I show you what my page looks like after Frontity pulled the data from the WordPress site, the first thing we have to do is to create pages we would like to show on our Frontity theme because the menu still contains links to Frontity’s demo content. To do so find @frontity/mars-theme setting object in frontity.setting.js and update the menu array to the structure of your site.
frontity.settings.js
const settings = {
  ...,
  packages: [
    {
      "name": "@frontity/mars-theme",
      "state": {
        "theme": {
          "menu": [
            [
              // The link to your home page
              "Home",
              "/"
            ],
            [
              // A link to a Contact Us page
              "Contact Us",
              "/contact-us/"
            ],
            [
              // A link to the About Us category
              "About Us",
              "/about-us/"
            ],
            ...
          ],
          "featured": {
            "showOnList": false,
            "showOnPost": false
          }
        }
      }
    },
    ...
  ]
}
In the above code, I added three menu items (Home, Contact Us, About Us). For example, if you want to link to the website about-us page located at https://africanhairinfo.com/about-us/ you will need to create a link that leads to the about-us in the menu array list.
You can then save these changes and refresh the website manually while the menu will update the links to all the three pages. Kindly note I’m only accessing the content of just three pages on this website (https://africanhairinfo.com/), not all the pages. However, if you want to access all the content, it’s still the same procedure.

Customize your Theme
Frontity takes a different approach to WordPress when customizing themes. It uses CSS in JS instead and also comes with Emotion among its libraries for styling. This allows you to write CSS styles with JavaScript.
Note that when we first set up Frontity, you selected the Mars theme. This theme controls your site’s appearance, but you can modify the default look of your website by editing the theme located in the package/mars-theme folder.
To do this styling, open the package/mars-theme folder and navigate to /src which contains index.js file where you can configure your theme, and a /components folder where all the components that are part of your theme are.
You can also read more about how to style your Frontity theme here.
To demonstrate the general process, we will be changing the background color of the website header. To do this, locate the <HeadContainer> component in index.js and change the background-color to red.
const HeadContainer = styled.div`
  display: flex;
  align-items: center;
  flex-direction: column;
  background-color: red;
`;
Save the changes and the new color will be applied immediately.

You can try to explore the theme files and folders to modify changes to help your websites stand out.
Publish your Websites
After you have added feature and style to your website, you can now deploy it to production. It is similar to how easy a new site is a scaffold and runs in development.
Run the following command from the root of your project to create a production-ready bundle:
npx frontity build
This will create a build folder containing your React application and Frontity(Node.js) server. This folder can be deployed to any hosting that is prepared to serve a Node.js application. For example, npx frontity serve can be used to run your project like a standard Node.js application, or upload it to a CDN(Content Delivery Network) and serverless service.
However, you could also use AWS lambda, Netlify, or Google Functions but Frontity recommended Vercel as a serverless solution.
To do so, you can use Vercel and follow these steps:
https://docs.frontity.org/deployment/deploy-using-vercel
Also, don’t forget to create a vercel.json file containing the following file on the app root directory.
{
  "version": 2,
  "builds": [
     {
       "src": "package.json",
       "use": "@frontity/now"
     }
  ]
}
Vercel will give you a default domain like this your-project-name.vercel.app that will allow you to check your site online. You can also configure your site under a custom domain.
By now your website is published and ready to be view by anybody.
Conclusion
In this tutorial, we have seen how to use Frontity to build a website with WordPress and React. Frontity makes WordPress-React development easier by reducing the workload typically required to create a headless WordPress website.
If you also need any help, Frontity has a great community around it.
I will also be in the comment section below to answer any of your questions.