

You built a React App using an Apollo client, and you’re wondering how to manage its state. You are faced with many options: Redux, MobX, Context, Hooks… Which one to pick?
Well, if your app’s data flow does not consist of many local state keys, you could just stick to GraphQL…
Apollo to manage the local state of you app? Say what…
You probably already knew about this option when following the Apollo Docs, maybe you’ve even built apps with it. This article aims to give you a little taste of how to use GraphQL queries with an Apollo server to manage the state of your App.
We’ll implement a simple Library Management System 📚 (LMS) . LMS represents a library that you own containing books.
Say you want the following functionalities:
- See all the books in the library, along with their information
- Add a book with an author to the library
Guess what, LMS can do all of these! Let’s get started 🔥
I- Setting up your Apollo server
We’ll first set up our graph API’s server.
Apollo Server is a library that helps you build an API using GraphQL. It can connect to any data source, including REST APIs and databases, and integrates with Apollo developer tooling.
Lucky for us, we don’t have to do it from scratch. For reference, we will be using this CodeSandbox as our GraphQL server.
Let’s walk over the pre-built to understand what’s happening and how to use it for our app.
a) Setting up a schema
In general, a schema is a representation of a plan or theory in the form of an outline or model. In our case, it represents a blueprint representing the data that flows through the app. With it we can:
1- Define the data and its type.
type Query {
  id: Int
  groceries: {
    product: String
  }
}
With this schema, if we make a query as such:
query {
  id
  groceries: {
    product
  }
}
We can get an output of the following format:
{
  "data": {
    "id" : 1,
 "groceries": [
       {
         "product": "Banana"
       },
       {
         "product": "Broccoli"
       }
     ]
   }
}
In our case, we have a library that manages books. Each book has:
- A unique id
- A title of type String
- An author representing a person with a name and email
- A synopsis of type String
You can see here that we can define two data types: type Book with id, author, title, synopsis, and type Author with a name and email.
type Book {
 id: ID!
 title: String!
 author: Author!
 synopsis: String!
},
type Author {
 name: String!
 email: String!
}Note: The exclamation point specifies that such key in the query will never be null. For instance, id: ID! in our
Booktype means that our server will never return a null value for the id of an object of typeBook.
2) Define queries
Most types in your schema will just be normal object types, like Book and Author above. But there are two types that are special within a schema:
- Queries
Every GraphQL service has a query type and may or may not have a mutation type. These types are the same as a regular object type, but they are special because they define the entry point of every GraphQL query.
Remember, with our LMS we can see all the books in the library, along with their information. So we need to be able to fetch data from our graph. For that, we use the books key to query an array [Book], meaning an array of objects of type Book.
type Query {
    books: [Book]
}- Mutations
A Query lets you fetch data from your server. What if we want to create, delete or update that data? To do so, we use mutations.
Remember, our LMS gives us the ability to:
- see all the books in the library, along with their information,
- add a book with an author to the library,
- delete a book from the library.
Notice the last two requirements require data updates? These requirements represent our mutations! So we define the following:
# The mutation root type, used to define all mutations
 type Mutation {
   # A mutation to add a new channel to the list of channels
   addBook(book: BookInput!): Book
 }
add(...) takes some book we wish to add to the library as an argument and returns an object of type Book (the newly added book).
STOP! Where is BookInput coming from?!
Nice catch! 🔥 Basically in a mutation, you can pass objects with normal types such as strings, ints, enums… Or more complex objects. In our case here, we want to make some updates on the Books in the library by creating a new Book. So we define an input type BookInput that can be passed to our addBook(...) mutation to create a new object.
Since BookInput follows the format of Book, it also contains an Author object, which we will define as an input type AuthorInput. We get the following input types.
input BookInput {
  title: String
  author: AuthorInput
  synopsis: String
}

input AuthorInput {
  name: String
  email: String
}
And we’re done with our schema! We put all of our types in our typeDefs constant to get the following:
// Construct a schema, using GraphQL schema language
const typeDefs = gql`
  type Query {
    books: [Book]
    book(id: ID!): Book
  }
  type Book {
    id: ID!
    title: String!
    author: Author!
    synopsis: String
  }
  input BookInput {
    title: String
    author: AuthorInput
    synopsis: String
  }
  input AuthorInput {
    name: String
    email: String
  }
  type Author {
    name: String
    email: String
  }

  # The mutation root type, used to define all mutations
  type Mutation {
    # A mutation to add a new channel to the list of channels
    addBook(book: BookInput!): Book
  }
`;
… Hooray! ✨
Now let’s do one last little step which is to add some default data to our server:
const author = { name: "Anssam", email: "[email protected]" };
const books = [
  {
    title: "Book1",
    id: 1,
    author: author,
    synopsis: "It's a mystery book!"
  }
];
Now we’re finally done with our schema!
b) Setting up our resolvers
Now that we’ve defined the data that we’ll manipulate in our app, we need to think of the logic on how to do that, as in, the queries.
Resolvers provide the instructions for turning a GraphQL operation (a query, mutation, or subscription) into data. They either return the same type of data we specify in our schema or a promise for that data. –Apollo Docs
In our app we wish to:
- See all books
- Add a book to the library
So we can define a fetching Query for the first two requirements as such:
const resolvers = {
 Query: {
  books: () => books
 },
...
};
What does this lead to? Remember, you can use your Apollo Server by hitting the play button on this CodeSandbox that you have now populated with our code. Let’s test our books query to see if it returns all the books we currently own.
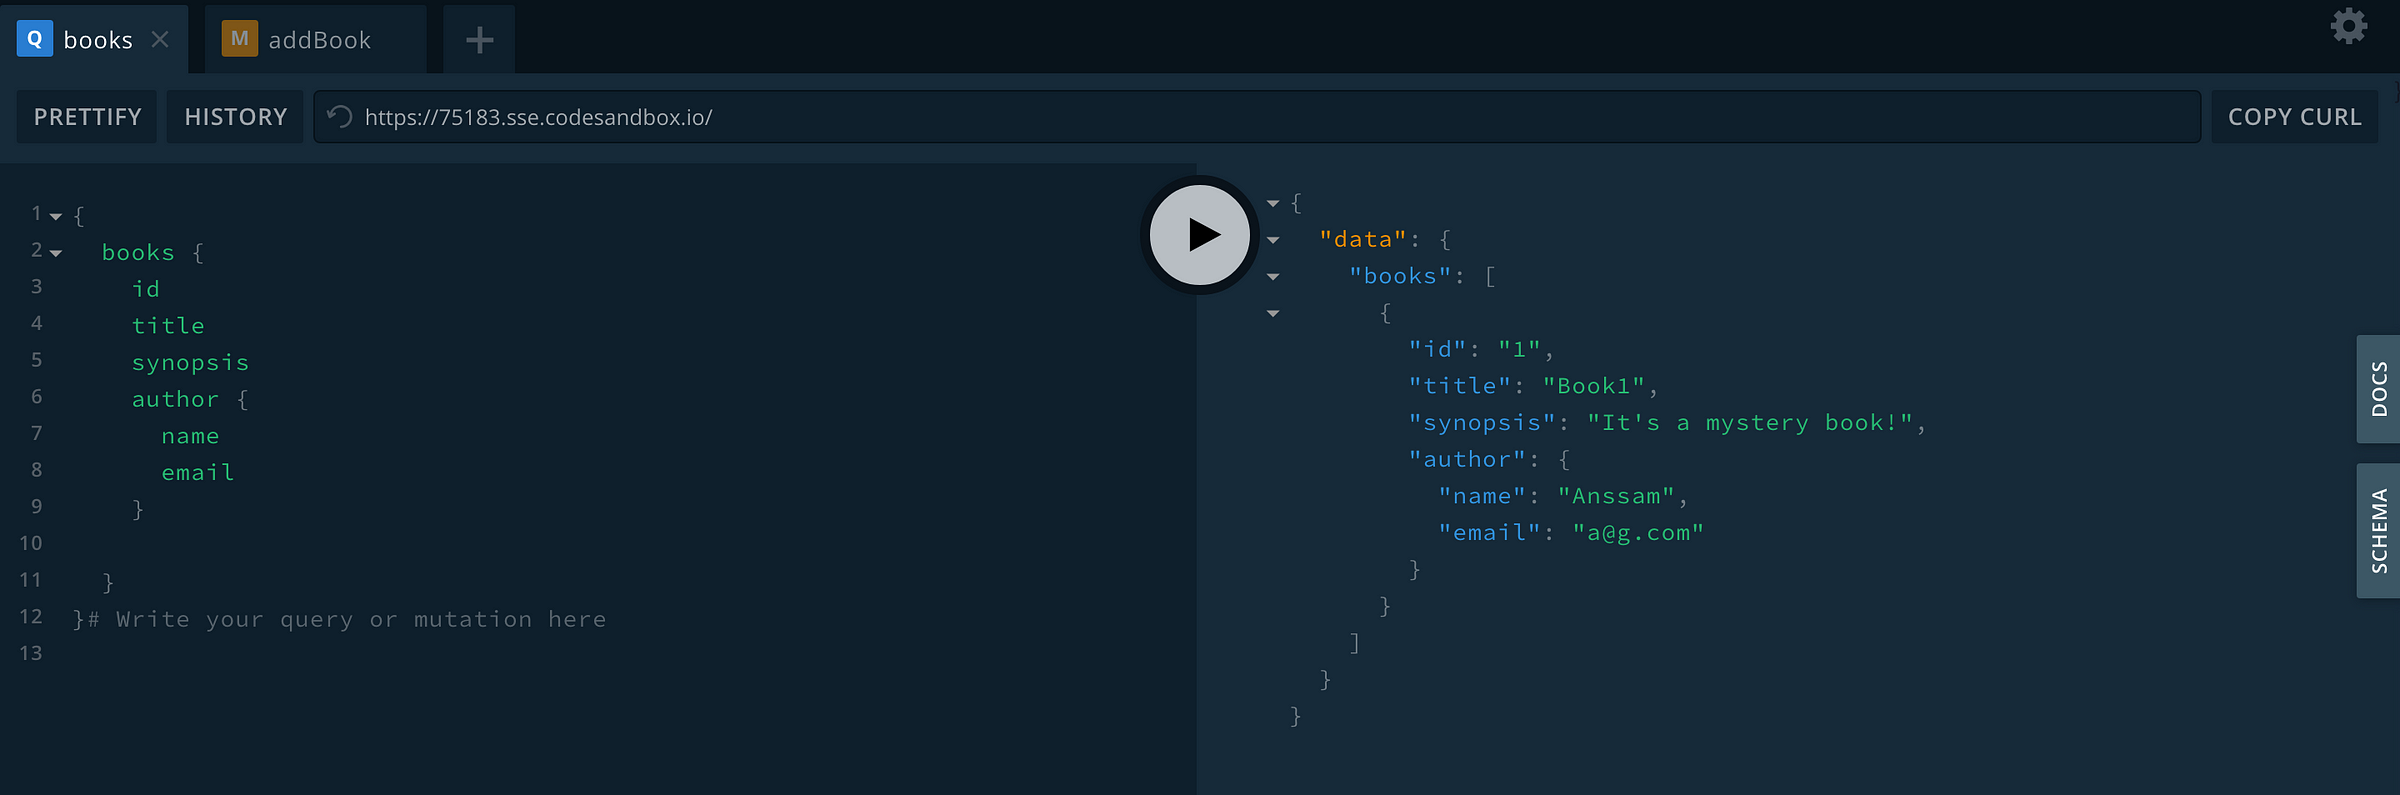
Yey it works! ✨
Now let’s write our mutation to update the data:
const resolvers = {
  ...
  Mutation: {
    addBook: (root, { book }) => {
      var id = require("crypto")
        .randomBytes(10)
        .toString("hex");
      const newBook = {
        ...book,
        id: id
      };
      books.push(newBook);
      return newBook;
    }
  }
};
In our Mutation, we generate a random id to assign to the new book newBook we wish to add. Make sure that you add it to yours books array by doing books.push(newBook)! Let’s test it.
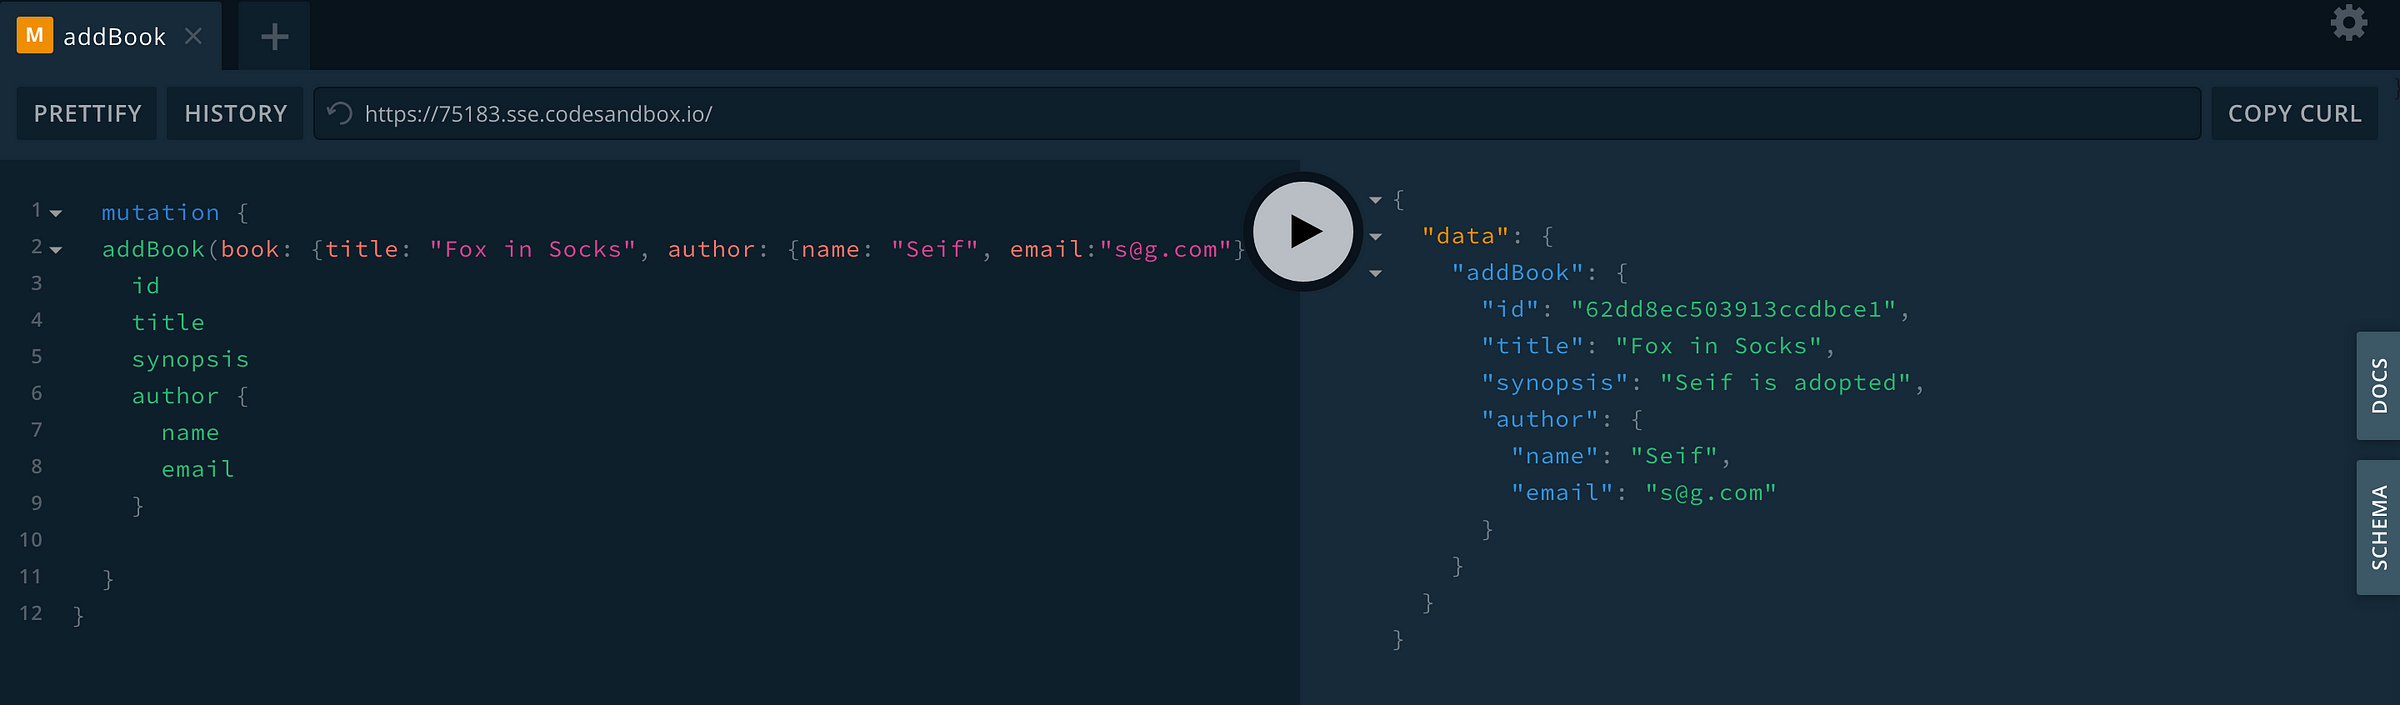
We have properly added Seif’s book to our library! You can even check by making another Query to get all the books to see that our books array now contains this new addition.
And we’re done configuring our Apollo server! ✨
Now let’s move on to the User Interface of our LMS 🔥
II- User interface
Let’s now make a UI for our library! For this part, we can use a React CodeSandBox
a) Setting up our client
Now that we’re done with building our Apollo server, let’s set up our Apollo client which will fetch data from it.
We first import ApolloClient…
import ApolloClient from “apollo-boost”;
…then we pass the uri of our server to the client, as in, the uri of the server we’ve built in Part I!
const client = new ApolloClient({
  uri: "https://75183.sse.codesandbox.io/"
});
We also import AppolloProvider…
import { ApolloProvider } from “react-apollo”;…then wrap the root our App with it
function App() {
  return (
    <ApolloProvider client={client}>
      <div className="App">
        <h1>Hello CodeSandbox</h1>
        <h2>Start editing to see some magic happen!</h2>
      </div>
    </ApolloProvider>
  );
}
What does the ApolloProvider do? If you are already familiar with React’s Context API, it acts just like it: it wraps all the elements that will need access to the client, as in, all the elements that perform queries to the server.
b) Building our Library component
Our Library component is the component that will make our queries.
For now, let’s just build a static component with some styles. It’s really up to you how you want to build it.
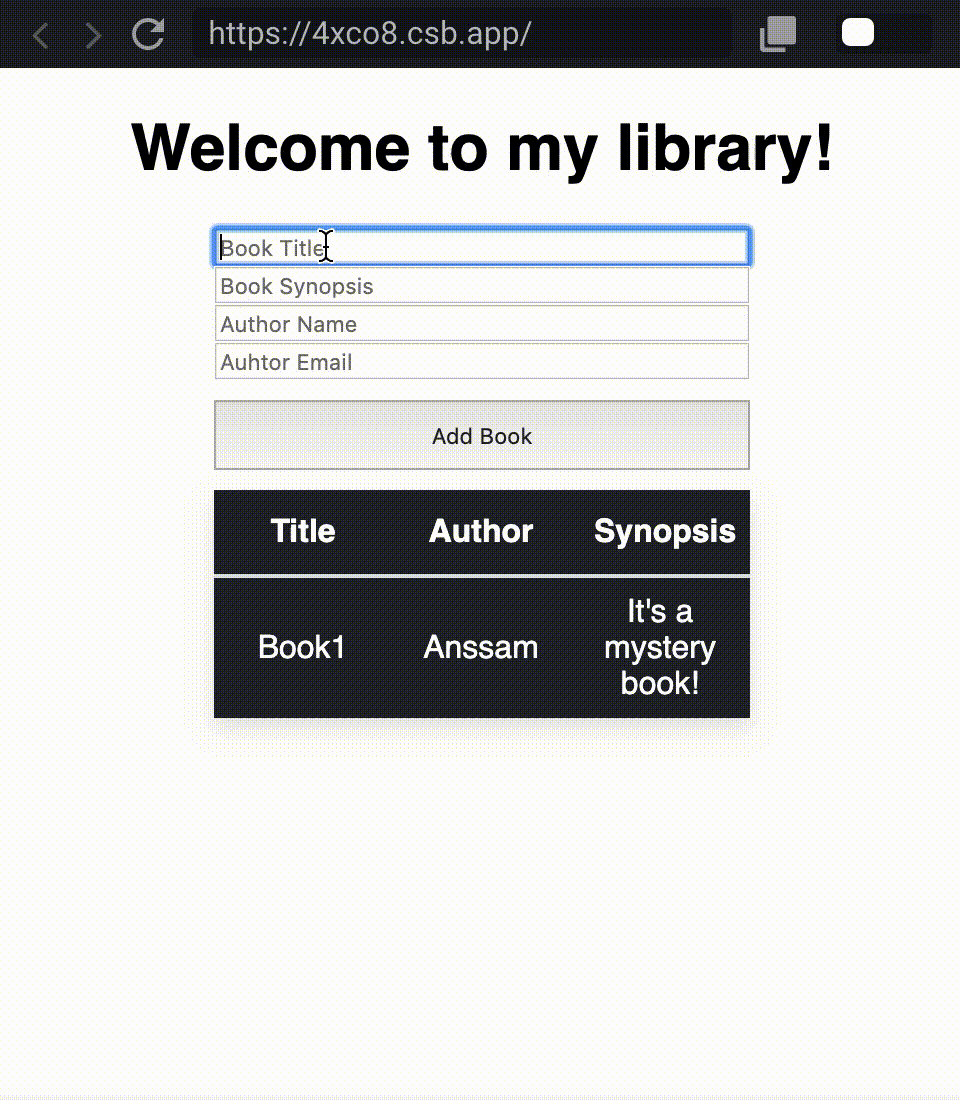
- LMS gives us the ability to add a book to our library: You can add some input fields for each book information (title, author name, author email, synopsis). You can wrap all these inputs in a form to submit to the server.
- LMS lets us see all the books in the library: You can display your books as a list of using
<li>elements, or you can make a<table>element with all your books in it.
We will use a list of inputs to prompt the user to add a book to the library as follows:
function Library() {
  let titleInput;
  let authorEmailInput;
  let authorNameInput;
  let synopsisInput;
…
  return (
      <div className="inputContainer">
        <input
          placeholder="Book Title"
          ref={node => {
            titleInput = node;
          }}
        />
        <input
          placeholder="Book Synopsis"
          ref={node => {
            synopsisInput = node;
          }}
        />
        <input
          placeholder="Author Name"
          ref={node => {
            authorNameInput = node;
          }}
        />
        <input
          placeholder="Auhtor Email"
          ref={node => {
            authorEmailInput = node;
          }}
        />
        <button/>
        >
          Add Book
        </button>
      </div>
  );
}
Note: Our “Add Book” button does not do anything for now. We will implement the logic of adding a book by using an onClick listener to this button later.
And we’ll use a table to display our data. It will have the following properties:
- 3 columns for the book’s title, author name, and synopsis
- 1 row for each book.
Note: As we’ve seen in part I, we know that once we’ve perform a query to fetch all the books, we will get a result of the format:
data = {books: [{title:"", author:{}, synopsis:""}]}. Our component does not have any data so we have an empty<tbody>for now:
function Library() {
…
  return (
…
      <div className="inputContainer">
        <table>
          <thead>
            <tr>
              <th>Title</th>
              <th>Author</th>
              <th>Synopsis</th>
            </tr>
          </thead>
          <tbody>
          </tbody>
        </table>
      </div>
  );
}
c) Using Hooks to query data
Now let’s make our component do something!
Remember, we know LMS lets us add books and view our books. Both of these requirements have been translated into queries in Part I. All we have to do is call these queries.
1) Populate our data constant with all the books in our library: You can guess here that we will be using the books query to get all the books
2) Add some logic to our submitBook function so that it adds a book to our library: You can guess here that we will be using the mutation addBook to add a book to our library
To do that, we will use gql, useQuery for 1) and useMutation hooks for 2).
import { gql } from “apollo-boost”;
import { useQuery, useMutation } from “@apollo/react-hooks”;
1) We define a GET_BOOKS query as such:
const GET_BOOKS = gql`
  {
    books {
      title
      author {
        name
        email
      }
      synopsis
    }
  }
`;
Then use the useQuery hook to submit this query to our server from our Library component:
const { loading, error, data } = useQuery(GET_BOOKS);

if (loading) return <p>Loading ...</p>;
if (error) return <p>Error :(</p>;
And we populate our table’s body without fetched data as such:
function Library() {
  …
  <tbody>
    {data.books.map((book, idx) => (
        <tr key={idx}>
          <td>{book.title}</td>
          <td>{book.author.name}</td>
          <td>{book.synopsis}</td>
         </tr>
     ))}
  </tbody>
  …
}
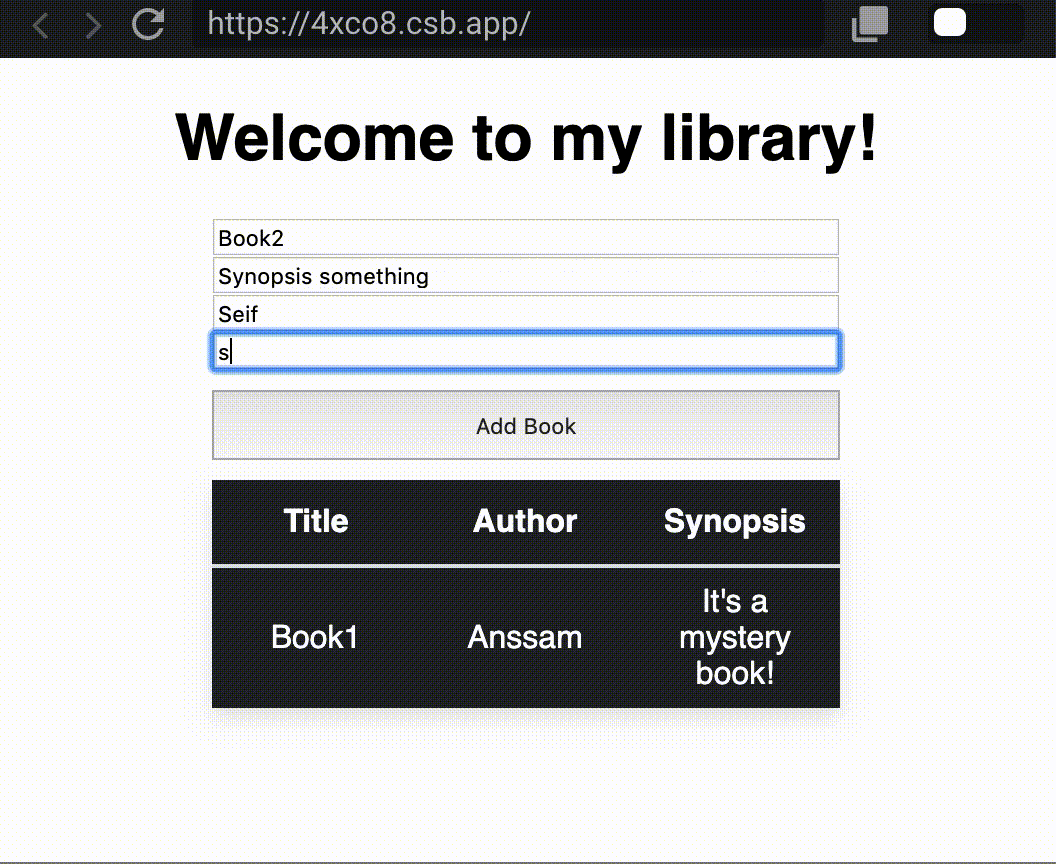
Now the table properly displays all the books you currently own in your library. Remember from Part I how we added a default book in our library? You can see it in our table!
2) We define a ADD_BOOK mutation as such:
const ADD_BOOK = gql`
  mutation AddBook(
    $title: String!
    $synopsis: String!
    $authorName: String!
    $authorEmail: String!
  ) {
    addBook(
      book: {
        title: $title
        author: { name: $authorName, email: $authorEmail }
        synopsis: $synopsis
      }
    ) {
      id
      title
      synopsis
      author {
        name
        email
      }
    }
  }
`;
The mutation takes as parameters :
- the title of the book as a string,
- the author’s name as a string,
- the author’s email as a string,
- the book’s synopsis as a string,
… and returns a book object with the same parameters in addition to its id (as in, an object of type Book like we defined in Part I)
We will call this mutation from our Library component as such:
function Library() {
  const [addBook] = useMutation(ADD_BOOK)
}
Then add the onClick listener to our “Add Book” button to call our addBook mutation:
addBook({
  variables: {
    title: titleInput.value,
    authorName: authorNameInput.value,
    authorEmail: authorEmailInput.value,
    synopsis: synopsisInput.value
  }
})
Note: We wrap all of our arguments to the addBook call in a variables object so that GraphQL properly maps the arguments to the parameters we defined earlier. Our variables here represent the data of the book we wish to add in our Library
And now we can add a book to our library!
⚠️ Notice though that we have to refresh the page to see the new addition
When you execute a mutation, you modify back-end data. If that data is also present in your Apollo Client cache, you might need to update your cache to reflect the result of the mutation. –Apollo Docs
Luckily, we can add an update function to our useMutation hook to show us the updates of the data, as in, the newly added book.
const [addBook] = useMutation(ADD_BOOK, {
    update(
      cache,
      {
        data: { addBook }
      }
    ) {
      const { books } = cache.readQuery({ query: GET_BOOKS });
      cache.writeQuery({
        query: GET_BOOKS,
        data: { books: books.concat([addBook]) }
      });
    }
});
Let’s look at our update function:
- We passed in our function the cache object representing the Apollo Client cache. This objects gives us access to the
readQueryandwriteQueryfunctions.
What’s up with readQuery? readQuery is a function in which we pass in an object {query: …}. In that object, we can add a query to the query property. When we do cache.readQuery({query: GET_BOOKS}), we are querying all the books in the library currently stored in the cache.
What about writeQuery? writeQuery is a function in which we pass an object {query: ..., data: ...}. In that object, we add a query to the query property and some data to the data property. The function writes some data in the shape of the provided GraphQL query. cache.writeQuery({query: GE_BOOKS, data: {books.concat([addBook]}}) writes the newly added book from our mutation to our list of books in our cache. So our cache will have a new data object with all our books + the newly added book.
- We also pass an object containing
data:{addBook}, as in, the return of ouraddBookmutation (which is an object of typeBook).
Let’s see if our cache is properly being updated after each mutation call (after adding a book)
Works like a gem! 💎
Checkout your awesome Library Management System 📚 🔥
Conclusion
As you can see, setting up our Apollo Client gives us another alternative to managing the state of our application, while giving us some perks:
- Our server is strongly typed
- Our server is the only source of truth when it comes to handling the data flow of our app: no need for a separate Redux or MobX store
- React Hooks with Apollo provide an even easier way to query the data from the server and update it
- Apollo lets you use your cache in a smart way to dramatically improve the speed of your queries
This makes local state management with Apollo another good alternative to think about when building your next cool application!
Notice: I hope this article was helpful, or that you gained something from it! My brothers and I are learning more about React and publish articles on a monthly basis. Follow me on twitter @anssam_ghezala to get in touch! 🙂