Close Menu
Soshace Digital Blog

    Subscribe to Updates

    Get The Latest News, Updates, And Amazing Offers

    What's Hot
    JavaScript

    React Native AsyncStorage Example: When I Die App

    Programming

    Follow These Guidelines to Write Testable Code That Can Scale | with Examples

    Development

    Leveraging Machine Learning for Innovative App Development

    Important Pages:
    • Home
    • About
    • Services
    • Contact Us
    • Privacy Policy
    • Terms & Conditions
    Facebook X (Twitter) Instagram LinkedIn YouTube
    Today's Picks:
    • Scaling Success: Monitoring Indexation of Programmatic SEO Content
    • Leveraging Influencers: Key Drivers in New Product Launches
    • How Privacy-First Marketing Will Transform the Industry Landscape
    • The Impact of Social Proof on Thought Leadership Marketing
    • Balancing Value-Driven Content and Promotional Messaging Strategies
    • Top Influencer Marketing Platforms to Explore in 2025
    • Emerging Trends in Marketing Automation and AI Tools for 2023
    • Strategies to Mitigate Duplicate Content in Programmatic SEO
    Sunday, September 28
    Facebook X (Twitter) Instagram LinkedIn YouTube
    Soshace Digital Blog
    • Home
    • About
    • Services
    • Contact Us
    • Privacy Policy
    • Terms & Conditions
    Services
    • SaaS & Tech

      Maximizing Efficiency: How SaaS Lowers IT Infrastructure Costs

      August 27, 2025

      Navigating Tomorrow: Innovations Shaping the Future of SaaS

      August 27, 2025

      Maximizing Impact: Strategies for SaaS & Technology Marketing

      August 27, 2025
    • AI & Automation

      Enhancing Customer Feedback Analysis Through AI Innovations

      August 27, 2025

      Navigating the Impact of AI on SEO and Search Rankings

      August 27, 2025

      5 Automation Hacks Every Home Service Business Needs to Know

      May 3, 2025
    • Finance & Fintech

      Critical Missteps in Finance Marketing: What to Avoid

      August 27, 2025

      Analyzing Future Fintech Marketing Trends: Insights Ahead

      August 27, 2025

      Navigating the Complex Landscape of Finance and Fintech Marketing

      August 27, 2025
    • Legal & Compliance

      Exploring Thought Leadership’s Impact on Legal Marketing

      August 27, 2025

      Maximizing LinkedIn: Strategies for Legal and Compliance Marketing

      August 27, 2025

      Why Transparency Matters in Legal Advertising Practices

      August 27, 2025
    • Medical Marketing

      Enhancing Online Reputation Management in Hospitals: A Guide

      August 27, 2025

      Analyzing Emerging Trends in Health and Medical Marketing

      August 27, 2025

      Exploring Innovative Content Ideas for Wellness Blogs and Clinics

      August 27, 2025
    • E-commerce & Retail

      Strategic Seasonal Campaign Concepts for Online and Retail Markets

      August 27, 2025

      Emerging Trends in E-commerce and Retail Marketing Strategies

      August 27, 2025

      Maximizing Revenue: The Advantages of Affiliate Marketing for E-Commerce

      August 27, 2025
    • Influencer & Community

      Leveraging Influencers: Key Drivers in New Product Launches

      August 27, 2025

      Top Influencer Marketing Platforms to Explore in 2025

      August 27, 2025

      Key Strategies for Successful Influencer Partnership Negotiations

      August 27, 2025
    • Content & Leadership

      The Impact of Social Proof on Thought Leadership Marketing

      August 27, 2025

      Balancing Value-Driven Content and Promotional Messaging Strategies

      August 27, 2025

      Analyzing Storytelling’s Impact on Content Marketing Effectiveness

      August 27, 2025
    • SEO & Analytics

      Scaling Success: Monitoring Indexation of Programmatic SEO Content

      August 27, 2025

      Strategies to Mitigate Duplicate Content in Programmatic SEO

      August 27, 2025

      Effective Data Visualization Techniques for SEO Reporting

      August 27, 2025
    • Marketing Trends

      How Privacy-First Marketing Will Transform the Industry Landscape

      August 27, 2025

      Emerging Trends in Marketing Automation and AI Tools for 2023

      August 27, 2025

      Maximizing ROI: Key Trends in Paid Social Advertising

      August 27, 2025
    Soshace Digital Blog
    Blog / JavaScript / React / React Native / React Native Lessons / Build Real-World React Native App #5: Single Post Screen and Bookmark
    JavaScript

    Build Real-World React Native App #5: Single Post Screen and Bookmark

    Krissanawat KaewsanmuangBy Krissanawat KaewsanmuangDecember 2, 2020No Comments9 Mins Read
    Facebook Twitter Pinterest Telegram LinkedIn Tumblr Email Reddit
    Build Real-World React Native App #5: Single Post Screen and Bookmark
    Build Real-World React Native App #5: Single Post Screen and Bookmark
    Share
    Facebook Twitter LinkedIn Pinterest Email Copy Link
    Build Real-World React Native App #5: Single Post Screen and Bookmark
    Build Real-World React Native App #5: Single Post Screen and Bookmark

    We have already implemented the Home screen in which the posts are shown in list format. Now, what happens when we tap on a post from the screen? Until now, nothing will happen. But, now we are going to create a screen that will display the details of the post. This screen will be called the SinglePost screen which we will implement in the SinglePost.js file.

    The SinglePost screen will contain the detail of the entire post optimized for reading purposes. We are also going to add a share button which will be functional as well. The share button allows users to share the post on social media and other platforms. For displaying the data format properly, we are going to take the help of the moment.js package. The moment.js is a powerful Date and Time library that allows us to configure the date and time format in various ways. The package has its implementation for every framework of JavaScript.

    The idea is to begin by implementing a SinglePost Screen and setting up the navigation to it through the list of posts in Home Screen or any other screen. We are going to add the share button and bookmark button as well. Lastly, we are going to make use of the async-storage to store the bookmarked posts and display them in the Bookmark Screen.

    Let’s get started!

    Create Single Post Screen

    First, we need to create a Singlepost.js in screens folders. Then, we need to make the necessary imports as shown in the code snippet below:

    import React, { useState, useEffect, useContext } from 'react';
    import {
       Avatar,
       withTheme,
       Card,
       Title,
       Paragraph,
       List, Button
    } from 'react-native-paper';
    import HTML from 'react-native-render-html';
    import ImageLoad from 'react-native-image-placeholder';
    import {
       Share,
       ScrollView,
       TouchableOpacity,
       View,
       Dimensions,
    } from 'react-native';
    import ContentPlaceholder from '../components/ContentPlaceholder';
    import moment from 'moment';

    Next, we need to create a functional component called SinglePost and define a state variable to handle the loading of the post data as shown in the code snippet below:

    const SinglePost = ({route}) => {
       const [isLoading, setisLoading] = useState(true);
       const [post, setpost] = useState([]);     
    }
    export default SinglePost

    Here, the parameter route enables us to fetch the data sent as a parameter from other components.

    Now, we are going to create a function in order to fetch the post details data based on the post id that we receive from the route params. The post detail data will be stored in the post state that we defined before as shown in the code snippet below:

    const fetchPost = async () => {
           let post_id = route.params.post_id;
           const response = await fetch(
               `https://kriss.io/wp-json/wp/v2/posts?_embed&include=${post_id}`,
           );
           const post = await response.json();
           setpost(post);
           setisLoading(false);
          
       }

    Then, we need to use useEffect to trigger the function every time the component loads as shown in the code snippet below:

    useEffect(() => {
           fetchPost()
       }, []);

    And, when we successfully fetch the data and store it on our post state, we will use the components from the react-native-paper package to create the UI and display the post data appropriately. The overall coding implementation is provided in the code snippet below:

    return(
         <ScrollView>
                   <Card>
                       <Card.Content>
                           <Title>{post[0].title.rendered}</Title>
     
                           <List.Item
                               title={`${post[0]._embedded.author[0].name}`}
                               description={`${post[0]._embedded.author[0].description}`}
                               left={props => {
                                   return (
                                       <Avatar.Image
                                           size={55}
                                           source={{
                                               uri: `${post[0]._embedded.author[0].avatar_urls[96]}`,
                                           }}
                                       />
                                   );
                               }}
                           />
                           <List.Item
                               title={`Published on ${moment(
                                   post[0].date,
                                   'YYYYMMDD',
                               ).fromNow()}`}
                           />
                           <Paragraph />
                       </Card.Content>
                       <ImageLoad
                           style={{ width: '100%', height: 250 }}
                           loadingStyle={{ size: 'large', color: 'grey' }}
                           source={{ uri: post[0].jetpack_featured_media_url }}
                       />
                       <Card.Content>
                           <HTML
                               html={post[0].content.rendered}
                               imagesMaxWidth={Dimensions.get('window').width}
     
                           />
                       </Card.Content>
                   </Card>
               </ScrollView>
    )

    Here, the UI code is a mix of different components from the react-native-paper package.

    Read More:  Exploring the Power of JavaScript Proxies and Reflect API

    Now, we are going to use content placeholders to display the loading state as well. For that, we are going to use isLoading state to handle the display of preloaders as shown in the code snippet below:

    if (isLoading) {
           return (
               <View style={{ paddingLeft: 10, paddingRight: 10, marginTop: 10 }}>
     
                   <ContentPlaceholder />
               </View>
           )
       } else {
           return (
               <ScrollView>
               </ScrollView>
           );
       }

    Hence, we will get the result as shown in the emulator screenshot below:
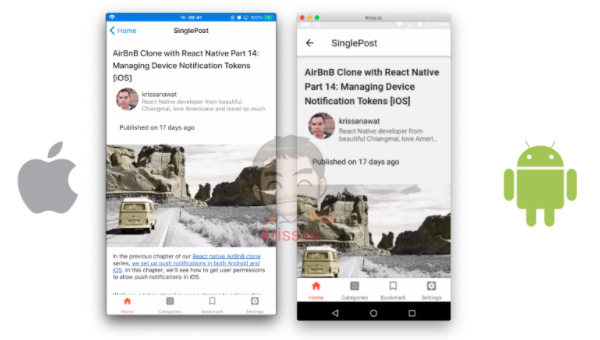
    Single post screen
    Single post screen

    Adding a Share button

    This is an extra section for this chapter where we are going to add a share button in SinglePost.js screen which enables us to share the post.

    First, we need to import Share component from the React Native package and also import the required fonts from the react-native-vector-icons package as shown in the code snippet below:

    import MaterialCommunityIcons from 'react-native-vector-icons/MaterialCommunityIcons';

    Next, we need to create a function to handle share action called onShare as shown in the code snippet below:

    const onShare = async (title, uri) => {
           Share.share({
               title: title,
               url: uri,
           });
       };

    Here, we are using the share function provided by the Share component. The parameters applied are the title and the post URI.

    Finally, we need to add the TouchableOpacity component in order to make the share button clickable as shown in the code snippet below:

    <List.Item
           title={`Published on ${moment(
                post[0].date,
                'YYYYMMDD',
            ).fromNow()}`}
                  right={props => {
                     return (
                        <TouchableOpacity
                            onPress={() =>
                              onShare(post[0].title.rendered, post[0].link)
                        }>
                        <MaterialCommunityIcons name="share" size={30} />
                             </TouchableOpacity>
                           );
                        }} />

    Hence, we will get the following result in our emulator screens:
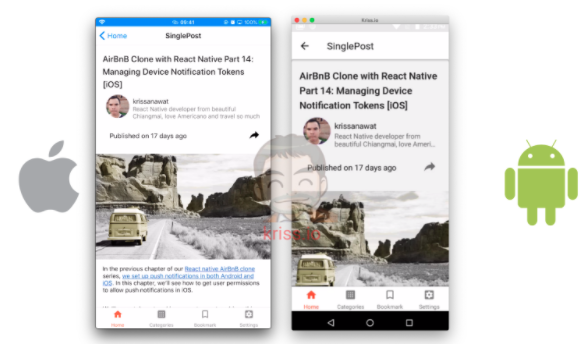
    Add share button
    Add share button

    As we can see, there is a share button on the right side of the screen. Now, if we tap on the share icon, the share option modal will open as shown in the emulator screenshots below:
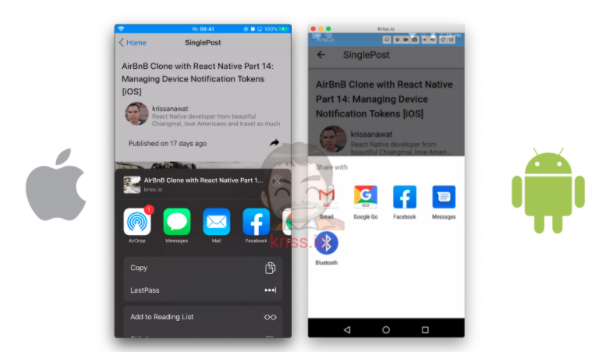
    Share button result
    Share button result

    Finally, we have successfully implemented the SinglePost screen along with preloaders and a Share button.

    Bookmark with AsyncStorage

    Here, we are going to learn how to implement the bookmark feature using async-storage to bookmark the posts so that we can easily access them on our Bookmark screen. The process is simple. We are going to save the post id to AsyncStorage from the SinglePost screen.

    Installing AsyncStorage

    Here, we are going to continue to setup async-storage package for storing the bookmarked posts and then fetching it in the Bookmark screen.

    First, we need to install the package provided by the React Native community using the following command in our project terminal:

    yarn add @react-native-community/async-storage

    Setup on iOS
    In iOS, we need to install cacao pod and re-run the app again using the following commands:

    cd ios ; 
    pod install ; 
    cd .. ; 
    react-native run-ios --device "Kris101"

    Setup on android

    There is no need to do anything if the React native version is greater than 0.60. Talking about which our React Native version is greater than 0.60. But in the case of lower versions, we will need to run the react-native link command.

    Now, we need to go to the SinglePost.js file and import the Asyncstorage component as shown in the code snippet below:

    import AsyncStorage from '@react-native-community/async-storage';

    Before storing the data ton AsyncStorage, we need to use local state data to handle the data as shown in the code snippet below:

    const [bookmark, setbookmark] = useState(false);

    Here, we are using bookmark as a state variable and setbookmark function in order to change the state of the state variable.

    Read More:  Understanding Data Structures in JavaScript (Linked Lists)

    Saving the Bookmarked Post

    In order to save the post, we need to create a function that receives post_id. Then, we need to start validating the data as shown in the code snippet below:

    const saveBookMark = async post_id => {
           setbookmark(true); 
           await AsyncStorage.getItem('bookmark').then(token => {
               const res = JSON.parse(token);
               if (res !== null) {
                   let data = res.find(value => value === post_id);
                   if (data == null) {
                       res.push(post_id);
                       AsyncStorage.setItem('bookmark', JSON.stringify(res));
                       alert('Your bookmark post');
                   }
               } else {
                   let bookmark = [];
                   bookmark.push(post_id);
                   AsyncStorage.setItem('bookmark', JSON.stringify(bookmark));
                   alert('Your bookmark post');
               }
           });
       };

    The coding implementation in the above code snippet is explained below:

    1. First, we set the local state to true.
    2. Next, we checked if the post exists.
    3. Since AsyncStorage stores data as plain text, we need to convert objects to a compatible format.
    4. Then, we checked if the post_id exists by using shorthand JS.
    5. If not, we use a push method to store data.
    6. If the initial state is null or empty, we will start by creating a blank array and save data accordingly.

    Hence, our save operation is complete.

    Removing the Bookmarked Post

    In order to remove data from bookmark state array, we use the coding implementation similar to Save operation but replace find function with filter function as shown in the code snippet below:

    const removeBookMark = async post_id => {
           setbookmark(false);
           const bookmark = await AsyncStorage.getItem('bookmark').then(token => {
               const res = JSON.parse(token);
               return res.filter(e => e !== post_id);
           });
           await AsyncStorage.setItem('bookmark', JSON.stringify(bookmark));
           alert('Your unbookmark post');
       };

    Render the Bookmarked Status Icon

    Here, we are going to set the bookmark status state when the screen loads. It will help us know if the post has already been bookmarked or not. For this, we need to use the code from the following code snippet:

    const renderBookMark = async post_id => {
           await AsyncStorage.getItem('bookmark').then(token => {
               const res = JSON.parse(token);
               if (res != null) {
                   let data = res.find(value => value === post_id);
                   return data == null ? setbookmark(false) : setbookmark(true);
               }
           });
       };

    Then, we use state to decide which button that we are going to show in the bookmark button icon display. It will either be a bookmarked icon or unbookmarked icon. For this, we need to use the code from the following code snippet:

    right={props => {
            if (bookmark == true) {
                 return (
                  <TouchableOpacity
                        onPress={() => removeBookMark(post[0].id)}>
                           <MaterialCommunityIcons name="bookmark" size={30} />
                              </TouchableOpacity>
                           );
                 } else {
                  return (
                    <TouchableOpacity onPress={() => saveBookMark(post[0].id)}>
                            <MaterialCommunityIcons
                                name="bookmark-outline"
                                 size={30}
                             />
                           </TouchableOpacity>
                          );
                     }
           }}

    To activate this post, we need to add the renderBookMark function to fetchPost function that is called every time the screen loads as shown in the code snippet below:

    const fetchPost = async () => {
            //…./////other code/////…...
           setpost(post);
           setisLoading(false);
           renderBookMark(post_id);
       }

    Hence, we will get the following result in our SinglePost screen:

    Create a bookmark
    Create a bookmark

    Here, we can see that the bookmarked post icon status is dark and the post not bookmarked has a bookmarked icon outline only.

    Conclusion

    In this chapter, we learned how to fetch data from the server using the parameter from the Home Screen. Then, we got an insight into how to use different UI components from the react-native-paper package to display the server response data. We also got stepwise guidance on how to implement a functional share button using the Share component from the react-native package. Lastly, we implemented the Bookmark feature by making use of the async-storage package to store the bookmarked posts and also render out the bookmark icon based on it.

    All code in this chapter is available on GitHub.

    Share. Facebook Twitter Pinterest LinkedIn Tumblr Email
    Krissanawat Kaewsanmuang
    • Website
    • X (Twitter)

    Developer Relation @instamobile.io

    Related Posts

    Streamlining Resource Allocation for Enhanced Project Success

    December 18, 2024

    Conducting Effective Post-Project Evaluations: A Guide

    December 16, 2024

    Strategies for Keeping Projects on Track and Meeting Deadlines

    December 10, 2024
    Leave A Reply Cancel Reply

    You must be logged in to post a comment.

    Stay In Touch
    • Facebook
    • Twitter
    • Pinterest
    • Instagram
    • YouTube
    • Vimeo
    Don't Miss
    Franchising May 8, 2019

    Essential Skill of Capabilities Assessment

    There are full service engage company is to provide solution for employees needs training manage…

    5 Website Security Threats and How to Counter Them

    October 16, 2019

    Web Workers: Concurrency In Java Script

    February 15, 2018

    5 Tips from Famous Entrepreneurs to Instantly Boost Your Productivity

    February 28, 2019

    Categories

    • AI & Automation
    • Angular
    • ASP.NET
    • AWS
    • B2B Leads
    • Beginners
    • Blogs
    • Business Growth
    • Case Studies
    • Comics
    • Consultation
    • Content & Leadership
    • CSS
    • Development
    • Django
    • E-commerce & Retail
    • Entrepreneurs
    • Entrepreneurship
    • Events
    • Express.js
    • Facebook Ads
    • Finance & Fintech
    • Flask
    • Flutter
    • Franchising
    • Funnel Strategy
    • Git
    • GraphQL
    • Home Services Marketing
    • Influencer & Community
    • Interview
    • Java
    • Java Spring
    • JavaScript
    • Job
    • Laravel
    • Lead Generation
    • Legal & Compliance
    • LinkedIn
    • Machine Learning
    • Marketing Trends
    • Medical Marketing
    • MSP Lead Generation
    • MSP Marketing
    • NestJS
    • Next.js
    • Node.js
    • Node.js Lessons
    • Paid Advertising
    • PHP
    • Podcasts
    • POS Tutorial
    • Programming
    • Programming
    • Python
    • React
    • React Lessons
    • React Native
    • React Native Lessons
    • Recruitment
    • Remote Job
    • SaaS & Tech
    • SEO & Analytics
    • Soshace
    • Startups
    • Swarm Intelligence
    • Tips
    • Trends
    • Vue
    • Wiki
    • WordPress
    Top Posts

    Deploying Your NodeJS Code to a Server Every Time You Push with Github Actions

    Node.js June 29, 2020

    Happy Programmer’s Day!

    Programming September 12, 2016

    Уроки React . Урок 9

    Programming October 7, 2016

    19. Node.js Lessons. Safe Way to a FS File and Path

    Programming October 21, 2016

    Subscribe to Updates

    Get The Latest News, Updates, And Amazing Offers

    About Us
    About Us

    Soshace Digital delivers comprehensive web design and development solutions tailored to your business objectives. Your website will be meticulously designed and developed by our team of seasoned professionals, who combine creative expertise with technical excellence to transform your vision into a high-impact, user-centric digital experience that elevates your brand and drives measurable results.

    7901 4th St N, Suite 28690
    Saint Petersburg, FL 33702-4305
    Phone: 1(877)SOSHACE

    Facebook X (Twitter) Instagram Pinterest YouTube LinkedIn
    Our Picks
    Programming

    16. Уроки Node.js. Событийный цикл, библиотека libUV. Часть 2.

    Programming

    9. Уроки Node.js. События, EventEmitter и Утечки Памяти

    JavaScript

    Effective Strategies for Managing Scope Creep in Projects

    Most Popular

    Developer Guide to the CCPA

    Entrepreneurship

    Enhancing Interview Success: The Critical Role of Confidence

    Interview

    Mastering Project Performance Reviews: A Step-by-Step Guide

    JavaScript
    © 2025 Soshace Digital.
    • Home
    • About
    • Services
    • Contact Us
    • Privacy Policy
    • Terms & Conditions

    Type above and press Enter to search. Press Esc to cancel.