
Close Menu
Soshace Digital Blog

    Subscribe to Updates

    Get The Latest News, Updates, And Amazing Offers

    What's Hot
    Programming

    RxJS Methods. Part 1

    Java

    Guide to Control Flow Statements in Java

    Programming

    19. Уроки Node.js. Безопасный Путь к Файлу в fs и path.

    Important Pages:
    • Home
    • About
    • Services
    • Contact Us
    • Privacy Policy
    • Terms & Conditions
    Facebook X (Twitter) Instagram LinkedIn YouTube
    Today's Picks:
    • Scaling Success: Monitoring Indexation of Programmatic SEO Content
    • Leveraging Influencers: Key Drivers in New Product Launches
    • How Privacy-First Marketing Will Transform the Industry Landscape
    • The Impact of Social Proof on Thought Leadership Marketing
    • Balancing Value-Driven Content and Promotional Messaging Strategies
    • Top Influencer Marketing Platforms to Explore in 2025
    • Emerging Trends in Marketing Automation and AI Tools for 2023
    • Strategies to Mitigate Duplicate Content in Programmatic SEO
    Thursday, September 11
    Facebook X (Twitter) Instagram LinkedIn YouTube
    Soshace Digital Blog
    • Home
    • About
    • Services
    • Contact Us
    • Privacy Policy
    • Terms & Conditions
    Services
    • SaaS & Tech

      Maximizing Efficiency: How SaaS Lowers IT Infrastructure Costs

      August 27, 2025

      Navigating Tomorrow: Innovations Shaping the Future of SaaS

      August 27, 2025

      Maximizing Impact: Strategies for SaaS & Technology Marketing

      August 27, 2025
    • AI & Automation

      Enhancing Customer Feedback Analysis Through AI Innovations

      August 27, 2025

      Navigating the Impact of AI on SEO and Search Rankings

      August 27, 2025

      5 Automation Hacks Every Home Service Business Needs to Know

      May 3, 2025
    • Finance & Fintech

      Critical Missteps in Finance Marketing: What to Avoid

      August 27, 2025

      Analyzing Future Fintech Marketing Trends: Insights Ahead

      August 27, 2025

      Navigating the Complex Landscape of Finance and Fintech Marketing

      August 27, 2025
    • Legal & Compliance

      Exploring Thought Leadership’s Impact on Legal Marketing

      August 27, 2025

      Maximizing LinkedIn: Strategies for Legal and Compliance Marketing

      August 27, 2025

      Why Transparency Matters in Legal Advertising Practices

      August 27, 2025
    • Medical Marketing

      Enhancing Online Reputation Management in Hospitals: A Guide

      August 27, 2025

      Analyzing Emerging Trends in Health and Medical Marketing

      August 27, 2025

      Exploring Innovative Content Ideas for Wellness Blogs and Clinics

      August 27, 2025
    • E-commerce & Retail

      Strategic Seasonal Campaign Concepts for Online and Retail Markets

      August 27, 2025

      Emerging Trends in E-commerce and Retail Marketing Strategies

      August 27, 2025

      Maximizing Revenue: The Advantages of Affiliate Marketing for E-Commerce

      August 27, 2025
    • Influencer & Community

      Leveraging Influencers: Key Drivers in New Product Launches

      August 27, 2025

      Top Influencer Marketing Platforms to Explore in 2025

      August 27, 2025

      Key Strategies for Successful Influencer Partnership Negotiations

      August 27, 2025
    • Content & Leadership

      The Impact of Social Proof on Thought Leadership Marketing

      August 27, 2025

      Balancing Value-Driven Content and Promotional Messaging Strategies

      August 27, 2025

      Analyzing Storytelling’s Impact on Content Marketing Effectiveness

      August 27, 2025
    • SEO & Analytics

      Scaling Success: Monitoring Indexation of Programmatic SEO Content

      August 27, 2025

      Strategies to Mitigate Duplicate Content in Programmatic SEO

      August 27, 2025

      Effective Data Visualization Techniques for SEO Reporting

      August 27, 2025
    • Marketing Trends

      How Privacy-First Marketing Will Transform the Industry Landscape

      August 27, 2025

      Emerging Trends in Marketing Automation and AI Tools for 2023

      August 27, 2025

      Maximizing ROI: Key Trends in Paid Social Advertising

      August 27, 2025
    Soshace Digital Blog
    Blog / JavaScript / React / React Native / React Native Lessons / Build Real-World React Native App #4 : Content Placeholder
    React Native

    Build Real-World React Native App #4 : Content Placeholder

    Krissanawat KaewsanmuangBy Krissanawat KaewsanmuangNovember 27, 2020No Comments7 Mins Read
    Facebook Twitter Pinterest Telegram LinkedIn Tumblr Email Reddit
    Build Real-World React Native App #4 : Content Placeholder
    Build Real-World React Native App #4 : Content Placeholder
    Share
    Facebook Twitter LinkedIn Pinterest Email Copy Link
    Build Real-World React Native App #4 : Content Placeholder
    Build Real-World React Native App #4 : Content Placeholder

    Placeholders are an essential addition to the overall UI of any app. They enable us to show the temporary image or text until the actual data loads. Using them, users can know that the content is yet to load in the section placeholders are shown. With there addition, users can even gauge out the internet connectivity. The longer the placeholder stands, the slower the connectivity. Hence, the content placeholders provide a visual impact in the overall UI. Thus, optimizing the user experience to another level.

    In this chapter, we will create a preloader using the component from the rn-placeholder package and a preloader for the image using the component from the image-placeholder package. For content, we are using rn-placeholder that displays some placeholder stuff before rendering your text or media content in React Native. For the image, we are using the image-placeholder that supports both Android and iOS. It also provides Activity Indicator customization. The preloaders help to provide a better user experience by showing the loading effect until the actual data loads. This will help users know that the data to be shown on the screen is loading. Its slowness depicts the disturbance in internet connection. Hence, it is a very useful feature for a great user experience.

    The idea is to set up the Pre-loader component for content in a separate component file and render it out conditionally in the post list. For the image placeholder, we are going to configure it and then add it to the FlatList component.

    Let’s get started!

    Creating a preloader Component

    First, we need to install rn-placeholder using yarn in the project terminal:

    yarn add rn-placeholder

    For preloader style, we are going to use a style similar to the Facebook app which we see every day. The example preloader style is shown below:

    Preloader example
    Preloader example

    Now, we need to create component name ContentPlaceholder.js as shown in the screenshot below:
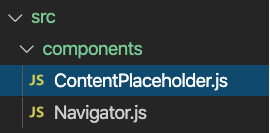
    Component structure
    Component structure

    In the file, we need to import all the necessary components from rn-placeholder package as shown in the code snippet below:

    import React, { Component } from 'react';
    import { Text, View } from 'react-native';
    import {
       Placeholder,
       PlaceholderMedia,
       PlaceholderLine,
       Fade,
    } from 'rn-placeholder';

    Here, we are creating a loop inside a function called PlaceHolderObject. Then, we need to add the placeholder to view by calling the function as shown in the code snippet below:

    const RNPlaceHolder = () => {
       return (
           <View>
               {PlaceholderObject()}
           </View>
       );
    };
    export default RNPlaceHolder;

    Hence, we have the placeholder component to be used in other components to show the preloaders.

    Now, we need to learn how to use them in different components.

    How to use

    First, we need to import it to the screen file that we want to set preload such as Home and SinglePost. For that, we need to use the code from the following code snippet:

    import ContentPlaceholder from '../components/ContentPlaceholder'

    Then, we need to create a state called isLoading in order to handle the loading state as shown in the code snippet below:

    const [isLoading, setIsLoading] = useState(true)

    Here, while the initial state is true we need to display the preloader until we get response data from the server. For that, we need to use the code from the following code snippet:

    const fetchLastestPost = async () => {
           const response = await fetch(
               `https://kriss.io/wp-json/wp/v2/posts?per_page=5&page=${page}`,
           );
           const post = await response.json();
           if (page == 1) {
               setPosts(post);
           } else {
               setPosts([...posts, ...post]);
           }
    	  setIsFetching(false);
           setIsLoading(false)
       }

    Here, the function fetchLatestPost is configured to fetch the date from the server. And, the loading is set based on the data being fetched.

    Read More:  Build Real-world React Native App #1: Splash screen and App Icon

    Now, we need to hide/show the preloaders based on the state value. For that, we need to use the code from the following code snippet:

    if (isLoading) {
           return (
               <View style={{ paddingLeft: 10, paddingRight: 10 }}>
                   <Headline style={{ marginLeft: 23 }}>Lastest Post</Headline>
                   <ContentPlaceholder />
               </View>
           )
       } else {
           return (
               <View>
                   <Headline style={{ marginLeft: 23 }}>Lastest Post</Headline>
                   <FlatList
                       data={posts}
                       onRefresh={() => onRefresh()}
                       refreshing={isFetching}
                       onEndReached={() => handleLoadMore()}
                       onEndReachedThreshold={0.1}
                       ListFooterComponent={() => renderFooter()}
                       renderItem={({ item }) => (
                           <Card
                               style={{
                                   shadowOffset: { width: 5, height: 5 },
                                   width: '90%',
                                   borderRadius: 12,
                                   alignSelf: 'center',
                                   marginBottom: 10,
                               }}>
                               <Card.Content>
                                   <Title>{item.title.rendered}</Title>
                                   <Paragraph>Published on {moment(item.date).fromNow()}</Paragraph>
                               </Card.Content>
                               <Card.Cover
                                   source={{ uri: item.jetpack_featured_media_url }}
                               />
                               <Card.Content>
     
                                   <HTMLRender html={item.excerpt.rendered} />
     
                               </Card.Content>
     
                           </Card>
                       )}
                       keyExtractor={(item, index) => index.toString()}
                   />
     
               </View>
           );
       }

    Hence, we will get the result as shown in the emulator screenshots below:
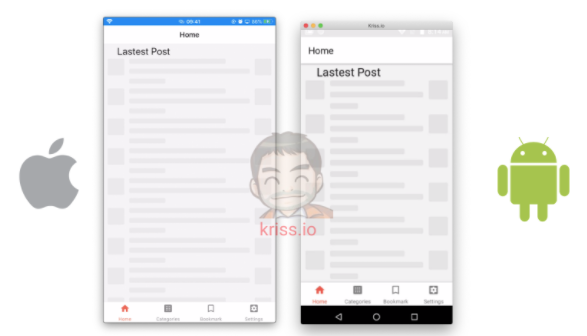
    React Native placeholder
    React Native placeholder

    Image placeholder

    The package that we used for the content placeholder above does not support images. Thus, we need to use a different package for image preloaders. Hence, the package we are going to use is react-native-image-placeholder.

    First, we need to install the package using the following command:

    yarn add react-native-image-placeholder

    Then, we need to import it to screen files that have images in it such as Home, SinglePost, etc as shown in the code snippet below:

    import ImageLoad from 'react-native-image-placeholder';

    Next, we need to replace <Image> component with ImageLoad component and set the attributes in order to adjust the loading icon as shown in the code snippet below:

    <ImageLoad
          style={{ width: '100%', height: 250 }}
          loadingStyle={{ size: 'large', color: 'grey' }}
          source={{ uri: item.jetpack_featured_media_url }}
      />

    Now, if we re-run the app, we will get the following result on the emulator screen:
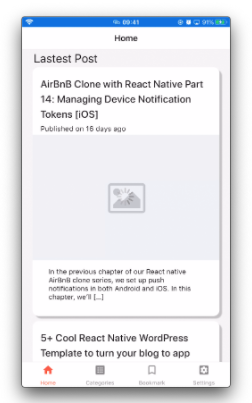
    React Native image placeholder
    React Native image placeholder

    Here, we can see the spinner-like icon at the center of the image area which is an image preloader.

    Read More:  Build Real-World React Native App #11 : Pay For Remove Ads

    Extracting Flatlist

    Until now, we have many duplicate FlatList components on multiple screens. In order to optimize it, we need to create a separate FlatlistItem component. For that, we need to create a new file called FlatlistItem.js first. Then, we can use the code from the following code snippet into this file for creating a FlatList component that can be used in multiple screens:

    import React from 'react';
    import { TouchableOpacity } from 'react-native';
    import HTMLRender from 'react-native-render-html';
    import ImageLoad from 'react-native-image-placeholder';
    import moment from 'moment';
    import {
       Card,
       Title,
       Paragraph
    } from 'react-native-paper';
    
    const FlatlistItem = ({ item, navigation }) => {
       return (
    
           <TouchableOpacity
               onPress={() =>
                   navigation.navigate('SinglePost', {
                       post_id: item.id,
                       name: item.title.rendered,
                   })
               }>
               <Card
                   style={{
                       shadowOffset: { width: 5, height: 5 },
                       width: '90%',
                       borderRadius: 12,
                       alignSelf: 'center',
                       marginBottom: 10,
                   }}>
                   <Card.Content>
                       <Title>{item.title.rendered}</Title>
                       <Paragraph>Published on {moment(item.date).fromNow()}</Paragraph>
                   </Card.Content>
                   <ImageLoad
                       style={{ width: '100%', height: 250 }}
                       loadingStyle={{ size: 'large', color: 'grey' }}
                       source={{ uri: item.jetpack_featured_media_url }}
                   />
                   <Card.Content>
                       <Card.Content>
                           <HTMLRender
                               html={item.excerpt.rendered}
                           />
                       </Card.Content>
                   </Card.Content>
               </Card>
           </TouchableOpacity>
       );
    };
    
    export default FlatlistItem

    Now, in order to use the FlatlistItem component in Home Screen, we need to import the FlatlistItem component to Home screen as shown in the code snippet below:

    import FlatlistItem from '../components/FlatlistItem'

    Next, we need to replace the old Flatlist component as highlighted in the code snippet below:

    <FlatList
           data={posts}
           onRefresh={() => onRefresh()}
           refreshing={isFetching}
           onEndReached={() => handleLoadMore()}
           onEndReachedThreshold={0.1}
           ListFooterComponent={() => renderFooter()}
           renderItem={({ item }) => (
                <FlatlistItem item={item} navigation={navigation} />
           )}
           keyExtractor={(item, index) => index.toString()}
        />

    Note that, we must not forget to pass the navigation object in the Home functional component as shown in the code snippet below:

    const Home = ({navigation}) => {

    Finally, we have successfully created the content placeholder component, integrated the image preloaders, and also configured the separate FlatList component which can be used on multiple screens.

    Conclusion

    The overall tutorial was simple and the implementation was also easy. This will help further optimize the user experience based on the React Native app. Content placeholders are an important concept to learn as it is used everywhere web, mobile, and desktop apps as well.

    In this chapter, we got an insight into improving user experience by integrating content and image placeholders. We got stepwise guidance on how to integrate them to different screens with server data to be loader. Moreover, we also learned how to optimize the code by extracting Flatlist items to a single component. Hence, using the Flatlist component in every screen that requires FlatList.

    All code in this chapter is available on GitHub.

    Share. Facebook Twitter Pinterest LinkedIn Tumblr Email
    Krissanawat Kaewsanmuang
    • Website
    • X (Twitter)

    Developer Relation @instamobile.io

    Related Posts

    Building a Realtime Messaging app with React Native and Firebase

    March 20, 2023

    Build Real-World React Native App #11 : Pay For Remove Ads

    February 17, 2021

    Build Real-World React Native App #10 : Setup in-App Purchase in iOS

    February 1, 2021
    Leave A Reply Cancel Reply

    You must be logged in to post a comment.

    Stay In Touch
    • Facebook
    • Twitter
    • Pinterest
    • Instagram
    • YouTube
    • Vimeo
    Don't Miss
    Programming October 31, 2016

    22. Long Polling Chat, POST Reading. Pt 1.

    Hey all! The aim of our lesson for today is to learn how to create a Node.js chat. Our first chat will be rather simple.

    Enhancing Code Quality: Best Practices for Software Development

    November 29, 2024

    Where to Hire Remote Developers

    July 12, 2018

    Уроки React. Урок 6.

    September 20, 2016

    Categories

    • AI & Automation
    • Angular
    • ASP.NET
    • AWS
    • B2B Leads
    • Beginners
    • Blogs
    • Business Growth
    • Case Studies
    • Comics
    • Consultation
    • Content & Leadership
    • CSS
    • Development
    • Django
    • E-commerce & Retail
    • Entrepreneurs
    • Entrepreneurship
    • Events
    • Express.js
    • Facebook Ads
    • Finance & Fintech
    • Flask
    • Flutter
    • Franchising
    • Funnel Strategy
    • Git
    • GraphQL
    • Home Services Marketing
    • Influencer & Community
    • Interview
    • Java
    • Java Spring
    • JavaScript
    • Job
    • Laravel
    • Lead Generation
    • Legal & Compliance
    • LinkedIn
    • Machine Learning
    • Marketing Trends
    • Medical Marketing
    • MSP Lead Generation
    • MSP Marketing
    • NestJS
    • Next.js
    • Node.js
    • Node.js Lessons
    • Paid Advertising
    • PHP
    • Podcasts
    • POS Tutorial
    • Programming
    • Programming
    • Python
    • React
    • React Lessons
    • React Native
    • React Native Lessons
    • Recruitment
    • Remote Job
    • SaaS & Tech
    • SEO & Analytics
    • Soshace
    • Startups
    • Swarm Intelligence
    • Tips
    • Trends
    • Vue
    • Wiki
    • WordPress
    Top Posts

    Strategies for Developing High-Performing Project Teams

    JavaScript December 7, 2024

    Introduction to Vue.js Event Handling

    JavaScript January 20, 2020

    How to build complex layouts with CSS Grid

    CSS August 28, 2020

    JavaScript Design Patterns in Action

    JavaScript January 2, 2020

    Subscribe to Updates

    Get The Latest News, Updates, And Amazing Offers

    About Us
    About Us

    Soshace Digital delivers comprehensive web design and development solutions tailored to your business objectives. Your website will be meticulously designed and developed by our team of seasoned professionals, who combine creative expertise with technical excellence to transform your vision into a high-impact, user-centric digital experience that elevates your brand and drives measurable results.

    7901 4th St N, Suite 28690
    Saint Petersburg, FL 33702-4305
    Phone: 1(877)SOSHACE

    Facebook X (Twitter) Instagram Pinterest YouTube LinkedIn
    Our Picks
    JavaScript

    Comparative Analysis of Free Tools for Physical Memory Dumps Parsing

    JavaScript

    JavaScript find() and filter() Array Iteration Methods Made Easy

    Entrepreneurship

    Tim Burgess: The Future of Work Will Revolve Heavily Around Flexibility

    Most Popular

    Leveraging Data Analytics for Informed Business Decisions

    Entrepreneurship

    Integrating Data Privacy into Effective Software Development

    Development

    Essential Steps to Identify and Validate Your Business Ideas

    Entrepreneurship
    © 2025 Soshace Digital.
    • Home
    • About
    • Services
    • Contact Us
    • Privacy Policy
    • Terms & Conditions

    Type above and press Enter to search. Press Esc to cancel.