


Flutter is a very interesting library/framework for building cross-platform mobile applications, Flutter can also be used to develop desktop and web applications. Since its release in 2017, it has grown in popularity and it has been adopted by companies like Alibaba in building cross-platform mobile applications. I am assuming that for you to be reading this article you are interested in Flutter and want to learn more about it so I will stop all the rave reviews and let’s try to get our hands and heads dirty.
Prerequisite Knowledge
For you get the most out of this tutorial you should have an understanding of the following:
- Flutter
- Dart
- Basic knowledge of Reactive Programming(Streams/Observables)
Introduction
What will be covered in this tutorial:
- What is Bloc?
- A little bit of Reactive Programming, Streams and StreamControllers(Subjects/Observables)
- When to use the BLOC pattern
- Accessing the BLOC in widgets
- Benefits in using the BLOC
- Guidelines/rules in implementing the BLOC
- Alternatives to BLOC.
What is BLOC?
BLOC is an acronym for Business Logic Component and was introduced by Google in Google I/O 2018, It provides a more elegant and reusable way of managing state in Flutter applications which takes advantage of flutter’s UI reactive model. Reactive model meaning that Flutter user interface components are made up of widgets and we can build complex user interfaces by composing those widgets. Flutter is reactive because it helps us manage the state of those widgets so when the state of any widget changes, it automatic redraws/rerender that widget by itself. To use trigger a state change/ redraw flutter provides the setState function if you have ever written React this is similar to this.setState.
A problem arises when you are building complex applications where you might have multiple setState calls, your logic tightly coupled to the user interface(Widgets) and you might have to deal with unnecessary redraw of a widget can lead to performance issues. So this is where the BLOC comes into play.
BLOCs helps us separate our logic from the user interface while maintaining flutter reactive model of redrawing/rerendering when a state or in this case when there is a new stream.
To understand BLOCs we need a little bit of knowledge about Reactive programming.
According to Wikipedia, “Reactive Programming is a declarative programming paradigm concerned with data streams and the propagation of change”; In simple terms, it is programming with asynchronous data streams. Reactive programming in flutter helps you propagate changes to the user interface without having to describe how the propagation happens.
In flutter we have a lot of sources of data streams, user inputs, network requests, and almost everything can be a source of data streams in Flutter. So it makes sense to take advantage of these streams and reactivity in Flutter to build maintainable and testable applications.
We will cover more Reactive programming and streams later in this article.
In this article, I will be using a simple demo application which accepts user input in a TextField widget and queries the Unsplash API for images then displays them. I will briefly walk you through its implementation using the setState model of managing state.

SetState Approach
Folder structure of the application
lib
├───src/
│ ├───screens/
│ │ └───imagelist_screen.dart
│ ├───api_key.dart
│ └───app.dart
└───main.dart
The main.dart contains the main method that initializes the application
// app.dart
import 'package:flutter/material.dart';
import 'screens/imagelist_screen.dart';

class App extends StatelessWidget {
  Widget build(context) {
	return MaterialApp(
  	title: 'View Images',
  	theme: new ThemeData(
    	primarySwatch: Colors.deepOrange,
  	),
  	home: Scaffold(
    	appBar: AppBar(
      	title: Text('View Images'),
    	),
    	body: ImageList(),
  	),
	);
  }
}
In the src folder we have the app.dart which is a stateless widget that renders the Scaffold containing the Appbar widget and our imagelist widget is what we will be focusing on.
//app.dart

import 'package:flutter/material.dart';
import 'dart:convert';
import 'package:http/http.dart' show get;
import '../api_key.dart';

class ImageList extends StatefulWidget {
  createState() {
	return new ImageListState();
  }
}

class ImageListState extends State<ImageList> {
  List _images = [];
  bool _isLoading = false;

  @override
  Widget build(BuildContext context) {
	return Container(
    	margin: EdgeInsets.all(20.0),
    	child: Column(
      	children: <Widget>[
        	_searchField(),
        	_displayImage(_images),
      	],
    	));
  }

  Future<List> _makeRequest(query) async {
	final response = await get(
    	'https://api.unsplash.com/search/photos?query=$query&client_id=$ACCESS_KEY');
	final img = json.decode(response.body);
	setState(() {
  	_images = img['results'];
	});

	return _images;
  }

  Widget _searchField() {
	return TextField(
  	onChanged: (query) {
    	_makeRequest(query);
  	},
  	decoration: InputDecoration(
      	border: OutlineInputBorder(),
      	prefixIcon: Icon(Icons.search),
      	hintText: 'Search for anything... cats or doggos maybe'),
	);
  }

  Widget _displayImage(List images) {
	return images.isEmpty
    	? Center(child: new CircularProgressIndicator())
    	: Expanded(
        	child: ListView.builder(
          	itemCount: images == null ? 0 : images.length,
          	itemBuilder: (context, int index) {
            	return _buildImage(images[index]);
          	},
        	),
      	);
  }

  Widget _buildImage(dynamic image) {
	return Container(
  	margin: EdgeInsets.all(20.0),
  	padding: EdgeInsets.all(20.0),
  	decoration: BoxDecoration(
    	border: Border.all(color: Colors.grey),
  	),
  	child: Column(
    	children: <Widget>[
      	Padding(
        	child: Image.network(
          	image['urls']['small'],
          	fit: BoxFit.fitWidth,
          	height: 200.0,
        	),
        	padding: EdgeInsets.only(
          	bottom: 8.0,
        	),
      	),
      	Text(image['description'] == null
          	? 'No description'
          	: image['description']),
    	],
  	),
	);
  }
}
The imagelist widget is a stateful widget which has a state called images to store the images gotten from the http request and trigger a redraw when there is a new image.
In the build method of the ImageList widget we have two functions _searchfield and _displayImage both return a widget. The _searchfield function returns a TextField widget that has an onChange function that calls another function _makerequest with its current value as an argument to make the http request to the Unsplash API.
We have the _displayimage function which returns a widget that displays the list of images and a short description in a ListView widget.
This is a trivial example that just makes an API call on change of the TextField widget and generates a list of images. It will work for a simple application like this, but won’t look good when the applications start getting more complex.
What is the problem with this approach?
- No separation of concerns.
- Difficult to testing because the user interface is tightly coupled to the Logic.
- We can’t reuse the logic in this application elsewhere because it is tightly coupled to the user interface implementation.
Let’s see how the BLOC approach helps us solve these problems.
BLOC approach
We have seen the setState approach to managing state in flutter applications but as mentioned above there are some issues with that approach so let’s see how that the BLOC helps us solve that.
In this context, I will say Reactive Programming is the use of functions to manipulate/consume data streams asynchronously. You can read more about reactive programming in The introduction to Reactive Programming you’ve been missing
What is a Stream?
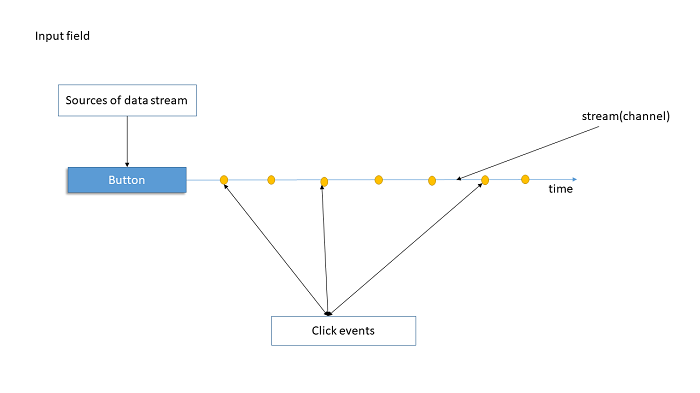
A Stream is a source of asynchronous data events, It provides a way to receive a sequence of events. These events can be a click event, user inputs, variables, hover events, or network request they could be anything.
We have to understand something, anything can be a source of streams like a variable, clicks, users input but how do we create and control the behavior of the stream. let’s take a look at this analogy, a stream is like a channel that anything(variable, mouse clicks, events, network request) can flow through it, you can add items from one end and it flows to the other end.
How do we create a Stream?
We can create and control a stream in Dart using a Streamcontroller. A Streamcontroller is a class provided by Dart in the dart-async package. Streamcontroller is used to create a stream and it provides a sink property to add data(events, variables, network requests) to the stream and also a stream property where you either transform data or listen to the data, errors and done events added to the stream.
This example below shows how to create a stream with a streamController
import 'dart:async';


void main(){
  final subject = new StreamController();
  subject.stream.listen((x)=>print(x));
  subject.sink.add('G');
  subject.sink.add('o');
  subject.sink.add('o');
  subject.sink.add('d');
  subject.sink.add('d');
  subject.sink.add('a');
  subject.sink.add('y');
}

//output
G
o
o
d
d
a
y
Note streams created with StreamController are single-subscription streams by default, which means that it allows only one listener to listen to the stream and they can only be listened to once if you try to listen to it again or add multiple listeners it throws an exception.
But it is possible to create a Broadcast stream(you can listen to them more than once and have multiple listeners) with StreamControllers, all you have to do is call its StreamController.broadcast() constructor when creating it. One thing to note about Broadcast StreamController is that StreamController sends to a listener only the events are added to the Stream after the time of subscription.
Example:
 final subject = new StreamController.broadcast();

  subject.sink.add('first');
  subject.stream.listen((x)=>print('first listener - ${x}'));
  subject.sink.add('second');

  subject.stream.listen((item) => print('second listener - ${item.toUpperCase()}'));// second listener see only the events added after it starts listener
  subject.sink.add('third');
  subject.sink.add('fourth');


  //output
 first listener - second
 second listener - THIRD
 first listener - third
 second listener - FOURTH
 first listener - fourth
If you need your StreamController to have a memory of the events that have to be added to the stream before subscription then I suggest you use StreamControllers provided by the RxDart Package.
RxDart is Dart’s implementation of the ReactiveX(Reactive Extension) Library, which builds on top of the native Dart Streams. In RxDart Stream are called Observable and StreamControllers are called Subjects.
Observable extends the native Stream class so all the methods defined on the Stream class are available in the Observables as well.
RxDart provides three types of StreamContollers for us:
1. PublishSubject: This is similar to a broadcast StreamController with only one difference that is the stream property returns an Observable instead of a Stream. All rxdart Streamcontroller return Observable instead of a Stream.
Example:
final subject = new PublishSubject();


  subject.sink.add('first');
  subject.stream.listen((x)=>print('first listener - ${x}')); //first listener sees only the events added after it starts listener
  subject.sink.add('second');

  subject.stream.listen((item) => print('second listener - ${item.toUpperCase()}'));// second listener see only the events added after it starts listener
  subject.sink.add('third');
  subject.sink.add('fourth');


  //output
 first listener - second
 second listener - THIRD
 first listener - third
 second listener - FOURTH
 first listener - fourth
2. BehaviorSubject: This is a special StreamController that captures the latest item that has been added to the controller and emits that as the first item to any new listener. You can also seed the BehaviorSubject with an initial value that will be emitted when no value has been added to the controller.
Example:
 final subject = new BehaviorSubject();

  subject.sink.add('first');
  subject.stream.listen((x)=>print('first listener - ${x}'));
  subject.sink.add('second');

  subject.stream.listen((item) => print('second listener - ${item.toUpperCase()}'));// second listener see the latest event added to the stream and any other one added after it starts listener
  subject.sink.add('third');
  subject.sink.add('fourth');


  //output
 first listener - first
 first listener - second
 second listener - SECOND
 second listener - THIRD
 first listener - third
 second listener - FOURTH
 first listener - fourth
3. ReplaySubject: This is a special StreamController that captures all the items that have been added to a controller and emits them as the first items to any new listener. It is possible to limit the number of stored items in the ReplaySubject by passing a maxSize property to its constructor.
Example:
 final subject = new ReplaySubject();


  subject.sink.add('first');
  subject.stream.listen((x)=>print('first listener - ${x}'));
  subject.sink.add('second');

  subject.stream.listen((item) => print('second listener - ${item.toUpperCase()}'));// second listener see every event added to the stream
  subject.sink.add('third');
  subject.sink.add('fourth');


  //output
 first listener - first
 first listener - second
 second listener - FIRST
 first listener - third
 second listener - SECOND
 first listener - fourth
 second listener - THIRD
 second listener - FOURTH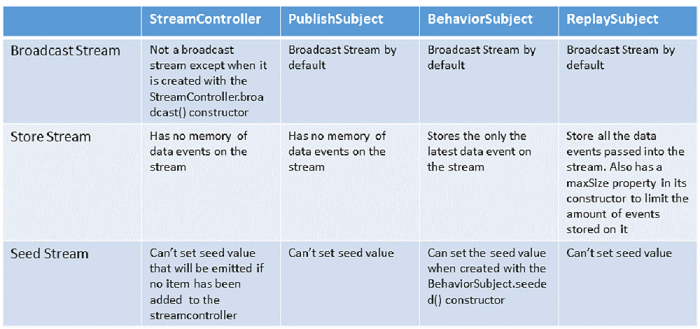
How do we fit Streams into Flutter’s Reactive UI Model
Flutter provides us with a Stateful widget called StreamBuilder which uses State.setState internally. The StreamBuilder widget takes stream property which it listens for any changes, anytime the stream emits new data the StreamBuilder calls its builder callback and it redraws/rerenders the widget. We will see how the StreamBuilder is used when we do the BLOC implementation of our demo application.
I think we know enough to jump right into the BLOC implementation of the Demo.
BLOC Implementation
Folder Structure
lib/
├───src/
│   ├───Api/
│   │   └───Image_Api.dart
│   ├───Bloc/
│   │   └───Image_bloc.dart
│   ├───models/
│   │   └───image_model.dart
│   ├───screens/
│   │   └───imagelist_screen.dart
│   ├───api_key.dart
│   └───app.dart
└───main.dart
Nothing really changed in the app.dart and the main.dart those remain the same but a few changes were made in the ImageList component.
//imagelist.dart

import 'package:flutter/material.dart';
import 'package:image_viewer_bloc_w0provider/src/Api/Image_Api.dart';
import 'package:image_viewer_bloc_w0provider/src/Bloc/Image_bloc.dart';

class ImageList extends StatelessWidget {
  final imageBloc = ImageBloc(ImageAPI());
  @override
  Widget build(BuildContext context) {
	return Container(
    	margin: EdgeInsets.all(20.0),
    	child: Column(
      	children: <Widget>[
        	_searchField(imageBloc),
        	_displayImage(imageBloc),
      	],
    	));
  }

  Widget _searchField(ImageBloc _bloc) {
	return TextField(
  	onChanged: _bloc.query.add,
  	decoration: InputDecoration(
      	border: OutlineInputBorder(),
      	prefixIcon: Icon(Icons.search),
      	hintText: 'Search for anything... cats or doggos maybe'),
	);
  }

  Widget _displayImage(ImageBloc _bloc) {
	return Expanded(
  	child: StreamBuilder(
    	stream: _bloc.images,
    	builder: (context, snapshot) {
      	if (!snapshot.hasData) {
        	return Center(
          	child: CircularProgressIndicator(),
        	);
      	} else {
        	return ListView.builder(
          	itemCount: snapshot.data.length,
          	itemBuilder: (context, index) {
            	return _buildImage(snapshot.data[index]);
          	},
        	);
      	}
    	},
  	),
	);
  }

  Widget _buildImage(dynamic snapshot) {
	return Container(
  	margin: EdgeInsets.all(20.0),
  	padding: EdgeInsets.all(20.0),
  	decoration: BoxDecoration(
    	border: Border.all(color: Colors.grey),
  	),
  	child: Column(
    	children: <Widget>[
      	Padding(
        	child: Image.network(
          	snapshot.urls.small,
          	fit: BoxFit.fitWidth,
          	height: 200.0,
        	),
        	padding: EdgeInsets.only(
          	bottom: 8.0,
        	),
      	),
      	Text(snapshot.description == null
          	? 'No description'
          	: snapshot.description),
    	],
  	),
	);
  }
}
Looking at the BLOC implementation of the imageList we can see that it is now a Stateless Widget and most of the business logic like the method that makes the http request and the setState are no more in the component. All of the business logic has been moved to the BLOC, we then create an instance of the BLOC class ImageBloc which we pass down TextField widget which calls its add method on the onChanged handler. Also we pass that instance to the stream property of the StreamBuilder widget to create a list of images. It seems like all the magic is happening in the ImageBloc component, let’s take a look at how the BLOC is implemented then we will come back and see how everything works together.
//import 'dart:async';

//import '../models/image_model.dart';
//import '../Api/Image_Api.dart';
//import 'package:rxdart/rxdart.dart';

class ImageBloc {
  final ImageAPI api;

  Stream<List<Images>> _images = Stream.empty();

  BehaviorSubject<String> _query = BehaviorSubject<String>();

  Stream<List<Images>> get images => _images;
  Sink<String> get query => _query;

  ImageBloc(this.api) {
	_images = _query.distinct().asyncMap(api.makeRequest).asBroadcastStream();
  }

  void dispose() {
	_query.close();
  }
}
In the ImageBloc class we create a class property _image a Stream of type List. _images is used to store the images that will be fetched from the Unsplash api, Since we are just need something to store the images that why we used Stream.empty() to initialize the _image property which creates an empty broadcast stream.
THe _query property is a BehaviorSubject(special Streamcontroller) of type String. we have covered what BehaviorSubject are earlier in this tutorial. The _query property is a Sink(the input of a stream) which contains the string typed in the TextField widget,to add an item to a Sink we call its add method.
We now create getters for the _images and _query properties to make them available for use, we have a images getter to get the _images stream and a query getter to have access to the _query Sink.
Then we have the ImageBloc constructor which accepts an instance of the ImageApi class.
//Image_Api.dart

//import 'package:http/http.dart' show get;
//import 'dart:convert';
//import '../models/image_model.dart';
//import '../api_key.dart';

class ImageAPI {
  Future<List<Images>> makeRequest(String query) async {
	List<Images> images = [];

	final response = await get(
    	'https://api.unsplash.com/search/photos?query=$query&client_id=$ACCESS_KEY');
	final parsedResponse = json.decode(response.body);
	final List results = parsedResponse['results'];
	results.forEach((result) => images.add(Images.fromJson(result)));

	return images;
  }
}
The ImageAPI class basically contains the logic that makes the http request to the Unsplash api. It has a single method called makeRequest which returns a Future.
Back to the ImageBloc constructor, here we see some of the strengths of functional/reactive programming which is that it helps us write concise and clean code
_images = _query.asyncMap(api.makeRequest)
what this line of code does simply is to take the query added to the _query Sink, fetch the images related to that query and assign that to the _images property.
we will break the line step by step.
1 _query.asyncMap(): asyncMap is a type of operator provided by dart, it is similar to the dart map method which takes a Stream and a function then applies that function to every element in the Stream. asyncMap is different it does this asynchronously.
Now we understand what is going on in the BLOC.
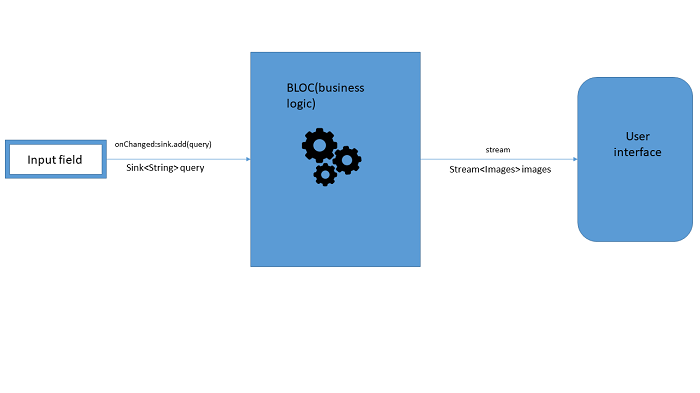
Back to the ImageList component to understand how everything fit, we create an instance of the ImageBloc called imageBloc and passed it to the functions that need it. whenever there is a change in TextField widget we call the BLOCs query.add method on its onChanged callback, this adds the query string to the Sink of the StreamController.
Now we have a stream of images coming out of the BLOC stream, how do we convert this stream to widgets? we have talked about the StreamBuilder widget earlier, it takes the stream from the BLOC and a builder method then calls that builder method whenever there is a new event on the stream which triggers a redraw/rerender of the Widgets in its builder method.
Widget _displayImage(ImageBloc _bloc) {
	return Expanded(
  	child: StreamBuilder(
    	stream: _bloc.images,
    	builder: (context, snapshot) {
      	if (!snapshot.hasData) {
        	return Center(
          	child: CircularProgressIndicator(),
        	);
      	} else {
        	return ListView.builder(
          	itemCount: snapshot.data.length,
          	itemBuilder: (context, index) {
            	return _buildImage(snapshot.data[index]);
          	},
        	);
      	}
    	},
  	),
	);
  }

	Widget _buildImage(dynamic snapshot) {
	return Container(
  	margin: EdgeInsets.all(20.0),
  	padding: EdgeInsets.all(20.0),
  	decoration: BoxDecoration(
    	border: Border.all(color: Colors.grey),
  	),
  	child: Column(
    	children: <Widget>[
      	Padding(
        	child: Image.network(
          	snapshot.urls.small,
          	fit: BoxFit.fitWidth,
          	height: 200.0,
        	),
        	padding: EdgeInsets.only(
          	bottom: 8.0,
        	),
      	),
      	Text(snapshot.description == null
          	? 'No description'
          	: snapshot.description),
    	],
  	),
	);
  }
From the above the StreamBuilder takes the BLOCs images property which is a stream and a builder method which takes a context and snapshot. If the snapshot is empty we return a CircularProgressIndicator else we return a ListView.builder widget that generates images with the description.
The BLOC implementation involves us writing a lot more code but we have all our business logic have been moved to the BLOC, we can easily modify the business logic without touching the UI. This also means it is easier to share logic between widgets and across platforms.
#### Consuming the BLOC
There are a couple of ways of consuming/accessing the BLOC:
1. Single Global Instance : This involves creating an instance of the BLOC and sharing that instance with any component/widget that needs access to the BLOC.
Example:
class ImageBloc {
	/////
	/////
	/////
	/////
	/////
}
// single instance of the BLOC that will be given to any widget that imports this file
final imageBloc = ImageBloc()
2. Local Instance: This is our current implementation, we import the BLOC into the component/widget that needs access to the BLOC then in the component we create an instance of the BLOC so that instance is available to that component only.
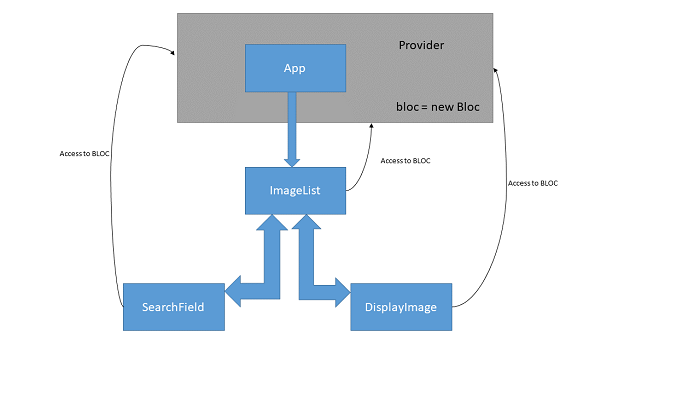
3. Provider pattern(InheritedWidget): I like this approach to accessing the BLOC and in my opinion, I think it is suitable when building a large application. This approach uses an InheritedWidget to wrap a parent widget so every child widget of that parent has access to an instance of the BLOC, if you have worked with React then it is similar to the React context but the implementation is completely different.
The diagram below explains it.
To implement the Provider pattern we create a provider class like this below
//import 'package:flutter/widgets.dart';

//import '../Bloc/Image_bloc.dart';
//import '../Api/Image_Api.dart';

class ImagesProvider extends InheritedWidget {
  final ImageBloc imageBloc;
  @override
  bool updateShouldNotify(InheritedWidget oldWidget) {
	return true;
  }
The ImageProvider class extends the InheritWidget class. The InheritWidget is what does the magic here it helps child components reach up the widget tree and get access to its data without having to pass the data through multiple constructors.
In the ImageProvider we create an instance of ImageBloc that we want the child widget to access then we implement the InheritedWidget abstract method updateShouldNotify that returns a boolean we will return true.
Then we create a static method called of which takes a BuildContext as an argument and returns an ImageBloc instance, what the method does is to take the context passed by the child widget then it looks up the widget tree for a widget that matches that type of ImageProvider then we cast it as a type of ImageProvider and then returns its imageBloc property containing the instance of the BLOC.
Then we have the ImageProvider constructor which takes an ImageBloc instance, a child key and a key.
//import 'package:flutter/material.dart';
//import 'screens/imagelist_screen.dart';
//import './Provider/image_provider.dart';
//import './Bloc/Image_bloc.dart';
//import './Api/Image_Api.dart';

class App extends StatelessWidget {
  Widget build(BuildContext context) {
	// wrap our application with the Images Provider
	return ImagesProvider(
  	imageBloc: ImageBloc(ImageAPI()),
  	child: MaterialApp(
    	title: 'View Images',
    	theme: new ThemeData(
      	primarySwatch: Colors.deepOrange,
    	),
    	home: Scaffold(
      	appBar: AppBar(
        	title: Text('View Images'),
      	),
      	body: ImageList(),
    	),
  	),
	);
  }
}
Now we have to wrap our App widget with provider like shown in the code snippet above we pass an instance of the ImageBloc and a child widget to the ImageProvider constructor. Now all the widget below the App widget have access to the ImageBloc instance using the provider.
To access the Bloc in any child widget we just call the ImageProvider static method of and pass a context as an argument like in the code below.
//imagelist_screen.dart

import 'package:flutter/material.dart';
import 'package:image_viewer_bloc/src/Bloc/Image_bloc.dart';
import 'package:image_viewer_bloc/src/Provider/image_provider.dart';

class ImageList extends StatelessWidget {
  @override
  Widget build(BuildContext context) {
	final _imageBloc = ImagesProvider.of(context);
	return Container(
    	margin: EdgeInsets.all(20.0),
    	child: Column(
      	children: <Widget>[
        	_searchField(_imageBloc),
        	_displayImage(_imageBloc),
      	],
    	));
  }
////////
////////
////////
Now our widgets have access to the BLOC through the ImageProvider.
Note: There are several options for accessing the BLOC that might be better than the three I covered in this article but this is what I choose to cover in this article.
What is the benefit of using the BLOC pattern?
- Separation of Concerns: The User Interface and the business logic are no longer tightly coupled this makes it easier to make changes to the user interface without or modifying the business logic. It keeps the UI simple and dumb.
- Testing: It is easier to the Business logic now because we do have to worry about how it fits with the user interface.
- Reactive Programming: Since the BLOC makes use of streams its helps us take advantage of the operators like distinct, where, asyncMap, switchMap e.t.c. They help in writing clean and concise code.
Guidelines for writing a BLOC
In Paolo Soares talk at DartConf (January 2018) he listed some guidelines you need to follow when writing a BLOC.
- Input and Output of the BLOC are simple Streams and Sinks.
- Dependencies must be injectable and Platform agnostic.
- No platform branching is allowed
- Implementation can be whatever you want as long as you follow the above rules.
Alternatives to the BLOC
What other options do we have to manage state in flutter applications
- Redux
- Mobx
- Scoped Model
- Flutter Hooks
- Firebase
- RxVMS(Dependency Injection/Service Locator)
Conclusion
Flutter has a lot of approaches to managing the state of an application so it is up to you the application developer to pick the right tool, as you can see the BLOC is an overkill for the demo application used in this tutorial but in more complex application this approach might be the best because it encourages separation of concerns and cleaner code.