

While creating the Hyvor Talk commenting plugin, I worked a lot of time with React and AJAX, because its moderation panel was completely written with those technologies. In this article, I’ll reveal everything I learned about React and AJAX. When you grasp the basics and some other tips, it’s really easy to write AJAX-based React applications. Let’s start!

AJAX
AJAX is a web technology used in client-side to perform an asynchronous HTTP request. Simply, we can use AJAX to fetch data from a server without reloading a page (If you don’t like the term AJAX, remember is as fetching data from APIs, no rocket science).
React and AJAX
If you have previously worked with jquery or angular, you may know that those libraries/frameworks have ways to fetch data (or use AJAX) by default. However, React doesn’t even know it has to deal with servers at all. React is always about rendering components. It takes data from two sources which are props and state. We can use AJAX to fetch data from the server to React. Then, we can render the component based on the loaded data.
Choosing an AJAX Library
First, let’s choose the method we use for asynchronous HTTP requests. The only way of performing asynchronous HTTP requests from the browser is using the XMLHttpRequest interface (Only new browsers support fetch API). However, there are wrappers that make the task much easier. Choosing the best one is completely upon you. It is all about how clear the syntax for you. For some methods, make sure you are happy with the browser support. Here are the methods and their syntax.
- XMLHttpRequest This is the default method which is supported by all major browsers. The methods below (excluding Fetch API) is based on this.
var xhttp = new XMLHttpRequest(); xhttp.onreadystatechange = function() { if (this.readyState == 4 && this.status == 200) { // ajax request is succesful } }; xhttp.open("GET", "SOME_URL", true); xhttp.send(); - Fetch API (This doesn’t support IE) There are two drawbacks of using fetch API: Less browser support and lack of feature to cancel the request.
fetch('SOME_URL', { method: 'get' }).then(function(response) { // success }).catch(function(err) { // Error }); - Axios Axios makes XMLHttpRequests from the browser. Many React developers prefer this as it perfectly pairs with React.
axios.get('/user?ID=12345') .then(function (response) { // handle success console.log(response); }) .catch(function (error) { // handle error console.log(error); }) .finally(function () { // always executed }); - SuperAgent SuperAgent is another promising agent. It can be written in different ways: callback, promise with then/catch, and promise with async/await.
const superagent = require('superagent');

// callback
superagent
  .post('/api/pet')
  .send({ name: 'Manny', species: 'cat' }) // sends a JSON post body
  .set('X-API-Key', 'foobar')
  .set('accept', 'json')
  .end((err, res) => {
    // Calling the end function will send the request
  });

// promise with then/catch
superagent.post('/api/pet').then(console.log).catch(console.error);

// promise with async/await
(async () => {
  try {
    const res = await superagent.post('/api/pet');
    console.log(res);
  } catch (err) {
    console.error(err);
  }
})();
Did you choose your favorite library? Let’s continue to the next part.
In this tutorial, I chose the Programming Quotes API and XMLHttpRequest. We can fetch some programming quotes from the API and display it to the user. Until loading, we can show a loader or a “loading” message.
Here’s the complete code of the first step. Check it out. I’ll explain all the steps in a moment.
A simple HTML div element where we render the React DOM.
<div id="view"></div>
Then, the React code.
class ProgrammingQuotes extends React.Component {

    constructor(props) {
        super(props);

        this.state = {
            isLoaded: false,
            error: null,
            quotes: []
        };
      }

    componentDidMount() {

        var xhr = new XMLHttpRequest();

        xhr.addEventListener("readystatechange", () => {
            if (xhr.readyState === 4) {
                if (xhr.status === 200) {
                    // request succesful
                    var response = xhr.responseText,
                        json = JSON.parse(response);

                  this.setState({
                    isLoaded: true,
                    quotes: json
                   });
                } else {
                    // error
                  this.setState({
                    isLoaded: true,
                    error: xhr.responseText
                  });
                }
            }
        });

        xhr.open("GET", "https://programming-quotes-api.herokuapp.com/quotes/page/1", true);
        xhr.send();

      }

      render() {

          var body;

        if (!this.state.isLoaded) {
            // yet loading
          body = <div>Loading...</div>;
        } else if (this.state.error) {
            // error
          body = <div>Error occured: { this.state.error }</div>
        } else {
            // success

            var quotes = this.state.quotes.map(
                quote => <div key={quote.id} className="quote-view">{ quote.en }</div>
              );

            body = <div>{quotes}</div>
        }

        return body;
      }
}

ReactDOM.render(
    <ProgrammingQuotes />,
  document.getElementById('view')
);
(If you like to test it our first, here’s the JSFiddle Demo)
Let’s go step by step.
1. Setting up State
constructor(props) {
      super(props);

      this.state = {
        isLoaded: false,
          error: null,
          quotes: []
    };
}
If you are a React dev, you must have used super(props). If you don’t know the reason, check out this blog post. However, the main focus of declaring the constructor is setting up the state variables. If you don’t have any other function to execute in the constructor, you can simply declare the state as property.
Ex:
class ProgrammingQuotes extends React.Component {
    state = {
        isLoaded: false,
          error: null,
          quotes: []
    };
}
Here we declare three states to save load status, error, and actual data. Usually, these are the only states needed for a component that fetches data and displays in itself. When the component tree grows, things can become complicated.
In non-react apps, we fetch from APIs on event handlers such as onload, onclick, etc. Nevertheless, React is about components and component trees. Also, as react doesn’t have external states like Redux, we have to rely on local states.
2. Fetching Data
Remember the name componentDidMount.
It is where all this happens.
componentDidMount() method runs after the component has been rendered to the DOM.
it is the best place to fetch data!
componentDidMount() {

    var xhr = new XMLHttpRequest();

    xhr.addEventListener("readystatechange", () => {
        if (xhr.readyState === 4) {
            if (xhr.status === 200) {
                // request successful
                var response = xhr.responseText,
                    json = JSON.parse(response);

                this.setState({
                    isLoaded: true,
                    quotes: json
                });
            } else {
                // error
                this.setState({
                    isLoaded: true,
                    error: xhr.responseText
                });
            }
        }
    });

    xhr.open("GET", "https://programming-quotes-api.herokuapp.com/quotes/page/1", true);
    xhr.send();

}
In this method, we initiate the AJAX request using XMLHttpRequest. We use the GET method and https://programming-quotes-api.herokuapp.com/quotes/page/1 as the endpoint which returns a JSON output of first page quotes.
readystatechange handler is called when the readyState of the request changes. readyState 4 means the request is completed. Normally, servers set the http response code to 200 when the request is successful (Thankfully, our API does it too). So, if xhr.status is 200, we know that the request is successful. Next, we parse the response to JSON and update the state.
If the request is not successful, we set the this.state.error variable which we will use in the next step.
3. Rendering the Component
render() {

    var body;

    if (!this.state.isLoaded) {
        // yet loading
      body = <div>Loading...</div>;
    } else if (this.state.error) {
        // error
      body = <div>Error occured: { this.state.error }</div>
    } else {
        // success

          var quotes = this.state.quotes.map(
              quote => <div key={quote.id} className="quote-view">{ quote.en }</div>
          );

        body = <div>{quotes}</div>
    }

      return body;
}
In our component we have three states:
- Loading
- Loaded, but an error occurred
- Loaded, successful
Here we use a simple condition to render different UIs based on the current state.
- We show a message saying “Loading…” when the data is loading
- If something goes wrong, we will show the error message.
- If data is fetched, we will render the quotes looping through each quote. Check out React lists and keys for more details on creating lists.And, it’s important to find out how the response of the API is structured. To do this, you can check out either their documentation or response itself. I use the browser console or an online JSON Pretty Printer to examine the structure of the response.
PRO TIP: render() method runs every time when the state is changed using setState().
Determining the Best Component for Fetching
In the above example, we only had one component. However, in real-world applications, we will have many complex component trees and we have to determine the best component to do the fetching. The following image shows a bit complex React component tree.
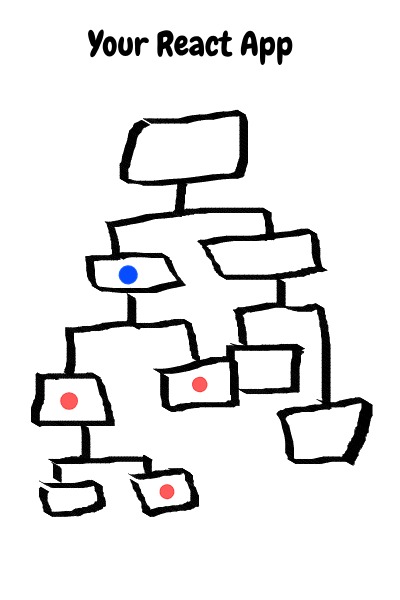
The components indicated with red dot (quite like the Japan flag) needs the data from API to be rendered. So, the component with the blue dot is the best place to fetch the data.
TL;DR Find all the components that depend on the data from API (including where the loader and the error message is shown). Then, get their lowest common parent. That’s the best component to fetch data.
Using Props Too
Now, we are going to upgrade our single component into a simple app where users can select quotes from multiple pages. I came up with this idea because our API natively supports that (use /quotes/page/${PAGE_ID} for different pages).
Here’s our upgraded app. (JSfiddle here)
class App extends React.Component {

    state = {
        currentPageNumber: 1
    }

    onChange(pageNumber) {
        this.setState({currentPageNumber: pageNumber});
    }

    render() {

        return (
            <div>
                <PageNumberSelector
                    onChange={(val) => this.onChange(val)}
                    currentPageNumber={this.state.currentPageNumber}
                />
                <ProgrammingQuotes currentPageNumber={this.state.currentPageNumber} />
            </div>
        );
    }

}

function PageNumberSelector(props) {

    var options = [1,2,3,4,5].map((i) => {

        return (
            <option
                value={i}
                key={i}
            >{i}</option>
        );

    });

    return (
        <div>
            Select Page Number:
            <select
                value={props.currentPageNumber}
                onChange={(e) => props.onChange(e.target.value)}
            >
                { options }
            </select>
        </div>
    )
}


class ProgrammingQuotes extends React.Component {

    constructor(props) {
        super(props);

        this.state = {
            isLoaded: false,
            error: null,
            quotes: []
        };
    }

    componentDidMount() {

        var xhr = new XMLHttpRequest();

        xhr.addEventListener("readystatechange", () => {
                if (xhr.readyState === 4) {
        if (xhr.status === 200) {
                // request succesful
                var response = xhr.responseText,
                        json = JSON.parse(response);

            this.setState({
                isLoaded: true,
                quotes: json
             });
        } else {
                // error
            this.setState({
                isLoaded: true,
                error: xhr.responseText
            });
        }
                }
        });

        var page = this.props.currentPageNumber;

        xhr.open("GET", "https://programming-quotes-api.herokuapp.com/quotes/page/" + page, true);
        xhr.send();

    }

    render() {

        var body;

        if (!this.state.isLoaded) {
                // yet loading
            body = <div>Loading...</div>
        } else if (this.state.error) {
                // error
            body = <div>Error occured: { this.state.error }</div>
        } else {
                // success

            var quotes = this.state.quotes.map(quote => <div key={quote.id} className="quote-view">{ quote.en }</div>);

                body = <div>{quotes}</div>
        }

        return body;
    }

}

ReactDOM.render(
    <App />,
    document.getElementById('app')
);
This includes a page number selector and the component we created earlier. We save the currentPageNumber state in the parent component and provide it to both child components. The ProgrammingQuotes component uses it to fetch pages dynamically.
However, if you try changing the page number on the app, you will notice that AJAX is not loaded again. And, if you change the initial currentPageNumber state, you will notice that it loads the next page of the API. This is because componentDidMount() only called one time at the first rendering.
In this case, componentDidUpdate comes into action. We can use it to re-fetch data when the props are changed.
From React Docs: componentDidUpdate() is invoked immediately after updating occurs. This method is not called for the initial render.
That’s what we actually need. Let’s use it.
class ProgrammingQuotes extends React.Component {

    constructor(props) {
        // no change
    }

    fetchData() {
        // reset
        this.setState({
            isLoaded: false,
            error: null,
            quotes: []
        });

        var xhr = new XMLHttpRequest();

        xhr.addEventListener("readystatechange", () => {
                if (xhr.readyState === 4) {
        if (xhr.status === 200) {
                // request succesful
                var response = xhr.responseText,
                        json = JSON.parse(response);

            this.setState({
                isLoaded: true,
                quotes: json
             });
        } else {
                // error
            this.setState({
                isLoaded: true,
                error: xhr.responseText
            });
        }
                }
        });

        var page = this.props.currentPageNumber;

        xhr.open("GET", "https://programming-quotes-api.herokuapp.com/quotes/page/" + page, true);
        xhr.send();

    }

    componentDidMount() {
        this.fetchData();
    }
    componentDidUpdate(prevProps) {
        // compare with previous props
        if (prevProps.currentPageNumber !== this.props.currentPageNumber) {
            this.fetchData();
        }
    }

    render() {
        // no change
    }

}
First, we separate the AJAX process as we need need to use it in two life-cycle methods.
In the componentDidUpdate, we compare the current props with the previous one (this is sent to the function by React). If the currentPageNumber is new, we will re-fetch the data.
Check these new features on JSFiddle.
Aborting AJAX Request
Try changing the page number very fast. You will see that when we change it twice very quickly, it will load both. You can see this more effectively on the browser console.
We can cancel the fetching request so that this issue won’t happen. Here’s the updated fetchData() method.
xhr = null;

fetchData() {
    // reset
    this.setState({
        isLoaded: false,
        error: null,
        quotes: []
    });

    // abort previous request
    if (this.xhr)
        this.xhr.abort();

    var xhr = new XMLHttpRequest();

    xhr.addEventListener("readystatechange", () => {
        if (xhr.readyState === 4) {
            if (xhr.status === 200) {
                // request succesful
                var response = xhr.responseText,
                    json = JSON.parse(response);

                this.setState({
                    isLoaded: true,
                    quotes: json
                 });
            } else {
                    // error
                this.setState({
                    isLoaded: true,
                    error: xhr.responseText
                });
            }

            this.xhr = null;
        }
    });

    var page = this.props.currentPageNumber;

    xhr.open("GET", "https://programming-quotes-api.herokuapp.com/quotes/page/" + page, true);
    xhr.send();

    this.xhr = xhr;

}
First, we set a class property xhr to save the current XMLHttpRequest instance. When the next one is called, we can simply abort the previous one. You can also do this with Axios (bit complicated) too.
Conclusion
In this article, we discussed how to make AJAX requests (or asynchronous API calls), how to use it in React, where to use it, and some tricks to solve everyday problems. If you like to play with, here’s the final live demo. Also, don’t forget to read the programming quotes.
Thank you very much for reading! If you have any questions, please let me know.

See you in the next article.