Close Menu
Soshace Digital Blog

    Subscribe to Updates

    Get The Latest News, Updates, And Amazing Offers

    What's Hot
    Programming

    Уроки React . Урок 10.

    JavaScript

    React Lesson 3: Exploring the React Component Lifecycle

    Programming

    Node.js Experience

    Important Pages:
    • Home
    • About
    • Services
    • Contact Us
    • Privacy Policy
    • Terms & Conditions
    Facebook X (Twitter) Instagram LinkedIn YouTube
    Today's Picks:
    • Scaling Success: Monitoring Indexation of Programmatic SEO Content
    • Leveraging Influencers: Key Drivers in New Product Launches
    • How Privacy-First Marketing Will Transform the Industry Landscape
    • The Impact of Social Proof on Thought Leadership Marketing
    • Balancing Value-Driven Content and Promotional Messaging Strategies
    • Top Influencer Marketing Platforms to Explore in 2025
    • Emerging Trends in Marketing Automation and AI Tools for 2023
    • Strategies to Mitigate Duplicate Content in Programmatic SEO
    Wednesday, September 10
    Facebook X (Twitter) Instagram LinkedIn YouTube
    Soshace Digital Blog
    • Home
    • About
    • Services
    • Contact Us
    • Privacy Policy
    • Terms & Conditions
    Services
    • SaaS & Tech

      Maximizing Efficiency: How SaaS Lowers IT Infrastructure Costs

      August 27, 2025

      Navigating Tomorrow: Innovations Shaping the Future of SaaS

      August 27, 2025

      Maximizing Impact: Strategies for SaaS & Technology Marketing

      August 27, 2025
    • AI & Automation

      Enhancing Customer Feedback Analysis Through AI Innovations

      August 27, 2025

      Navigating the Impact of AI on SEO and Search Rankings

      August 27, 2025

      5 Automation Hacks Every Home Service Business Needs to Know

      May 3, 2025
    • Finance & Fintech

      Critical Missteps in Finance Marketing: What to Avoid

      August 27, 2025

      Analyzing Future Fintech Marketing Trends: Insights Ahead

      August 27, 2025

      Navigating the Complex Landscape of Finance and Fintech Marketing

      August 27, 2025
    • Legal & Compliance

      Exploring Thought Leadership’s Impact on Legal Marketing

      August 27, 2025

      Maximizing LinkedIn: Strategies for Legal and Compliance Marketing

      August 27, 2025

      Why Transparency Matters in Legal Advertising Practices

      August 27, 2025
    • Medical Marketing

      Enhancing Online Reputation Management in Hospitals: A Guide

      August 27, 2025

      Analyzing Emerging Trends in Health and Medical Marketing

      August 27, 2025

      Exploring Innovative Content Ideas for Wellness Blogs and Clinics

      August 27, 2025
    • E-commerce & Retail

      Strategic Seasonal Campaign Concepts for Online and Retail Markets

      August 27, 2025

      Emerging Trends in E-commerce and Retail Marketing Strategies

      August 27, 2025

      Maximizing Revenue: The Advantages of Affiliate Marketing for E-Commerce

      August 27, 2025
    • Influencer & Community

      Leveraging Influencers: Key Drivers in New Product Launches

      August 27, 2025

      Top Influencer Marketing Platforms to Explore in 2025

      August 27, 2025

      Key Strategies for Successful Influencer Partnership Negotiations

      August 27, 2025
    • Content & Leadership

      The Impact of Social Proof on Thought Leadership Marketing

      August 27, 2025

      Balancing Value-Driven Content and Promotional Messaging Strategies

      August 27, 2025

      Analyzing Storytelling’s Impact on Content Marketing Effectiveness

      August 27, 2025
    • SEO & Analytics

      Scaling Success: Monitoring Indexation of Programmatic SEO Content

      August 27, 2025

      Strategies to Mitigate Duplicate Content in Programmatic SEO

      August 27, 2025

      Effective Data Visualization Techniques for SEO Reporting

      August 27, 2025
    • Marketing Trends

      How Privacy-First Marketing Will Transform the Industry Landscape

      August 27, 2025

      Emerging Trends in Marketing Automation and AI Tools for 2023

      August 27, 2025

      Maximizing ROI: Key Trends in Paid Social Advertising

      August 27, 2025
    Soshace Digital Blog
    Blog / Python / Flask / Implementing Machine Learning in Web Applications with Python and TensorFlow
    Flask

    Implementing Machine Learning in Web Applications with Python and TensorFlow

    EkekentaBy EkekentaApril 7, 2023Updated:June 4, 2024No Comments8 Mins Read
    Facebook Twitter Pinterest Telegram LinkedIn Tumblr Email Reddit
    Implementing Machine Learning in Web Applications with Python and TensorFlow
    Share
    Facebook Twitter LinkedIn Pinterest Email Copy Link
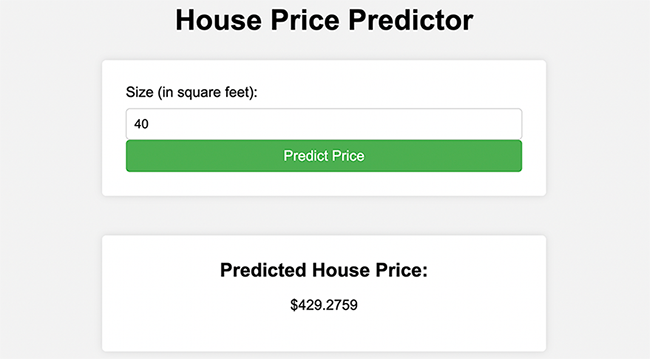
    Predicted House Price
    Predicted House Price

    Introduction

    In this tutorial, you’ll learn how to implement machine learning in web applications using Python and TensorFlow. By the end of this tutorial, you’ll be able to create a simple web application that utilizes a machine-learning model. Without much ado,  let’s begin!

    Overview

    This tutorial’s main goal is to walk you through the creation of a web application that uses a machine learning model. First, we’ll use TensorFlow to build a straightforward machine-learning model. Next, we’ll create a web application with Flask, a quick and easy Python web framework. The model will then be deployed and integrated into the web application.

    What is Tensorflow

    The Google-developed open-source software package TensorFlow is used to create and train machine learning models. Because it functions particularly well with large-scale neural networks, it has become one of the most extensively used machine learning frameworks. One of TensorFlow’s key advantages is its simplicity in handling complex calculations and large datasets. It is designed to operate well with GPUs and other hardware accelerators, allowing deep neural networks to be trained much more quickly than with other frameworks.

    In addition to its speed advantages, TensorFlow offers a range of tools and APIs for developing and deploying machine learning models. Using the wide range of pre-built components it includes for tasks like data processing, model construction, and visualization will speed up and save time during the development of machine learning applications. Another benefit of TensorFlow is its versatility. It can be used for a variety of machine-learning tasks, such as sentiment analysis, natural language processing, and image identification.

    Setting up the Environment

    To set up your environment, the first thing you ought to take in account is your internet connection. If it is stable and reliable, move to the next step but if not, you might want to switch to an ISP that offers not only seamless connectivity but also wireless compatibility for all your devices.

    Let’s set up our environment. You’ll use Python and TensorFlow for our machine learning model, and Flask for your web application. First, you need to install Anaconda to be able to install and use the Tensorflow library. To do that, follow the steps below:

    1. Visit the download page for Anaconda.
    2. Click the download button after selecting the suitable installer for your operating system (Windows, macOS, or Linux).
    3. To start the installer after the download is finished, double-click it.
    4. To install Anaconda on your PC, adhere to the instructions.
    • You might be given the option to install Anaconda for all users or just the current user on Windows. Click Next after selecting the suitable option.
    • You might come across a macOS warning stating that the installer is an internet-downloaded program. To continue with the installation, click Open.
    • You might be prompted to accept the Anaconda End User License Agreement during the installation. Click I Agree if you agree.

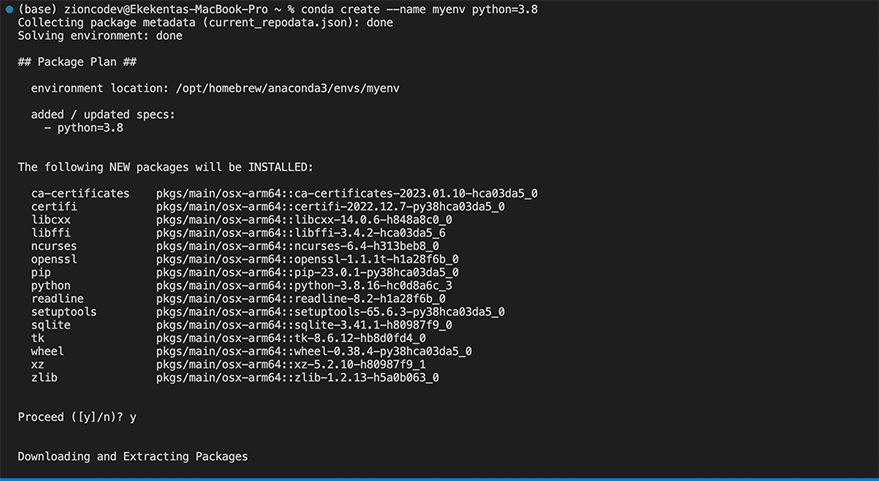
    Once the installation is complete, open a terminal or Anaconda Prompt and create a new conda environment for your project.

    conda create --name myenv python=3.8

    This creates a new environment named myenv Python 3.8 installed. You can replace myenv with the name you want to use for your environment.
    conda create --name myenv python=3.8
    conda create –name myenv python=3.8

    Now activate the new environment by running the following command:

    conda activate myenv

    This activates the myenv environment and prepares your terminal or Anaconda Prompt to use it. You can now install TensorFlow and Flask in the new environment by running the following commands:

    conda install tensorflow
    pip install flask

    This installs TensorFlow and Flask in the myenv environment.

    Read More:  How I Built an Admin Dashboard with Python Flask

    Project Structure

    After setting up the environment for this tutorial, Let me show you what the project structure of the application I’ll be building throughout this tutorial will look like:

    📦mypyapp

    ┣ 📂templates
    ┃ ┣ 📜index.html
    ┃ ┗ 📜result.html
    ┣ 📜app.py
    ┣ 📜housing_data.csv
    ┗ 📜model.py

    Let me talk briefly about these files:

    • templates folder: Here is where you will add all the template files for the project.
    • templates/index.html: This is the root template that is rendered when a user visits the app.
    • templates/result.html: Here is where the result of the prediction from the model is rendered.
    • app.py: This is the Flask application file.
    • housing_data.csv: This file is where the data sets used by the model for prediction are stored.
    • model.py: Here is the machine learning prediction model.

    Creating a Simple Machine Learning Model

    With the project environment setup, create a simple linear regression model to predict housing prices based on the size of a house. This model is chosen for its simplicity, but you can replace it with any other model you’d like.

    First, let’s create a new Python file called model.py. I’ll import the necessary libraries and load our dataset:

    # Load the dataset
    import tensorflow as tf
    import numpy as np
    import pandas as pd
    
    data = pd.read_csv('housing_data.csv')

    In the above code snippet, I’ve imported the Python machine-learning packages required for the model. The code will load the data sets in the housing_data.csv which you’ll be creating shortly to train the model using some data sets I pass to it. Now create the housing_data.csv file and add records with two columns: “Size” (in square feet) and “Price” (in USD).

    Size,Price
    1000,120000
    1200,140000
    1400,160000
    1600,180000
    1800,210000
    2000,240000
    2200,260000
    2400,290000
    2600,320000
    2800,340000
    

    Then I will update the file to the code below to split the data into training and testing sets:

    # Split data into training and testing sets
    train_data = data.sample(frac=0.8, random_state=42)
    test_data = data.drop(train_data.index)

    Now, I will create the linear regression model using TensorFlow:

    # Create a linear regression model
    model = tf.keras.Sequential([
        tf.keras.layers.Dense(units=1, input_shape=[1])
    ])
    
    # Compile the model
    model.compile(optimizer=tf.keras.optimizers.Adam(0.1), loss='mean_squared_error')

    Next, train the model with your training data:

    # Train the model
    history = model.fit(train_data['Size'], train_data['Price'], epochs=100, verbose=False)

    To evaluate the performance of your model, I’ll use the test data:

    # Evaluate the model
    loss = model.evaluate(test_data['Size'], test_data['Price'], verbose=False)
    print(f"Mean squared error: {loss:.2f}")

    Finally, I will save the trained model to use it later in the web application:

    # Save the model
    model.save('linear_regression_model')

    Building the Web Application

    With the machine learning model ready, let’s create the web application using Flask. First, create a new Python file called app.py and import the necessary libraries:

    from flask import Flask, render_template, request, jsonify
    import tensorflow as tf
    import numpy as np
    
    app = Flask(__name__)

    Now, let’s load the previously saved linear regression model:

    # Load the saved model
    model = tf.keras.models.load_model('linear_regression_model')

    Next, I’ll create a route for our home page where users can input the house size and receive a predicted price. I’ll use an HTML template for this purpose. Create a new folder called templates and a file named index.html inside it. Add the following code to index.html:

    <!DOCTYPE html>
    <html lang="en">
      <head>
        <meta charset="UTF-8" />
        <title>House Price Predictor</title>
        <style>
          body {
            font-family: Arial, sans-serif;
            margin: 0;
            padding: 0;
            background-color: #f2f2f2;
          }
    
          h1 {
            text-align: center;
            margin-top: 50px;
            margin-bottom: 30px;
            font-size: 36px;
          }
    
          form {
            max-width: 500px;
            margin: 0 auto;
            padding: 30px;
            background-color: #fff;
            border-radius: 5px;
            box-shadow: 0px 0px 10px 0px rgba(0, 0, 0, 0.1);
          }
    
          label {
            display: block;
            margin-bottom: 10px;
            font-size: 18px;
          }
    
          input[type="number"] {
            display: block;
            width: 100%;
            padding: 10px;
            border: 1px solid #ccc;
            border-radius: 5px;
            font-size: 16px;
            box-sizing: border-box;
          }
    
          button[type="submit"] {
            display: block;
            width: 100%;
            padding: 10px;
            background-color: #4caf50;
            color: #fff;
            border: none;
            border-radius: 5px;
            font-size: 18px;
            cursor: pointer;
            transition: background-color 0.3s ease;
          }
    
          button[type="submit"]:hover {
            background-color: #3e8e41;
          }
        </style>
      </head>
      <body>
        <h1>House Price Predictor</h1>
        <form action="/predict" method="post">
          <label for="size">Size (in square feet):</label
          ><input type="number" id="size" name="size" required /><button
            type="submit"
          >
            Predict Price
          </button>
        </form>
      </body>
    </html>

    Then create a result.html file in the templates folder to render the result of the predictions with the code snippet below:

    <!DOCTYPE html>
    <html lang="en">
      <head>
        <meta charset="UTF-8" />
        <title>House Price Predictor</title>
        <style>
          body {
            font-family: Arial, sans-serif;
            margin: 0;
            padding: 0;
            background-color: #f2f2f2;
          }
    
          h1 {
            text-align: center;
            margin-top: 50px;
            margin-bottom: 30px;
            font-size: 36px;
          }
    
          form {
            max-width: 500px;
            margin: 0 auto;
            padding: 30px;
            background-color: #fff;
            border-radius: 5px;
            box-shadow: 0px 0px 10px 0px rgba(0, 0, 0, 0.1);
          }
    
          label {
            display: block;
            margin-bottom: 10px;
            font-size: 18px;
          }
    
          input[type="number"] {
            display: block;
            width: 100%;
            padding: 10px;
            border: 1px solid #ccc;
            border-radius: 5px;
            font-size: 16px;
            box-sizing: border-box;
          }
    
          button[type="submit"] {
            display: block;
            width: 100%;
            padding: 10px;
            background-color: #4caf50;
            color: #fff;
            border: none;
            border-radius: 5px;
            font-size: 18px;
            cursor: pointer;
            transition: background-color 0.3s ease;
          }
    
          button[type="submit"]:hover {
            background-color: #3e8e41;
          }
    
          .result {
            max-width: 500px;
            margin: 0 auto;
            padding: 30px;
            background-color: #fff;
            border-radius: 5px;
            box-shadow: 0px 0px 10px 0px rgba(0, 0, 0, 0.1);
            margin-top: 50px;
          }
    
          .result h2 {
            margin-top: 0;
            margin-bottom: 20px;
            font-size: 24px;
            text-align: center;
          }
    
          .result p {
            margin-top: 0;
            font-size: 18px;
            text-align: center;
          }
        </style>
      </head>
      <body>
        <h1>House Price Predictor</h1>
        <form action="/predict" method="post">
          <label for="size">Size (in square feet):</label
          ><input type="number" id="size" name="size" required /><button
            type="submit"
          >
            Predict Price
          </button>
        </form>
        {% if price %}
        <div class="result">
          <h2>Predicted House Price:</h2>
          <p>${{ price }}</p>
        </div>
        {% endif %}
      </body>
    </html>
    

    Now, create a route in app.py to render the index.html template:

    @app.route('/')
    def index():
        return render_template('index.html')

    Next, I’ll create a route to handle the price prediction when the user submits the form:

    @app.route('/predict', methods=['POST'])
    def predict():
        size = float(request.form['size'])
        price = model.predict(np.array([size]))[0][0]
        return jsonify({'price': price})

    Finally, let’s run our Flask application:

    if __name__ == '__main__':
        app.run(debug=True)

    Integrating the Model with the Web Application

    I have integrated the machine learning model into the web application in the previous step. Users can input the house size, and our Flask app will return the predicted price using the trained linear regression model.

    Read More:  Building Machine Learning-Enabled Web Applications with Django and Scikit-Learn Introduction
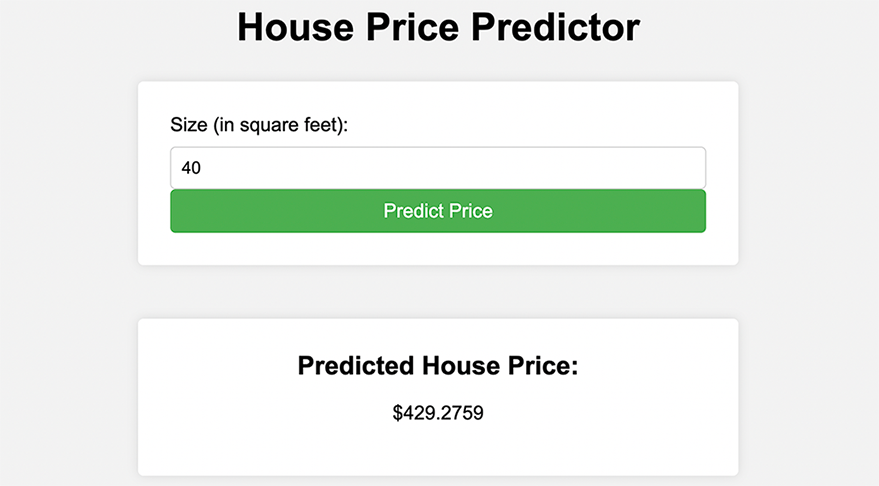
    Predicted House Price
    Predicted House Price

    Conclusion

    Congratulations! You have successfully built a web application that uses a machine-learning model to predict house prices based on size. I hope this tutorial has been both informative and enjoyable. You can now take this knowledge and apply it to your projects, whether it’s for personal or professional use. The code for this tutorial is available here on my GitHub repository, feel free to clone it. Happy coding!

    ——————

    Share. Facebook Twitter Pinterest LinkedIn Tumblr Email
    Ekekenta

      Related Posts

      Flask Development Made Easy: A Comprehensive Guide to Test-Driven Development

      January 4, 2024

      Creating Our Own Chat GPT

      July 27, 2023

      The Ultimate Guide to Pip

      June 12, 2023
      Leave A Reply Cancel Reply

      You must be logged in to post a comment.

      Stay In Touch
      • Facebook
      • Twitter
      • Pinterest
      • Instagram
      • YouTube
      • Vimeo
      Don't Miss
      Express.js March 26, 2023

      How to mock a Sequelize database

      Sequelize is a powerful Object-Relational Mapping (ORM) library for Node.js that allows developers to interact with databases using JavaScript. It provides a simple and elegant way to define and manipulate data models that map to relational database tables.

      Enhancing Software Development Efficiency: The Role of Version Control

      December 1, 2024

      21. Node.js Lessons. Writable Response Stream (res), Pipe Method. Pt.2

      October 28, 2016

      Уроки React. Урок 13. Часть 2.

      November 10, 2016

      Categories

      • AI & Automation
      • Angular
      • ASP.NET
      • AWS
      • B2B Leads
      • Beginners
      • Blogs
      • Business Growth
      • Case Studies
      • Comics
      • Consultation
      • Content & Leadership
      • CSS
      • Development
      • Django
      • E-commerce & Retail
      • Entrepreneurs
      • Entrepreneurship
      • Events
      • Express.js
      • Facebook Ads
      • Finance & Fintech
      • Flask
      • Flutter
      • Franchising
      • Funnel Strategy
      • Git
      • GraphQL
      • Home Services Marketing
      • Influencer & Community
      • Interview
      • Java
      • Java Spring
      • JavaScript
      • Job
      • Laravel
      • Lead Generation
      • Legal & Compliance
      • LinkedIn
      • Machine Learning
      • Marketing Trends
      • Medical Marketing
      • MSP Lead Generation
      • MSP Marketing
      • NestJS
      • Next.js
      • Node.js
      • Node.js Lessons
      • Paid Advertising
      • PHP
      • Podcasts
      • POS Tutorial
      • Programming
      • Programming
      • Python
      • React
      • React Lessons
      • React Native
      • React Native Lessons
      • Recruitment
      • Remote Job
      • SaaS & Tech
      • SEO & Analytics
      • Soshace
      • Startups
      • Swarm Intelligence
      • Tips
      • Trends
      • Vue
      • Wiki
      • WordPress
      Top Posts

      Git – Recommendations for “Soshace” Team

      Git January 12, 2016

      Everyday Coding

      Programming August 9, 2016

      Create simple POS with React, Node and MongoDB #3: setup E-mail pipeline with add activate on SignUp

      JavaScript January 28, 2020

      Leveraging Interactive Content for Effective B2B Lead Generation

      B2B Leads December 1, 2024

      Subscribe to Updates

      Get The Latest News, Updates, And Amazing Offers

      About Us
      About Us

      Soshace Digital delivers comprehensive web design and development solutions tailored to your business objectives. Your website will be meticulously designed and developed by our team of seasoned professionals, who combine creative expertise with technical excellence to transform your vision into a high-impact, user-centric digital experience that elevates your brand and drives measurable results.

      7901 4th St N, Suite 28690
      Saint Petersburg, FL 33702-4305
      Phone: 1(877)SOSHACE

      Facebook X (Twitter) Instagram Pinterest YouTube LinkedIn
      Our Picks
      LinkedIn

      Strategies to Enhance Your LinkedIn Profile for Lead Generation

      JavaScript

      Basic Principles and Rules of Our Team

      Django

      Creating Our Own Chat GPT

      Most Popular

      Dockerization of Node.JS Applications on Amazon Elastic Containers

      Node.js

      Build Real-World React Native App #8 : implement Dark mode

      React

      Effective LinkedIn Outreach: Proven Strategies for Prospects

      LinkedIn
      © 2025 Soshace Digital.
      • Home
      • About
      • Services
      • Contact Us
      • Privacy Policy
      • Terms & Conditions

      Type above and press Enter to search. Press Esc to cancel.