


Every application, whether it’s a bustling social network or a sophisticated business tool, hinges on a robust and reliable authentication system. Traditionally, platforms like Auth0 have been the go-to solution for developers seeking to integrate authentication without the heavy lifting. However, there’s a new player in town that’s turning heads – Clerk.dev.Why consider an alternative to Auth0, you might ask? Well, Clerk.dev is not just another authentication service; it’s a game-changer for developers who crave simplicity, flexibility, and power in their user management. In this article, we’re going to take a deep dive into Clerk.dev, exploring how it can breathe new life into your Next.js applications with its sleek, developer-friendly approach to authentication. We’re going to integrate Clerk.dev step by step, showcasing its seamless blend with Next.js and how it simplifies the once-daunting task of securing your application.
Overview of Clerk.dev
Clerk.dev is more than just an authentication tool; it’s a comprehensive platform designed to simplify and enhance user management and security in web applications. With a focus on developer experience and application flexibility, Clerk.dev emerges as a robust alternative to more traditional solutions like Auth0. Let’s explore its standout features and advantages.
Key Features of Clerk.dev:
- User Management: Clerk.dev offers a full-fledged user management system that handles everything from user registration to profile updates. Its intuitive dashboard allows for easy monitoring and management of user activities.
- Customizable UI Components: Unlike many other platforms, Clerk.dev provides highly customizable UI components. This flexibility allows developers to tailor the authentication interface to match the app’s design seamlessly.
- Multi-Factor Authentication (MFA): Security is paramount in Clerk.dev’s design. It supports various MFA methods, including SMS, TOTP, and biometric verification, ensuring an additional layer of security for user accounts.
- SSO and Social Login Integration: Clerk.dev simplifies the integration of Single Sign-On (SSO) and social logins, enabling users to access your application with their existing accounts on platforms like Google, Facebook, and more.
- Frontend and Backend SDKs: Clerk.dev provides comprehensive SDKs for both frontend and backend development, offering a unified experience across different stages of application development.
- Webhooks and APIs: To extend functionality and integration, Clerk.dev offers an array of webhooks and APIs. These tools empower developers to create custom workflows and integrate with other services effortlessly.
Advantages Over Auth0
- Ease of Integration: Clerk.dev is specifically designed for a smoother integration experience, particularly with frameworks like Next.js, making it more approachable for developers at different skill levels.
- More Customization Options: While Auth0 offers customization, Clerk.dev goes a step further, offering more granular control over UI and user flows, allowing for a more tailored user experience.
- Simplified Pricing Structure: Clerk.dev’s pricing model is straightforward and transparent, with no hidden costs, making it easier for developers and businesses to plan their expenses.
- Faster Setup and Deployment: Due to its intuitive design and comprehensive documentation, setting up Clerk.dev in a Next.js application can be faster and more straightforward than with Auth0.
Having highlighted the features and advantages of Clerk.dev, let’s pivot to its seamless integration with Next.js. This integration is pivotal, as it leverages Clerk.dev’s capabilities within the versatile and powerful Next.js framework, ensuring developers can implement robust authentication systems efficiently and effectively. In the next section, we delve into the specifics of integrating Clerk.dev into a Next.js application, laying the foundation for our demo project.
Setting Up the Development Environment
Before diving into the setup process, it’s crucial to ensure you have the necessary tools and environment ready. Here’s what you need:
- Nodejs ≥v18
- Knowledge of React and JavaScript
- A Clerk.dev account
Setting Up a Basic Next.js Application
Start by creating a new Next.js application. Open your terminal and run the following command:
npx create-next-app my-clerkdev-app
Use the following presets:
✔ Would you like to use TypeScript? … Yes
✔ Would you like to use ESLint? … No
✔ Would you like to use Tailwind CSS? …  Yes
✔ Would you like to use `src/` directory? … Yes
✔ Would you like to use App Router? (recommended) … No
✔ Would you like to customize the default import alias (@/*)? … No
This command creates a new Next.js application with all the necessary files and configurations.
Once the application is created, navigate to your project folder using:
cd my-clerkdev-app
Installing Clerk.dev
To integrate Clerk.dev, you need to add it to your project. In your terminal, run:
npm install @clerk/nextjs
After installing the packages, you’ll need to configure Clerk.dev in your Next.js application. This involves setting up environment variables and initializing Clerk.dev in your application code, which we’ll cover in the following sections.
With your development environment set up and Clerk.dev package installed, you’re perfectly positioned to begin integrating Clerk.dev authentication into your Next.js app. In the next section, we’ll step through this integration process, showcasing how Clerk.dev enhances your application with secure and user-friendly authentication.
Implementing Clerk.dev Authentication
After setting up your development environment and installing the necessary packages, it’s time to integrate Clerk.dev authentication into your Next.js application. This section will provide a step-by-step guide on how to implement this, along with an explanation of the authentication flow and relevant code snippets.
Configuring Clerk.dev Environment Variables
First, you need to obtain your Clerk.dev API keys. Log in to your Clerk.dev account and create a new application.
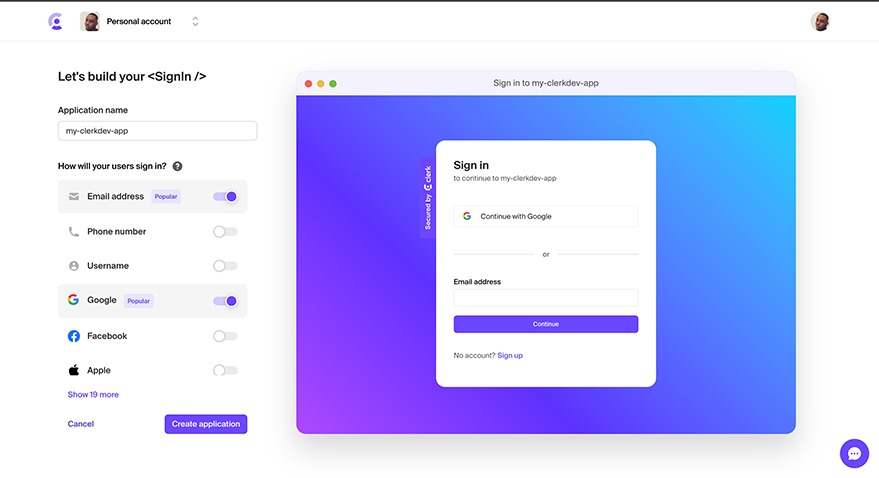
You will be presented with this screen. Copy the keys.
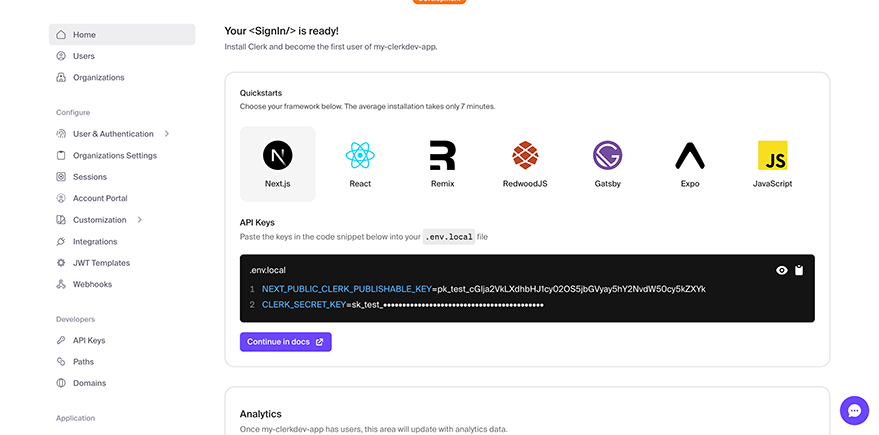
Create a .env.local file in your Nextjs app and paste the keys:
NEXT_PUBLIC_CLERK_PUBLISHABLE_KEY=your_publishable_key
CLERK_SECRET_KEY=your_secret_key
In your _app.tsx file, wrap your Next.js application with the <ClerkProvider> component. This will provide session and user context to Clerk’s components and hooks:
import { ClerkProvider } from "@clerk/nextjs";
import type { AppProps } from "next/app";
import Header from "@/components/Header"

function MyApp({ Component, pageProps }: AppProps) {
  return (
    <ClerkProvider {...pageProps}>
			<Header />
      <Component {...pageProps} />
    </ClerkProvider>
  );
}

export default MyApp;
<ClerkProvider> is a React component that provides Clerk.dev’s context to your application, enabling authentication features.
To add the clerkdev prebuilt UserButton component, create a component called UserButton.tsx and add these lines of code:
import { UserButton } from '@clerk/nextjs';

const MyUserButton = () => {
    return <UserButton />;
};

export default MyUserButton;
Then integrate it in your Header.tsx:
import MyUserButton from './UserButton';

export default function Header() {
    return (
        <nav>
            <div>
                <MyUserButton />
            </div>
        </nav>
    );
}
Let’s test the workflow. Run your nextjs app by executing this command on your terminal:
npm run dev
You’ll be presented with this authentication page:

Sign in/Create account for Nextjs appYou should have something like this:
Authentication and User profile have already been implemented in a few lines of code! Awesome.
Reading User Data
Now your user is authenticated, you can read their data using the useAuth hook. The useAuth hook provides the minimal information needed for data-loading and helper methods to manage the current active session.
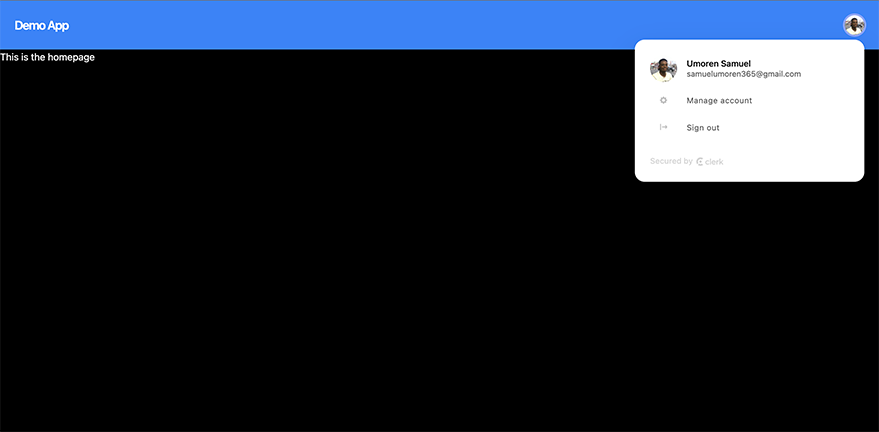
Update your homepage with these lines of code:
import { useUser } from "@clerk/nextjs";

export default function Homepage() {
  const { isLoaded, isSignedIn, user } = useUser();
  if (!isLoaded || !isSignedIn) {
    return null;
  }

  return <div>Hello, {user.lastName}. This is the homepage</div>;
}
You should see something like this:

Protecting Pages with Middleware
Incorporating middleware in a Next.js application using Clerk for page protection involves several steps. Clerk provides two primary ways to protect your application: Next.js Middleware and Control Components for the client side. Using Middleware is a comprehensive approach to page protection. Before we get into the middleware, let’s create custom sign up and sign in pages with clerk.dev components. To do this create a pages/sign-up/[[...index].tsx file and add these lines of code:
import { SignUp } from "@clerk/nextjs";

const SignUpPage = () => (
    <SignUp path="/sign-up" routing="path" signInUrl="/sign-in" />
);
export default SignUpPage;
Save and Navigate to localhost:3000/sign-up and you should see this page:
Create a pages/sign-in/[[...index]].tsx file and add these lines of code:
import { SignIn } from "@clerk/nextjs";

const SignInPage = () => (
    <SignIn path="/sign-in" routing="path" signUpUrl="/sign-up" />
);

export default SignInPage;
When you navigate to the /sign-in route on your browser, you should see this:

Implementing the Middleware
Create a /pages/protected.tsx and /pages/public.tsx files and add content to them. Then create a middleware.ts file, use the authMiddleware function from @clerk/nextjs. You’ll need to define which routes are public and which are protected.
import { authMiddleware } from "@clerk/nextjs";
export default authMiddleware({
    // "/" will be accessible to all users
    publicRoutes: ["/", "/public", "/sign-in", "/sign-up"]
});

export const config = {
    matcher: ['/((?!.+.[w]+$|_next).*)', '/', '/(api|trpc)(.*)'],
};
The homepage, public, sign-in, and sign-up pages are public, while all other routes are protected.
Add these variables to your .env.local
NEXT_PUBLIC_CLERK_SIGN_IN_URL=/sign-in
NEXT_PUBLIC_CLERK_SIGN_UP_URL=/sign-up
NEXT_PUBLIC_CLERK_AFTER_SIGN_IN_URL=/
NEXT_PUBLIC_CLERK_AFTER_SIGN_UP_URL=/
This makes sure that when you go to a protected route, you’ll be redirected to the appropriate authentication page.
Let’s test this out. Head to the /public page in your browser and you should see this:

Next, head to /protected page in the browser and you should be redirected to sign in.

When you sign in, you should see this:

With this setup, we’ve verified that Clerk’s authMiddleware is correctly protecting specified pages in your Next.js application, redirecting unauthenticated users as needed.
Troubleshooting Common Issues in Clerk.dev and Next.js Integration
Integrating any new technology can present challenges. Here, we address some common issues developers might face while integrating Clerk.dev with Next.js, along with solutions and workarounds.
Environment Variables Not Loading
Symptom: Clerk.dev API keys or other environment variables are not recognized.
Solution: Ensure your .env.local file is in the root of your Next.js project. Restart your development server after making changes to environment variables.
Redirection Loop or Incorrect Redirection
Symptom: After signing in or out, users are redirected incorrectly, leading to a loop or unexpected pages.
Solution: Check your redirection URLs in Clerk.dev’s dashboard and in your Next.js router logic. Ensure you’re using the correct paths for NEXT_PUBLIC_CLERK_SIGN_IN_URL, NEXT_PUBLIC_CLERK_SIGN_UP_URL, etc.
Protected Routes Still Accessible
Symptom: Pages that should be protected by middleware are accessible without authentication.
Solution: Verify your middleware.ts configuration. Ensure your authMiddleware is correctly set up and that publicRoutes and matcher are correctly defined.
Clerk.dev Components Not Rendering Correctly
Symptom: Clerk.dev UI components are not displaying as expected.
Solution: Check if the Clerk.dev SDK is properly installed and imported. Ensure that your custom styles or Tailwind CSS configurations do not conflict with Clerk.dev components.
Slow Page Loads or Performance Issues
Symptom: Slow performance observed after integrating Clerk.dev.
Solution: Optimize your application by dynamically importing Clerk.dev components and using efficient rendering techniques in Next.js.
Conclusion
Integrating Clerk.dev with Next.js offers a powerful and flexible solution for managing authentication and user experiences in modern web applications. Throughout this article, we’ve explored the key features and benefits of Clerk.dev, demonstrated how to set up and configure it in a Next.js environment, and provided solutions to common integration challenges.