Close Menu
Soshace Digital Blog

    Subscribe to Updates

    Get The Latest News, Updates, And Amazing Offers

    What's Hot
    JavaScript

    Essential Steps for Crafting a Comprehensive Project Charter

    JavaScript

    An Introduction to Clustering in Node.js

    Beginners

    Overview of FREE Python Programming Courses for Beginners

    Important Pages:
    • Home
    • About
    • Services
    • Contact Us
    • Privacy Policy
    • Terms & Conditions
    Facebook X (Twitter) Instagram LinkedIn YouTube
    Today's Picks:
    • Scaling Success: Monitoring Indexation of Programmatic SEO Content
    • Leveraging Influencers: Key Drivers in New Product Launches
    • How Privacy-First Marketing Will Transform the Industry Landscape
    • The Impact of Social Proof on Thought Leadership Marketing
    • Balancing Value-Driven Content and Promotional Messaging Strategies
    • Top Influencer Marketing Platforms to Explore in 2025
    • Emerging Trends in Marketing Automation and AI Tools for 2023
    • Strategies to Mitigate Duplicate Content in Programmatic SEO
    Wednesday, September 10
    Facebook X (Twitter) Instagram LinkedIn YouTube
    Soshace Digital Blog
    • Home
    • About
    • Services
    • Contact Us
    • Privacy Policy
    • Terms & Conditions
    Services
    • SaaS & Tech

      Maximizing Efficiency: How SaaS Lowers IT Infrastructure Costs

      August 27, 2025

      Navigating Tomorrow: Innovations Shaping the Future of SaaS

      August 27, 2025

      Maximizing Impact: Strategies for SaaS & Technology Marketing

      August 27, 2025
    • AI & Automation

      Enhancing Customer Feedback Analysis Through AI Innovations

      August 27, 2025

      Navigating the Impact of AI on SEO and Search Rankings

      August 27, 2025

      5 Automation Hacks Every Home Service Business Needs to Know

      May 3, 2025
    • Finance & Fintech

      Critical Missteps in Finance Marketing: What to Avoid

      August 27, 2025

      Analyzing Future Fintech Marketing Trends: Insights Ahead

      August 27, 2025

      Navigating the Complex Landscape of Finance and Fintech Marketing

      August 27, 2025
    • Legal & Compliance

      Exploring Thought Leadership’s Impact on Legal Marketing

      August 27, 2025

      Maximizing LinkedIn: Strategies for Legal and Compliance Marketing

      August 27, 2025

      Why Transparency Matters in Legal Advertising Practices

      August 27, 2025
    • Medical Marketing

      Enhancing Online Reputation Management in Hospitals: A Guide

      August 27, 2025

      Analyzing Emerging Trends in Health and Medical Marketing

      August 27, 2025

      Exploring Innovative Content Ideas for Wellness Blogs and Clinics

      August 27, 2025
    • E-commerce & Retail

      Strategic Seasonal Campaign Concepts for Online and Retail Markets

      August 27, 2025

      Emerging Trends in E-commerce and Retail Marketing Strategies

      August 27, 2025

      Maximizing Revenue: The Advantages of Affiliate Marketing for E-Commerce

      August 27, 2025
    • Influencer & Community

      Leveraging Influencers: Key Drivers in New Product Launches

      August 27, 2025

      Top Influencer Marketing Platforms to Explore in 2025

      August 27, 2025

      Key Strategies for Successful Influencer Partnership Negotiations

      August 27, 2025
    • Content & Leadership

      The Impact of Social Proof on Thought Leadership Marketing

      August 27, 2025

      Balancing Value-Driven Content and Promotional Messaging Strategies

      August 27, 2025

      Analyzing Storytelling’s Impact on Content Marketing Effectiveness

      August 27, 2025
    • SEO & Analytics

      Scaling Success: Monitoring Indexation of Programmatic SEO Content

      August 27, 2025

      Strategies to Mitigate Duplicate Content in Programmatic SEO

      August 27, 2025

      Effective Data Visualization Techniques for SEO Reporting

      August 27, 2025
    • Marketing Trends

      How Privacy-First Marketing Will Transform the Industry Landscape

      August 27, 2025

      Emerging Trends in Marketing Automation and AI Tools for 2023

      August 27, 2025

      Maximizing ROI: Key Trends in Paid Social Advertising

      August 27, 2025
    Soshace Digital Blog
    Blog / JavaScript / React / React Native / Building a Realtime Messaging app with React Native and Firebase
    React Native

    Building a Realtime Messaging app with React Native and Firebase

    Oluwaseun RaphaelBy Oluwaseun RaphaelMarch 20, 2023Updated:March 20, 2023No Comments8 Mins Read
    Facebook Twitter Pinterest Telegram LinkedIn Tumblr Email Reddit
    Building a Realtime Messaging app with React Native and Firebase
    Building a Realtime Messaging app with React Native and firebase
    Share
    Facebook Twitter LinkedIn Pinterest Email Copy Link
    Building a Realtime Messaging app with React Native and firebase
    Building a Realtime Messaging app with React Native and firebase

    In today’s world, it’s essential for web and mobile apps to have real-time functionality. This guide shows you how to add real-time messaging functionality a React Native mobile apps using Firebase SDK.

    Setting up a Firebase real-time database
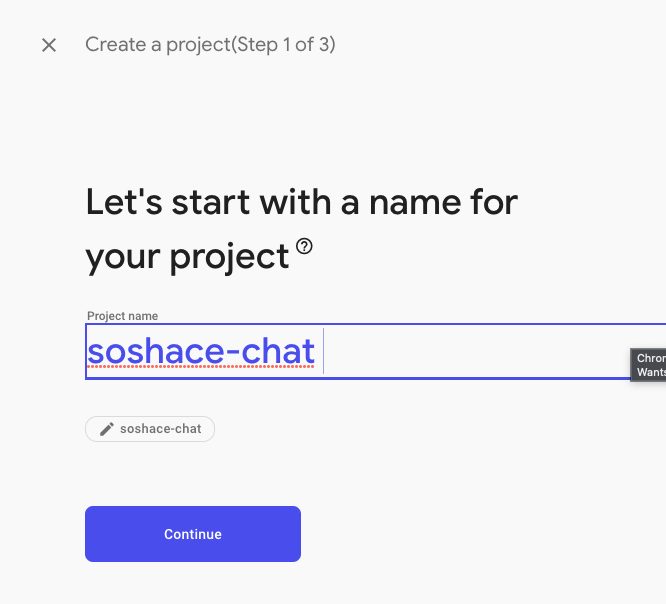
    Create a new project with a name of your choosing
    Create a new project with a name of your choosing

    To set up a Realtime database, head over to the firebase console and create a new project with a name of your choosing.

    Once your project is set up, add a web app to your project and give it a name you like. In this guide, we use a web app and not android or ios, as the functionality we need is supported by the firebase web SDK.

    React Native Setup

    To set up our React native project, we use the expo CLI – an amazing tool that helps you get started with react native quickly.

    npx expo init soshace-chat

    Adding Firebase

    Once your project is scaffolded, open it up with your favorite code editor, and install the firebase Javascript SDK in a new terminal.

    npx expo install firebase

    In the root of your expo project, i.e., the same folder as your package.json file, create a firebaseConfig.js file and add your firebase project configuration in the format below

    import { initializeApp } from 'firebase/app';
    import { getAuth } from "firebase/auth";


    // Initialize Firebase
    const firebaseConfig = {
      apiKey: 'api-key',
      authDomain: 'project-id.firebaseapp.com',
      databaseURL: 'https://project-id.firebaseio.com',
      projectId: 'project-id',
      storageBucket: 'project-id.appspot.com',
      messagingSenderId: 'sender-id',
      appId: 'app-id',
    };
    
    const app = initializeApp(firebaseConfig);
    export const auth = getAuth(app);
    
    // For more information on how to access Firebase in your project,
    // see the Firebase documentation: https://firebase.google.com/docs/web/setup#access-firebase
    

    Next, scaffold a custom metro.config.js file by running the following command.

    npx expo customize metro.config.js

    Once your metro config file is generated, replace the content with the following piece of code to enable metro to recognize firebase files with the .cjs extension.

    const { getDefaultConfig } = require('@expo/metro-config');
    
    const defaultConfig = getDefaultConfig(__dirname);
    defaultConfig.resolver.assetExts.push('cjs');
    
    module.exports = defaultConfig;
    

    Adding Navigation

    Now that we have firebase set up, let’s proceed to add navigation to our app using the react-navigation library and its required dependencies.

    npx expo install @react-navigation/native react-native-screens react-native-safe-area-context

    In our project folder, set up a src/screens folder and create two files, namely, WelcomeScreen.js and ChatScreen.js and scaffold a basic react native component in each file.

    //WelcomeScreen.js
    import React from 'react'
    import {Text} from 'react-native'
    
    export default function WelcomeScreen(){
        return (<Text> Welcome Screen </Text/>)
    }
    
    //ChatScreen.js
    import React from 'react'
    import {Text} from 'react-native'
    
    export default function ChatScreen(){
        return (<Text> Chat Screen </Text/>)
    }

    Next, in the src folder, add a router file named router.js and then set up our screens to show different screens based on the authentication state of the user passed by a hook that we’ll create next.

    import React from "react";
    import { NavigationContainer } from "@react-navigation/native";
    import { createStackNavigator } from "@react-navigation/stack";
    
    import WelcomeScreen from "./screens/WelcomeScreen";
    import ChatScreen from "./screens/ChatScreen";
    import { useAuthentication } from "./useAuth";
    
    const Stack = createStackNavigator();
    
    function AuthStack() {
      return (
        <NavigationContainer>
          <Stack.Navigator>
            <Stack.Screen name="Welcome" component={WelcomeScreen} />
          </Stack.Navigator>
        </NavigationContainer>
      );
    }
    
    function UserStack() {
      return (
        <NavigationContainer>
          <Stack.Navigator>
            <Stack.Screen name="Chat" component={ChatScreen} />
          </Stack.Navigator>
        </NavigationContainer>
      );
    }
    
    export default function Router() {
      const { user } = useAuthentication();
    
      return user ? <UserStack /> : <AuthStack />;
    }
    

    Next, create the corresponding useAuthentication() hook that listens to firebase auth change events.

    import React, { useState } from "react";
    import { onAuthStateChanged } from "firebase/auth";
    import { auth } from "../firebaseConfig";
    
    export function useAuthentication() {
      const [user, setUser] = useState();
    
      React.useEffect(() => {
        const unsubscribeFromAuthStatuChanged = onAuthStateChanged(auth, (user) => {
          if (user) {
            // User is signed in, see docs for a list of available properties
            // https://firebase.google.com/docs/reference/js/firebase.User
            setUser(user);
          } else {
            // User is signed out
            setUser(undefined);
          }
        });
    
        return unsubscribeFromAuthStatuChanged;
      }, []);
    
      return {
        user,
      };
    }
    

    Adding Login Functionality using firebase

    Firebase provides a host of authentication mechanisms we could easily use to authenticate users in minutes; in this tutorial, we will use the Anonymous auth feature as we don’t need a more complex system.

    Read More:  Build Real-World React Native App #8 : implement Dark mode

    To enable users login anonymously into our app, replace the content of the WelcomeScreen.js file we set up earlier with the code below to add a Login button and a handleLogin() method that signs users anonymously into our app while displaying a nice little spinner.

    import {
      ActivityIndicator,
      Button,
      Text,
      View,
    } from "react-native";
    import React, { useState } from "react";
    import { signInAnonymously } from "firebase/auth";
    import { auth } from "../../firebaseConfig";
    
    export default function WelcomeScreen() {
      const [loading, setLoading] = useState(false);
      const handleLogin = async () => {
        try {
          setLoading(true);
          await signInAnonymously(auth);
        } catch (error) {
          console.log(error.message);
        } finally {
          setLoading(false);
        }
      };
      return (
        <View
          style={{
            justifyContent: "center",
            alignItems: "center",
            marginVertical: 100,
          }}
        >
          <Text>Welcome to Anonymous Chat App</Text>
          <Button title="Login to Room" onPress={handleLogin} />
           // show a loading spinner to the user while our handleLogin() function is in progress
          {loading && <ActivityIndicator size="large" color="green" />}
        </View>
      );
    }


    Our WelcomeScreen should look like this afterward.

    WelcomeScreen
    WelcomeScreen

    Building Chat UI with Gifted-chat

    Next, let’s set up our Chat screen, and it’s corresponding functionality using react-native-gifted-chat and firebase real-time database.

    npx expo install react-native-gifted-chat

    In our src/screens/ChatScreen.js , add the following to see the Giftedchat library in action

    import React, { useCallback, useState, useEffect } from "react";
    import { GiftedChat } from "react-native-gifted-chat"; 
    
    export default function ChatScreen() {
      const [messages, setMessages] = useState([]);
    
      useEffect(() => {
        setMessages([
          {
            _id: 1,
            text: 'Hello developer',
            createdAt: new Date(),
            user: {
              _id: 2,
              name: 'React Native',
              avatar: 'https://placeimg.com/140/140/any',
            },
          },
        ])
      }, [])
    
      const onSend = useCallback((messages = []) => {
        setMessages(previousMessages => GiftedChat.append(previousMessages, messages))
      }, [])
    
      return (
        <GiftedChat
          messages={messages}
          onSend={messages => onSend(messages)}
          user={{
            _id: 1,
          }}
        />
      )
    }
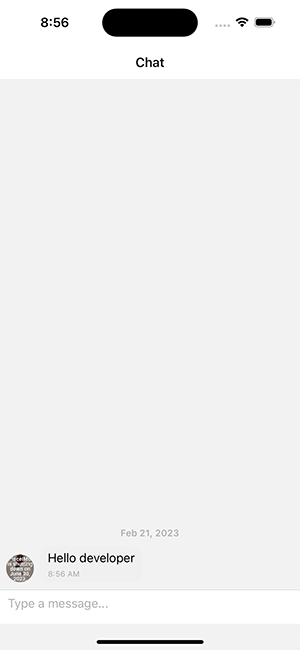
    GftedChat UI
    GftedChat UI

    On running the project and clicking on the Login to room button, we see the GftedChat UI in action

    GftedChat UIThe above code snippet saves our messages in the messages state, but we intend to save the message in the firebase real-time database we set up earlier.

    Adding Realtime Functionality

    To add real-time messaging functionality to our react native chat app using firebase, we first need to import the getDatabase method from firebase/database and make a reference to in ChatScreen.js

    import {getDatabase} from 'firebase/database' 
    
    export default function ChatScreen(){
    
    
    const database = getDatabase();
    
    ---

    Sending Messages to the room
    To send an actual message, it’s important to distinguish the message sender before anything else. We do this by modifying the user prop passed to GiftedChat to be the actual authenticated firebase user.

     import { auth } from "../../firebaseConfig";
         ...
     
    
    return (
        <GiftedChat
          messages={messages}
          onSend={(messages) => onSend(messages)}
          user={{
            _id: auth.currentUser.uid,
            name: "Anonymous",
          }}
        />
      );

    Now that our message sender is authenticated, we send messages to our database by modifying the OnSend method passed to GiftedChat to be as below.

      const onSend = useCallback((messages = []) => {
        setMessages((previousMessages) =>
          GiftedChat.append(previousMessages, messages)
        );
        const { _id, text, user } = messages[0];
        const newChatRef = push(chatRef);
        const date = new Date();
        set(newChatRef, {
          _id,
          createdAt: date.toDateString(),
          text,
          user: {
            name: user.name,
            _id: user._id,
          },
        });
      }, []);

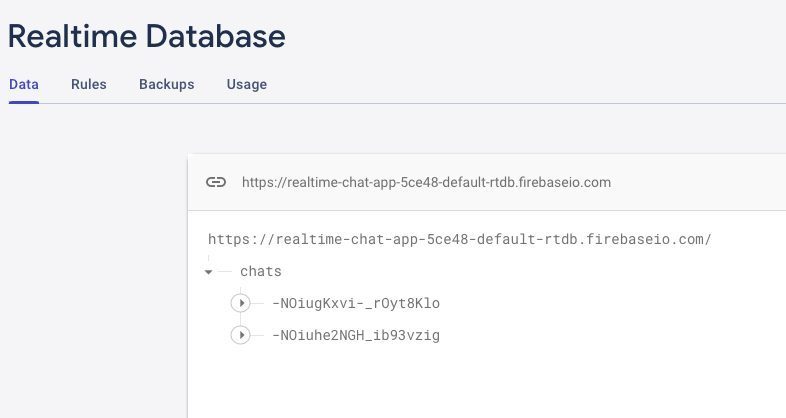
    On running the app and sending a message, you should see it reflected in your firebase dashboard’s real-time database section.
    Read More:  Build Real-World React Native App #11 : Pay For Remove Ads
    Real-time database section
    Real-time database section

    Should you attempt to reload or refresh the app at this point, your messages will be lost as we’re not syncing the chats yet from the database. Let’s fix that by modifying our useEffect() method to automatically sync messages from the database while our ChatScreen component is mounted.

    useEffect(() => {
        const listen = onValue(chatRef, (querySnapshot) => {
          const unserialized = JSON.stringify(querySnapshot);
          const serialized = JSON.parse(unserialized);
          if (serialized) {
            const data = Object.values(serialized);
            setMessages(
              data
                .map((item) => ({
                  _id: item._id,
                  user: item.user,
                  text: item.text,
                  createdAt: item.createdAt,
                }))
                .reverse()
            );
          }
        });
    
        return () => listen();
      });

    Listening for Messages

    Conclusion

    We sure have covered a lot in this real-time firebase walkthrough. We started by setting up a real-time database using the firebase console. Then we set up a react native project using the Expo CLI and added navigation and an authentication system using the react-navigation library and firebase, respectively. Next, we built our chat UI using react native gifted-chat library. Finally, we added real-time functionality by connecting our chat UI with the firebase real-time database we set up earlier.

    While this tutorial has covered the basics of adding real-time functionality to a react-native app using the firebase SDK, you may want to add extra features to this project to strengthen your knowledge of firebase and react native further. Should you intend to do so, here’s a list of extra features you could consider adding to the project.

    • Advanced authentication using email auth, Facebook, or google social authentication.
    • Custom Rooms
    • Invite only rooms
    • One-on-one (Two person chat rooms)

    If you found this guide helpful or want to show me the cool projects you build based on this guide, do give me a Twitter shoutout @theafolayan

    Share. Facebook Twitter Pinterest LinkedIn Tumblr Email
    Oluwaseun Raphael

      Related Posts

      Build Real-World React Native App #11 : Pay For Remove Ads

      February 17, 2021

      Build Real-World React Native App #10 : Setup in-App Purchase in iOS

      February 1, 2021

      Build Real-World React Native App #9 : Implementing Remove Ads Feature

      January 19, 2021
      Leave A Reply Cancel Reply

      You must be logged in to post a comment.

      Stay In Touch
      • Facebook
      • Twitter
      • Pinterest
      • Instagram
      • YouTube
      • Vimeo
      Don't Miss
      React December 24, 2020

      How to use the redux dev tools to speed up development and debugging

      Redux dev tools are development tools used to debug Redux-based applications. In this article, we’ll learn more about how this tool aids the development and debugging of applications.

      Create simple POS with React.js, Node.js, and MongoDB #17: Stat screen

      October 23, 2020

      Уроки React. Урок 5.

      September 16, 2016

      30 React JS Tools That You Can Use

      October 5, 2020

      Categories

      • AI & Automation
      • Angular
      • ASP.NET
      • AWS
      • B2B Leads
      • Beginners
      • Blogs
      • Business Growth
      • Case Studies
      • Comics
      • Consultation
      • Content & Leadership
      • CSS
      • Development
      • Django
      • E-commerce & Retail
      • Entrepreneurs
      • Entrepreneurship
      • Events
      • Express.js
      • Facebook Ads
      • Finance & Fintech
      • Flask
      • Flutter
      • Franchising
      • Funnel Strategy
      • Git
      • GraphQL
      • Home Services Marketing
      • Influencer & Community
      • Interview
      • Java
      • Java Spring
      • JavaScript
      • Job
      • Laravel
      • Lead Generation
      • Legal & Compliance
      • LinkedIn
      • Machine Learning
      • Marketing Trends
      • Medical Marketing
      • MSP Lead Generation
      • MSP Marketing
      • NestJS
      • Next.js
      • Node.js
      • Node.js Lessons
      • Paid Advertising
      • PHP
      • Podcasts
      • POS Tutorial
      • Programming
      • Programming
      • Python
      • React
      • React Lessons
      • React Native
      • React Native Lessons
      • Recruitment
      • Remote Job
      • SaaS & Tech
      • SEO & Analytics
      • Soshace
      • Startups
      • Swarm Intelligence
      • Tips
      • Trends
      • Vue
      • Wiki
      • WordPress
      Top Posts

      Преимущество в знаниях

      Wiki June 25, 2016

      Strategic Approaches to the ‘Why Should We Hire You?’ Query

      Interview December 9, 2024

      Web Workers: Concurrency In Java Script

      Programming February 15, 2018

      Search of Investments

      Comics March 18, 2017

      Subscribe to Updates

      Get The Latest News, Updates, And Amazing Offers

      About Us
      About Us

      Soshace Digital delivers comprehensive web design and development solutions tailored to your business objectives. Your website will be meticulously designed and developed by our team of seasoned professionals, who combine creative expertise with technical excellence to transform your vision into a high-impact, user-centric digital experience that elevates your brand and drives measurable results.

      7901 4th St N, Suite 28690
      Saint Petersburg, FL 33702-4305
      Phone: 1(877)SOSHACE

      Facebook X (Twitter) Instagram Pinterest YouTube LinkedIn
      Our Picks
      Tips

      Work With the Customer

      Interview

      Strategies for Effectively Discussing Weaknesses in Interviews

      Machine Learning

      Learn how to deploy an ML model to the web

      Most Popular

      Уроки React. Урок 7

      Programming

      С днем программиста!

      Programming

      Build Real-World React Native App #4 : Content Placeholder

      React Native
      © 2025 Soshace Digital.
      • Home
      • About
      • Services
      • Contact Us
      • Privacy Policy
      • Terms & Conditions

      Type above and press Enter to search. Press Esc to cancel.