Close Menu
Soshace Digital Blog

    Subscribe to Updates

    Get The Latest News, Updates, And Amazing Offers

    What's Hot
    Interview

    Mastering Phone Interviews: Strategies for Success

    Programming

    Guidelines to Writing a Clear Spec [Software Specification Document]

    Development

    Leveraging Machine Learning for Innovative App Development

    Important Pages:
    • Home
    • About
    • Services
    • Contact Us
    • Privacy Policy
    • Terms & Conditions
    Facebook X (Twitter) Instagram LinkedIn YouTube
    Today's Picks:
    • Scaling Success: Monitoring Indexation of Programmatic SEO Content
    • Leveraging Influencers: Key Drivers in New Product Launches
    • How Privacy-First Marketing Will Transform the Industry Landscape
    • The Impact of Social Proof on Thought Leadership Marketing
    • Balancing Value-Driven Content and Promotional Messaging Strategies
    • Top Influencer Marketing Platforms to Explore in 2025
    • Emerging Trends in Marketing Automation and AI Tools for 2023
    • Strategies to Mitigate Duplicate Content in Programmatic SEO
    Monday, September 29
    Facebook X (Twitter) Instagram LinkedIn YouTube
    Soshace Digital Blog
    • Home
    • About
    • Services
    • Contact Us
    • Privacy Policy
    • Terms & Conditions
    Services
    • SaaS & Tech

      Maximizing Efficiency: How SaaS Lowers IT Infrastructure Costs

      August 27, 2025

      Navigating Tomorrow: Innovations Shaping the Future of SaaS

      August 27, 2025

      Maximizing Impact: Strategies for SaaS & Technology Marketing

      August 27, 2025
    • AI & Automation

      Enhancing Customer Feedback Analysis Through AI Innovations

      August 27, 2025

      Navigating the Impact of AI on SEO and Search Rankings

      August 27, 2025

      5 Automation Hacks Every Home Service Business Needs to Know

      May 3, 2025
    • Finance & Fintech

      Critical Missteps in Finance Marketing: What to Avoid

      August 27, 2025

      Analyzing Future Fintech Marketing Trends: Insights Ahead

      August 27, 2025

      Navigating the Complex Landscape of Finance and Fintech Marketing

      August 27, 2025
    • Legal & Compliance

      Exploring Thought Leadership’s Impact on Legal Marketing

      August 27, 2025

      Maximizing LinkedIn: Strategies for Legal and Compliance Marketing

      August 27, 2025

      Why Transparency Matters in Legal Advertising Practices

      August 27, 2025
    • Medical Marketing

      Enhancing Online Reputation Management in Hospitals: A Guide

      August 27, 2025

      Analyzing Emerging Trends in Health and Medical Marketing

      August 27, 2025

      Exploring Innovative Content Ideas for Wellness Blogs and Clinics

      August 27, 2025
    • E-commerce & Retail

      Strategic Seasonal Campaign Concepts for Online and Retail Markets

      August 27, 2025

      Emerging Trends in E-commerce and Retail Marketing Strategies

      August 27, 2025

      Maximizing Revenue: The Advantages of Affiliate Marketing for E-Commerce

      August 27, 2025
    • Influencer & Community

      Leveraging Influencers: Key Drivers in New Product Launches

      August 27, 2025

      Top Influencer Marketing Platforms to Explore in 2025

      August 27, 2025

      Key Strategies for Successful Influencer Partnership Negotiations

      August 27, 2025
    • Content & Leadership

      The Impact of Social Proof on Thought Leadership Marketing

      August 27, 2025

      Balancing Value-Driven Content and Promotional Messaging Strategies

      August 27, 2025

      Analyzing Storytelling’s Impact on Content Marketing Effectiveness

      August 27, 2025
    • SEO & Analytics

      Scaling Success: Monitoring Indexation of Programmatic SEO Content

      August 27, 2025

      Strategies to Mitigate Duplicate Content in Programmatic SEO

      August 27, 2025

      Effective Data Visualization Techniques for SEO Reporting

      August 27, 2025
    • Marketing Trends

      How Privacy-First Marketing Will Transform the Industry Landscape

      August 27, 2025

      Emerging Trends in Marketing Automation and AI Tools for 2023

      August 27, 2025

      Maximizing ROI: Key Trends in Paid Social Advertising

      August 27, 2025
    Soshace Digital Blog
    Blog / JavaScript / React / React Native / React Native Lessons / Build Real-World React Native App #6: Show Bookmark and Categories
    JavaScript

    Build Real-World React Native App #6: Show Bookmark and Categories

    Krissanawat KaewsanmuangBy Krissanawat KaewsanmuangDecember 7, 2020Updated:December 8, 2020No Comments9 Mins Read
    Facebook Twitter Pinterest Telegram LinkedIn Tumblr Email Reddit
    Build Real-World React Native App #6: Show Bookmark and Categories
    Build Real-World React Native App #6: Show Bookmark and Categories
    Share
    Facebook Twitter LinkedIn Pinterest Email Copy Link
    Build Real-World React Native App #6: Show Bookmark and Categories
    Build Real-World React Native App #6: Show Bookmark and Categories

    Here, we are going to implement the list view of bookmarked posts in the Bookmark screen and also work on implementing the Categories screen. For the post list in the Bookmark screen, we are going to use the post id that we saved to AsyncStorage from the SinglePost screen in the previous tutorial to fetch the articles on the bookmark screen. After that, we are going to implement the Categories screen. This screen will contain the list of categories related to the article posts. And on clicking on these categories, we will navigate to the posts which are based on that respective category. The implementation is simple. We are going to fetch the categories data and display it with the FlatList component. And by using the TouchableOpacity component, we will navigate to the new list screen which will display the list of article posts based on that category.

    Let’s get started!

    Bookmark List Screen

    Now, we need to create a screen to display the posts which have been bookmarked. So, we need to go to the Bookmark.js file as import the required components and packages as shown in the code snippet below:

    import React, { useEffect, useState, useContext } from 'react';
    import { FlatList, View, Image } from 'react-native';
    import FlatlistItem from '../components/FlatlistItem';
    import { Headline, Text } from 'react-native-paper';
    import ContentPlaceholder from '../components/ContentPlaceholder';
    import AsyncStorage from '@react-native-community/async-storage';

    Then, we need to define the initial states called bookmarkpost and isloading state to handle the post and preloader as shown in the code snippet below:

       const Bookmark = ({ navigation }) => {
       const [bookmarkpost, setbookmarkpost] = useState([]);
       const [isloading, setisloading] = useState(true);

    Next, we need to create a function for fetching the bookmarked post. The coding implementation for this is provided in the code snippet below:

    const fetchBookMark = async () => {
           await AsyncStorage.getItem('bookmark').then(async (token) => {
               res = JSON.parse(token);
               setisloading(true);
               if (res) {
                   console.log('arr', res)
                   const result = res.map(post_id => {
                       return 'include[]=' + post_id;
                   });
                   let query_string = result.join('&');
                   const response = await fetch(
                       `https://kriss.io/wp-json/wp/v2/posts?${query_string}`,
                   );
                   const post = await response.json();
                   setbookmarkpost(post);
                   console.log(post)
                   setisloading(false);
               } else {
                   setbookmarkpost([]);
                   setisloading(false);
               }
           });
       };

    The coding implementation in the above code snippet is explained below:

    1. First, we get bookmarked data from Asyncstorage.
    2. Next, we convert the string data to the array form.
    3. Then, we loop through the strings and create a query string for fetching the post.
    4. Then, we concatenate the query string to the main URL.

    Now, we have successfully completed the implementation of the Bookmark List screen.

    Using Focus Hook
    In order to update data every time a user navigates to the Bookmark screen, we are going to use the Focus hook from react-navigation to detect screen focus events. First, we need to import the hook function as shown in the code snippet below:

    import { useIsFocused } from '@react-navigation/native';

    Then, we need to create a new constant as shown in the code snippet below:

    const isFocused = useIsFocused();

    And, also use useEffect hook to observe isFocused event as shown in the code snippet below:

    useEffect(() => {
           fetchBookMark();
       }, [isFocused]);

    Lastly, we need to make the conditional rendering to display the screen with data or without the data as shown in the code snippet below:

    if (isloading) {
           return (
               <View style={{ marginTop: 30, padding: 12 }}>
                   <ContentPlaceholder />
               </View>
           );
       } else if (bookmarkpost.length == 0) {
           return (
              <View style={{ textAlign: 'center', alignItems: 'center', alignSelf: 'center' }}>
                   <Image source={require('../assets/image/nobookmark.png')} />
               </View>
           );
       } else {
           return (
               <View>
                   <Headline style={{ marginLeft: 30 }}>Bookmark Post</Headline>
                   <FlatList
                       data={bookmarkpost}
                       renderItem={({ index, item }) => (
                           <React.Fragment>
                               <FlatlistItem item={item} navigation={navigation} />
                           </React.Fragment>
                       )}
                       keyExtractor={(item, index) => index.toString()}
                   />
               </View>
           );
       }

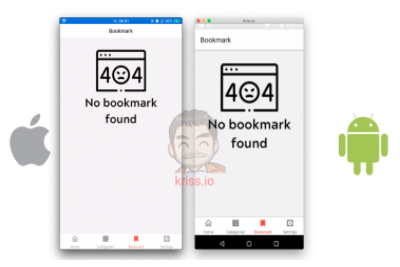
    Hence, the Bookmark screen without any bookmarked posts is shown in the emulator screenshots below:
    Read More:  Comparative Analysis of Free Tools for Physical Memory Dumps Parsing
    Bookmark is not found. Result
    Bookmark is not found. Result

    While the Bookmark screen with bookmarked posts is shown in the emulator screenshots below:
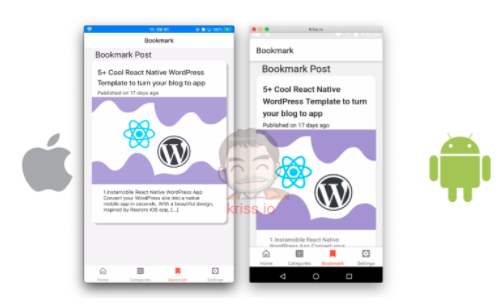
    Show bookmark post
    Show bookmark post

    Hence, we have successfully implemented the bookmark feature along with Bookmark List screen.

    Implementing Categories Screen

    First, we need to import the necessary component in the Category.js screen as shown in the code snippet below:

    import React, { useState, useEffect, useContext } from 'react';
    import { FlatList, ScrollView, View, TouchableOpacity } from 'react-native';
    import ContentPlaceholder from '../components/ContentPlaceholder';
    import { Card, Title } from 'react-native-paper'

    Next, we need to create a functional component that receives a navigation option as a parameter. We also need to define some state variables to handle the preloaders and categories data as shown in the code snippet below:

       const Categories = ({ navigation }) => {
       const [isloading, setisloading] = useState(true);
       const [categories, setCategories] = useState([]);

    Now, we need to create a function that fetches data from WordPress Api. First, we need to set the loading state to true to show the content placeholders until the data has been fetched. After the data is fetched successfully, we will display the fetched data and hide the loading placeholders. For that, we need to use the code from the following code snippet:

    const fetchCategorie = async () => {
           setisloading(true);
           const response = await fetch(`https://kriss.io/wp-json/wp/v2/categories`);
           const categories = await response.json();
           setCategories(categories);
           setisloading(false);
       };

    For the initial load, we need to call the function inside the useEffect hook as shown in the code snippet below:

    useEffect(() => {
           fetchCategorie();
       }, []);

    Next, we start implementing the UI part. The UI implementation is the same in which we will set the conditional rendering to show either preloaders or a categories data in FlatList as shown in the code snippet below:

    if (isloading) {
           return (
               <View style={{ marginTop: 30, padding: 12 }}>
                   <ContentPlaceholder />
               </View>
           );
       } else {
           return (
                <FlatList
                       data={categories}
                       renderItem={({ item }) => (
                           <TouchableOpacity
                               onPress={() =>
                                   navigation.navigate('CategorieList', {
                                       categorie_id: item.id,
                                       categorie_name: item.name,
                                   })
                               }>
                               <Card>
                                   <Card.Content>
                                       <Title>{item.name}</Title>
                                   </Card.Content>
                               </Card>
                           </TouchableOpacity>
                       )}
                       keyExtractor={(item, index) => index.toString()}
                   />
             );
       }
    }
    export default Categories

    Hence, we will get the following result on our emulator screen:
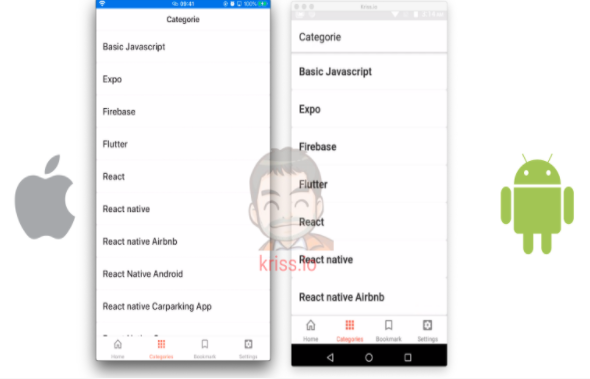
    Categories screen
    Categories screen


    Display Categories list

    Now, we need to create a screen that will show the list of posts based on a particular category. This screen will be the same as the Home screen. Only the post will be based on the category we choose. Here, we are going to add pull to refresh and infinite scroll as well.

    First, we need to create a new component screen name CategorieList.js in the components folders. Then, we need to make the following imports to the file:

    import React, { useEffect, useState, useContext } from 'react';
    import { FlatList, View, ActivityIndicator } from 'react-native';
    import ContentPlaceholder from '../components/ContentPlaceholder';
    import FlatlistItem from '../components/FlatlistItem';

    Next, we need to define the state variables for posts, page, fetching and loading states as shown in the code snippet below:

    const CategorieList = ({ navigation, route }) => {
       const [posts, setPosts] = useState([]);
       const [isloading, setIsLoading] = useState(true);
       const [isFetching, setIsFetching] = useState(false);
       const [page, setPage] = useState(1);

    The posts state is for handling the fetched post, isloading state to handle the display of preloaders, and the page state to handle the fetched page from the server.

    Read More:  Quam Nulla Porttitor Massa Dneque Aliquam Vestibulum

    Now, we need to make use of useEffect hook to observe events for pull to refresh and infinite scroll as shown in the code snippet below:

    useEffect(() => {
           fetchLastestPost();
       }, []);
       useEffect(() => {
           if (isFetching) {
               fetchLastestPost();
           }
       }, [isFetching]);
       useEffect(() => {
           if (page > 1) {
               fetchLastestPost();
           }
       }, [page]);

    Now, in order to fetch the data from WordPress API, we are going to implement an asynchronous function and use the category id and page queries in the URL as shown in the code snippet below:

    const fetchLastestPost = async () => {
           let categorie_id = route.params.categorie_id;
           const response = await fetch(
               `https://kriss.io/wp-json/wp/v2/posts?categories=${categorie_id}&per_page=5&page=${page}`,
           );
           const post = await response.json();
           if (page == 1) {
               setPosts(post);
           } else {
               setPosts([...posts, ...post]);
           }
           setIsLoading(false);
           setIsFetching(false);
       };

    Then, we need to create two functions to handle pull to refresh and infinite scroll as shown in the code snippet below:

    function onRefresh() {
           setIsFetching(true);
       }
       function handleLoadMore() {
           setPage(page => page + 1);
       }
       function renderFooter() {
           if (isFetching) return null;
           return (
               <View
                   style={{
                       paddingVertical: 20,
                       borderTopWidth: 1,
                       borderColor: '#CED0CE',
                   }}>
                   <ActivityIndicator animating size="large" />
               </View>
           );
       }
    

    We need the preloader content placeholder to the render method as well. We are going to use isloading state to handle the showing and hiding of preloaders as shown in the code snippet below:

    if (isloading) {
           return (
               <View style={{ marginTop: 30, padding: 12 }}>
                   <ContentPlaceholder />
               </View>
           );
       } else {
           return (
               <View>
                   <FlatList
                       data={posts}
                       onRefresh={() => onRefresh()}
                       refreshing={isFetching}
                       onEndReached={() => handleLoadMore()}
                       onEndReachedThreshold={0.1}
                       ListFooterComponent={() => renderFooter()}
                       renderItem={({ index, item }) => (
                             <FlatlistItem item={item} navigation={navigation} />
                          )}
                       keyExtractor={(item, index) => index.toString()}
                   />
               </View>
           );
       }
    };
     
    export default CategorieList;

    Hence, we will get the following result on the emulator screen:
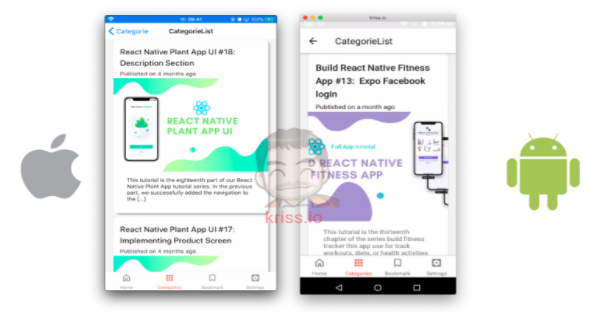
    Categories list screen
    Categories list screen

    Finally, we have completed the implementation of Categories Screen in our project.

    Conclusion

    In this chapter, we made use of the AsyncStorage and fetch method to successfully fetch the bookmarked post to be displayed on the Bookmark screen. Then, we went on to implement the overall UI of the Categories screen as well as the Categories List screen. We learned how to fetch the categories of different posts from the WordPress API. Then, we implemented the navigation to the Category List screen where we learned how to fetch the articles post based on the category id and display them as a list. Then, by clicking on the article posts we navigated to the SinglePost screen.

    In the next chapter, we will learn how to use Formik, Yup, and Firebase to create a simple form.

    All code available on Github.


    Share. Facebook Twitter Pinterest LinkedIn Tumblr Email
    Krissanawat Kaewsanmuang
    • Website
    • X (Twitter)

    Developer Relation @instamobile.io

    Related Posts

    Streamlining Resource Allocation for Enhanced Project Success

    December 18, 2024

    Conducting Effective Post-Project Evaluations: A Guide

    December 16, 2024

    Strategies for Keeping Projects on Track and Meeting Deadlines

    December 10, 2024
    Leave A Reply Cancel Reply

    You must be logged in to post a comment.

    Stay In Touch
    • Facebook
    • Twitter
    • Pinterest
    • Instagram
    • YouTube
    • Vimeo
    Don't Miss
    Programming November 24, 2016

    2. Уроки Express.js . Логгер, Конфигурация, Шаблонизация с EJS. Часть 1.

    Всем привет! Для того чтобы дальше разрабатывать это приложение, нам нужно сделать еще две важные вещи , а именно, конфигурация и логирование. Для того чтобы конфигурировать, будем использовать модуль nconf:

    Strategies for Cultivating a Robust Talent Pool

    November 24, 2024

    Effective LinkedIn Messaging Strategies to Qualify Prospects

    November 27, 2024

    Building Machine Learning-Enabled Web Applications with Django and Scikit-Learn Introduction

    March 28, 2023

    Categories

    • AI & Automation
    • Angular
    • ASP.NET
    • AWS
    • B2B Leads
    • Beginners
    • Blogs
    • Business Growth
    • Case Studies
    • Comics
    • Consultation
    • Content & Leadership
    • CSS
    • Development
    • Django
    • E-commerce & Retail
    • Entrepreneurs
    • Entrepreneurship
    • Events
    • Express.js
    • Facebook Ads
    • Finance & Fintech
    • Flask
    • Flutter
    • Franchising
    • Funnel Strategy
    • Git
    • GraphQL
    • Home Services Marketing
    • Influencer & Community
    • Interview
    • Java
    • Java Spring
    • JavaScript
    • Job
    • Laravel
    • Lead Generation
    • Legal & Compliance
    • LinkedIn
    • Machine Learning
    • Marketing Trends
    • Medical Marketing
    • MSP Lead Generation
    • MSP Marketing
    • NestJS
    • Next.js
    • Node.js
    • Node.js Lessons
    • Paid Advertising
    • PHP
    • Podcasts
    • POS Tutorial
    • Programming
    • Programming
    • Python
    • React
    • React Lessons
    • React Native
    • React Native Lessons
    • Recruitment
    • Remote Job
    • SaaS & Tech
    • SEO & Analytics
    • Soshace
    • Startups
    • Swarm Intelligence
    • Tips
    • Trends
    • Vue
    • Wiki
    • WordPress
    Top Posts

    Code Review

    Programming September 19, 2016

    How To Secure Python Web App Using Bandit

    Programming February 13, 2021

    Implementing Role-Based Access Control in a Node.js application

    JavaScript September 5, 2019

    Enhancing Interview Success: The Crucial Role of Research

    Interview December 4, 2024

    Subscribe to Updates

    Get The Latest News, Updates, And Amazing Offers

    About Us
    About Us

    Soshace Digital delivers comprehensive web design and development solutions tailored to your business objectives. Your website will be meticulously designed and developed by our team of seasoned professionals, who combine creative expertise with technical excellence to transform your vision into a high-impact, user-centric digital experience that elevates your brand and drives measurable results.

    7901 4th St N, Suite 28690
    Saint Petersburg, FL 33702-4305
    Phone: 1(877)SOSHACE

    Facebook X (Twitter) Instagram Pinterest YouTube LinkedIn
    Our Picks
    Entrepreneurship

    5 Tips from Famous Entrepreneurs to Instantly Boost Your Productivity

    JavaScript

    Introduction to WebAssembly: The Magic of Native Code in Web Apps

    JavaScript

    Essential Steps for Crafting a Comprehensive Project Charter

    Most Popular

    Guide to Control Flow Statements in Java

    Java

    Уроки React. Урок 2, Домашнее задание.

    Programming

    Step-by-Step Guide to Building a RESTful API Effectively

    Programming
    © 2025 Soshace Digital.
    • Home
    • About
    • Services
    • Contact Us
    • Privacy Policy
    • Terms & Conditions

    Type above and press Enter to search. Press Esc to cancel.