Close Menu
Soshace Digital Blog

    Subscribe to Updates

    Get The Latest News, Updates, And Amazing Offers

    What's Hot
    B2B Leads

    Leveraging Chatbots for Effective B2B Lead Generation

    Job

    Hire a Software Engineer: Quirks of a Profession

    Tips

    Why Localize: Website Translation Best Practices

    Important Pages:
    • Home
    • About
    • Services
    • Contact Us
    • Privacy Policy
    • Terms & Conditions
    Facebook X (Twitter) Instagram LinkedIn YouTube
    Today's Picks:
    • Scaling Success: Monitoring Indexation of Programmatic SEO Content
    • Leveraging Influencers: Key Drivers in New Product Launches
    • How Privacy-First Marketing Will Transform the Industry Landscape
    • The Impact of Social Proof on Thought Leadership Marketing
    • Balancing Value-Driven Content and Promotional Messaging Strategies
    • Top Influencer Marketing Platforms to Explore in 2025
    • Emerging Trends in Marketing Automation and AI Tools for 2023
    • Strategies to Mitigate Duplicate Content in Programmatic SEO
    Sunday, September 28
    Facebook X (Twitter) Instagram LinkedIn YouTube
    Soshace Digital Blog
    • Home
    • About
    • Services
    • Contact Us
    • Privacy Policy
    • Terms & Conditions
    Services
    • SaaS & Tech

      Maximizing Efficiency: How SaaS Lowers IT Infrastructure Costs

      August 27, 2025

      Navigating Tomorrow: Innovations Shaping the Future of SaaS

      August 27, 2025

      Maximizing Impact: Strategies for SaaS & Technology Marketing

      August 27, 2025
    • AI & Automation

      Enhancing Customer Feedback Analysis Through AI Innovations

      August 27, 2025

      Navigating the Impact of AI on SEO and Search Rankings

      August 27, 2025

      5 Automation Hacks Every Home Service Business Needs to Know

      May 3, 2025
    • Finance & Fintech

      Critical Missteps in Finance Marketing: What to Avoid

      August 27, 2025

      Analyzing Future Fintech Marketing Trends: Insights Ahead

      August 27, 2025

      Navigating the Complex Landscape of Finance and Fintech Marketing

      August 27, 2025
    • Legal & Compliance

      Exploring Thought Leadership’s Impact on Legal Marketing

      August 27, 2025

      Maximizing LinkedIn: Strategies for Legal and Compliance Marketing

      August 27, 2025

      Why Transparency Matters in Legal Advertising Practices

      August 27, 2025
    • Medical Marketing

      Enhancing Online Reputation Management in Hospitals: A Guide

      August 27, 2025

      Analyzing Emerging Trends in Health and Medical Marketing

      August 27, 2025

      Exploring Innovative Content Ideas for Wellness Blogs and Clinics

      August 27, 2025
    • E-commerce & Retail

      Strategic Seasonal Campaign Concepts for Online and Retail Markets

      August 27, 2025

      Emerging Trends in E-commerce and Retail Marketing Strategies

      August 27, 2025

      Maximizing Revenue: The Advantages of Affiliate Marketing for E-Commerce

      August 27, 2025
    • Influencer & Community

      Leveraging Influencers: Key Drivers in New Product Launches

      August 27, 2025

      Top Influencer Marketing Platforms to Explore in 2025

      August 27, 2025

      Key Strategies for Successful Influencer Partnership Negotiations

      August 27, 2025
    • Content & Leadership

      The Impact of Social Proof on Thought Leadership Marketing

      August 27, 2025

      Balancing Value-Driven Content and Promotional Messaging Strategies

      August 27, 2025

      Analyzing Storytelling’s Impact on Content Marketing Effectiveness

      August 27, 2025
    • SEO & Analytics

      Scaling Success: Monitoring Indexation of Programmatic SEO Content

      August 27, 2025

      Strategies to Mitigate Duplicate Content in Programmatic SEO

      August 27, 2025

      Effective Data Visualization Techniques for SEO Reporting

      August 27, 2025
    • Marketing Trends

      How Privacy-First Marketing Will Transform the Industry Landscape

      August 27, 2025

      Emerging Trends in Marketing Automation and AI Tools for 2023

      August 27, 2025

      Maximizing ROI: Key Trends in Paid Social Advertising

      August 27, 2025
    Soshace Digital Blog
    Blog / JavaScript / React / React Native / React Native Lessons / Build Real-World React Native App #3: Home Screen With React Native Paper
    JavaScript

    Build Real-World React Native App #3: Home Screen With React Native Paper

    Krissanawat KaewsanmuangBy Krissanawat KaewsanmuangNovember 23, 2020No Comments9 Mins Read
    Facebook Twitter Pinterest Telegram LinkedIn Tumblr Email Reddit
    Build Real-World React Native App #3: Home Screen With React Native Paper
    Build Real-World React Native App #3: Home Screen With React Native Paper
    Share
    Facebook Twitter LinkedIn Pinterest Email Copy Link
    Build Real-World React Native App #3: Home Screen With React Native Paper
    Build Real-World React Native App #3: Home Screen With React Native Paper

    In this chapter, we are going to implement the overall UI for the Home Screen in the Home.js file. Here, we are going to simply fetch data from the WordPress API and display the data on the Home screen as FlatList. We are also going to make use of the react-native-paper package using provides us with numerous useful components. Lastly, we will implement Pull to refresh and Infinite scroll as well.

    Installing React Native paper

    First, we need to install react-native-paper package by running the following command in our project folder:

    yarn add react-native-paper

    First, we need to install react-native-paper package by running the following command in our project folder:

    import {
       Avatar,
       Button,
       Card,
       Title,
       Paragraph,
       List,
       Headline,
     } from 'react-native-paper';

    First, we need to install react-native-paper package by running the following command in our project folder:

    const Home = () => {
       return (
           <View>
               <Headline style={{ marginLeft: 23 }}>Lastest Post</Headline>
               <Card
                   style={{
                       shadowOffset: { width: 5, height: 5 },
                       width: '90%',
                       borderRadius: 12,
                       alignSelf: 'center',
                       marginBottom: 10,
                   }}>
                   <Card.Content>
                       <Title>Blog post</Title>
                       <Card.Cover
                           style={{
                               width: '100%',
                               height: 190,
                               alignSelf: 'center',
                           }}
                           source={{
                               uri:
                                   'https://images.unsplash.com/photo-15739212650045-8d99c48c879f?ixlib=rb-1.2.1&ixid=eyJhcHBfaWQiOjEyMDd9&auto=format&fit=crop&w=1050&q=80',
                           }}
                       />
                       <Paragraph>just a blog post</Paragraph>
                   </Card.Content>
               </Card>
           </View>
       );
     
    }
     
    export default Home

    Here, we made use of the Card component as a parent component which wraps its sub-components. All the components have some styles integrated into them in order to make them look good.

    Hence, we will get the following result on the emulator screen:
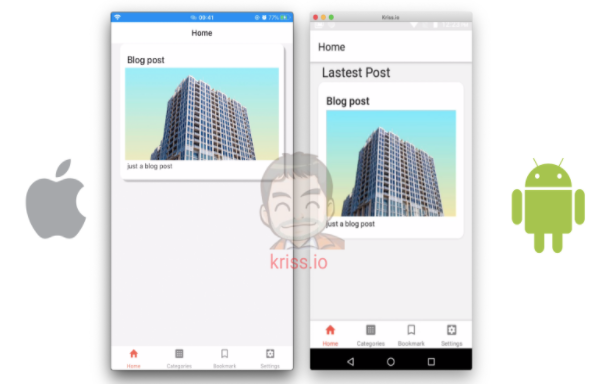
    Home screen
    Home screen

    Fetch data from WordPress API

    Next, we are going to fetch the posts from the WordPress API using the fetch() method. After fetching, we are going to parse the response into JSON format and configure it to the state called posts.

    First, we need to import the modules to handle state from the react package as shown in the code snippet below:

    import React, { useState, useEffect, useContext } from 'react';

    Now in the Home.js file, we are going to create two state properties using the useState module. The two states are posts to which stores the posts result from server and setPosts method that enables us to set the posts state as shown in the code snippet below:

    const Home = () => {
           const [posts, setPosts] = useState([]);

    The coding implementation is in the function called fetchLastestPost() whose overall configuration is provided in the code snippet:

    Const fetchLastestPost = async () => {
       const response = await fetch(
           `https://kriss.io/wp-json/wp/v2/posts?per_page=5`,
       );
       const posts = await response.json();
       setPosts(posts);
    }

    Here, we made an asynchronous call to the WordPress API from the function.

    Next, we need to call the function in useEffect module alternatively we can also use componentDidmount in order to call fetchLastestPost.

    The coding implementation is shown in the code snippet below:

    useEffect(() => {
         fetchLastestPost()
     }, [])

    The JSON data from the response will have a lot of properties.

    Next, we are going to wrap the Card component with the FlatList component and feed the API data into the FlatList. Then, the Card component template will be returned by the FlatList. But first, we need to import the FlatList component as shown in the code snippet below:

    import { View, FlatList } from 'react-native'

    Now, we are going to use the posts state data into the FlatList as shown in the code snippet below:
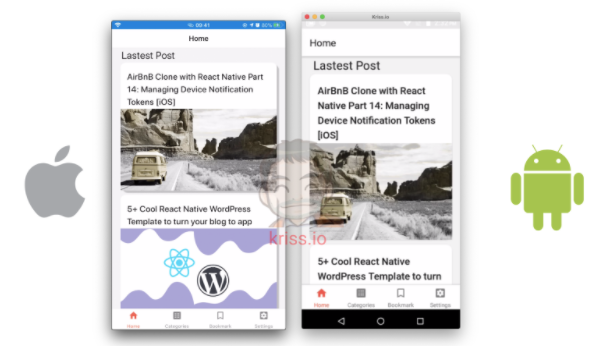
    <FlatList  
         data={posts}
         renderItem={({ item }) => (
             <Card
                 style={{
                     shadowOffset: { width: 5, height: 5 },
                     width: '90%',
                     borderRadius: 12,
                     alignSelf: 'center',
                     marginBottom: 10,
                 }}>
                 <Card.Content>
                     <Title>{item.title.rendered}</Title>
                 </Card.Content>
                 <Card.Cover
                     source={{ uri: item.jetpack_featured_media_url }}
                 />
             </Card>
         )}
         keyExtractor={(item, index) => index.toString()}
     />

    Now, we are going to use the posts state data into the FlatList as shown in the code snippet below:

    Read More:  Node.js Lesson 13: Debugging in Node.js
    Home screen with flatlist
    Home screen with flatlist

    Display Html content with react-native-render-html

    Now, we need to display the excerpt of the overall post on the list. For that, we are going to make use of components from the react-native-render-html package. And, we need to display the published date of the article as well. For that, we are going to make use of the moment package which provides the moment.js configurations.

    In order to use these packages, we need to install them first. For that, we need to use the command from the following code snippet:

    yarn add react-native-render-html moment react-native-webview

    Now, we need to import both the packages in the Home.js file as shown in the code snippet below:

    import HTMLRender from 'react-native-render-html'
    import moment from 'moment'

    Now, we are going to use the HTMLRender component and moment component in our Card template as shown in the code snippet below:

    <Card
         style={{
             shadowOffset: { width: 5, height: 5 },
             width: '90%',
             borderRadius: 12,
             alignSelf: 'center',
             marginBottom: 10,
         }}>
         <Card.Content>
             <Title>{item.title.rendered}</Title>
             <Paragraph>Published on {moment(item.date).fromNow()}</Paragraph>
         </Card.Content>
         <Card.Cover
             source={{ uri: item.jetpack_featured_media_url }}
         />
         <Card.Content>
             <Card.Content>
                 <HTMLRender html={item.excerpt.rendered} />
             </Card.Content>
         </Card.Content>
     </Card>

    Here, we have used the HTMLRender component in order to display the excerpt data using HTML format. Then, using the moment method, we can customize the way in which the timestamp is being displayed.

    Hence, we will get the following result in the emulator screens on the next page:
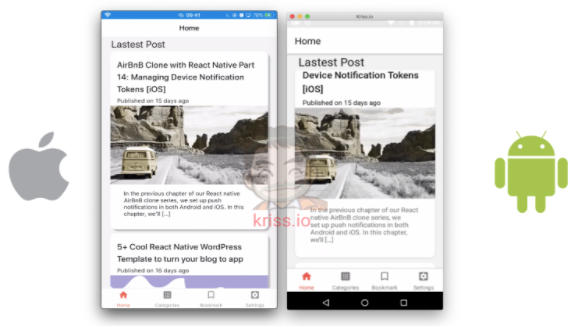
    Render HTML in React native
    Render HTML in React native

    Adding pull to refresh and Infinite scroll

    Here, we are going to implement pull to refresh which will refresh and make API call again to refresh the posts in the Home screen list. Also, we are going to add the Infinite scroll to the bottom of the Home screen. The infinite scroll will trigger the request to the server which will load more articles into the list.

    Implementing Pull to Refresh

    First, we are going to implement pull to refresh. For that, we need to define a state variable called isFetching which will handle the hiding and showing of refresh loader. The isFetching state and setIsFetching state function are defined using the useState module as shown in the code snippet below:

    const [isFetching, setIsFetching] = useState(false);

    Here, the isFetching state is initially set to false.

    Next, we are going to use useEffect as listener on isFetching in case of state changes as shown in the code snippet below:

    useEffect(() => {
           if (isFetching) {
               fetchLastestPost();
           }
       }, [isFetching]);

    Next, we need to create a function called onRefresh() which will trigger when we pull the pull to refresh trigger. Here, the isFetching state is set to true using setIsFetching state method as shown in the code snippet below:

    function onRefresh() {
           setIsFetching(true);
       }

    Now, we need to add the onRefresh function to the onRefresh event of the FlatList as shown in the code snippet below:

    <FlatList
    		 data={posts}
                onRefresh={() => onRefresh()}
                refreshing={isFetching}

    And, in the fetchLastestPost function, we also need to change the state of isFetching to false to hide the scroll loader at the end as shown in the code snippet below:

    fetchLastestPost = async () => {
         const response = await fetch(
             `https://kriss.io/wp-json/wp/v2/posts?per_page=5`,
         );
         const posts = await response.json();
         setPosts(posts);
         setIsFetching(false)
     }

    Hence, we will see the activity indicator when we make a gesture the pull the post downward to refresh the posts:
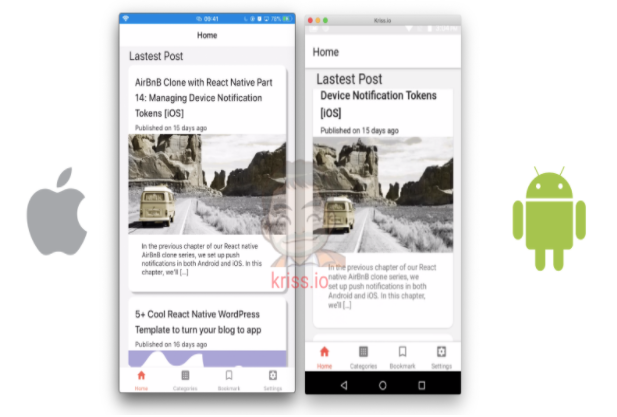
    Read More:  Mastering JavaScript Proxies: Practical Use Cases and Real-World Applications
    Flatlist pull to refresh
    Flatlist pull to refresh

    Implementing Infinite Scroll

    Now, we are going to add the infinite scroll to the bottom of the Home screen. The idea is to load more articles when we scroll to the bottom. For that, we need to define a state variable called page which will handle which data we are fetching from the WordPress API. The setPage state method is used to set the page state variable. Initially, the page state is set to 1 as shown in the code snippet below:

    const [page, setPage] = useState(1);

    Now, the implementation of the handleLoadMore function is provided in the code snippet below:

    function handleLoadMore() {
           setPage(page => page + 1);
       }

    Here, we have incremented the page value by 1 using setPage state method.

    Now, we use the useEffect module to listen for page change. If the page state variable value increases, we call the fetchLastestPost method as shown in the code snippet below:

    useEffect(() => {
         if (page > 1) {
             fetchLastestPost();
         }
     }, [page]);

    Now, we need to make some configuration in the fetching of API as well which will be based on the page number as shown in the code snippet below:

    const fetchLastestPost = async () => {
         const response = await fetch(
             `https://kriss.io/wp-json/wp/v2/posts?per_page=5&page=${page}`,
         );
         const post = await response.json();
         if (page == 1) {
             setPosts(post);
         } else {
             setPosts([...posts, ...post]);
         }
         setIsFetching(false);
     }

    Here, we have

    1. added page to the query in order to fetch next page.
    2. Then after fetching, we have concatenated it to the post state variable using setPosts state method.

    Now, in order to add the Infinite scroll, we need to make use of the ActivityIndicator component from the react-native package.

    Then, we need to implement a new function called renderFooter() which will return the template for ActivityIndicator wrapped by View component with styles or nothing based on the isFetching state as shown in the code snippet below:

    function renderFooter() {
       if (isFetching) return null;
       return (
           <View
               style={{
                   paddingVertical: 20,
                   borderTopWidth: 1,
                   borderColor: '#CED0CE',
               }}>
               <ActivityIndicator animating size="large" />
           </View>
       );
    }

    Hence, we are going to call handleLoadMore and call it in the onEndReached event of the FlatList. We are also configuring some additional props to the FlatList such as onEndReachedThreshold which controls the trigger of function based on how far we are from the bottom of the list. The overall implementation is provided in the code snippet below:

    <FlatList
        data={posts}
             onRefresh={() => onRefresh()}
          	refreshing={isFetching}
          	     onEndReached={() => handleLoadMore()}
             onEndReachedThreshold={0.1}
             	ListFooterComponent={() => renderFooter()}

    Hence, if we re-run the app, we can call a new post when we scroll to the bottom of the Home screen as shown in the emulator simulation below:
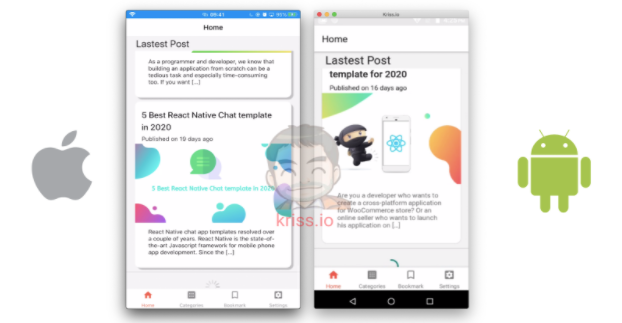
    Flatlist infinite scroll
    Flatlist infinite scroll

    Finally, we have successfully completed the implementation of the Home screen list.

    Conclusion

    In this chapter, we learned how to implement the overall UI of the Home screen tab using the react-native-paper package. We also learned how to fetch the data from the WordPress server using the fetch method. Then, we set up the react-native-render-html and moment package in order to render the HTML tags and also format the timestamp using the moment package. Furthermore, we learned how to configure the pull to refresh function in both android and iOS. Lastly, we learned how to set up the infinite loader to trigger load more function which loads additional articles into the list.

    All code in this chapter is available on GitHub.

    Share. Facebook Twitter Pinterest LinkedIn Tumblr Email
    Krissanawat Kaewsanmuang
    • Website
    • X (Twitter)

    Developer Relation @instamobile.io

    Related Posts

    Streamlining Resource Allocation for Enhanced Project Success

    December 18, 2024

    Conducting Effective Post-Project Evaluations: A Guide

    December 16, 2024

    Strategies for Keeping Projects on Track and Meeting Deadlines

    December 10, 2024
    Leave A Reply Cancel Reply

    You must be logged in to post a comment.

    Stay In Touch
    • Facebook
    • Twitter
    • Pinterest
    • Instagram
    • YouTube
    • Vimeo
    Don't Miss
    LinkedIn November 25, 2024

    Transforming LinkedIn Connections into Viable Sales Leads

    Transforming LinkedIn connections into viable sales leads requires a strategic approach. By engaging meaningfully with your network, identifying common pain points, and providing tailored solutions, you can foster relationships that convert into tangible business opportunities.

    Best Open Source Time Tracking Software

    December 9, 2019

    Optimizing LinkedIn: A Strategic Lead Generation Funnel Approach

    November 27, 2024

    Node.js Lesson 9: Events, EventEmitter and Memory Leaks

    November 2, 2020

    Categories

    • AI & Automation
    • Angular
    • ASP.NET
    • AWS
    • B2B Leads
    • Beginners
    • Blogs
    • Business Growth
    • Case Studies
    • Comics
    • Consultation
    • Content & Leadership
    • CSS
    • Development
    • Django
    • E-commerce & Retail
    • Entrepreneurs
    • Entrepreneurship
    • Events
    • Express.js
    • Facebook Ads
    • Finance & Fintech
    • Flask
    • Flutter
    • Franchising
    • Funnel Strategy
    • Git
    • GraphQL
    • Home Services Marketing
    • Influencer & Community
    • Interview
    • Java
    • Java Spring
    • JavaScript
    • Job
    • Laravel
    • Lead Generation
    • Legal & Compliance
    • LinkedIn
    • Machine Learning
    • Marketing Trends
    • Medical Marketing
    • MSP Lead Generation
    • MSP Marketing
    • NestJS
    • Next.js
    • Node.js
    • Node.js Lessons
    • Paid Advertising
    • PHP
    • Podcasts
    • POS Tutorial
    • Programming
    • Programming
    • Python
    • React
    • React Lessons
    • React Native
    • React Native Lessons
    • Recruitment
    • Remote Job
    • SaaS & Tech
    • SEO & Analytics
    • Soshace
    • Startups
    • Swarm Intelligence
    • Tips
    • Trends
    • Vue
    • Wiki
    • WordPress
    Top Posts

    Streamlining Resource Allocation for Enhanced Project Success

    JavaScript December 18, 2024

    Express.js Lessons. Express: Basics and Middleware. Part 2.

    Programming November 24, 2016

    Стиль кода

    Programming January 11, 2016

    Implementing Two-Factor Authentication with NodeJS and otplib

    JavaScript June 11, 2020

    Subscribe to Updates

    Get The Latest News, Updates, And Amazing Offers

    About Us
    About Us

    Soshace Digital delivers comprehensive web design and development solutions tailored to your business objectives. Your website will be meticulously designed and developed by our team of seasoned professionals, who combine creative expertise with technical excellence to transform your vision into a high-impact, user-centric digital experience that elevates your brand and drives measurable results.

    7901 4th St N, Suite 28690
    Saint Petersburg, FL 33702-4305
    Phone: 1(877)SOSHACE

    Facebook X (Twitter) Instagram Pinterest YouTube LinkedIn
    Our Picks
    Tips

    5 Effective DevOps Practices You Must Follow

    Angular

    How to Create a Personal Blogging Website: Back-End (Flask/Python) #1

    Tips

    Becoming a Technical Lead: Working on Your Leadership Skills

    Most Popular

    Create a simple POS with React, Node and MongoDB #1: Register and Login with JWT

    JavaScript

    Balancing Enthusiasm: Effective Interview Strategies

    Interview

    Optimizing Database Interactions in Python: SQLAlchemy Best Practices

    Programming
    © 2025 Soshace Digital.
    • Home
    • About
    • Services
    • Contact Us
    • Privacy Policy
    • Terms & Conditions

    Type above and press Enter to search. Press Esc to cancel.