Close Menu
Soshace Digital Blog

    Subscribe to Updates

    Get The Latest News, Updates, And Amazing Offers

    What's Hot
    Lead Generation

    The Ultimate Guide to Local Lead Generation for Home Service Providers

    Recruitment

    Effective Strategies to Overcome International Recruitment Challenges

    Programming

    Уроки React. Урок 13. Часть 1.

    Important Pages:
    • Home
    • About
    • Services
    • Contact Us
    • Privacy Policy
    • Terms & Conditions
    Facebook X (Twitter) Instagram LinkedIn YouTube
    Today's Picks:
    • Scaling Success: Monitoring Indexation of Programmatic SEO Content
    • Leveraging Influencers: Key Drivers in New Product Launches
    • How Privacy-First Marketing Will Transform the Industry Landscape
    • The Impact of Social Proof on Thought Leadership Marketing
    • Balancing Value-Driven Content and Promotional Messaging Strategies
    • Top Influencer Marketing Platforms to Explore in 2025
    • Emerging Trends in Marketing Automation and AI Tools for 2023
    • Strategies to Mitigate Duplicate Content in Programmatic SEO
    Tuesday, September 9
    Facebook X (Twitter) Instagram LinkedIn YouTube
    Soshace Digital Blog
    • Home
    • About
    • Services
    • Contact Us
    • Privacy Policy
    • Terms & Conditions
    Services
    • SaaS & Tech

      Maximizing Efficiency: How SaaS Lowers IT Infrastructure Costs

      August 27, 2025

      Navigating Tomorrow: Innovations Shaping the Future of SaaS

      August 27, 2025

      Maximizing Impact: Strategies for SaaS & Technology Marketing

      August 27, 2025
    • AI & Automation

      Enhancing Customer Feedback Analysis Through AI Innovations

      August 27, 2025

      Navigating the Impact of AI on SEO and Search Rankings

      August 27, 2025

      5 Automation Hacks Every Home Service Business Needs to Know

      May 3, 2025
    • Finance & Fintech

      Critical Missteps in Finance Marketing: What to Avoid

      August 27, 2025

      Analyzing Future Fintech Marketing Trends: Insights Ahead

      August 27, 2025

      Navigating the Complex Landscape of Finance and Fintech Marketing

      August 27, 2025
    • Legal & Compliance

      Exploring Thought Leadership’s Impact on Legal Marketing

      August 27, 2025

      Maximizing LinkedIn: Strategies for Legal and Compliance Marketing

      August 27, 2025

      Why Transparency Matters in Legal Advertising Practices

      August 27, 2025
    • Medical Marketing

      Enhancing Online Reputation Management in Hospitals: A Guide

      August 27, 2025

      Analyzing Emerging Trends in Health and Medical Marketing

      August 27, 2025

      Exploring Innovative Content Ideas for Wellness Blogs and Clinics

      August 27, 2025
    • E-commerce & Retail

      Strategic Seasonal Campaign Concepts for Online and Retail Markets

      August 27, 2025

      Emerging Trends in E-commerce and Retail Marketing Strategies

      August 27, 2025

      Maximizing Revenue: The Advantages of Affiliate Marketing for E-Commerce

      August 27, 2025
    • Influencer & Community

      Leveraging Influencers: Key Drivers in New Product Launches

      August 27, 2025

      Top Influencer Marketing Platforms to Explore in 2025

      August 27, 2025

      Key Strategies for Successful Influencer Partnership Negotiations

      August 27, 2025
    • Content & Leadership

      The Impact of Social Proof on Thought Leadership Marketing

      August 27, 2025

      Balancing Value-Driven Content and Promotional Messaging Strategies

      August 27, 2025

      Analyzing Storytelling’s Impact on Content Marketing Effectiveness

      August 27, 2025
    • SEO & Analytics

      Scaling Success: Monitoring Indexation of Programmatic SEO Content

      August 27, 2025

      Strategies to Mitigate Duplicate Content in Programmatic SEO

      August 27, 2025

      Effective Data Visualization Techniques for SEO Reporting

      August 27, 2025
    • Marketing Trends

      How Privacy-First Marketing Will Transform the Industry Landscape

      August 27, 2025

      Emerging Trends in Marketing Automation and AI Tools for 2023

      August 27, 2025

      Maximizing ROI: Key Trends in Paid Social Advertising

      August 27, 2025
    Soshace Digital Blog
    Blog / JavaScript / React / React Native / React Native Lessons / Build Real-world React Native App #2: React navigation and React native vector icons
    React Native

    Build Real-world React Native App #2: React navigation and React native vector icons

    Krissanawat KaewsanmuangBy Krissanawat KaewsanmuangNovember 18, 2020No Comments7 Mins Read
    Facebook Twitter Pinterest Telegram LinkedIn Tumblr Email Reddit
    Build Real-world React Native App #2:  React navigation and  React native vector icons
    Build Real-world React Native App #2: React navigation and React native vector icons
    Share
    Facebook Twitter LinkedIn Pinterest Email Copy Link
    Build Real-world React Native App #2: React navigation and React native vector icons
    Build Real-world React Native App #2: React navigation and React native vector icons

    In this chapter, we use React navigation version 5 for bootstrap app navigation and create a blank screen to show how it works finally we setup react native vector icons for add icon to tabs.

    install react-navigation version 5

    In this version, the expo team divides into multiple packages for this app we use stack and tabs so the list below is the package that we need to install:

    1. react-navigation/native is the core package
    2. react-navigation/stack for general stack navigation style
    3. react-navigation/bottom-tabs for tab-style menu in bottom screen

    In order to install these packages, we need to run the following command in the command prompt or command line of your IDE:

    yarn add @react-navigation/native @react-navigation/stack @react-navigation/bottom-tabs

    Here, we have installed the react-navigation package along with the react-navigation-stack and react-navigation-tabs package. The react-navigation-stack package enables us to create the navigator stack of our app screens. The react-navigation-tabs package enables us to create the bottom tab navigation on our main screen. Now, we also need to install the required dependencies in order to run the react-navigation package properly, Hence, we need to install the following package as well:

    yarn add react-native-reanimated react-native-gesture-handler react-native-screens react-native-safe-area-context @react-native-community/masked-view

    Setup React Navigation on iOS

    In case of iOS, we need to navigate to ‘./ios/’ folder and then run the following command:

    cd ios ; pod install ; cd..

    Setup React Navigation on Android

    For Android, we may need to link the packages if the version of the react-native is less than 0.60. For that, we can run the following code for each package:

    react-native link <package-name>

    Organizing Project files and folder structure

    n this section, we need to create the required files for the screens as shown in the ‘./screens/’ folder. We also need to create a Navigator.js file in ‘./components’ which will contain an overall code for navigation as shown in the screenshot below:

    Folder structure
    Folder structure

    Now, for every screen file inside the ‘./screens’ folder, we need to add the starter react native template code. The starter template code for the Home.js screen is shown in the code snippet below:

    import React from 'react'
    import { View, Text } from 'react-native'
     
    const Home = () => {
       return (
           <View>
               <Text>Home Screen</Text>
           </View>
       )
    }
    export default Home

    Now, what we can do is, we can copy the same starter template code to each screen file and just change the main function name and the text between the Text element based on the name of the files.

    Handling Navigation

    Here, we are going to use Navigator.js which will contain React navigation-related code. But first, let us see the navigation flow of our app in the following diagram:

    Read More:  Build Real-World React Native App #8 : implement Dark mode
    Navigation diagram
    Navigation diagram

    From the diagram above, we can learn that Home, Categories, Bookmark, Setting screens are on the main screen linked by bottom tabs navigation whereas SinglePost, CategoriesList, Feedback screens are linked by stack navigation. To implement the navigation configuration in the Navigation.js file, we need to import all the required packages first as shown in the code snippet below:

    import React from 'react'
    import { NavigationContainer } from '@react-navigation/native'
    import { createStackNavigator } from '@react-navigation/stack';
    import { createBottomTabNavigator } from '@react-navigation/bottom-tabs';

    Then, we need to import all the screens as well, as shown in the code snippet below:

    import HomeScreen from '../screens/Home';
    import CategorieScreen from '../screens/Categories';
    import SettingScreen from '../screens/Setting';
    import BookMarkScreen from '../screens/Bookmark';
    import SinglePost from '../screens/SinglePost';
    import CategorieList from '../screens/CategorieList';
    import Feedback from '../screens/Feedback';

    Now, we have all the prerequisites necessary to configure the navigation for our app. First, we are going to code the stack navigator for each main screen namely Home, Categories, Bookmark, Setting screens. The code to implement the stack navigator is provided in the code snippet below:

    const Stack = createStackNavigator()
    function HomeStack() {
       return (
           <Stack.Navigator>
               <Stack.Screen
                   name="Home"
                   component={HomeScreen}
               />
               <Stack.Screen
                   name="SinglePost"
                   component={SinglePost}
               />
           </Stack.Navigator>
       );
    }
    function BookMarkStack() {
       return (
           <Stack.Navigator>
               <Stack.Screen name="Bookmark" component={BookMarkScreen}  />
               <Stack.Screen name="SinglePost" component={SinglePost}/>
           </Stack.Navigator>
       );
    }
    function SettingStack() {
       return (
           <Stack.Navigator>
               <Stack.Screen name="Setting" component={SettingScreen}  />
               <Stack.Screen name="Feedback" component={Feedback}  />
           </Stack.Navigator>
       );
    }
    function CategorieStack({ navigation }) {
       return (
           <Stack.Navigator>
               <Stack.Screen name="Categorie" component={CategorieScreen} />
               <Stack.Screen name="CategorieList" component={CategorieList} />
               <Stack.Screen name="SinglePost" component={SinglePost}  />
           </Stack.Navigator>
       );
    }

    Here, what we have done is, each stack function represents one stack for every main tab screen. Now, we can freely add what we want to the stack navigation. Now, we assemble all the stack navigators for each main screens into one single bottom tab navigator as shown in the code snippet below:

    export default Navigator = () => {
       const Tab = createBottomTabNavigator();
       return (
           <NavigationContainer >
               <Tab.Navigator>
                   <Tab.Screen name="Home" component={HomeStack} />
                   <Tab.Screen name="Categories" component={CategorieStack} />
                   <Tab.Screen name="Bookmark" component={BookMarkStack} />
                   <Tab.Screen name="Settings" component={SettingStack} />
               </Tab.Navigator>
           </NavigationContainer>
       );
    }

    Finally, in our App.js file, we need to make the main entry point to React navigation. For that, we need to remove the previous code from the App.js file and import Navigator.js. Next, we need to create the Navigators component and return the Navigators component from the App.js file as the main entry point. The code to do this provided in the code snippet below:

    import React from 'react';
    import Navigators from './src/components/Navigator';
    import SplashScreen from 'react-native-splash-screen'
    export default function App() {
     React.useEffect(() => {
       SplashScreen.hide()
     }, [])
     return <Navigators />
    }

    Now, if we re-run our app, we will get the following result in our emulator or device screen:

    Result on add navigation
    Result on add navigation

    Here, we can see the bottom tab with all the main screens’ names included.

    Read More:  Build Real-World React Native App #11 : Pay For Remove Ads

    Integrating Vector Icons Package

    In this step, we are going to add the icons to our bottom navigation tabs by using react-native vector icons package. The icons will make the app look more elegant and intuitive.

    First, we need to install the react-native-vector-icons package by running the following command:

    yarn add react-native-vector-icons

    Installation on iOS

    Here, we need to using Cacaopod again and run the following command:

    cd ios ; pod install ; cd ..

    Lastly, we need to Xcode and add the code below into info.plist file inside the ‘./ios’ folder:

    <key>UIAppFonts</key>
    <array>
     <string>AntDesign.ttf</string>
     <string>Entypo.ttf</string>
     <string>EvilIcons.ttf</string>
     <string>Feather.ttf</string>
     <string>FontAwesome.ttf</string>
     <string>FontAwesome5_Brands.ttf</string>
     <string>FontAwesome5_Regular.ttf</string>
     <string>FontAwesome5_Solid.ttf</string>
     <string>Foundation.ttf</string>
     <string>Ionicons.ttf</string>
     <string>MaterialIcons.ttf</string>
     <string>MaterialCommunityIcons.ttf</string>
     <string>SimpleLineIcons.ttf</string>
     <string>Octicons.ttf</string>
     <string>Zocial.ttf</string>
    </array>

    Here, we are manually adding the icon fonts name in case of iOS platform.

    The exact location to add the fonts code manually is provided in the screenshot below:
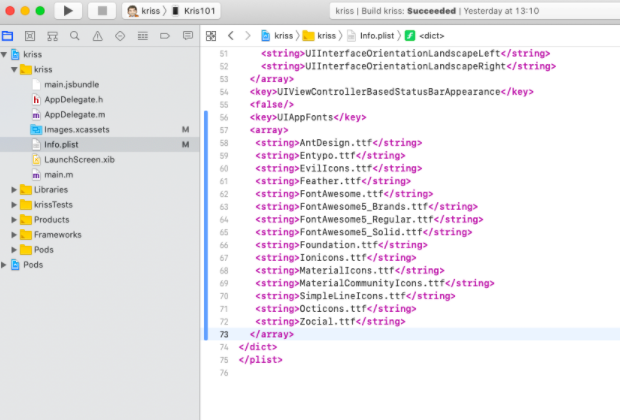
    Setup vector icon in Xcode
    Setup vector icon in Xcode

    Installation on Android

    In the case of the Android platform, we need to run the following command to link the vector icons package to the native project:

    react-native link react-native-vector-icons --platforms android

    Adding Icons to Bottom Tabs

    Now, we navigate back to Navigator.js and import the MaterialCommunityIcons icon package from the react-native-vector-icons package as shown in the code snippet below:

    import MaterialCommunityIcons from 'react-native-vector-icons/MaterialCommunityIcons';

    Next, we need to use screenOption parameter in the config option of tab bar NavigationContainer. Then, we choose the icons based on the route names in the tabBarIcon configuration option as shown in the code snippet below:

    <Tab.Navigator screenOptions={({ route }) => ({
                   tabBarIcon: ({ focused, color, size }) => {
                       let iconName;
     
                       if (route.name === 'Home') {
                           iconName = focused ? 'home' : 'home-outline';
                       } else if (route.name === 'Bookmark') {
                           iconName = focused ? 'bookmark' : 'bookmark-outline';
                       } else if (route.name === 'Categories') {
                           iconName = focused ? 'apps' : 'apps-box';
                       } else if (route.name === 'Settings') {
                           iconName = focused ? 'settings' : 'settings-box';
                       }
                       return (
                           <MaterialCommunityIcons
                               name={iconName}
                               size={size}
                               color={color}
                           />
                       );
                   },
               })}
                   tabBarOptions={{
                       activeTintColor: 'tomato',
                       inactiveTintColor: 'gray',
                   }}>

    Finally, if we re-run our app, we will get the following result in our emulator or device screen:

    Result for add vector icon
    Result for add vector icon

    Conclusion

    In this chapter, we learned how to set up the react-navigation v5 package with all it’s dependency packages. Then, using these packages we learned how to set up the bottom tab navigation in our project. Lastly, we learned how to set up the vector icons package and use it along with our navigation configuration to set up the bottom tab bar icons. In the next chapter, we start using react-native-paper together with the Flatlist component to build the Home screen.

    All the code is available on Github.

    Share. Facebook Twitter Pinterest LinkedIn Tumblr Email
    Krissanawat Kaewsanmuang
    • Website
    • X (Twitter)

    Developer Relation @instamobile.io

    Related Posts

    Building a Realtime Messaging app with React Native and Firebase

    March 20, 2023

    Build Real-World React Native App #11 : Pay For Remove Ads

    February 17, 2021

    Build Real-World React Native App #10 : Setup in-App Purchase in iOS

    February 1, 2021
    Leave A Reply Cancel Reply

    You must be logged in to post a comment.

    Stay In Touch
    • Facebook
    • Twitter
    • Pinterest
    • Instagram
    • YouTube
    • Vimeo
    Don't Miss
    Programming November 8, 2016

    Уроки React. Урок 13. Часть 1.

    Сегодня мы с Вами поговорим об асинхронных actions. Мы начнем доставать наши статьи из API. Как вы могли заметить у нас уже работает простенький API для запуска которого нужно зайти в папку simple_api, выполнить в ней к

    Setting CSS Styles with JavaScript

    December 25, 2019

    JAMstack Architecture with Next.js

    March 15, 2024

    Overcoming the Challenges of B2B Lead Generation Today

    November 27, 2024

    Categories

    • AI & Automation
    • Angular
    • ASP.NET
    • AWS
    • B2B Leads
    • Beginners
    • Blogs
    • Business Growth
    • Case Studies
    • Comics
    • Consultation
    • Content & Leadership
    • CSS
    • Development
    • Django
    • E-commerce & Retail
    • Entrepreneurs
    • Entrepreneurship
    • Events
    • Express.js
    • Facebook Ads
    • Finance & Fintech
    • Flask
    • Flutter
    • Franchising
    • Funnel Strategy
    • Git
    • GraphQL
    • Home Services Marketing
    • Influencer & Community
    • Interview
    • Java
    • Java Spring
    • JavaScript
    • Job
    • Laravel
    • Lead Generation
    • Legal & Compliance
    • LinkedIn
    • Machine Learning
    • Marketing Trends
    • Medical Marketing
    • MSP Lead Generation
    • MSP Marketing
    • NestJS
    • Next.js
    • Node.js
    • Node.js Lessons
    • Paid Advertising
    • PHP
    • Podcasts
    • POS Tutorial
    • Programming
    • Programming
    • Python
    • React
    • React Lessons
    • React Native
    • React Native Lessons
    • Recruitment
    • Remote Job
    • SaaS & Tech
    • SEO & Analytics
    • Soshace
    • Startups
    • Swarm Intelligence
    • Tips
    • Trends
    • Vue
    • Wiki
    • WordPress
    Top Posts

    TOP 13 Best Technical Writing Books | Learn the Technical Writing Craft [Bookmark Now!]

    Beginners November 27, 2019

    WordPress for Non-Programmers: Introduction to the Web Development World

    Beginners August 7, 2019

    Уроки Express.js . Основы и Middleware. Часть 1.

    Programming November 22, 2016

    Agile Software Development, Scrum part 1

    JavaScript August 11, 2016

    Subscribe to Updates

    Get The Latest News, Updates, And Amazing Offers

    About Us
    About Us

    Soshace Digital delivers comprehensive web design and development solutions tailored to your business objectives. Your website will be meticulously designed and developed by our team of seasoned professionals, who combine creative expertise with technical excellence to transform your vision into a high-impact, user-centric digital experience that elevates your brand and drives measurable results.

    7901 4th St N, Suite 28690
    Saint Petersburg, FL 33702-4305
    Phone: 1(877)SOSHACE

    Facebook X (Twitter) Instagram Pinterest YouTube LinkedIn
    Our Picks
    Programming

    Guidelines for Building Accessible Web Applications

    Events

    Partnerships with Conferences: Announcement for 2019-2020

    Startups

    Strategies for Maintaining Agility in Your Startup’s Growth

    Most Popular

    Nodejs Lesson 16: Internals of Nodejs: Event Loop

    Node.js

    Understanding The GIT Workflow

    Git

    Leveraging Case Studies and Testimonials for B2B Leads

    B2B Leads
    © 2025 Soshace Digital.
    • Home
    • About
    • Services
    • Contact Us
    • Privacy Policy
    • Terms & Conditions

    Type above and press Enter to search. Press Esc to cancel.