Close Menu
Soshace Digital Blog

    Subscribe to Updates

    Get The Latest News, Updates, And Amazing Offers

    What's Hot
    Events

    HR Tech Conferences Worth Your Time [2019]

    JavaScript

    Exploring the Power of JavaScript Proxies and Reflect API

    Finance & Fintech

    Navigating the Complex Landscape of Finance and Fintech Marketing

    Important Pages:
    • Home
    • About
    • Services
    • Contact Us
    • Privacy Policy
    • Terms & Conditions
    Facebook X (Twitter) Instagram LinkedIn YouTube
    Today's Picks:
    • Scaling Success: Monitoring Indexation of Programmatic SEO Content
    • Leveraging Influencers: Key Drivers in New Product Launches
    • How Privacy-First Marketing Will Transform the Industry Landscape
    • The Impact of Social Proof on Thought Leadership Marketing
    • Balancing Value-Driven Content and Promotional Messaging Strategies
    • Top Influencer Marketing Platforms to Explore in 2025
    • Emerging Trends in Marketing Automation and AI Tools for 2023
    • Strategies to Mitigate Duplicate Content in Programmatic SEO
    Sunday, September 28
    Facebook X (Twitter) Instagram LinkedIn YouTube
    Soshace Digital Blog
    • Home
    • About
    • Services
    • Contact Us
    • Privacy Policy
    • Terms & Conditions
    Services
    • SaaS & Tech

      Maximizing Efficiency: How SaaS Lowers IT Infrastructure Costs

      August 27, 2025

      Navigating Tomorrow: Innovations Shaping the Future of SaaS

      August 27, 2025

      Maximizing Impact: Strategies for SaaS & Technology Marketing

      August 27, 2025
    • AI & Automation

      Enhancing Customer Feedback Analysis Through AI Innovations

      August 27, 2025

      Navigating the Impact of AI on SEO and Search Rankings

      August 27, 2025

      5 Automation Hacks Every Home Service Business Needs to Know

      May 3, 2025
    • Finance & Fintech

      Critical Missteps in Finance Marketing: What to Avoid

      August 27, 2025

      Analyzing Future Fintech Marketing Trends: Insights Ahead

      August 27, 2025

      Navigating the Complex Landscape of Finance and Fintech Marketing

      August 27, 2025
    • Legal & Compliance

      Exploring Thought Leadership’s Impact on Legal Marketing

      August 27, 2025

      Maximizing LinkedIn: Strategies for Legal and Compliance Marketing

      August 27, 2025

      Why Transparency Matters in Legal Advertising Practices

      August 27, 2025
    • Medical Marketing

      Enhancing Online Reputation Management in Hospitals: A Guide

      August 27, 2025

      Analyzing Emerging Trends in Health and Medical Marketing

      August 27, 2025

      Exploring Innovative Content Ideas for Wellness Blogs and Clinics

      August 27, 2025
    • E-commerce & Retail

      Strategic Seasonal Campaign Concepts for Online and Retail Markets

      August 27, 2025

      Emerging Trends in E-commerce and Retail Marketing Strategies

      August 27, 2025

      Maximizing Revenue: The Advantages of Affiliate Marketing for E-Commerce

      August 27, 2025
    • Influencer & Community

      Leveraging Influencers: Key Drivers in New Product Launches

      August 27, 2025

      Top Influencer Marketing Platforms to Explore in 2025

      August 27, 2025

      Key Strategies for Successful Influencer Partnership Negotiations

      August 27, 2025
    • Content & Leadership

      The Impact of Social Proof on Thought Leadership Marketing

      August 27, 2025

      Balancing Value-Driven Content and Promotional Messaging Strategies

      August 27, 2025

      Analyzing Storytelling’s Impact on Content Marketing Effectiveness

      August 27, 2025
    • SEO & Analytics

      Scaling Success: Monitoring Indexation of Programmatic SEO Content

      August 27, 2025

      Strategies to Mitigate Duplicate Content in Programmatic SEO

      August 27, 2025

      Effective Data Visualization Techniques for SEO Reporting

      August 27, 2025
    • Marketing Trends

      How Privacy-First Marketing Will Transform the Industry Landscape

      August 27, 2025

      Emerging Trends in Marketing Automation and AI Tools for 2023

      August 27, 2025

      Maximizing ROI: Key Trends in Paid Social Advertising

      August 27, 2025
    Soshace Digital Blog
    Blog / JavaScript / React / React Native / React Native Lessons / Build Real-World React Native App #11 : Pay For Remove Ads
    JavaScript

    Build Real-World React Native App #11 : Pay For Remove Ads

    Krissanawat KaewsanmuangBy Krissanawat KaewsanmuangFebruary 17, 2021No Comments11 Mins Read
    Facebook Twitter Pinterest Telegram LinkedIn Tumblr Email Reddit
    Build Real-World React Native App #11 : Pay For Remove Ads
    Build Real-World React Native App #11 : Pay For Remove Ads
    Share
    Facebook Twitter LinkedIn Pinterest Email Copy Link
    Build Real-World React Native App #11 : Pay For Remove Ads
    Build Real-World React Native App #11 : Pay For Remove Ads

    In the previous chapter, we configured the in-app purchase in our React Native app. In this chapter, we are going to apply it in order to implement the Remove Ads feature. First, we are going to implement the Remove ads screen which will have a privacy policy and terms of use along with buttons to trigger the subscription-based payments. The chapter is a bit complex since we are dealing with the actual money here. But, we are going to go step by step to make the implementation simple and easy to understand. At the end of this tutorial, we will be able to make the test remove ads purchase from the app itself.

    Let’s get started!

    Control banner display on the home screen

    Hence, the subscription-based purchase is also successful. Since the purchase is successful, the ads will auto-hide themselves.

    Now in the Home screen, we need to import the state that we are going to use in order to toggle the ads state. First, we need to import IApContext as shown in the code snippet below:

    import { IApContext } from '../components/IApController'

    Then, we need to get the showads function from IApContext using the useContext hook as shown in the code snippet below:

    const { showads } = useContext(IApContext)

    Hence, we can now use it as a condition on render as shown in the code snippet below:

    renderItem={({ item ,index}) => (
             <React.Fragment>
                    <FlatlistItem item={item} navigation={navigation} />
                    {showads && index % 3 == 0 ? renderBanner() : <View />}
              /React.Fragment>
      )}

    Hence, we will get the result as displayed in the screenshots below:
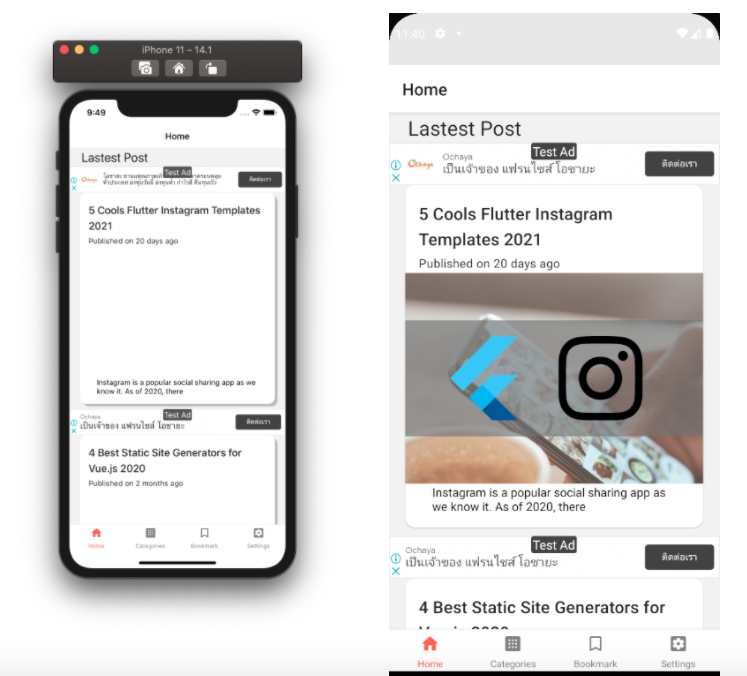
    Showing banner on home page
    Showing banner on home page

    Control banner display on the single post screen

    Another screen is the SinglePost post screen in which we do the same thing. We start by importing the context class as shown in the code snippet below:

    import { IApContext } from '../components/IApController'

    Then, we need to pick the state that we can use for toggling as shown in the code snippet below:

    const { showads } = useContext(IApContext)

    Thus, apply it for conditional rendering as shown in the code snippet below:

                  </Card.Content>
                       {showads && renderBanner()}
                       <ImageLoad
                           style={{ width: '100%', height: 250 }}
                           loadingStyle={{ size: 'large', color: 'grey' }}
                           source={{ uri: post[0].jetpack_featured_media_url }}
                   />

    Also, we need to add it to reward ads as shown in the code snippet below:

    const renderContent = () => {
     
           if (point <= 0 && showads) {
               return renderRewardAdsButton();
           }

    Hence, we get the result as shown in the screenshot below:
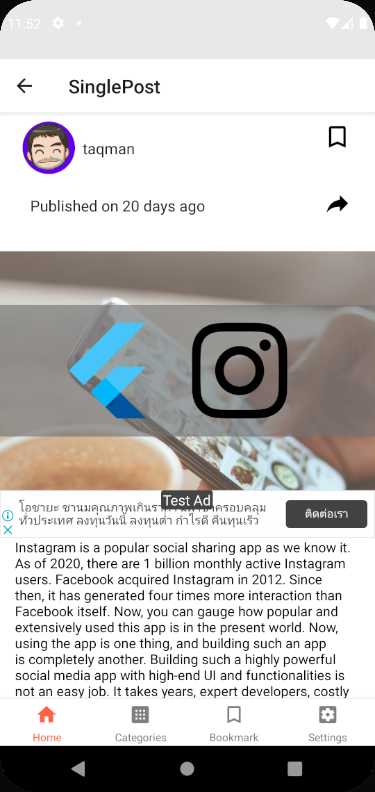
    AdSense banner in single post screen
    AdSense banner in single post screen

    Checking Product status

    Now when we load the app again, we also need to check user status if the user has already bought the product or not by using the getAvaliablePurchase function. The coding implementation for this is provided in the code snippet below:

    checkValidPurchase = async () => {
           try {
               const purchases = await RNIap.getAvailablePurchases();
     
               purchases.forEach(async (purchase) => {
                   switch (purchase.productId) {
                       case 'kriss.once.removeads':
                           // await AsyncStorage.setItem('removeadsmonthly', JSON.stringify(res));
                           toggleAds(false)
                           break
     
                       case 'kriss.sub.removeads':
                           //   await AsyncStorage.setItem('removeadsmonthly', JSON.stringify(res));
                           toggleAds(false)
                           break
                       case 'com.kriss.remove_ads_monthly':
                           // await AsyncStorage.setItem('removeadsmonthly', JSON.stringify(res));
                           toggleAds(false)
                           break
                       case 'com.kriss.remove_ad_forever':
                           //   await AsyncStorage.setItem('removeadsmonthly', JSON.stringify(res));
                           toggleAds(false)
                           break
                       default: console.warn('your did not have any purchase');
     
                   }
               })
     
           } catch (err) {
               console.warn(err);
           }
       }

    Then, we need to activate it in the Navigator.js file as shown in the code snippet below:

    const { initIAp, checkValidPurchase } = useContext(IApContext);
     
       useEffect(() => {
           initIAp()
           checkValidPurchase()
       }, [])

    Setup in-app purchase on Android

    The setup in Android is more complicated than in iOS. In Android, we need to release APK in order to add billing permission before activating the billing feature on the Playstore dashboard.

    First, we need to open the AndroidManifest.xml file and add the following line of code:

    <uses-permission android:name="com.android.vending.BILLING" />

    Then, we need to generate a keystore file for release APK by using the following command:

    keytool -genkeypair -v -keystore myupload.keystore -alias mykeyalias -keyalg RSA -keysize 2048 -validity 10000


    Read More:  Task Estimation

    The keystore file will appear in app folder as shown in the screenshot below:

    Keystore location
    Keystore location

    Now, we need to open build.gradle file and add keystore file name as directed in the code snippet below:

    signingConfigs {
           debug {
               storeFile file('debug.keystore')
               storePassword 'android'
               keyAlias 'androiddebugkey'
               keyPassword 'android'
           }
            release {
               storeFile file('myuploadkey.keystore')
               storePassword '111111'
               keyAlias 'my-key-alias'
               keyPassword '111111'
           }
          
       }
       buildTypes {
           debug {
               signingConfig signingConfigs.debug
           }
           release {
                crunchPngs false
           
               signingConfig signingConfigs.release
               minifyEnabled enableProguardInReleaseBuilds
               proguardFiles getDefaultProguardFile("proguard-android.txt"), "proguard-rules.pro"
           }
       }

    Now, we can generate the release APK for our app by running the following commands:

    cd android/ ; ./gradlew bundleRelease

    Then, our APK file will appear in the following path:

    android/app/build/outputs/bundle/release/app.aab

    Next, we need to go to the Playstore dashboard and create a new app as shown in the screenshot below:

    Create a new Playstore app
    Create a new Playstore app

    Then, we need to goto in-App purchase where we will see the APK requirement information that has billing permission as displayed in the screenshot below:

    Playstore dashboard
    Playstore dashboard

    Next, we need to select the APK and upload the new APK. Then, we need to scroll to Internal app sharing as directed in the screenshots below:
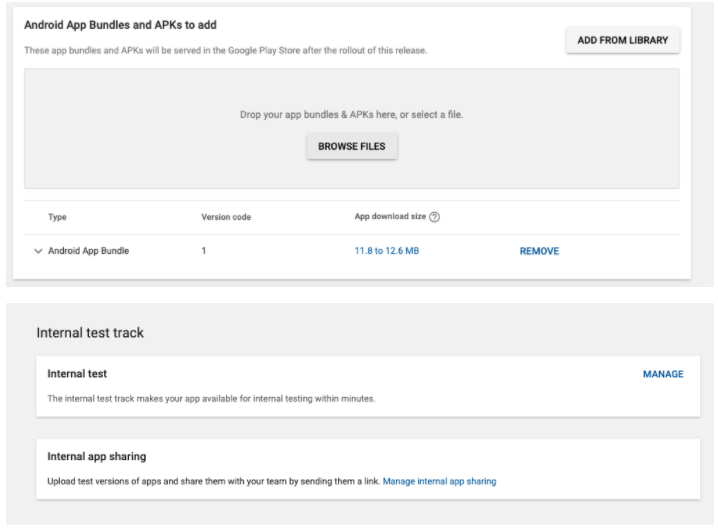
    Playstore APK management dashboard
    Playstore APK management dashboard

    Then, we need to pick the released APK and fill in version and description information as shown in the screenshot below:
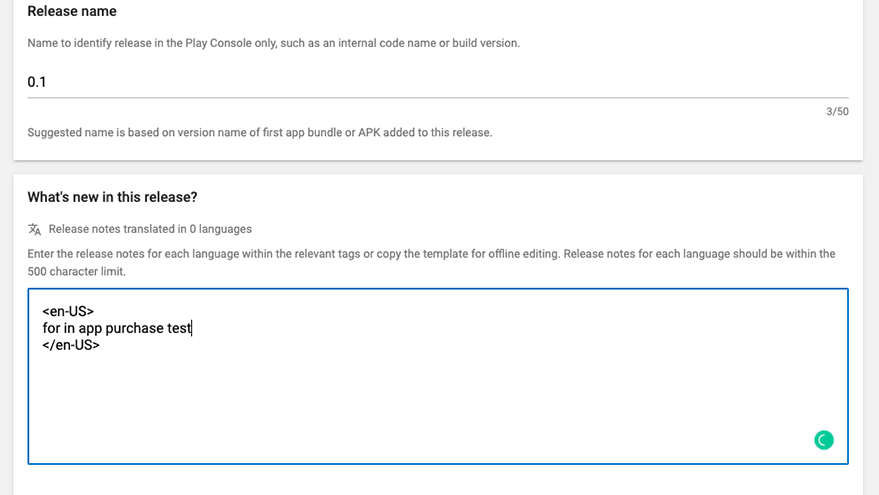
    Playstore app release description
    Playstore app release description

    The last step is to invite tester to use their email to register on Android device as shown in the screenshot below:

    Invite tester on Playstore
    Invite tester on Playstore

    Now, we can test the in-app purchase option on Android as well:

    Release summary in Playstore app
    Release summary in Playstore app

    If we get the following status, we can install and start testing in the Android platform as well:

    app status in playstore
    app status in playstore

    For testers, they will receive the email invitation as shown in the screenshot below:
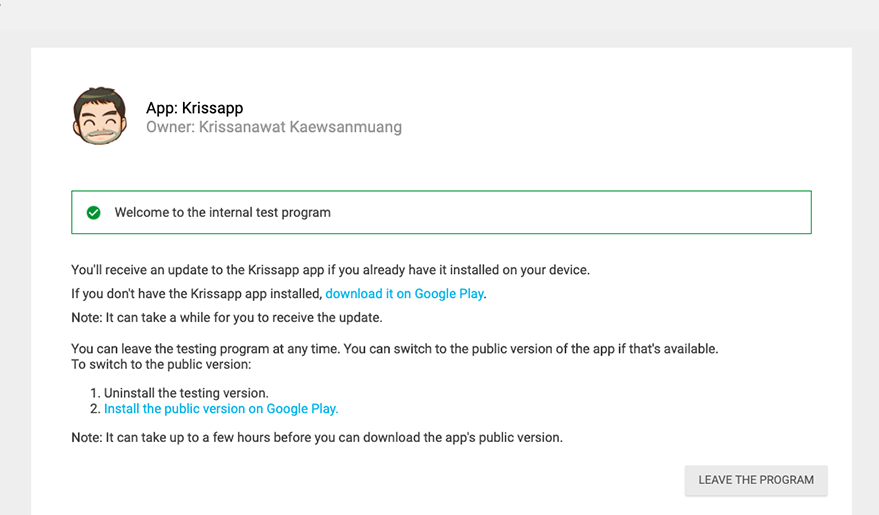
    Playstore invite tester with email
    Playstore invite tester with email

    Hence, they can now install the app as well:

    Install app on early access
    Install app on early access

    Thus, we have successfully set up the testers for the app as shown in the screenshot below:

    Install android app in tester mode
    Install android app in tester mode

    Create in-app product

    Now, we can create the in-app Purchase product in Android as well. First, let us learn about some of the types of In-App purchase products.

    Types Of In-App Purchases

    In-app purchases product has many types of product :

    • Consumable: Consumable products are those products that users need to buy every time on reinstalling or changing the device. These products cannot be used for free once bought. Hence, repeated purchasing is required. Some examples can be the currency, hints, and health in gaming apps.
    • Non-consumable: This is bought once and use for free forever in the future kind of product. Once subscribed or purchased, users don’t need to purchase again in the future. The subscription to these kinds of products is not lost even on reinstalling or changing devices. Some examples can be subscribing to the pro version or removing advertisements.
    • Non-renewing subscriptions: These kinds of products can be used by the user for a fixed period of time. Once the period ends, users have to purchase or subscribe to them again. The service is free over a certain period of time.
    • Auto-renewable subscriptions: These kinds of services have the due date for re-subscription of re-purchase which is done automatically when the end period strikes. The items are available for a certain period of time once purchased and the items are re-purchased automatically once the period ends.

    Now, let’s start creating the Android In-app purchase product.

    First, we need to goto Managed Product tab and insert the product ID as shown in the screenshot below:

    Add new in-app product
    Add new in-app product

    Next, we need to add the description as directed in the screenshot below:
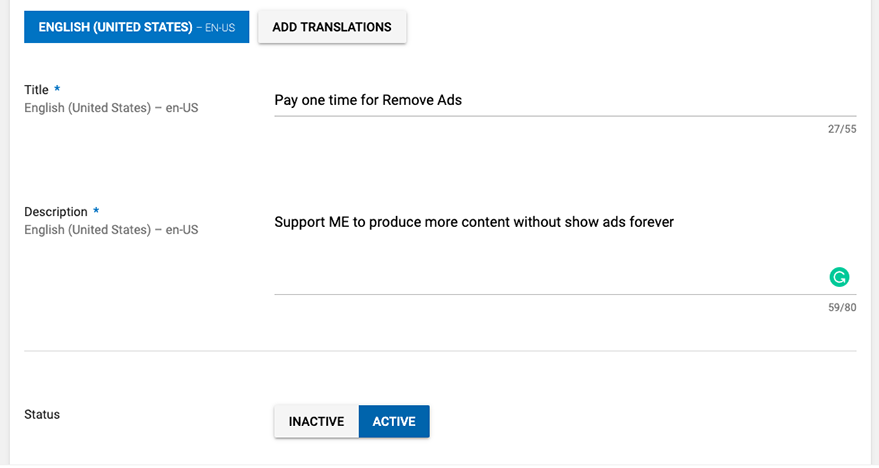
    Add in-app product description
    Add in-app product description

    Lastly, we need to set the pricing information as directed in the screenshot below:
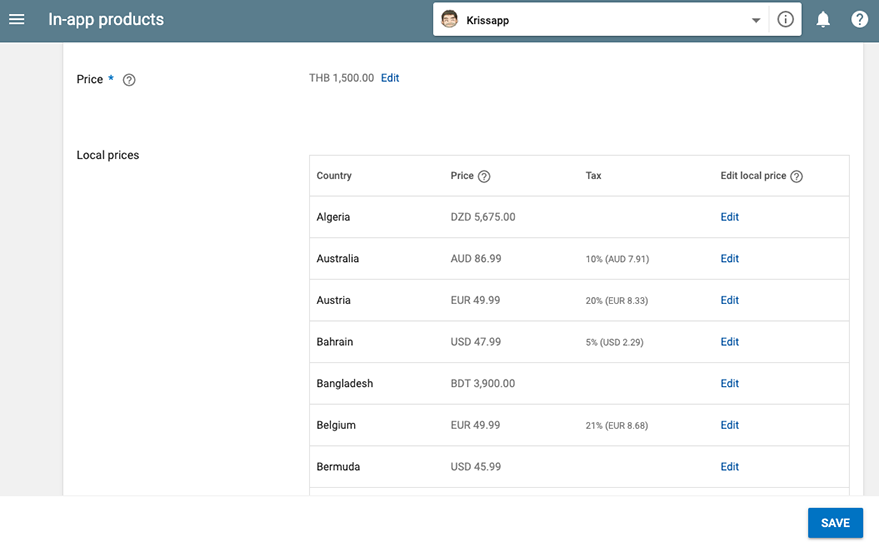
    Add in-app product price
    Add in-app product price

    Hence, we have configured the one-time purchase product as shown in the screenshot below:

    Read More:  Ultimate List of JavaScript Interview Questions
    in-app product on playstore
    in-app product on playstore

    Next, we move to subscription-based purchases. For that, we need to go to the Subscription tab to create the subscription product as shown in the screenshot below:
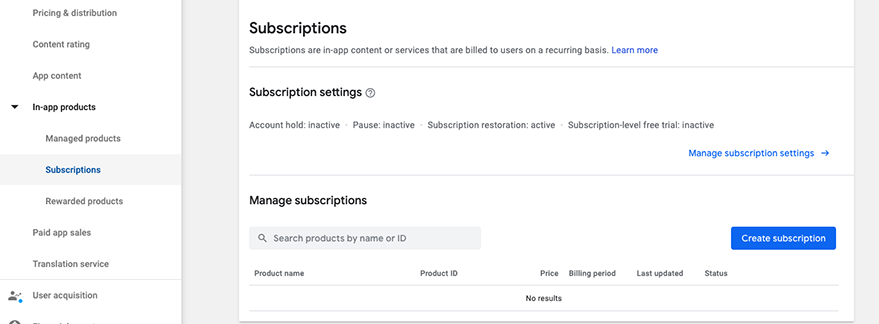
    Add new subscription product in Playstore
    Add new subscription product in Playstore

    Then, we need to add the product ID as shown in the screenshot below:
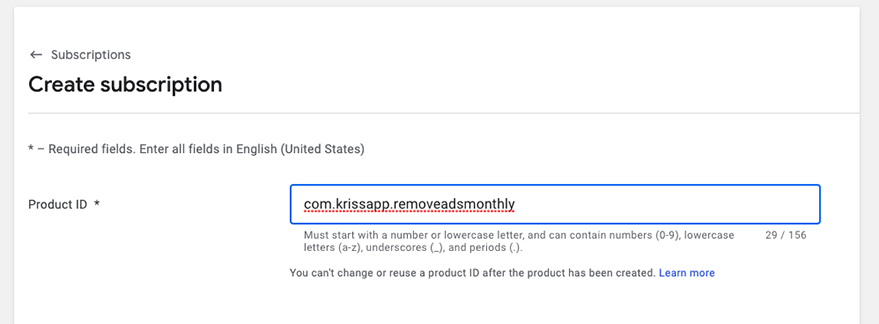
    Add id to subscription product
    Add id to a subscription product

    Add subscription product idNext, we need to add the pricing, duration, and description detail as directed in the screenshots below:
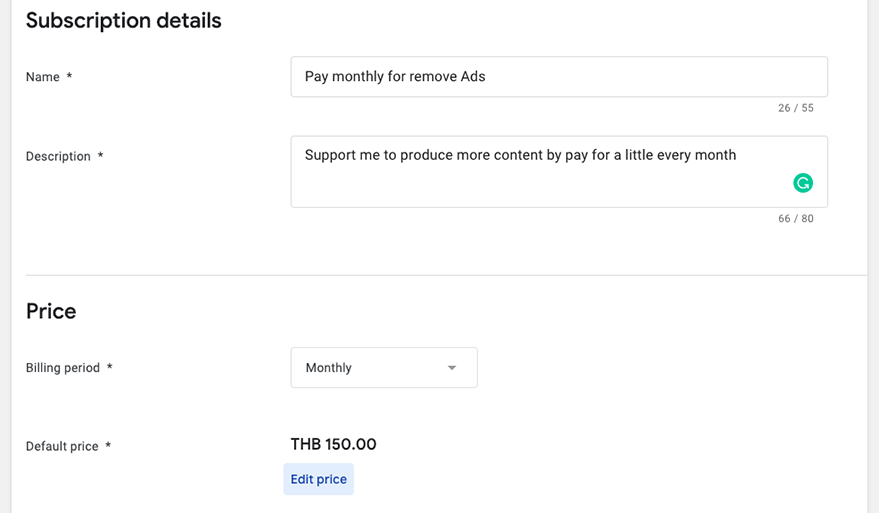
    Add in-app subscription description
    Add in-app subscription description

    Hence, we have successfully set up the subscription-based purchase as well as shown in the screenshot below:

    Successfully add new in-app subscription playstore
    Successfully add new in-app subscription playstore

    Note that we need to wait around 6-12 hours for the approval.

    perform Static Test

    While waiting for approval, we can use these three product IDs for testing:

    • android.test.purchased success case
    • android.test.canceled – cancel case
    • android.test.item_unavailable – unavailable case

    Hence, we can change the product ID as directed in the following screenshot:

    const itemSkus = Platform.select({
       ios: [
           'kriss.once.removeads',
           'kriss.sub.removeads'
       ],
       android: [
           'android.test.purchased',
           'android.test.canceled',
           'android.test.item_unavailable'
       ]
    });

    Hence, the result for the product purchase on the emulator device is shown below:
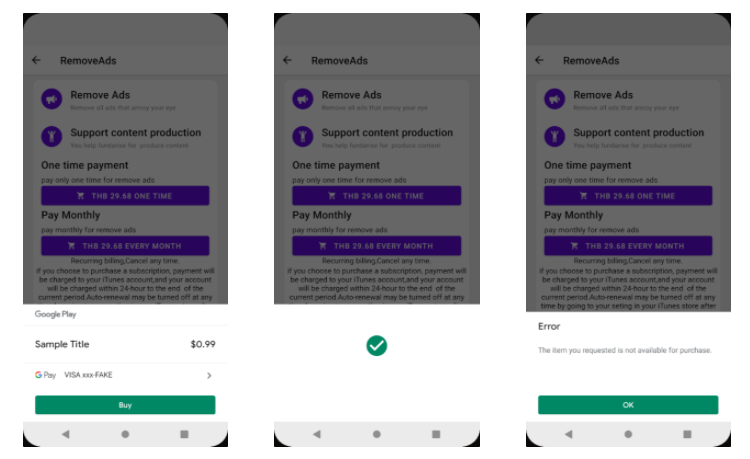
    Result of testing in-app purchase on android
    Result of testing in-app purchase on android

    Real Test

    Once our In-App products get published on the Playstore, we can perform the real-time test from the actual device. Here, we will be able to fetch the real data from the Playstore.

    There is also an option for multiple payment options as shown in the screenshot below:
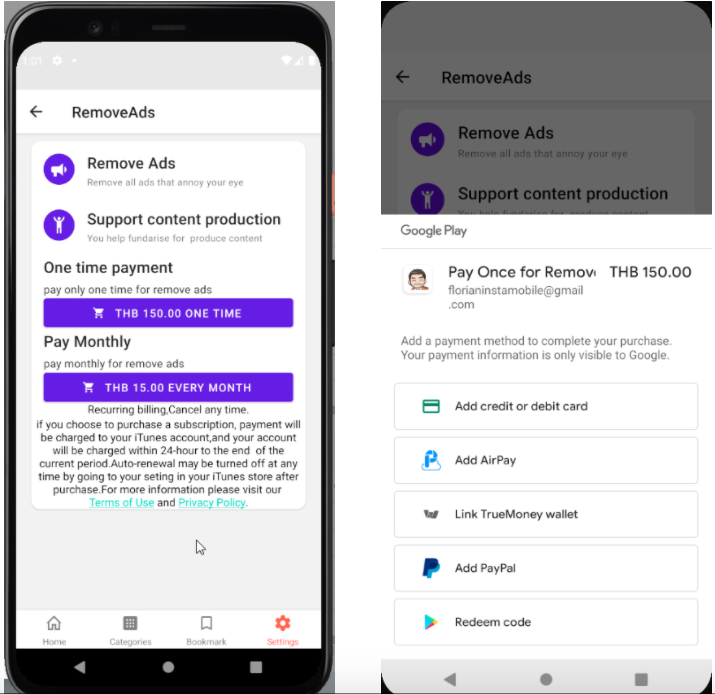
    The result from display real in-app product
    The result from display real in-app product

    Pay to Read

    Another way we can implement the in-app purchase in this app is to limit the user’s readable access to the post. And, implement a mechanism that requires users to pay the credit in order to access the full post to read.

    first, we give initial credit at ten on App.js

    async function initPoint() {
        let initPoint = await AsyncStorage.getItem('yourcanreadfreepost');
        if (initPoint == null) {
          await AsyncStorage.setItem('yourcanreadfreepost', '10')
        }
      }

    Then, we call the function every time the app launches as shown in the code snippet below:

    export default function App() {
      React.useEffect(() => {
        SplashScreen.hide()
        initPoint()
    ............other code.......

    Next, we need to add the function that triggers the payment event:

    const renderPaymentButton = () => {
        return (
          <View>
            <Title style={{textAlign: 'center'}}>
              Pay {products.products[1].localizedPrice} for read more 10 post
            </Title>
            <Button
              icon="bullhorn"
              color={'#53ccf9'}
              mode="contained"
              onPress={() => makePurchase(products.products[1].productId)}>
              Pay now
            </Button>
          </View>
        );
      };

    Now in IAPController, we need to make updates to the function to make the payment successful. First, we need to check the product SKU if it matches while fetching the credit. If it does not match then we need to add new credit and set the point to the state for immediate access to the screen. The overall coding implementation is provided in the code snippet below:

    const [pointfromiap, setPointfromiap] = useState()
     
      makePurchase = async sku => {
        try {
          await RNIap.requestPurchase(sku, false).then(async res => {
            toggleAds(false);
            if(sku == 1){
              await AsyncStorage.setItem('yourcanreadfreepost', '10').then(res => {
                setPointfromiap(10)
            });
            }
          });
        } catch (err) {
          console.warn(err.code, err.message);
        }
      };

    Now, if the user runs out of credit, we will see the following results:
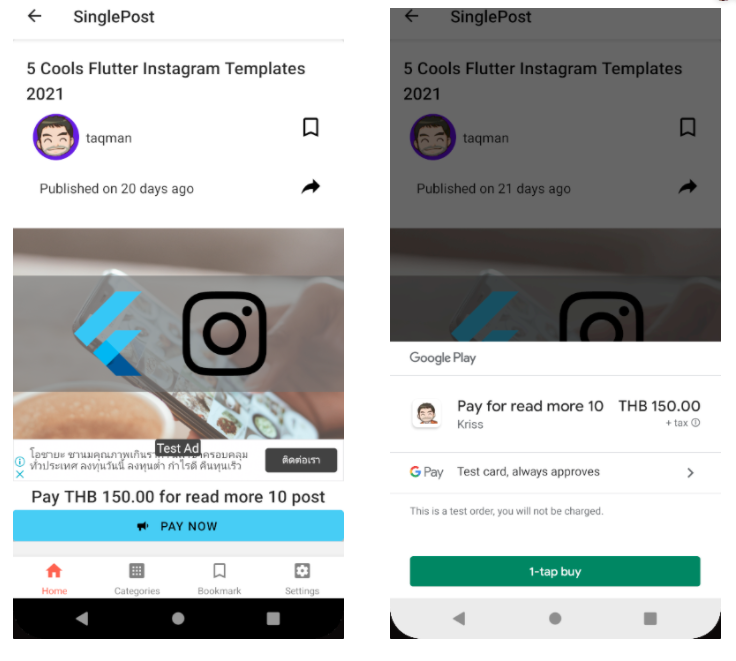
    Payment result on playstore
    Payment result on playstore

    Lastly, when the payment is successful, there will be the addition of 10 credit and also unblock the screen access for the user subsequently

    Conclusion

    Well, this chapter was a bit complex. We continued from where we left off in the previous chapter. We found a way to make a little bit of money using In-app purchase. We dealt with the actual money here to make the in-app purchase to remove ads from the app. We got stepwise guidance on how to integrate one-time and subscription-based in-app purchases in both Android and iOS platforms. We implemented this feature to offer users the choice to remove the annoying advertisements. We also configured the tester option in both Android and iOS to enable the testing mechanism as well.

    All code available on Github.

    Share. Facebook Twitter Pinterest LinkedIn Tumblr Email
    Krissanawat Kaewsanmuang
    • Website
    • X (Twitter)

    Developer Relation @instamobile.io

    Related Posts

    Streamlining Resource Allocation for Enhanced Project Success

    December 18, 2024

    Conducting Effective Post-Project Evaluations: A Guide

    December 16, 2024

    Strategies for Keeping Projects on Track and Meeting Deadlines

    December 10, 2024
    Leave A Reply Cancel Reply

    You must be logged in to post a comment.

    Stay In Touch
    • Facebook
    • Twitter
    • Pinterest
    • Instagram
    • YouTube
    • Vimeo
    Don't Miss
    Programming November 7, 2019

    The Path of the Self-Taught Programmer: Avoiding Common Problems

    In this article, we’ll explore how a self-taught programmer comes to be: which education opportunities they can utilize, which problems they may encounter, and whether this path is right for you.

    Why Working Remotely Is a Double-Edged Sword

    August 9, 2019

    React Lesson 9: Homework Lesson 8

    February 24, 2020

    Top Strategies for Effective B2B Lead Generation with Content

    December 5, 2024

    Categories

    • AI & Automation
    • Angular
    • ASP.NET
    • AWS
    • B2B Leads
    • Beginners
    • Blogs
    • Business Growth
    • Case Studies
    • Comics
    • Consultation
    • Content & Leadership
    • CSS
    • Development
    • Django
    • E-commerce & Retail
    • Entrepreneurs
    • Entrepreneurship
    • Events
    • Express.js
    • Facebook Ads
    • Finance & Fintech
    • Flask
    • Flutter
    • Franchising
    • Funnel Strategy
    • Git
    • GraphQL
    • Home Services Marketing
    • Influencer & Community
    • Interview
    • Java
    • Java Spring
    • JavaScript
    • Job
    • Laravel
    • Lead Generation
    • Legal & Compliance
    • LinkedIn
    • Machine Learning
    • Marketing Trends
    • Medical Marketing
    • MSP Lead Generation
    • MSP Marketing
    • NestJS
    • Next.js
    • Node.js
    • Node.js Lessons
    • Paid Advertising
    • PHP
    • Podcasts
    • POS Tutorial
    • Programming
    • Programming
    • Python
    • React
    • React Lessons
    • React Native
    • React Native Lessons
    • Recruitment
    • Remote Job
    • SaaS & Tech
    • SEO & Analytics
    • Soshace
    • Startups
    • Swarm Intelligence
    • Tips
    • Trends
    • Vue
    • Wiki
    • WordPress
    Top Posts

    Deep Learning vs Machine Learning: Overview & Comparison

    Beginners September 12, 2019

    Fortune 500 top hiring trends in 2019. How top companies attract best talents?

    JavaScript September 14, 2018

    Creating Our Own Chat GPT

    Django July 27, 2023

    Best Service provides for Small Businesses

    Consultation July 4, 2020

    Subscribe to Updates

    Get The Latest News, Updates, And Amazing Offers

    About Us
    About Us

    Soshace Digital delivers comprehensive web design and development solutions tailored to your business objectives. Your website will be meticulously designed and developed by our team of seasoned professionals, who combine creative expertise with technical excellence to transform your vision into a high-impact, user-centric digital experience that elevates your brand and drives measurable results.

    7901 4th St N, Suite 28690
    Saint Petersburg, FL 33702-4305
    Phone: 1(877)SOSHACE

    Facebook X (Twitter) Instagram Pinterest YouTube LinkedIn
    Our Picks
    Programming

    Crafting Interactive User Interfaces Using JavaScript Techniques

    Java

    10 Practices You Should Avoid to Become a Good Java Developer

    Programming

    21. Node.js Lessons. Writable Response Stream (res), Pipe Method. Pt.2

    Most Popular

    23. Уроки Node.js. Домены, “асинхронный try..catch”. Часть 3.

    Programming

    A/B Testing Explained + a Collection of A/B Testing Learning Resources

    Beginners

    How to Prepare for Your First Coding Job Interview?

    Interview
    © 2025 Soshace Digital.
    • Home
    • About
    • Services
    • Contact Us
    • Privacy Policy
    • Terms & Conditions

    Type above and press Enter to search. Press Esc to cancel.