Close Menu
Soshace Digital Blog

    Subscribe to Updates

    Get The Latest News, Updates, And Amazing Offers

    What's Hot
    JavaScript

    Exploring the Power of JavaScript Proxies and Reflect API

    Recruitment

    Ensuring Quality Hires: The Vital Role of Background Checks

    Interview

    Interview with Philipp

    Important Pages:
    • Home
    • About
    • Services
    • Contact Us
    • Privacy Policy
    • Terms & Conditions
    Facebook X (Twitter) Instagram LinkedIn YouTube
    Today's Picks:
    • Scaling Success: Monitoring Indexation of Programmatic SEO Content
    • Leveraging Influencers: Key Drivers in New Product Launches
    • How Privacy-First Marketing Will Transform the Industry Landscape
    • The Impact of Social Proof on Thought Leadership Marketing
    • Balancing Value-Driven Content and Promotional Messaging Strategies
    • Top Influencer Marketing Platforms to Explore in 2025
    • Emerging Trends in Marketing Automation and AI Tools for 2023
    • Strategies to Mitigate Duplicate Content in Programmatic SEO
    Wednesday, September 10
    Facebook X (Twitter) Instagram LinkedIn YouTube
    Soshace Digital Blog
    • Home
    • About
    • Services
    • Contact Us
    • Privacy Policy
    • Terms & Conditions
    Services
    • SaaS & Tech

      Maximizing Efficiency: How SaaS Lowers IT Infrastructure Costs

      August 27, 2025

      Navigating Tomorrow: Innovations Shaping the Future of SaaS

      August 27, 2025

      Maximizing Impact: Strategies for SaaS & Technology Marketing

      August 27, 2025
    • AI & Automation

      Enhancing Customer Feedback Analysis Through AI Innovations

      August 27, 2025

      Navigating the Impact of AI on SEO and Search Rankings

      August 27, 2025

      5 Automation Hacks Every Home Service Business Needs to Know

      May 3, 2025
    • Finance & Fintech

      Critical Missteps in Finance Marketing: What to Avoid

      August 27, 2025

      Analyzing Future Fintech Marketing Trends: Insights Ahead

      August 27, 2025

      Navigating the Complex Landscape of Finance and Fintech Marketing

      August 27, 2025
    • Legal & Compliance

      Exploring Thought Leadership’s Impact on Legal Marketing

      August 27, 2025

      Maximizing LinkedIn: Strategies for Legal and Compliance Marketing

      August 27, 2025

      Why Transparency Matters in Legal Advertising Practices

      August 27, 2025
    • Medical Marketing

      Enhancing Online Reputation Management in Hospitals: A Guide

      August 27, 2025

      Analyzing Emerging Trends in Health and Medical Marketing

      August 27, 2025

      Exploring Innovative Content Ideas for Wellness Blogs and Clinics

      August 27, 2025
    • E-commerce & Retail

      Strategic Seasonal Campaign Concepts for Online and Retail Markets

      August 27, 2025

      Emerging Trends in E-commerce and Retail Marketing Strategies

      August 27, 2025

      Maximizing Revenue: The Advantages of Affiliate Marketing for E-Commerce

      August 27, 2025
    • Influencer & Community

      Leveraging Influencers: Key Drivers in New Product Launches

      August 27, 2025

      Top Influencer Marketing Platforms to Explore in 2025

      August 27, 2025

      Key Strategies for Successful Influencer Partnership Negotiations

      August 27, 2025
    • Content & Leadership

      The Impact of Social Proof on Thought Leadership Marketing

      August 27, 2025

      Balancing Value-Driven Content and Promotional Messaging Strategies

      August 27, 2025

      Analyzing Storytelling’s Impact on Content Marketing Effectiveness

      August 27, 2025
    • SEO & Analytics

      Scaling Success: Monitoring Indexation of Programmatic SEO Content

      August 27, 2025

      Strategies to Mitigate Duplicate Content in Programmatic SEO

      August 27, 2025

      Effective Data Visualization Techniques for SEO Reporting

      August 27, 2025
    • Marketing Trends

      How Privacy-First Marketing Will Transform the Industry Landscape

      August 27, 2025

      Emerging Trends in Marketing Automation and AI Tools for 2023

      August 27, 2025

      Maximizing ROI: Key Trends in Paid Social Advertising

      August 27, 2025
    Soshace Digital Blog
    Blog / JavaScript / React / React Native / React Native Lessons / Build Real-World React Native App #10 : Setup in-App Purchase in iOS
    React Native

    Build Real-World React Native App #10 : Setup in-App Purchase in iOS

    Krissanawat KaewsanmuangBy Krissanawat KaewsanmuangFebruary 1, 2021No Comments10 Mins Read
    Facebook Twitter Pinterest Telegram LinkedIn Tumblr Email Reddit
    Build Real-World React Native App #10 : Setup in-App Purchase in iOS
    Build Real-World React Native App #10 : Setup in-App Purchase in iOS
    Share
    Facebook Twitter LinkedIn Pinterest Email Copy Link
    Build Real-World React Native App #10 : Setup in-App Purchase in iOS
    Build Real-World React Native App #10 : Setup in-App Purchase in iOS

    The most awaited and considerably the lengthiest chapter is here. In this chapter, we will learn how to add the in-app purchase service in React Native using React Native IAP package The configurations are mainly for the iOS platform. Here, we are going to set up the subscriptions and configure the App Store Connect to enable the in-app purchase feature. The process is somewhat lengthy but make sure to do it carefully. We are also going to implement a tester to test the in-app purchase service. Lastly, we are also going to configure the UI screen for the Remove ads feature.

    Let’s get started!

    Installing React Native IAP

    First, we are going to install a package named react-native iap. This is a react-native native module library project for in-app purchases for both Android and iOS platforms. For that, we need to run the following command in our project terminal:

    yarn add react-native-iap

    Setup on iOS

    In iOS, we need to run a general command for cacao pod install as shown below:

    cd ios/ && pod install ; cd ..

    Then, we need to go to Xcode and add in-app purchase capability as shown in the screenshot below:
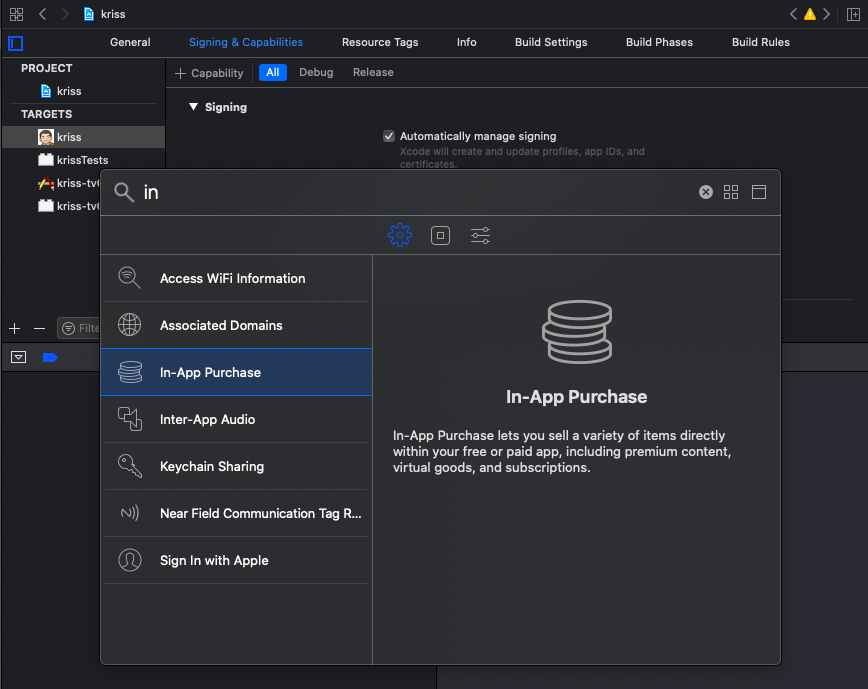
    Setup Inapp in Xcode
    Setup Inapp in Xcode

    As we are done in Xcode, we will see the following information:
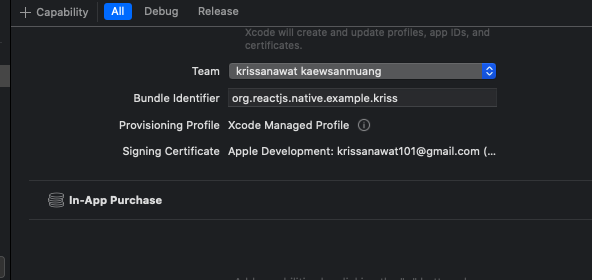
    Setup bundle identifier
    Setup bundle identifier

    To use the In-app purchase service, we need to create a Context component named IApController first. Then, we need to import components as shown in the code snippet below:

    import React, { createContext, useState, useContext } from 'react';
    import * as RNIap from 'react-native-iap';
    import { Alert, Platform } from 'react-native'
    export const IApContext = createContext();

    Then, we need to create an array to contain the product name that will match on both Android and Apple developer dashboard as shown in the code snippet below:

    const itemSkus = Platform.select({
       ios: [
           'kriss.once.removeads',
           'kriss.sub.removeads'
       ],
       android: [
           'com.kriss.remove_ads_monthly',
           'com.kriss.remove_ad_forever'
       ]
    });

    Next, we need to create two states to handle product data and ads status as shown in the code snippet below:

    export const IApController = ({ children }) => {
       const [products, setProducts] = useState([])
       const [showads, setShowads] = useState(true);

    Now, we are going to start with fetching product data from the app store and play store. For Playstore, we need to get a subscription with separate function as shown in the code snippet below:

    const initIAp = async () => {
           try {
               const products = await RNIap.getProducts(itemSkus);
               if (Platform.OS === 'android') {
                   const subscription = await RNIap.getSubscriptions(itemSkus);
                   products.push(subscription[0])
               }
               console.log(products)
               setProducts({ products });
               console.log(products)
           } catch (err) {
               console.warn(err); // standardized err.code and err.message available
           }
       }

    Product and Subscription

    Now, we need to create two more functions to handle user purchases and subscriptions. The idea is to hide the ads when the purchase or subscription is successful. The coding implementation for this is provided in the code snippet below:

    makePurchase = async (sku) => {
           try {
               await RNIap.requestPurchase(sku, false).then(async (res) => {
                    toggleAds(false)
               });
           } catch (err) {
               console.warn(err.code, err.message);
           }
       }
       makeSubscription = async (sku) => {
           try {
               await RNIap.requestSubscription(sku, false).then(async (res) => {
                      toggleAds(false)
               });
           } catch (err) {
               console.warn(err.code, err.message);
           }
       }

    Then, we need to create a toggle function to display or hide ads as shown in the code snippet below:

    const [showads, setShowads] = useState(true);
       const toggleAds = value => {
           if (value === true) {
               setShowads(true);
           } else {
               setShowads(false);
           }
       };

    Next, we need to prepare a list of functions that we want to export to use in other components as shown in the code snippet below:

    return (
           <IApContext.Provider value={{
    	     initIAp,
                Showads,
                products,
                makePurchase,
               makeSubscription,
           }}>
               {children}
           </IApContext.Provider>
       );
    }

    Hence, we have completed the configuration part of the IApController. Our next step is to activate Context in App.js.

    Read More:  Build Real-World React Native App #9 : Implementing Remove Ads Feature

    First, we start by importing IApController to App.js file as shown in the code snippet below:

    import { IApController } from './src/components/IApController'

    Then, we wrap the Navigator with another level of Context component as shown in the code snippet below:

    <IApController>
         <AdmobController>
           <NetworkController>
             <ThemeController>
               <Navigators />
             </ThemeController>
           </NetworkController>
         </AdmobController>
       </IApController>

    Now, we need to fetch the list of products that we need to activate in Navigator.js. First import the IApContext in Navigator as shown in the code snippet below:

    import { IApContext } from './IApController'

    Then by using useEffect hook, we activate it every time the app loads as shown in the code snippet below:

    export default Navigator = () => {
    const { initIAp } = useContext(IApContext)
       useEffect(() => {
           initIAp()
       }, [])

    Now, when re-running the app, we get a blank array because we didn’t create a product list on the app store or play store as shown in the screenshot below:

    Fetch Iap data
    Fetch Iap data

    App Store Connect

    To register for App store Connect, we require a developer account which costs about 99$ per year. To access this feature, we need to set up financial data first. The screenshot of the App Store Connect console is shown below:
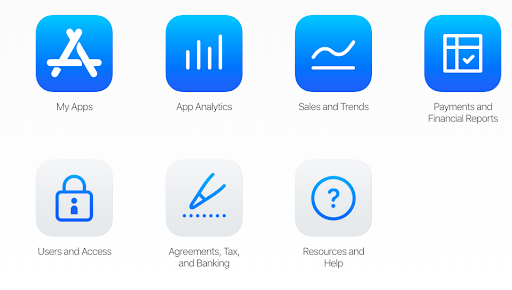
    App-store connect dashboard
    App-store connect dashboard

    Then, we need to go to the My Apps option and create a new App as directed in the screenshot below:
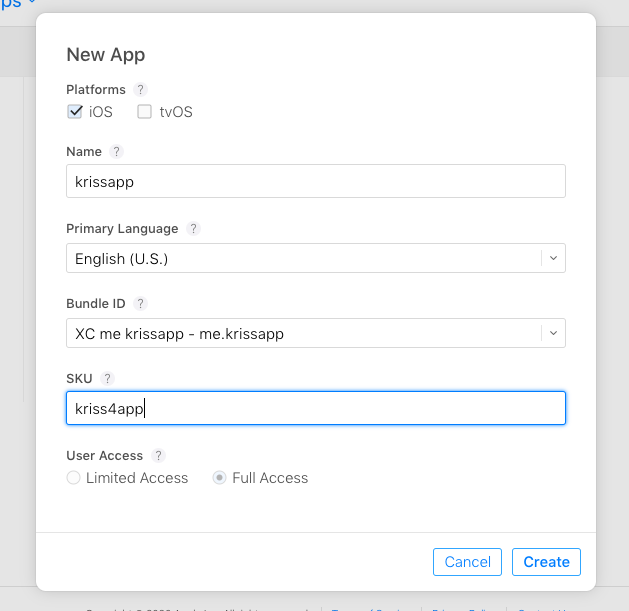
    Add a new app to AppStore connect.png
    Add a new app to AppStore connect.png

    Next, we need to go to the Feature tab as shown in the screenshot below:
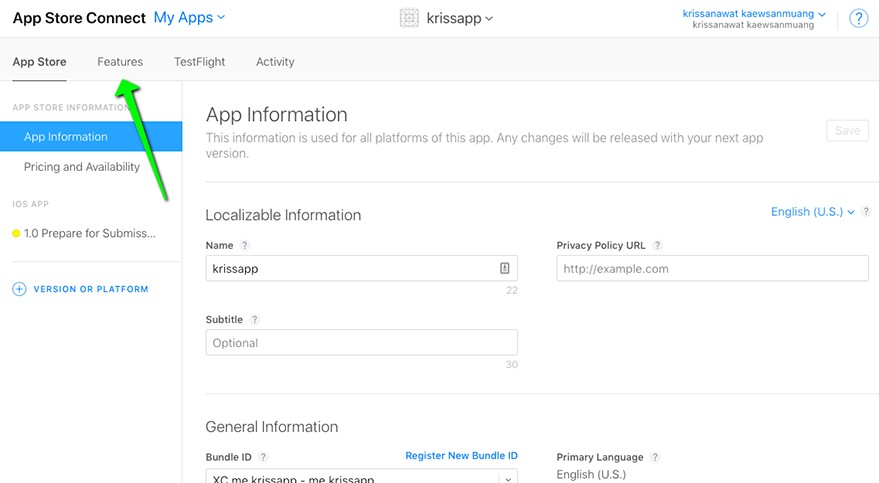
    App-store connect feature tab

    App-store connect feature tabThen, we need to select in-App Purchase and also choose Non-Consumable. Hence, we will use this to offer to remove ads forever as shown in the console screenshot below:
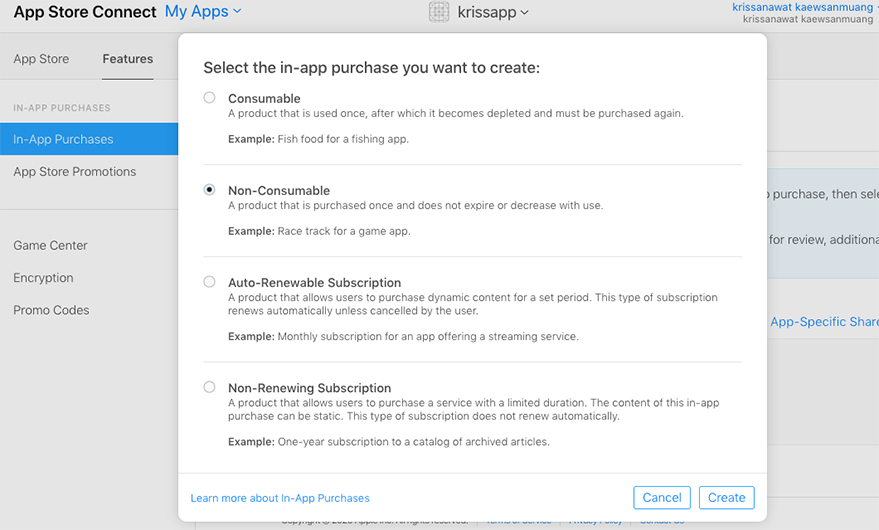
    Add new consumable item

    Add new consumable itemWe can provide any name in the Reference Name field but Product ID requires the same ID value that we defined In-app configuration as shown in the screenshot below:

    Add product detail
    Add product detail

    Then, we need to fill in pricing and other description as shown in the screenshot below:
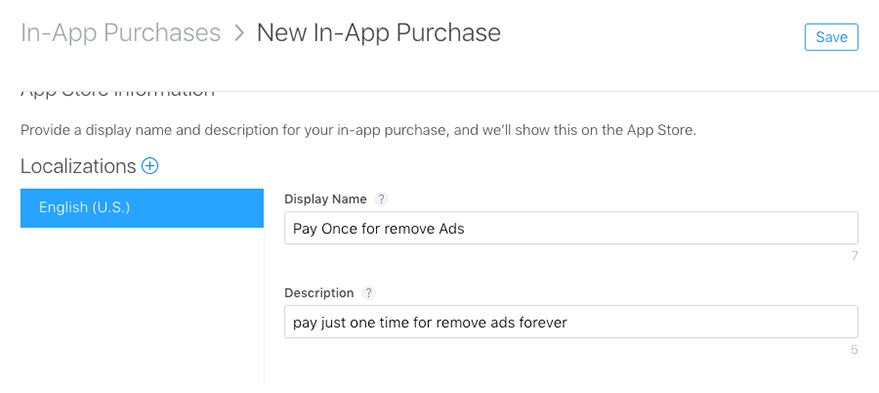
    Localize product detail
    Localize product detail

    Now, it is ready to use as displayed in the screenshot below:

    First non-consumable product
    First non-consumable product

    Now next step is to paid subscription option as directed in the screenshot below:
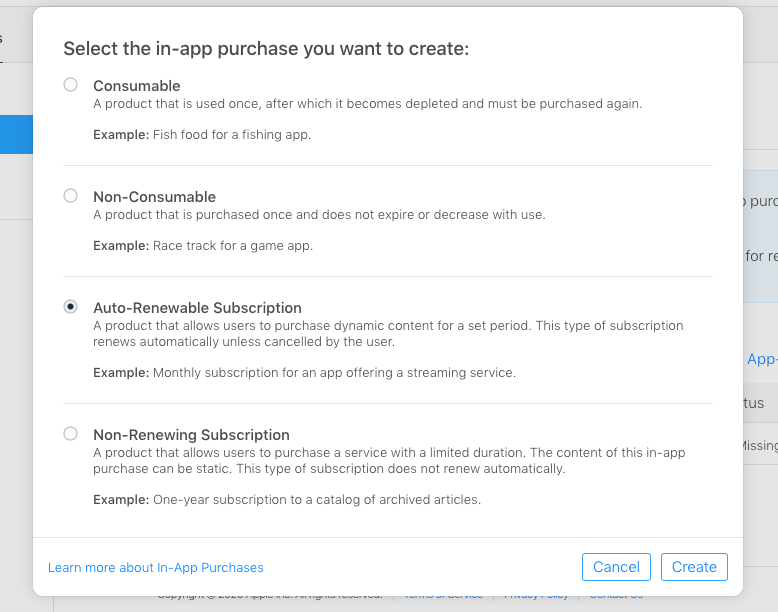
    Create auto-renewable subscription
    Create auto-renewable subscription

    First, we need to choose Auto-Renewable Subscription as shown in the screenshot above and then fill in Reference Name and Product ID as before as shown in the screenshot below:
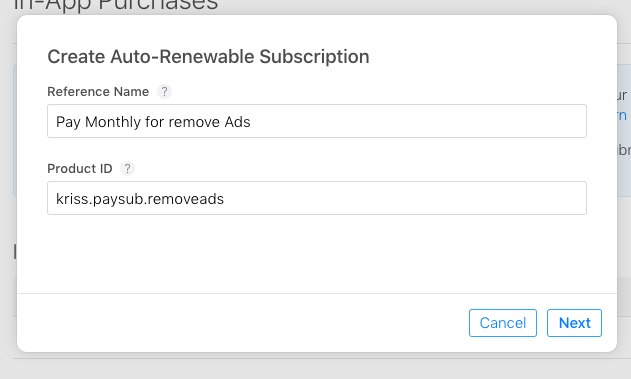
    Add app id and app name
    Add app id and app name

    Then, we need to create a subscription group as shown in the screenshot below:
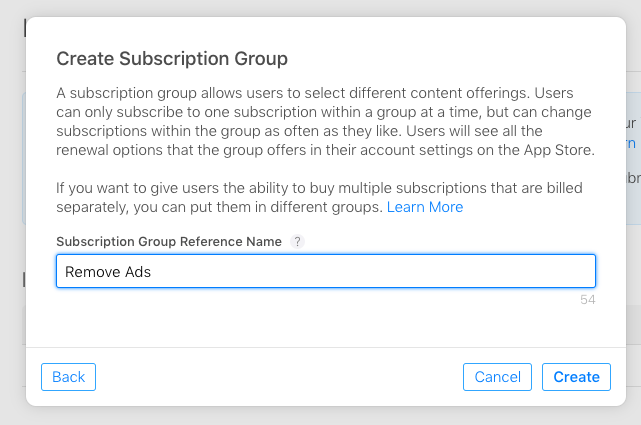
    Create subscription group
    Create subscription group

    Next, we need to select the subscription duration which is 1 Month for our app as shown in the screenshot below:
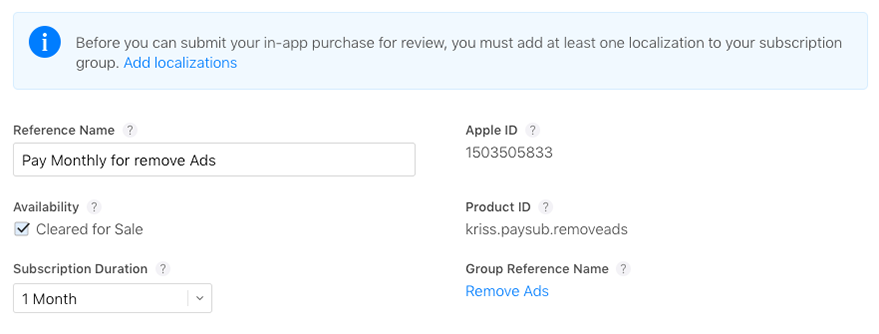
    Add subscription duration
    Add subscription duration

    Lastly, we need to select the pricing option which 4.99$ per month as shown in the screenshot below:
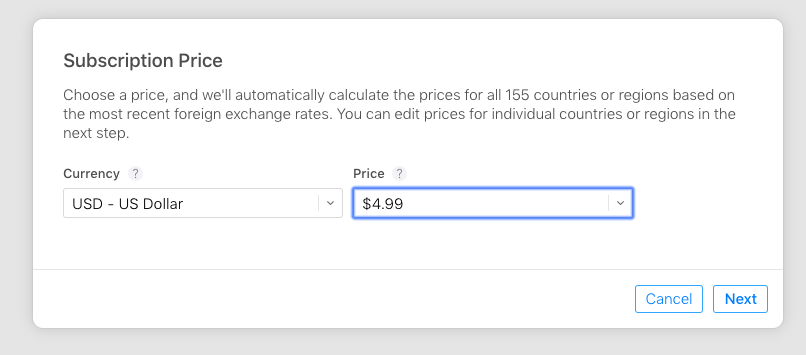
    Add subscription pricing
    Add subscription pricing

    Thus, the app store will calculate pricing for every country itself as shown in the screenshot below:
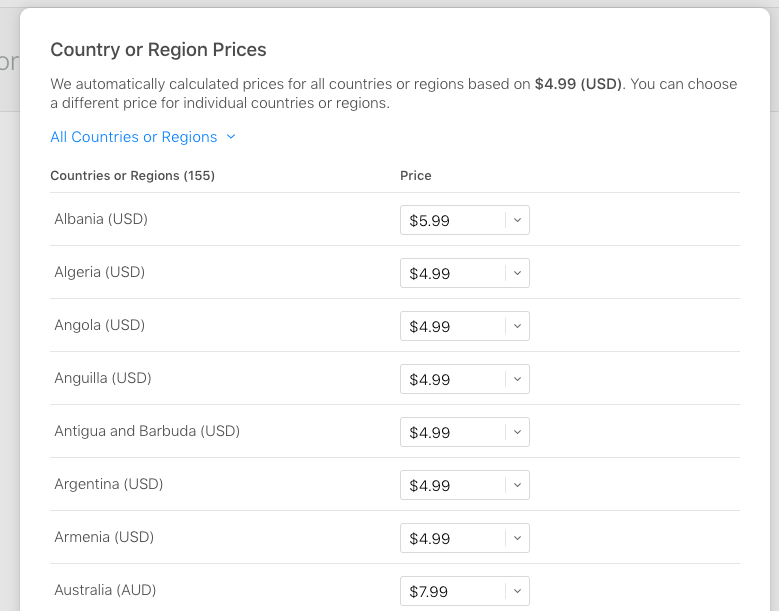
    Pricing by country
    Pricing by country

    Hence, we have successfully configured the one-time payment and subscription-based payment option as shown in the screenshot below:

    All of app store product
    All of app store product

    Now, we need to create a Tester.

    Creating Tester

    First, we need to apply a test for users for initial performance in development mode. Thus, we need to go to User and Access as shown in the screenshot below:
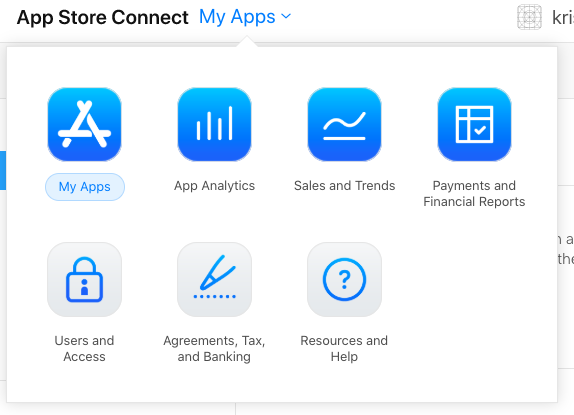
    Create app-store tester
    Create app-store tester

    Then, we need to create a new tester as directed in the screenshot below:
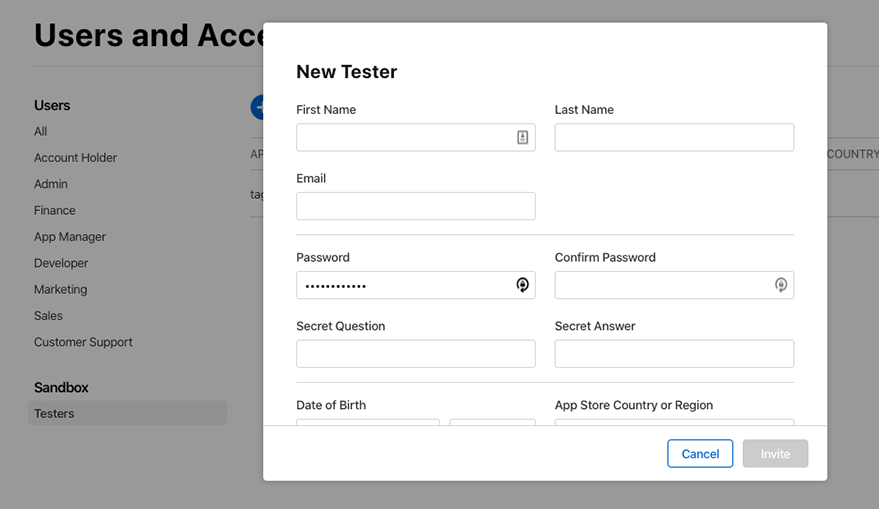
    Add tester detail
    Add tester detail

    To use this in the iOS platform, we can register as a Sandbox account as shown in the screenshot below:
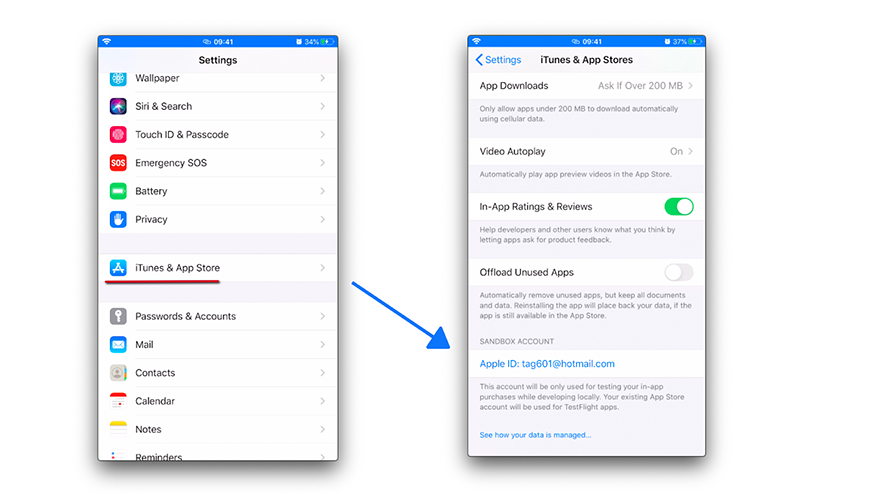
    Add tester to the device
    Add tester to the device

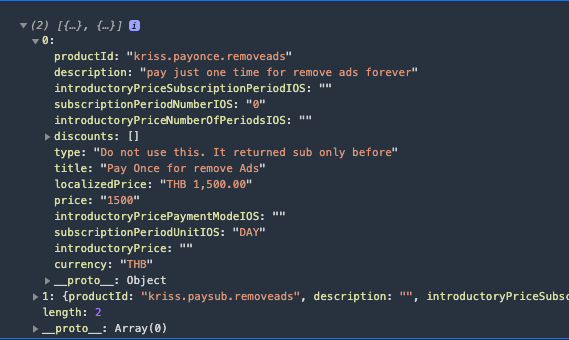
    Now, we need to re-run the app again using the following command:

    react-native run-ios --device "Kris101"

    Hence, we will get the product data printed in the terminal as shown in the screenshot below:
    Read More:  Build Real-World React Native App #5: Single Post Screen and Bookmark
    Success fetch app store product
    Success fetch app store product

    Next, we need to create a new screen to handle the in-app purchases.

    For that, we need to create a new screen named RemoveAds and import it to the Navigator.js file as shown in the code snippet below:

    import RemoveAds from '../screens/RemoveAds';

    Then, we need to add it to the same group on the setting screen as shown in the code snippet below:

           <Stack.Navigator>
               <Stack.Screen name="Setting" component={SettingScreen} />
               <Stack.Screen name="Feedback" component={Feedback} />
               <Stack.Screen name="RemoveAds" component={RemoveAds} />
           </Stack.Navigator>

    Next, we need to go back to the Setting screen and add a new menu option called RemoveAds as shown in the code snippet below:

               <TouchableOpacity
                   onPress={() => navigation.navigate('RemoveAds')}>
                   <List.Item
                       title="Remove Ads"
                       left={() => <List.Icon icon="bullhorn" />}
                   />
               </TouchableOpacity>

    Now, we have a menu option to navigate to the RemoveAds screen as shown in the emulator screenshot below:

    Create remove ads navigation
    Create remove ads navigation

    Implementing RemoveAds screen

    On this screen, we are going to perform in-app purchase configurations. Thus, we require a privacy policy and terms of use on this screen. First, we need to import the required packages, modules, and components as shown in the screenshot below:

    import React from 'react'
    import HTML from 'react-native-render-html';
    import {
       List,
       Card,
       Title,
       Paragraph,
       Avatar
    } from 'react-native-paper';

    For UI, we construct the screen using the code from the following code snippet:

    const RemoveAds = () => {
     
       const htmlContent = `
       <p style="textAlign: center;">Recurring billing,Cancel any time.</p>
       <p style="textAlign: center;">if you choose to purchase a subscription, payment will be charged to your iTunes account,and your account will be charged within 24-hour to the end  of the current period.Auto-renewal may be turned off at any time by going to your seting in your iTunes store after purchase.For more information please visit our <br><a href="https://kriss.io/term-of-service/">Terms of Use</a> and <a href="https://kriss.io/privacy-policy-for-kriss/">Privacy Policy</a>.</p>
    `;
       return (
           <ScrollView>
               <Card style={{
                   shadowOffset: { width: 5, height: 5 },
                   width: '90%',
                   borderRadius: 12,
                   alignSelf: 'center',
                   marginBottom: 10,
                   marginTop: 10
               }}>
                   <Card.Title
                       title="Remove Ads"
                       subtitle="Remove all ads that annoy your eye"
                       left={props => <Avatar.Icon {...props} icon="bullhorn" />}
                   />
                   <Card.Title
                       title="Support content production"
                       subtitle="You help fundarise for  produce content"
                       left={props => <Avatar.Icon {...props} icon="human-handsup" />}
                   />
                   <Card.Content>
                       <Title> Monthly Subscription</Title>
                       <Paragraph>pay monthly for remove ads</Paragraph>
                       <Button icon="cart" mode="contained" onPress={() => console.log('Pressed')}>
                           4.99$ per month
                    </Button>
                       <Title>One time payment</Title>
                       <Paragraph>pay only one time for remove ads</Paragraph>
                       <Button icon="cart" mode="contained" onPress={() => console.log('Pressed')}>
                           49.99$ one time
                    </Button>
                   </Card.Content>
                   <HTML
                       html={htmlContent}
                       onLinkPress={(event, href) => {
                           Linking.openURL(href).catch((err) => console.error('An error occurred', err));
                       }}
     
                   />
               </Card >
           </ScrollView>
       )
    }
    export default RemoveAds

    Hence, we will get the following result in our emulator screen:
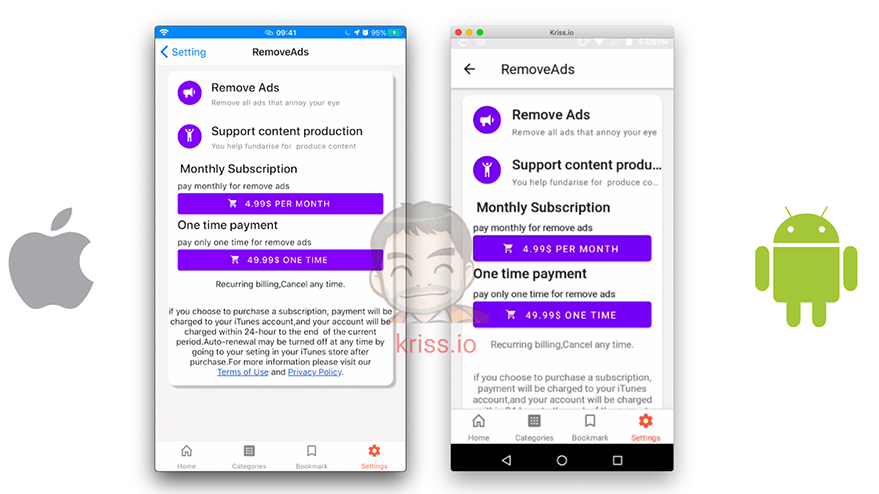
    Remove ads screen

    Remove ads screen

    Conclusion

    Well, this chapter has been an interesting one. We got stepwise guidance on how to configure the in-app purchase in the React Native app using the IAP package. We configured the in-app purchase for the app store configuring the App Store Connect. The main objective of this chapter was to integrate in-app purchase in the React Native project for the iOS platform so that we can use it to buy a subscription to remove ads in the next chapter. To trigger the in-app purchase we also need to UI screen to provide the detailed subscription feature which is connected to the App store connect through the IAP package. Hence, we also created a UI screen to trigger In-app purchases. In this case, to remove the ads.

    Hence, in the next chapter, we are going to use it to implement the subscription-based in-app purchase to remove ads from the app.

    Share. Facebook Twitter Pinterest LinkedIn Tumblr Email
    Krissanawat Kaewsanmuang
    • Website
    • X (Twitter)

    Developer Relation @instamobile.io

    Related Posts

    Building a Realtime Messaging app with React Native and Firebase

    March 20, 2023

    Build Real-World React Native App #11 : Pay For Remove Ads

    February 17, 2021

    Build Real-World React Native App #9 : Implementing Remove Ads Feature

    January 19, 2021
    Leave A Reply Cancel Reply

    You must be logged in to post a comment.

    Stay In Touch
    • Facebook
    • Twitter
    • Pinterest
    • Instagram
    • YouTube
    • Vimeo
    Don't Miss
    Interview December 9, 2024

    Strategic Approaches to the ‘Why Should We Hire You?’ Query

    When faced with the query “Why should we hire you?”, candidates should employ a strategic approach that highlights unique qualifications, aligns personal strengths with the company’s values, and demonstrates problem-solving capabilities relevant to the role.

    Essential Strategies for Building a Robust Entrepreneurial Network

    November 27, 2024

    Node.js Lesson 9: Events, EventEmitter and Memory Leaks

    November 2, 2020

    17. Уроки Node.js. Таймеры, Отличия от Браузера, ref и unref

    October 7, 2016

    Categories

    • AI & Automation
    • Angular
    • ASP.NET
    • AWS
    • B2B Leads
    • Beginners
    • Blogs
    • Business Growth
    • Case Studies
    • Comics
    • Consultation
    • Content & Leadership
    • CSS
    • Development
    • Django
    • E-commerce & Retail
    • Entrepreneurs
    • Entrepreneurship
    • Events
    • Express.js
    • Facebook Ads
    • Finance & Fintech
    • Flask
    • Flutter
    • Franchising
    • Funnel Strategy
    • Git
    • GraphQL
    • Home Services Marketing
    • Influencer & Community
    • Interview
    • Java
    • Java Spring
    • JavaScript
    • Job
    • Laravel
    • Lead Generation
    • Legal & Compliance
    • LinkedIn
    • Machine Learning
    • Marketing Trends
    • Medical Marketing
    • MSP Lead Generation
    • MSP Marketing
    • NestJS
    • Next.js
    • Node.js
    • Node.js Lessons
    • Paid Advertising
    • PHP
    • Podcasts
    • POS Tutorial
    • Programming
    • Programming
    • Python
    • React
    • React Lessons
    • React Native
    • React Native Lessons
    • Recruitment
    • Remote Job
    • SaaS & Tech
    • SEO & Analytics
    • Soshace
    • Startups
    • Swarm Intelligence
    • Tips
    • Trends
    • Vue
    • Wiki
    • WordPress
    Top Posts

    Why Most MSPs Fail at Lead Generation (And How to Fix It)

    Lead Generation May 3, 2025

    Create a simple POS with React, Node and MongoDB #1: Register and Login with JWT

    JavaScript January 14, 2020

    Уроки React . Урок 10.

    Programming October 27, 2016

    Memory Leaks in Java: A Cautionary Tale and Gentle Introduction to Preventing Memory Errors

    Java December 26, 2019

    Subscribe to Updates

    Get The Latest News, Updates, And Amazing Offers

    About Us
    About Us

    Soshace Digital delivers comprehensive web design and development solutions tailored to your business objectives. Your website will be meticulously designed and developed by our team of seasoned professionals, who combine creative expertise with technical excellence to transform your vision into a high-impact, user-centric digital experience that elevates your brand and drives measurable results.

    7901 4th St N, Suite 28690
    Saint Petersburg, FL 33702-4305
    Phone: 1(877)SOSHACE

    Facebook X (Twitter) Instagram Pinterest YouTube LinkedIn
    Our Picks
    Recruitment

    Enhancing Employee Retention: The Critical Role of Recruiters

    Interview

    Interview with Sergey

    Java

    Guide to Control Flow Statements in Java

    Most Popular

    24. Уроки Node.js. Чтение параметров из командной строки и окружения.

    Programming

    Уроки React. Урок 14.

    Programming

    Implementing Search Functionality with Meilisearch, Prisma and Express

    Express.js
    © 2025 Soshace Digital.
    • Home
    • About
    • Services
    • Contact Us
    • Privacy Policy
    • Terms & Conditions

    Type above and press Enter to search. Press Esc to cancel.