Close Menu
Soshace Digital Blog

    Subscribe to Updates

    Get The Latest News, Updates, And Amazing Offers

    What's Hot
    JavaScript

    Top AngularJS interview questions

    Startups

    Maximizing Efficiency: The Crucial Role of Lean Startup Methodology

    Beginners

    Google Algorithm Update: Recent Changes to SEO

    Important Pages:
    • Home
    • About
    • Services
    • Contact Us
    • Privacy Policy
    • Terms & Conditions
    Facebook X (Twitter) Instagram LinkedIn YouTube
    Today's Picks:
    • Scaling Success: Monitoring Indexation of Programmatic SEO Content
    • Leveraging Influencers: Key Drivers in New Product Launches
    • How Privacy-First Marketing Will Transform the Industry Landscape
    • The Impact of Social Proof on Thought Leadership Marketing
    • Balancing Value-Driven Content and Promotional Messaging Strategies
    • Top Influencer Marketing Platforms to Explore in 2025
    • Emerging Trends in Marketing Automation and AI Tools for 2023
    • Strategies to Mitigate Duplicate Content in Programmatic SEO
    Tuesday, September 9
    Facebook X (Twitter) Instagram LinkedIn YouTube
    Soshace Digital Blog
    • Home
    • About
    • Services
    • Contact Us
    • Privacy Policy
    • Terms & Conditions
    Services
    • SaaS & Tech

      Maximizing Efficiency: How SaaS Lowers IT Infrastructure Costs

      August 27, 2025

      Navigating Tomorrow: Innovations Shaping the Future of SaaS

      August 27, 2025

      Maximizing Impact: Strategies for SaaS & Technology Marketing

      August 27, 2025
    • AI & Automation

      Enhancing Customer Feedback Analysis Through AI Innovations

      August 27, 2025

      Navigating the Impact of AI on SEO and Search Rankings

      August 27, 2025

      5 Automation Hacks Every Home Service Business Needs to Know

      May 3, 2025
    • Finance & Fintech

      Critical Missteps in Finance Marketing: What to Avoid

      August 27, 2025

      Analyzing Future Fintech Marketing Trends: Insights Ahead

      August 27, 2025

      Navigating the Complex Landscape of Finance and Fintech Marketing

      August 27, 2025
    • Legal & Compliance

      Exploring Thought Leadership’s Impact on Legal Marketing

      August 27, 2025

      Maximizing LinkedIn: Strategies for Legal and Compliance Marketing

      August 27, 2025

      Why Transparency Matters in Legal Advertising Practices

      August 27, 2025
    • Medical Marketing

      Enhancing Online Reputation Management in Hospitals: A Guide

      August 27, 2025

      Analyzing Emerging Trends in Health and Medical Marketing

      August 27, 2025

      Exploring Innovative Content Ideas for Wellness Blogs and Clinics

      August 27, 2025
    • E-commerce & Retail

      Strategic Seasonal Campaign Concepts for Online and Retail Markets

      August 27, 2025

      Emerging Trends in E-commerce and Retail Marketing Strategies

      August 27, 2025

      Maximizing Revenue: The Advantages of Affiliate Marketing for E-Commerce

      August 27, 2025
    • Influencer & Community

      Leveraging Influencers: Key Drivers in New Product Launches

      August 27, 2025

      Top Influencer Marketing Platforms to Explore in 2025

      August 27, 2025

      Key Strategies for Successful Influencer Partnership Negotiations

      August 27, 2025
    • Content & Leadership

      The Impact of Social Proof on Thought Leadership Marketing

      August 27, 2025

      Balancing Value-Driven Content and Promotional Messaging Strategies

      August 27, 2025

      Analyzing Storytelling’s Impact on Content Marketing Effectiveness

      August 27, 2025
    • SEO & Analytics

      Scaling Success: Monitoring Indexation of Programmatic SEO Content

      August 27, 2025

      Strategies to Mitigate Duplicate Content in Programmatic SEO

      August 27, 2025

      Effective Data Visualization Techniques for SEO Reporting

      August 27, 2025
    • Marketing Trends

      How Privacy-First Marketing Will Transform the Industry Landscape

      August 27, 2025

      Emerging Trends in Marketing Automation and AI Tools for 2023

      August 27, 2025

      Maximizing ROI: Key Trends in Paid Social Advertising

      August 27, 2025
    Soshace Digital Blog
    Blog / JavaScript / React / React Native / React Native Lessons / Build Real-world React Native App #1: Splash screen and App Icon
    JavaScript

    Build Real-world React Native App #1: Splash screen and App Icon

    Krissanawat KaewsanmuangBy Krissanawat KaewsanmuangNovember 9, 2020Updated:May 26, 2024No Comments8 Mins Read
    Facebook Twitter Pinterest Telegram LinkedIn Tumblr Email Reddit
    Build Real-world React Native App #1:  Splash screen and App Icon
    Build Real-world React Native App #1: Splash screen and App Icon
    Share
    Facebook Twitter LinkedIn Pinterest Email Copy Link
    Build Real-world React Native App #1: Splash screen and App Icon
    Build Real-world React Native App #1: Splash screen and App Icon

    In the first step, we are going to implement the Splash Screen using the latest version of React Native and plugins. Major steps in this tutorial are going to take place in Xcode as we need to configure the iOS part of the app for displaying the Splash Screen. The idea is to add the required splash screen icons and configure the native iOS app directory in the Xcode. We are going to make use of the react-native-splash-screen package in the React Native part as well as the iOS part to display the splash screen transition. Most of the work takes place in Xcode for configuring the splash screen and only some minor part is for the react-native side.

    If we realize, there is already a default splash screen from react native project. But we are going to implement our own splash screen with our own logo icon for my site. For now, we have just put some text on the splash screen which is displayed in the emulator simulation below:

    Generate Icon

    Here download the logo from this link first  we use this for build icon

    App icon
    App icon

    Then go to  makeappicon drop file then fill email wait for file coming to an inbox
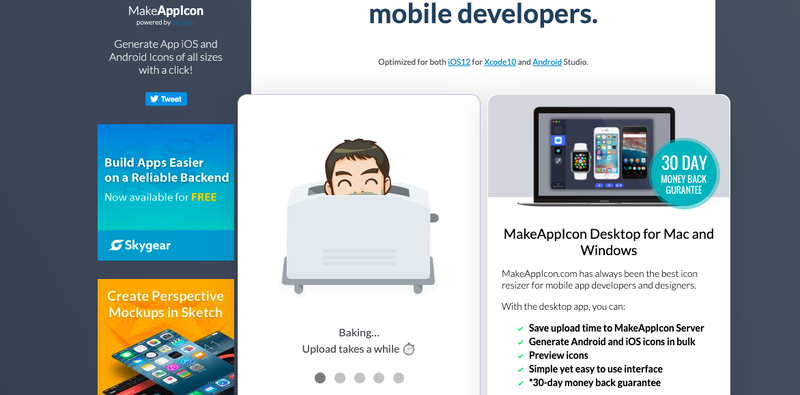
    Make app icon site
    Make app icon site

    Now we got icon set for Android and iOS in this one time

    Generate icon set for android and ios
    Generate icon set for android and ios

    Icon and splash screen for iOS

    In this step, we are going to configure the app in Xcode in order to integrate the splash screen. First, we need to open our project on Xcode as shown in the screenshot below:

    use terminal in VsCode for open Xcode project by this command:

    xed ios/kriss.xcodeproj

    After opening Xcode, we need to add an app icon to Xcode project as directed in the screenshot below:
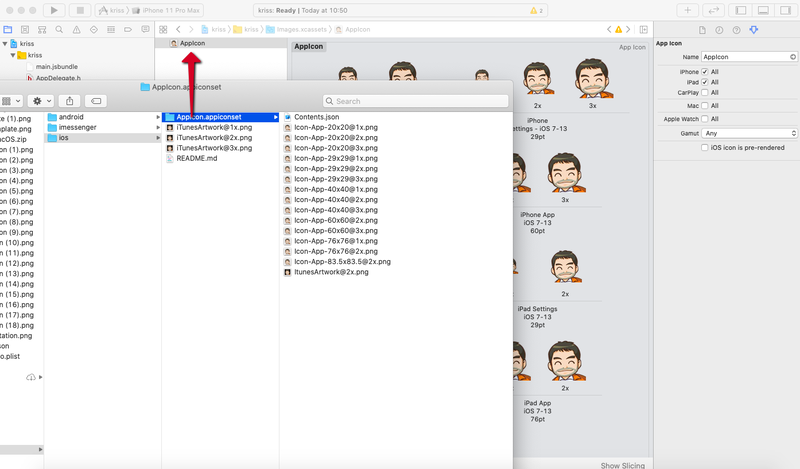
    Add app icon to xcode project
    Add app icon to xcode project

    Next, we need to open the folder ./images.xcassest. Then, we need to choose AppIcon and replace the default icon with our new icon. Now, if we re-built our app, we will be able to see the new app icon as demonstrated in the screenshot below:

    Change app icon
    Change app icon

    Update new splash screen

    For the splash screen, we use the app icon that we downloaded earlier to generate an image set. We need to go to the Image Sets tab and drop the image. Lastly, we need to click generate to generate the image set as shown in the screenshot below:

    Use app icon for splash screen
    Use app icon for splash screen

    Now, we have the new image set for splash screen.

    Back to Xcode, we need to select + in this top and choose New Image Set. We can name it as SplashScreen:

    Read More:  React Lesson 6: CSS and Animation
    Add image set to xcode
    Add image set to xcode

    Then, we need to drop new image set as directed in the screenshot below:
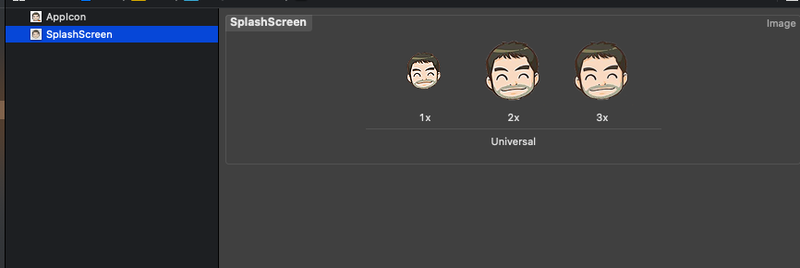
    Use app icon in splash screen
    Use app icon in splash screen

    Next, we need to open LunchScreen.xib and replace old text as shown in the screenshot below:
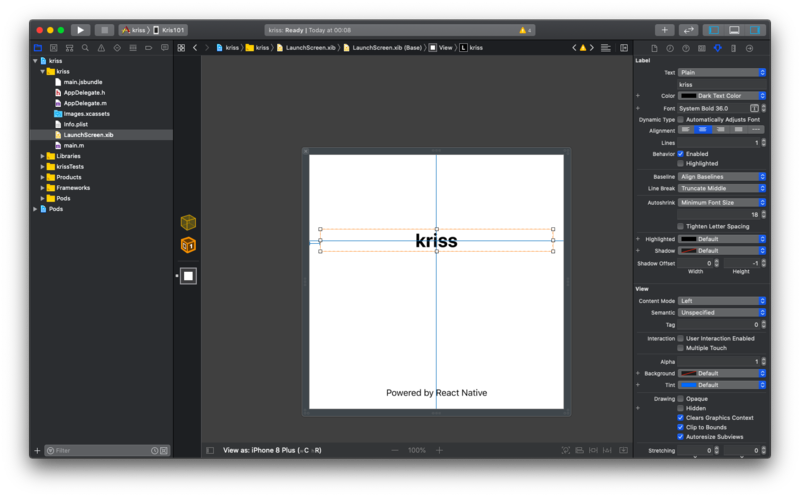
    Build splash screen in xcode
    Build splash screen in xcode

    Then, we need to add new Image View as directed in the screenshot below:
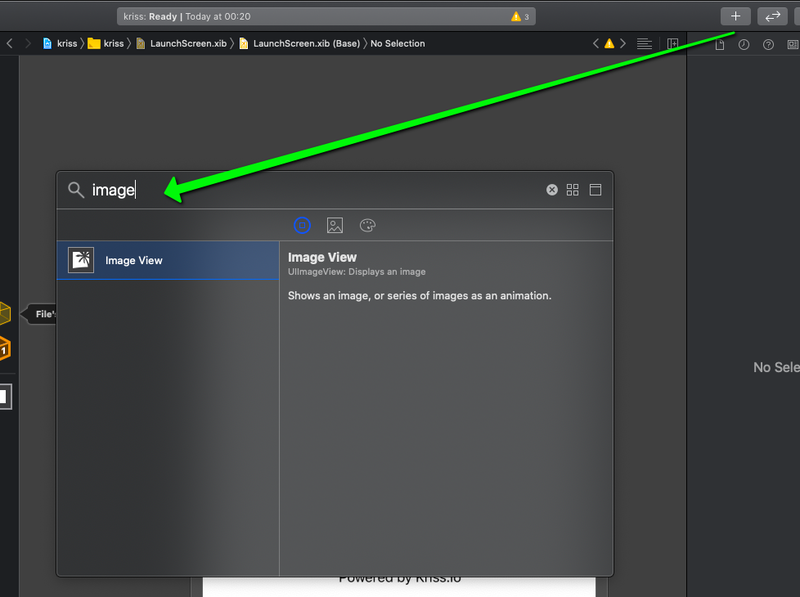
    Add image view for build splash screen
    Add image view for build splash screen

    Next, we need to choose the image set that we created before as shown in the highlighted section below:
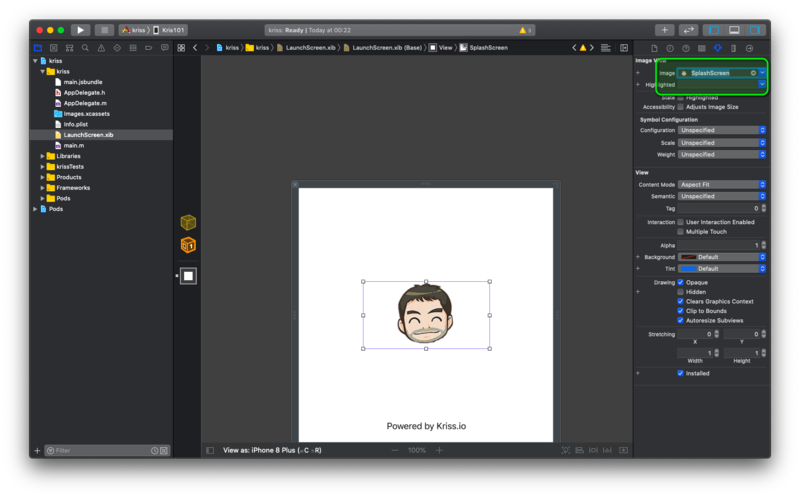
    Add app icon to splash screen
    Add app icon to splash screen

    Lastly, we need to adjust the icon and splash screen size.

    Autoresizing

    We need to make the image responsive to the screen size. For that, we need to follow the image below:

    Make logo auto resize base on device
    Make logo auto resize base on device

    Finally, we are done with setting a new splash screen. We can rebuild the app to see the new splash screen:

    Final result splash screen in iOS
    Final result splash screen in iOS

    Icon and Splashscreen for Android

    For the Android platform, we are going to use the same image set generated from makeappicon to create the App icon and Splash screen:

    Generate app icon to android
    Generate app icon to android

    First, we need to replace old icons folder with new icons sets as directed in the screenshot below:

    App icon directory in android project
    App icon directory in android project

    Now if we rebuild the app, we will see the new icon as depicted in the screenshots below:

    Next, we need to copy the code from the code snippet below and paste it into the background_splash.xml file:
    Next, we need to copy the code from the code snippet below and paste it into the background_splash.xml file:

    For splash screen, we need to create the file named background_splash.xml in the location shown by the screenshot below:

    backgroud_splash location
    backgroud_splash location

    Next, we need to copy the code from the code snippet below and paste it into the background_splash.xml file:

    <?xml version="1.0" encoding="utf-8"?>
     <layer-list xmlns:android="http://schemas.android.com/apk/res/android">
      <item android:drawable="@color/white"/>
       <item
         android:width="200dp"
         android:height="200dp"
         android:drawable="@drawable/icon"
         android:gravity="center" />
    </layer-list>

    Next, we need to create the file named colors.xml in folder ./values. The full path to where the file should be created is shown in the image below:

    color.xml path
    color.xml path

    Inside the file, we need to define the color values as shown in the code snippet below:

    <?xml version="1.0" encoding="utf-8"?>
    <resources>
      <color name="grey">#e8e8e8</color>
      <color name="white">#ffffff</color>
    </resources>

    Next, we need to open styles.xml inside the same folder where we created the colors.xml file. Then, we need to configure the status bar color by using the code from the code snippet below:

    <resources>
    <!-- Base application theme. -->
      <style name="AppTheme" parent="Theme.AppCompat.Light.NoActionBar">
    <!-- Customize your theme here. -->
         <item name="android:statusBarColor">@color/grey</item>
       </style>
       <style name="SplashTheme" parent="Theme.AppCompat.Light.NoActionBar">
          <item name="android:windowBackground">@drawable/background_splash</item>
          <item name="android:statusBarColor">@color/white</item>
      </style>
    
    </resources>

    Now with colors and styles configured, we need to create a new file named launch_screen.xml inside the layout folder:

    lunch_screen.xml
    lunch_screen.xml

    Inside the file, we need to add the code from the code snippet below:

    <?xml version="1.0" encoding="utf-8"?>
    <LinearLayout xmlns:android="http://schemas.android.com/apk/res/android"
        android:orientation="vertical"
        android:layout_width="match_parent"
        android:layout_height="match_parent"
        android:background="@color/white"
        android:gravity="center">
        <ImageView
            android:layout_width="200dp"
            android:layout_height="200dp"
            android:layout_marginTop="24dp"
            android:src="@mipmap/ic_launcher"
        />
    </LinearLayout>
    

    To activate the splash screen, we need to create a new activity file named SplashActivity.java. The file should be created in the located directed by the screenshot below:

    Read More:  Ultimate List of JavaScript Interview Questions
    SplashActivity.java
    SplashActivity.java

    Inside the activity file, we need to add the code from the following code snippet:

    package com.kriss;
    
    import android.content.Intent;
    import android.os.Bundle;
    import androidx.appcompat.app.AppCompatActivity;
    
    public class SplashActivity extends AppCompatActivity {
    
        @Override
    
        protected void onCreate(Bundle savedInstanceState) {
        super.onCreate(savedInstanceState);=
        Intent intent = new Intent(this, MainActivity.class);
        startActivity(intent);
          finish();   
        }
    
    }

    Next, we need to open AndroidManifest.xml file which is located as shown by the image below:

    AndroidManifest.xml path
    AndroidManifest.xml path

    Here, we need to configure the SplashActivity.java file. For that, we need to add the new activity inside the application element as shown in the code snippet below:

    <manifest xmlns:android="http://schemas.android.com/apk/res/android"
    
        package="com.kriss">
        <uses-permission android:name="android.permission.INTERNET" />
        <application
            android:name=".MainApplication"
            android:label="@string/app_name"
            android:icon="@mipmap/ic_launcher"
            android:roundIcon="@mipmap/ic_launcher_round"
            android:allowBackup="false"
            android:theme="@style/AppTheme">
                <activity
                    android:name=".SplashActivity"
                    android:theme="@style/SplashTheme"
                    android:label="@string/app_name">
                    <intent-filter>
                    <action android:name="android.intent.action.MAIN" />
                    <category android:name="android.intent.category.LAUNCHER" />
                </intent-filter>
                </activity>
            <activity android:name="com.facebook.react.devsupport.DevSettingsActivity" />
    
        </application>
    
    </manifest>

    Last thing in MainActivity.java we import SplashScreen package that got from command react-native link

    package com.kriss;
    import com.facebook.react.ReactActivity;
    import android.os.Bundle;
    import org.devio.rn.splashscreen.SplashScreen;
    
    public class MainActivity extends ReactActivity {
    
        @Override
    
        protected void onCreate(Bundle savedInstanceState) {
        SplashScreen.show(this);
          super.onCreate(savedInstanceState);
        }

    Now if we re-run the app, we will see the splash screen in the Android emulator or device:

    Splash screen on Android
    Splash screen on Android

    Using React Native Splash Screen

    Lastly, we need to close the splash screen as well. We need to do that from the React Native environment using the package called react-native-splash-screen. This package will help us hide the splash screen. Hence, we need to install the package first by running the following command in our project terminal:

    yarn add react-native-splash-screen

    For iOS, we need to run the following commands:

    cd ios
    pod install 
    react-native run-ios --device "Kris101"

    Now, in the index.js file, we need to SplashScreen component from from ‘react-native-splash-screen’ package:

    import SplashScreen from 'react-native-splash-screen';

    Then, by using the useEffect hook or alternatively componentDidmount in the class component. we need to call the hide function to hide the Splash screen once the React Native app loads as shown in the code snippet below:

    const Apps = () => {
        useEffect(() => {
            SplashScreen.hide();
    
        })
        return <App />
    }
    AppRegistry.registerComponent(appName, () => Apps);

    Finally, we have successfully integrated a splash screen and app icon from both Android and iOS platforms.

    Conclusion

    This chapter was all about integrating the app icon and splash screen for both Android and iOS platforms. The tutorial mostly focuses on icon generation and native codes rather than React Native code. Integrating the app icon and splash screen makes the app look professional.

    In the next chapter, we will implement the foundation of any React Native app which is React Navigation.

    All the code is available on Github.

    Share. Facebook Twitter Pinterest LinkedIn Tumblr Email
    Krissanawat Kaewsanmuang
    • Website
    • X (Twitter)

    Developer Relation @instamobile.io

    Related Posts

    Streamlining Resource Allocation for Enhanced Project Success

    December 18, 2024

    Conducting Effective Post-Project Evaluations: A Guide

    December 16, 2024

    Strategies for Keeping Projects on Track and Meeting Deadlines

    December 10, 2024
    Leave A Reply Cancel Reply

    You must be logged in to post a comment.

    Stay In Touch
    • Facebook
    • Twitter
    • Pinterest
    • Instagram
    • YouTube
    • Vimeo
    Don't Miss
    JavaScript September 9, 2020

    Create simple POS with React.js, Node.js, and MongoDB #14: Export PDF, Excel, CSV, Bulk Delete, Inline Editing

    In this chapter, we are going to continue from where we left off from the previous chapter. We are about to add more features to our react table to make it feature-rich and dynamic. Here, we are going to add features like document export, bulk delete, and inline editing.

    Create simple POS with React, Node and MongoDB #3: setup E-mail pipeline with add activate on SignUp

    January 28, 2020

    Real-Time Subscriptions with Vue and GraphQL

    December 16, 2020

    Full List of JavaScript Conferences 2020 [41 Events] Updated 28.08.2020

    November 6, 2019

    Categories

    • AI & Automation
    • Angular
    • ASP.NET
    • AWS
    • B2B Leads
    • Beginners
    • Blogs
    • Business Growth
    • Case Studies
    • Comics
    • Consultation
    • Content & Leadership
    • CSS
    • Development
    • Django
    • E-commerce & Retail
    • Entrepreneurs
    • Entrepreneurship
    • Events
    • Express.js
    • Facebook Ads
    • Finance & Fintech
    • Flask
    • Flutter
    • Franchising
    • Funnel Strategy
    • Git
    • GraphQL
    • Home Services Marketing
    • Influencer & Community
    • Interview
    • Java
    • Java Spring
    • JavaScript
    • Job
    • Laravel
    • Lead Generation
    • Legal & Compliance
    • LinkedIn
    • Machine Learning
    • Marketing Trends
    • Medical Marketing
    • MSP Lead Generation
    • MSP Marketing
    • NestJS
    • Next.js
    • Node.js
    • Node.js Lessons
    • Paid Advertising
    • PHP
    • Podcasts
    • POS Tutorial
    • Programming
    • Programming
    • Python
    • React
    • React Lessons
    • React Native
    • React Native Lessons
    • Recruitment
    • Remote Job
    • SaaS & Tech
    • SEO & Analytics
    • Soshace
    • Startups
    • Swarm Intelligence
    • Tips
    • Trends
    • Vue
    • Wiki
    • WordPress
    Top Posts

    Strategies for Overcoming Recruitment Challenges in 2023

    Recruitment December 4, 2024

    Уроки React. Урок 13. Часть 1.

    Programming November 8, 2016

    Building React Components Using Children Props and Context API

    JavaScript August 22, 2019

    UpWork Profile Maintenance

    Remote Job June 23, 2016

    Subscribe to Updates

    Get The Latest News, Updates, And Amazing Offers

    About Us
    About Us

    Soshace Digital delivers comprehensive web design and development solutions tailored to your business objectives. Your website will be meticulously designed and developed by our team of seasoned professionals, who combine creative expertise with technical excellence to transform your vision into a high-impact, user-centric digital experience that elevates your brand and drives measurable results.

    7901 4th St N, Suite 28690
    Saint Petersburg, FL 33702-4305
    Phone: 1(877)SOSHACE

    Facebook X (Twitter) Instagram Pinterest YouTube LinkedIn
    Our Picks
    Development

    Essential Contributions of Backend Development in Full-Stack Projects

    B2B Leads

    Overcoming the Challenges of B2B Lead Generation Today

    Programming

    2. Express.js Lessons. Logger, Configuration, Templating with EJS. Part 1.

    Most Popular

    Node.js Lesson 4: NPM Package Structure

    Node.js

    PostgreSQL vs MySQL: Is There a Clear Winner?

    Programming

    Node.js Lesson 13: Debugging in Node.js

    JavaScript
    © 2025 Soshace Digital.
    • Home
    • About
    • Services
    • Contact Us
    • Privacy Policy
    • Terms & Conditions

    Type above and press Enter to search. Press Esc to cancel.