Understanding The GIT Workflow

Understanding The GIT Workflow
Nowadays, GIT has become an integral part of the software development process.
GIT is a distributed version control system to track changes in software development.
But how developers use GIT to track changes in day to day life?
In this article, we are going to learn the GIT workflow. I will explain to you a simple GIT workflow developers use to track the changes and maintain the clean GIT history.
I will tell you my story: what actions I performed after my team leads assigned me a new task.
I have recently become a part of a team of 10 developers. Soon after, my team lead asked me to add a new feature to the application.
Other developers were also working on their tasks simultaneously, maybe some features or bug fixes.
I have listed down all the steps that I performed. From now, I’ll write everything in the present tense.
Actions:
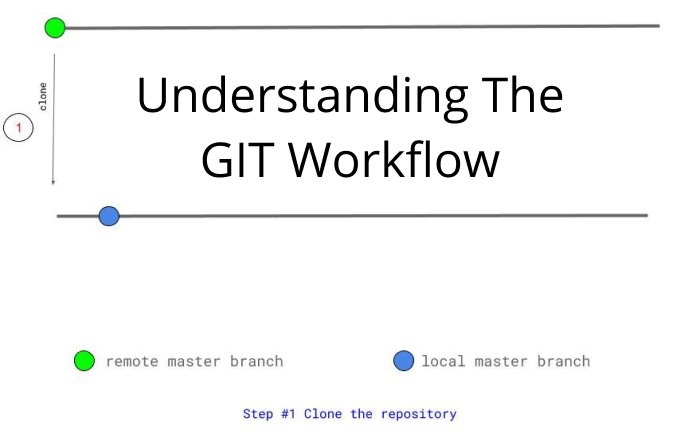
1. Clone the repository
2. git fetch and git rebase
3. Create a new branch
4. Add commits
5. git fetch and git rebase (on the master branch)
6. Push the commits
7. Create a Pull Request
8. Discuss, review and merge pull request
The following diagram shows the complete git workflow
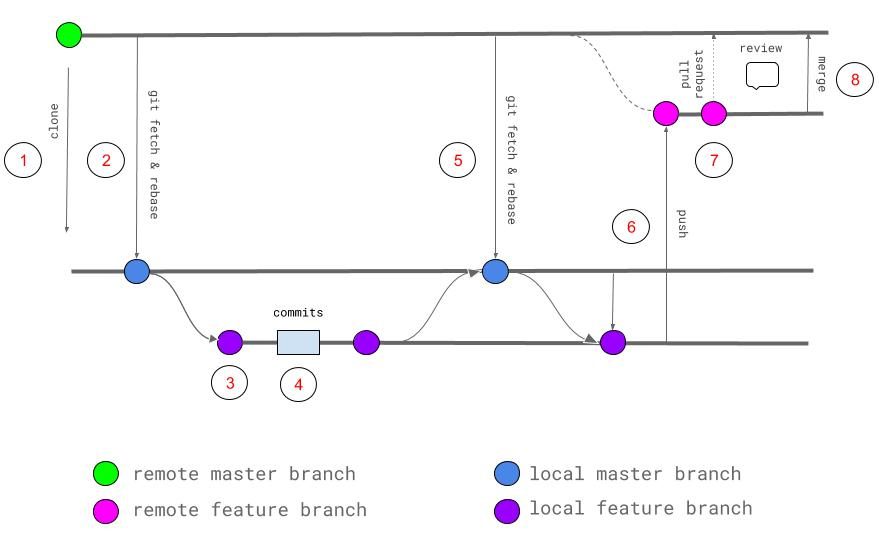
The Git Workflow
Now we will see all these steps one by one in detail with its workflow diagram
1. Clone the repository
I have become a part of the new team.
My team leads discussed the new feature with me and asked me to work on it.
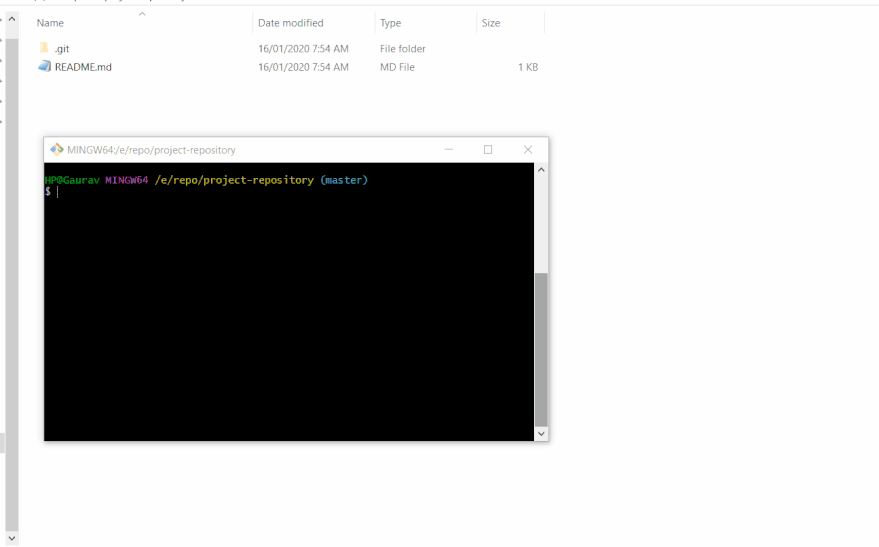
What will be the first step? Of course, my first step will be cloning the application repository from the GIT hosting platform on my computer.
Cloning the repository means; you are downloading the available repository from the GIT hosting platform to work on it.
We will consider GITHUB as our GIT hosting platform.
How do I clone my repository?
We can use the git command git clone and the GitHub repository URL to clone it on my computer.
The following command clones the repository in the current directory.
1 | $ git clone <your-github-repository-url> |
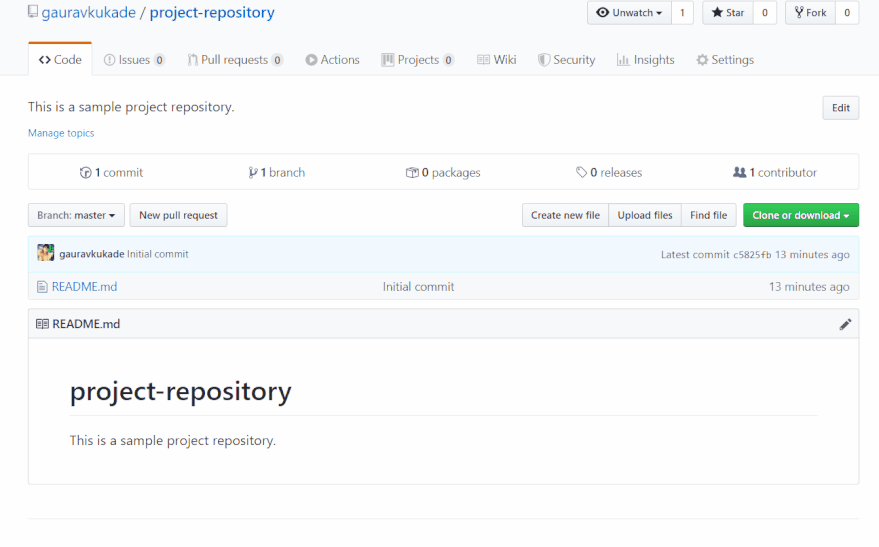
I have created a simple GitHub repository for this tutorial. The following image shows you the repository URL to use for cloning.
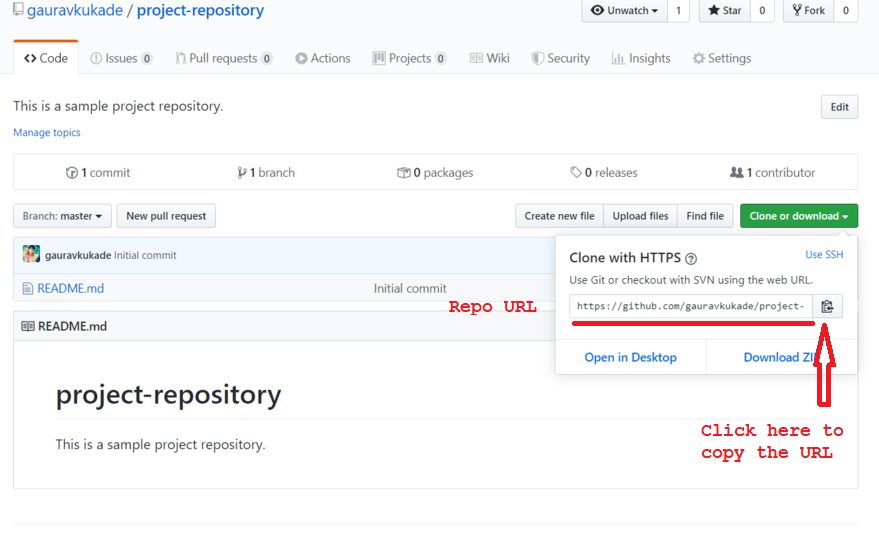
Showing the GitHub repository URL
The following GIF shows how to clone a repository.
Cloning a git repository
The following diagram shows the workflow for step 1 Clone the repository
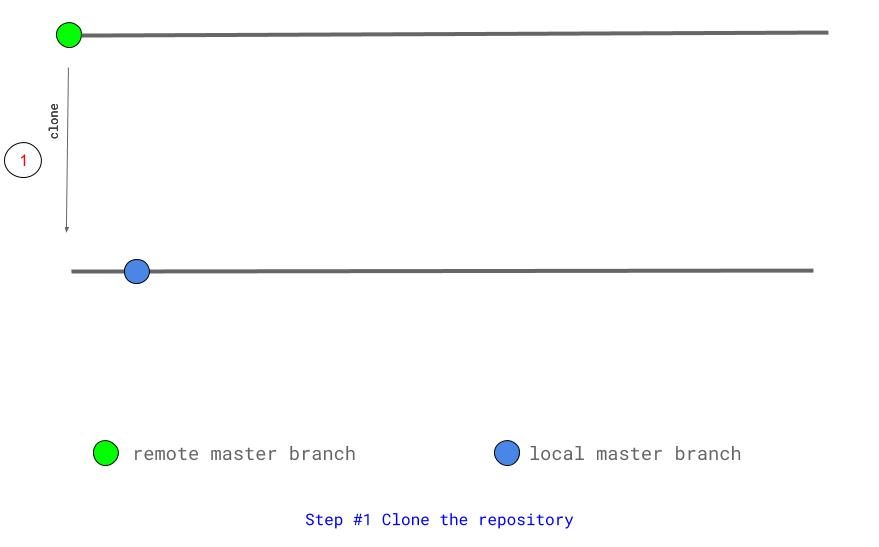
Step 1 Clone the repository
2. git fetch and git rebase
What does it mean by these commands?
Instead of learning the commands directly, let us understand the concept.
Always start your new work on the tip of the master branch. But what if your team lead merged other commits with the master after you cloned the repository on your computer. Hence we are performing this step as precaution.
To avoid this issue, you should check if there are any new commits on the remote repository.
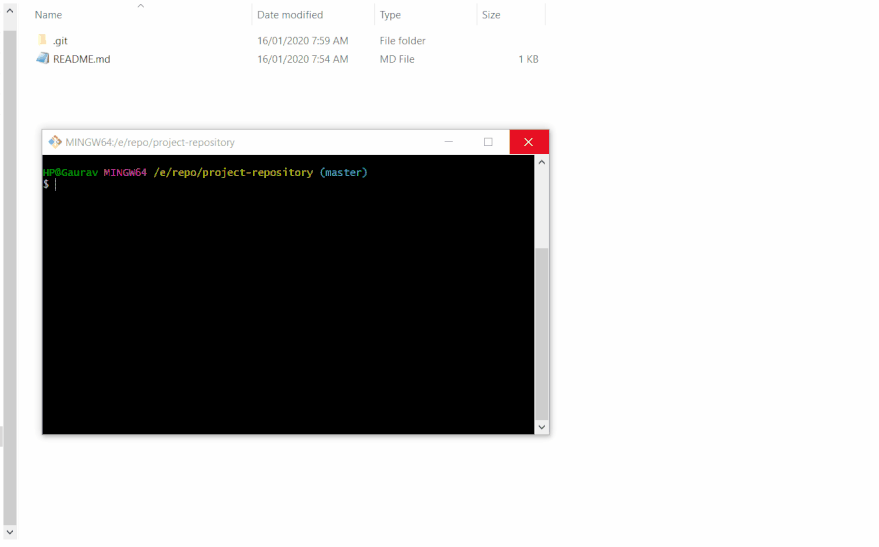
git fetch does the same thing. It will download all the commits, files, and references from the remote repository to your local repository.
Now I can see what my other team members have worked on while I was doing my setup.
GIT isolates the fetched commits from the local commits. You can review these changes and decide to merge them into your local repository or not.
If you decide to not merge the downloaded commits into your local repository, you can use the git checkout command to check out the commits explicitly.
Nothing will be downloaded if there are no changes in the remote repository, but you will get assurance that you are starting your work on the tip of the master.
By using the following command, you can fetch the commits from the remote repository.
1 | $ git fetch |
As you knew, git fetch only downloads the commits from the remote repository to the local repository. It does not merge these commits with the local repository.
So, we use our next command, git rebase.
This command will combine the sequence of new commits (commits received from the remote repository) to the base commits (your local master branch).
1 | $ git rebase |
The following GIF shows the fetching and rebasing your local branch with new downloaded commits from remote repository
Executing git fetch and git rebase commands in git bash
Now I have the local master branch, with all the latest commits and you can start working on your new feature.
Before moving towards the next step, we will see one more way to fetch and rebase the commits.
It is git pull command.
This command will download the content as well as merge it into the local branch. It is a more aggressive alternative to the git fetch command.
I will not be able to review the downloaded changes. So, when I am not sure about what other developers are working on, it is not recommended to use this command.
You can consider git fetch and git rebase a ‘safe’ version for this purpose.
The following diagram shows the workflow for step 2 git fetch and git rebase
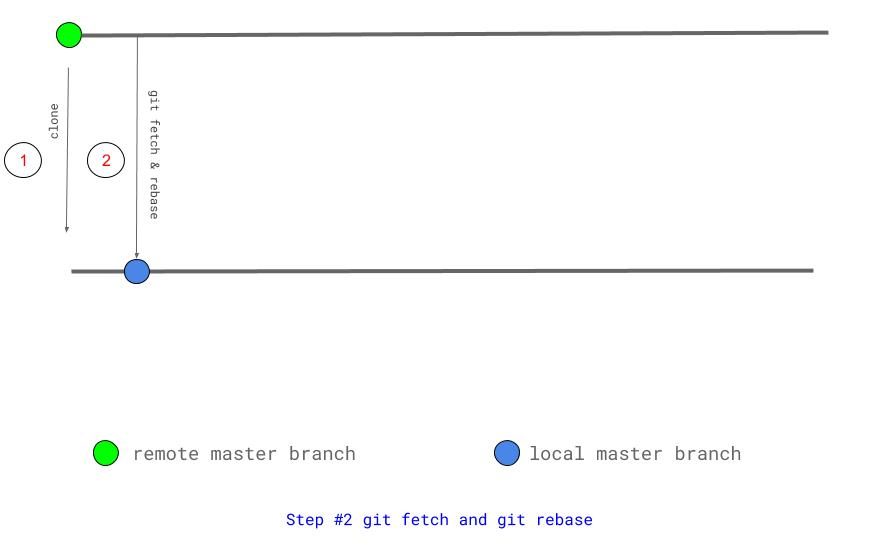
Step 2 git fetch and git rebase
3. Create a new branch
Branching concepts exists to manage the workflow.
When you create a new branch locally, you are creating a new environment to try out new ideas. Things you change here will not affect the master branch.
So, I will create a new branch for the task assigned to me.
The following command creates a new branch locally.
1 | $ git checkout -b <your-new-branch-name> |
The following GIF shows you how to create a new branch.
Create a new branch locally
You should create a new branch for a feature.
Naming your GIT branch
There are many GIT branch naming conventions. The GitHub refers to simple descriptive branch naming.
On Atlassian’s Git tutorials they have suggested the following ways,
1 2 3 4 5 | How to name your supporting branch prefixes? Feature branches? [feature/] Release branches? [release/] Hotfix branches? [hotfix/] Support branches? [support/] |
I think these prefixes with the forward-slash help you to categories your branches easily.
The naming convention can be different in your organization.
Since my team lead has assigned me a task related to the new feature, I will name my branch feature/my-new-feature-short-description .
The following diagram shows the workflow for step 3 Create a new branch

Step 3 Create a new branch
4. Add commits
Now I have my local branch dedicated to the feature. I will make the required changes to add it.
Once I have done the changes, I will check if everything is working fine. If the feature assigned by the team lead is working fine, I will be ready to add the commit.
You already know how to commit the changes. If you do not know, don’t worry, I am explaining it below. If you like to know it in more detail, consider visiting this tutorial.
You can commit the changes in two steps.
The first step is to stage the changes to commit using the git add command. You can add multiple files at a single time, separating their name by space.
The last step is to commit the changes using the git commit command. Please remember to give a descriptive message to your commit.
The following commands show staging and committing you changes
1 2 3 | $ git add <your-new-feature-file> <your-new-feature-file-2> $ git commit -m "Add <feature-name> new feature" |
You can view the current status of the commit process by git status command.
The following GIF will show you how to commit the changes I have done for adding a new feature.
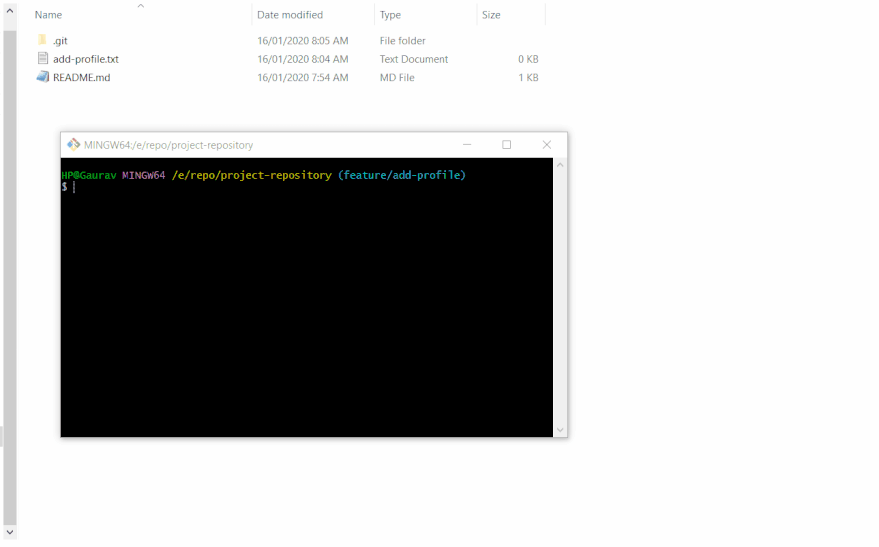
Adding commits
The following diagram shows the workflow for step 4 Add commits
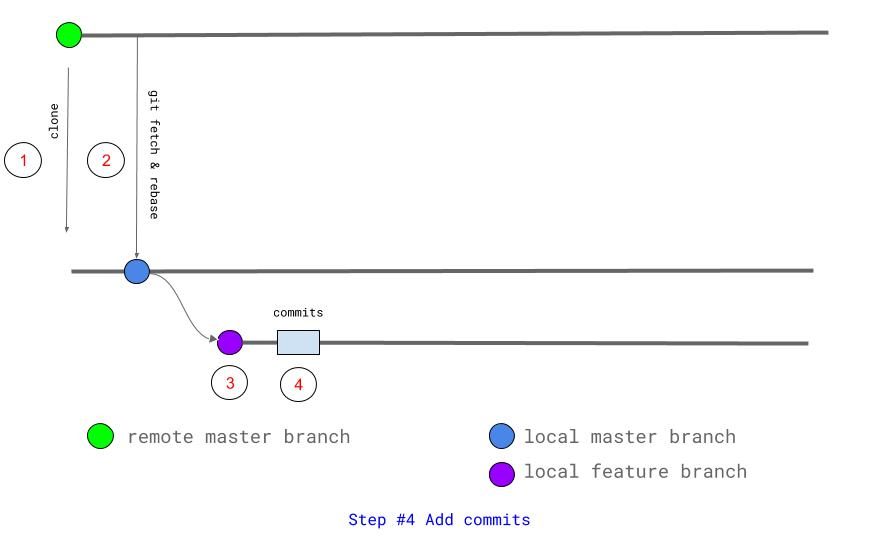
Step 4 Add commits
5. git fetch and git rebase (on the master branch)
Now, you will think why do we have to perform these commands again?
We have learned the concepts behind the git fetch and git rebase in the second step.
We do execute these commands to download the commits by other team members to the remote repository and merge them into the local repository.
I will execute the following command to check out to the master branch from my current branch (feature branch).
1 | $ git checkout master |
Then I will execute the following commands one by one to download all commits from my other team members to the remote repository.
1 2 3 | $ git fetch $ git rebase |
Now I have the latest local master branch and your new branch with the commits.
I will check out to my feature branch using the following command.
1 | $ git checkout feature/my-new-feature-short-description |
I will perform the following command, and it will add all the extra commits from the master branch to the current branch (my feature branch).
1 | $ git rebase master |
Now my feature branch has all the commits from the latest master branch on the remote repository and the commits I have made for adding my new feature.
The following the GIF shows the above commands.
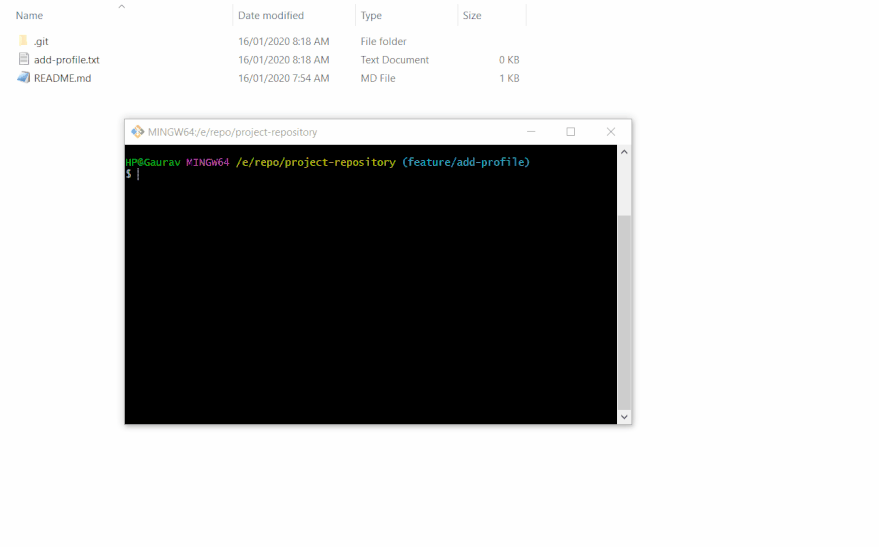
git fetch and git rebase on the master branch
So, I am ready to push my changes to the GitHub.
The following diagram shows the workflow for step 5 git fetch and git rebase (on the master branch)
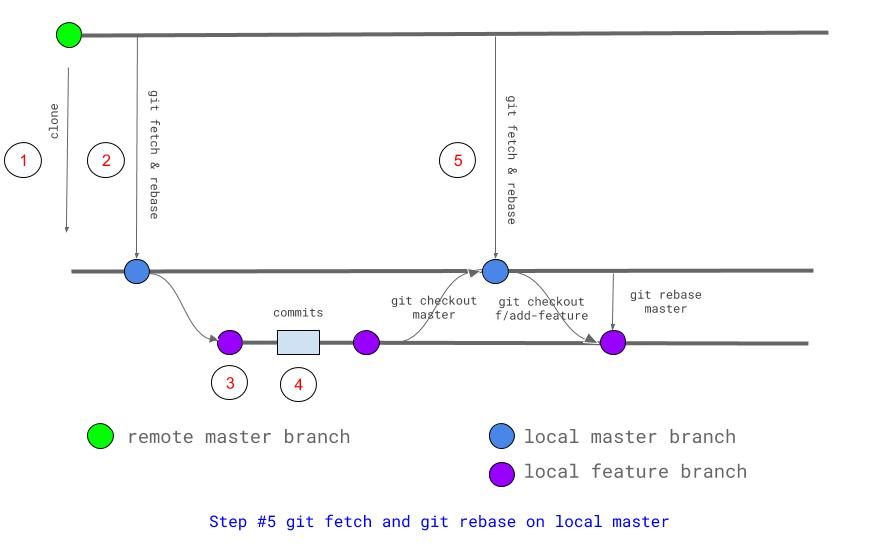
Step 5 git fetch and git rebase (on the master branch)
6. Push the commits
Now you can push your changes to the GitHub using the git push command.
If your local branch does not exist on the remote platform, the git push command push all your local branch into the platform.
The following commands push your current branch/changes to the GitHub.
1 | $ git push origin feature/my-new-feature-short-description |
here origin is the remote repository it is pointing to.
The following GIF shows how to push the code.
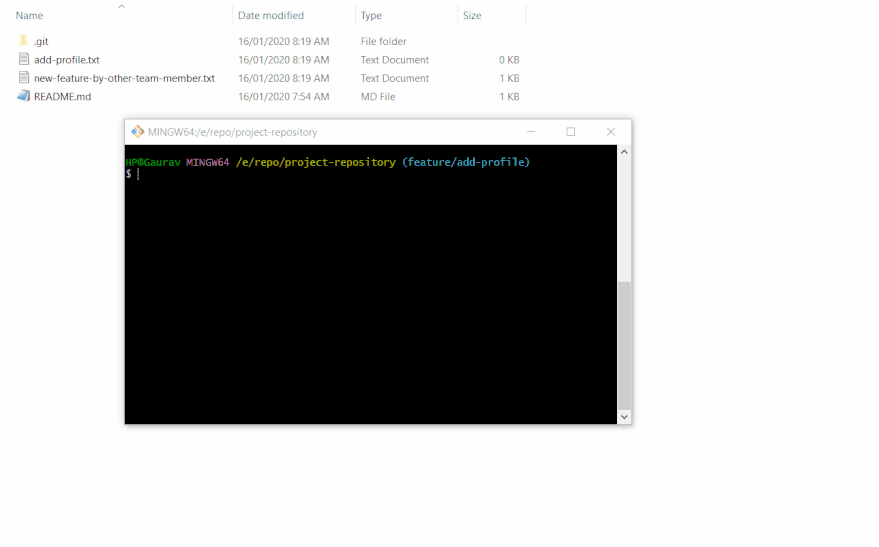
Pushing the commits to remote branch
The following diagram shows the workflow for step 6 Push the commits
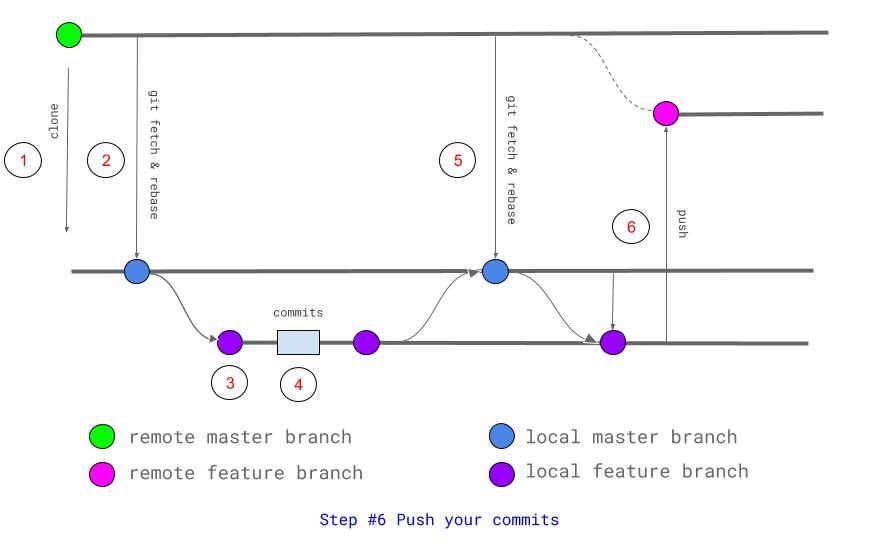
Step 6 Push the commits
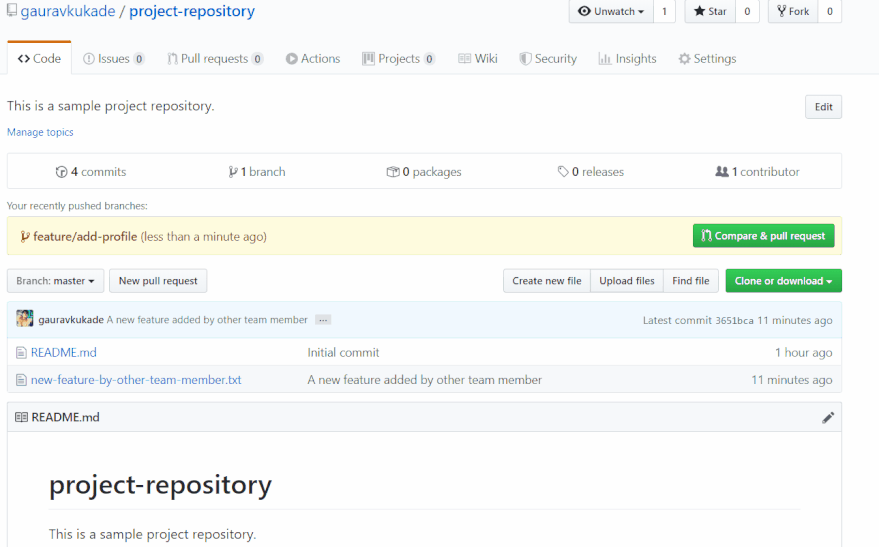
7. Create a pull request
When you push your changes to the GitHub, you can see the following button on your GitHub repository,
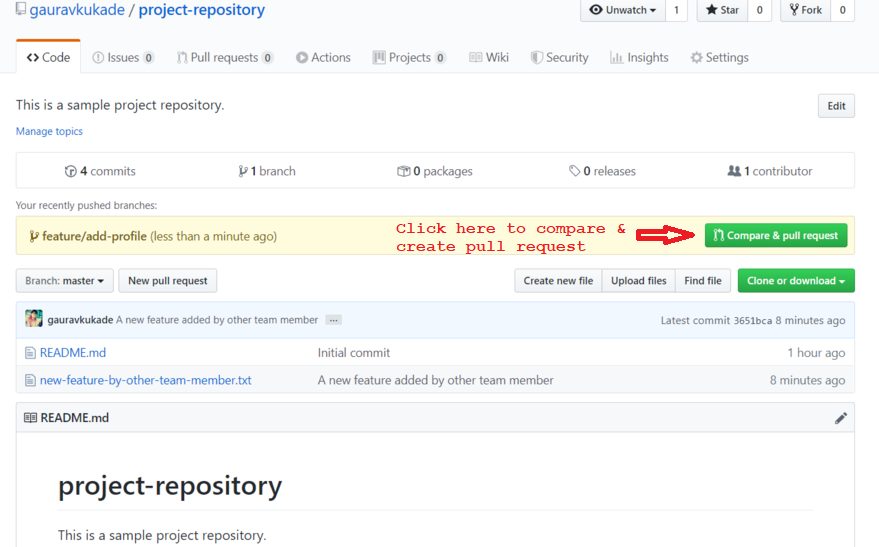
Showing compare and create pull request button
Click on the create a pull request, it will open a dialog.
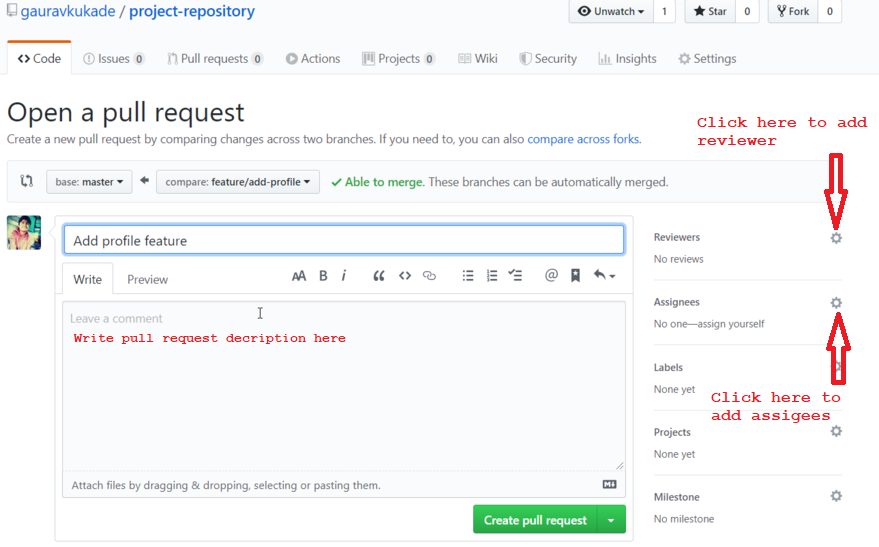
Create a pull request dialog
Here you are comparing your branch with the master branch.
You can add a title to your pull request and add a description of what changes will happen to the application if this pull request merged.
Also, I can assign this to pull request to my team lead so that we can discuss and review the changes.
The following GIF show how to create a pull request on GitHub.
create a pull request on GitHub
The following diagram shows the workflow for step 7 Create a Pull Request
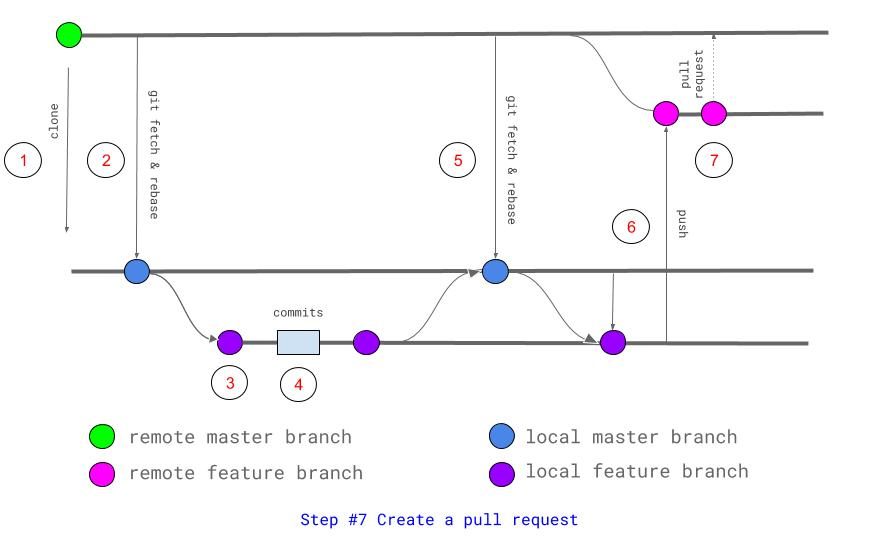
Step 7 Create a Pull Request
8. Discuss, review and merge pull request
Discussion and reviewing your code is one of the most important steps of the git workflow.
When your team leads reviews your code he can give his valuable suggestions and tips which will help you next time.
GitHub provides special features to review the code of the pull request. The team lead can add comments to the specific line of code so that you can refer to it later on.
Once all things are fine, the team lead will merge your pull request.
The following diagram shows the workflow for step 8 Discuss, review and merge pull request
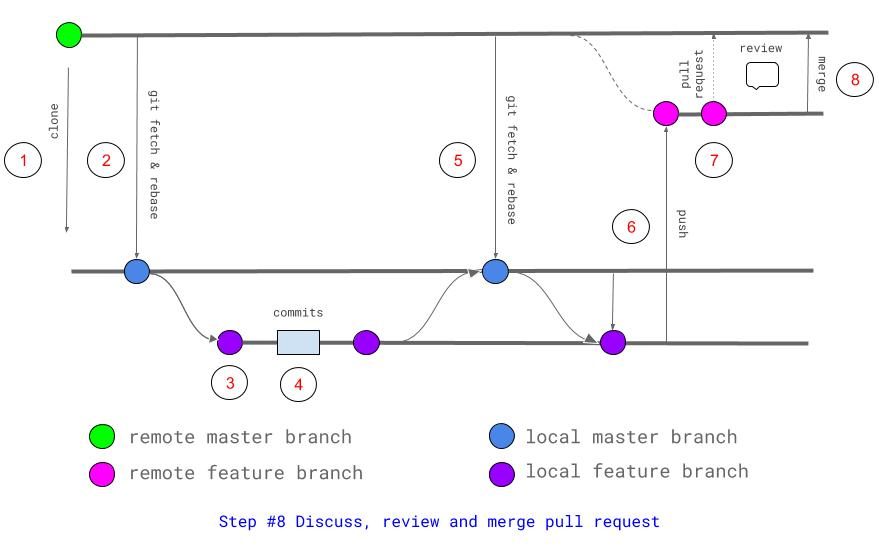
Step 8 Discuss, review and merge pull request
Conclusion
In this article, we have learned the simple git workflow.
First, you have to clone the repository locally. Please do not forget to fetch and rebase since there are chances that other developers can merge commits to the remote repository after you cloned it on your local computer.
Always create a new branch for a new feature. After making the required changes on the new branch, commit the changes.
Please, do not forget to fetch and rebase on the master. Always push your feature branch with all the commits from the current remote master branch as well as local commits from your feature branch. ‘Fetch and rebase on the master’ step will help you achieve the same.
Once you pushed your branch to the GitHub, it will provide you a nice UI where you can edit your commit message as title and write a description for your pull request. Also, you can assign the pull request to team lead and add reviewers to review your code.
Finally, create a pull request and discuss your code with your team lead. He may provide you some tips and suggestions, which will help you next time.
Do not shy, feel free to ask your team lead, if you have any query about the code.
Your team lead will merge your pull request if he found everything OK and your code will be added to the master branch.
Its time to enjoy. Happy coding!
What do you think about the above git workflow?
If you follow some other practices at your organization and have tips please write down in the comment section below.
About the author


Top developers
-

 Alexey D. Frontend DeveloperJSReactHTMLCSSAngularShow lessAll skills
 Dragos S. Full Stack DeveloperJSAngularNode.jsShow lessAll skills
 Juan F. Senior JavaScript developer
Related articles

 2.08.2020
How I Built an Admin Dashboard with Python Flask
In this article, I will share the how I built an admin dashboard. I will give a step by step guideline on how I built this application with Python ...
 4.08.2020
Getting started with Git Hooks using ghooks
Git hooks are configured scripts that are executed at specific moments during git operations. ghooks is a package that configures git hooks so that ...
 5.11.2019
Introduction to GitHub Desktop: A GUI Enhancement to a CLI Approach
In this article, we'll explore various use cases of GitHub Desktop -- GUI software designed to ehance your git workflow. Does it hold up against CLI ...
Categories


8 comments
Hi Gaurav,
This is a really beginner-friendly article regarding Git!
Compared to other articles I’ve read, I did not have a hard time reading and learning through this one.
It’s so easy to keep in mind all the things you’ve said.
Thank you Gaurav! Looking forward to your next articles. I’ve enjoyed it.
Thank you, Ken!
I am glad you liked it.
Hi Gaurav,
Thanks for this blog, it is very easy to understand, and you explained like storytelling.
In one read, I understand all points.
Love it.
Thank you scharde20293,
I am happy you understood the blog in one read.
The purpose behind storytelling was a better understanding and to continue the flow till the end.
Check my previous article at https://soshace.com/organize-your-java-code-using-packages/
Thanks!
This is very timely information for me, thanks for writing this up. I occasionally have to bring down other devs’ branches from the remote repo and this is always where I get confused. I *think* the process for that is similar to step 5 above but I could be wrong. Could you please explain with a short example?
Thanks, Gaurav
Robert T
Ok.
As per my understanding, you want to get the other dev’s remote branch locally.
Simply clone the repository. Switch to project using following command
$ cd project-name
Then hit the following command
$ git branch
The above command will show you the local branches.
If the branch you want is not present in the list then it means it is a remote branch.
Then hit the following command
$ git branch -a
The above command will show you all the branches (local and remote both)
If you want to work on the remote branch, hit the following command
$ git checkout remote-branch-name
The above command will take the branch and create it locally for you. Also it setup to track the remote branch.
To check, hit the following command,
$ git branch
The above command shows the local branches, and now you can see the branch you want in the list.
Hope that helps you.
– Gaurav Kuakde
Thank you, my friend. That’s just what I needed !
Hey R T, Welcome.
Happy to help! 🙂